2013 SUBARU FORESTER wheel
[x] Cancel search: wheelPage 372 of 436
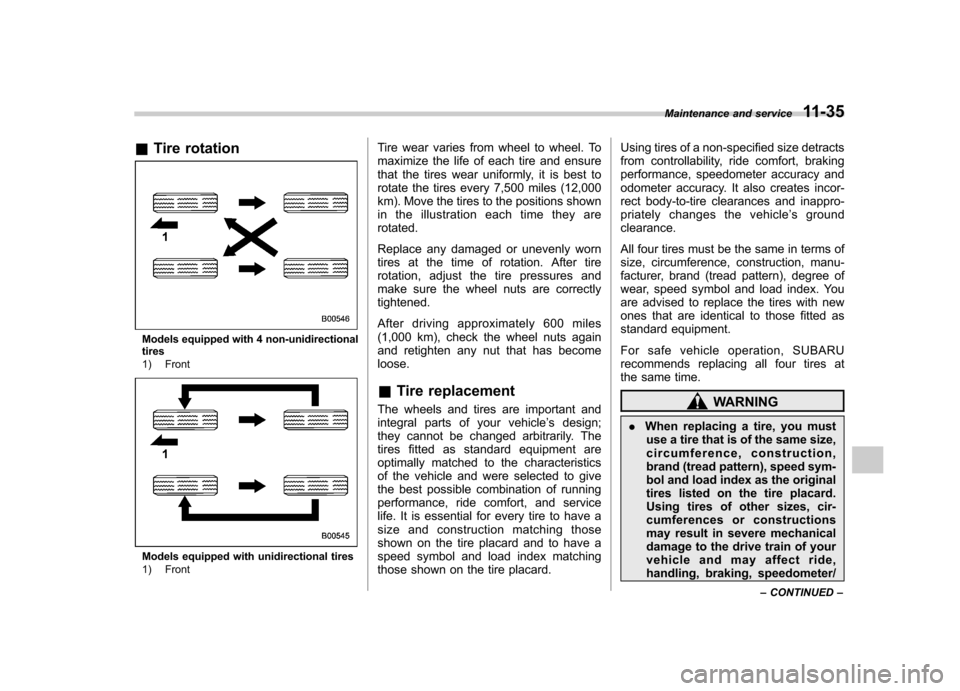
&Tire rotation
Models equipped with 4 non-unidirectional tires
1) Front
Models equipped with unidirectional tires
1) Front Tire wear varies from wheel to wheel. To
maximize the life of each tire and ensure
that the tires wear uniformly, it is best to
rotate the tires every 7,500 miles (12,000
km). Move the tires to the positions shown
in the illustration each time they arerotated.
Replace any damaged or unevenly worn
tires at the time of rotation. After tire
rotation, adjust the tire pressures and
make sure the wheel nuts are correctlytightened.
After driving approximately 600 miles
(1,000 km), check the wheel nuts again
and retighten any nut that has becomeloose. &
Tire replacement
The wheels and tires are important and
integral parts of your vehicle ’s design;
they cannot be changed arbitrarily. The
tires fitted as standard equipment are
optimally matched to the characteristics
of the vehicle and were selected to give
the best possible combination of running
performance, ride comfort, and service
life. It is essential for every tire to have a
size and construction matching those
shown on the tire placard and to have a
speed symbol and load index matching
those shown on the tire placard. Using tires of a non-specified size detracts
from controllability, ride comfort, braking
performance, speedometer accuracy and
odometer accuracy. It also creates incor-
rect body-to-tire clearances and inappro-
priately changes the vehicle
’s ground
clearance.
All four tires must be the same in terms of
size, circumference, construction, manu-
facturer, brand (tread pattern), degree of
wear, speed symbol and load index. You
are advised to replace the tires with new
ones that are identical to those fitted as
standard equipment.
For safe vehicle operation, SUBARU
recommends replacing all four tires at
the same time.
WARNING
. When replacing a tire, you must
use a tire that is of the same size,
circumference, construction,
brand (tread pattern), speed sym-
bol and load index as the original
tires listed on the tire placard.
Using tires of other sizes, cir-
cumferences or constructions
may result in severe mechanical
damage to the drive train of your
vehicle and may affect ride,
handling, braking, speedometer/ Maintenance and service
11-35
– CONTINUED –
Page 373 of 436
11-36Maintenance and service
odometer calibration, and clear-
ance between the body and tires.
It also may be dangerous and
lead to loss of vehicle control.
. You must install four tires that are
of the same size, circumference,
construction, manufacturer,
brand (tread pattern), degree of
wear, speed symbol and load
index. Mixing tires of different
types, sizes or degrees of wear
can result in damage to the
vehicle ’s power train. Use of
different types or sizes of tires
can also dangerously reduce
controllability and braking per-
formance and can lead to anaccident.
. Use only radial tires. Do not use
radial tires together with belted
bias tires and/or bias-ply tires.
Doing so can dangerously re-
duce controllability, resulting in
an accident.
& Wheel replacement
When replacing wheels due to damage,
for example, make sure the replacement
wheels match the specifications of the
wheels that are fitted as standard equip- ment. Replacement wheels are available
from SUBARU dealers.
WARNING
Use only those wheels that are
specified for your vehicle. Wheels
not meeting specifications could
interfere with brake caliper opera-
tion and may cause the tires to rub
against the wheel well housing dur-
ing turns. The resulting loss of
vehicle control could lead to anaccident.
NOTE
When any of the wheels are removed
and replaced for tire rotation or to
change a flat tire, always check the
tightness of the wheel nuts after driv-
ing approximately 600 miles (1,000 km).
If any nut is loose, tighten it to the
specified torque. &
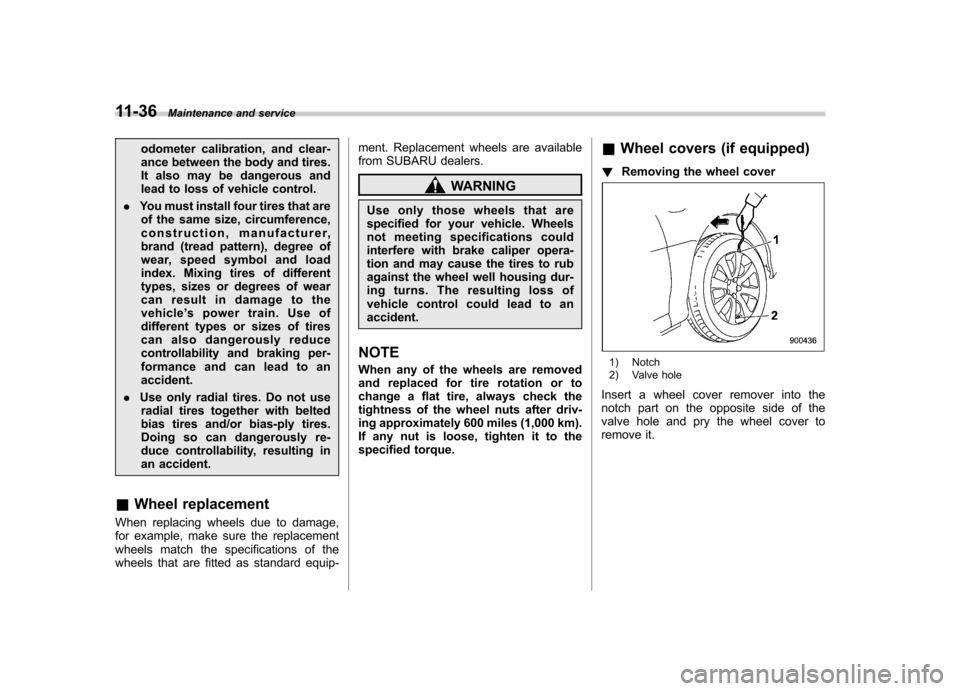
Wheel covers (if equipped)
! Removing the wheel cover
1) Notch
2) Valve hole
Insert a wheel cover remover into the
notch part on the opposite side of the
valve hole and pry the wheel cover to
remove it.
Page 374 of 436
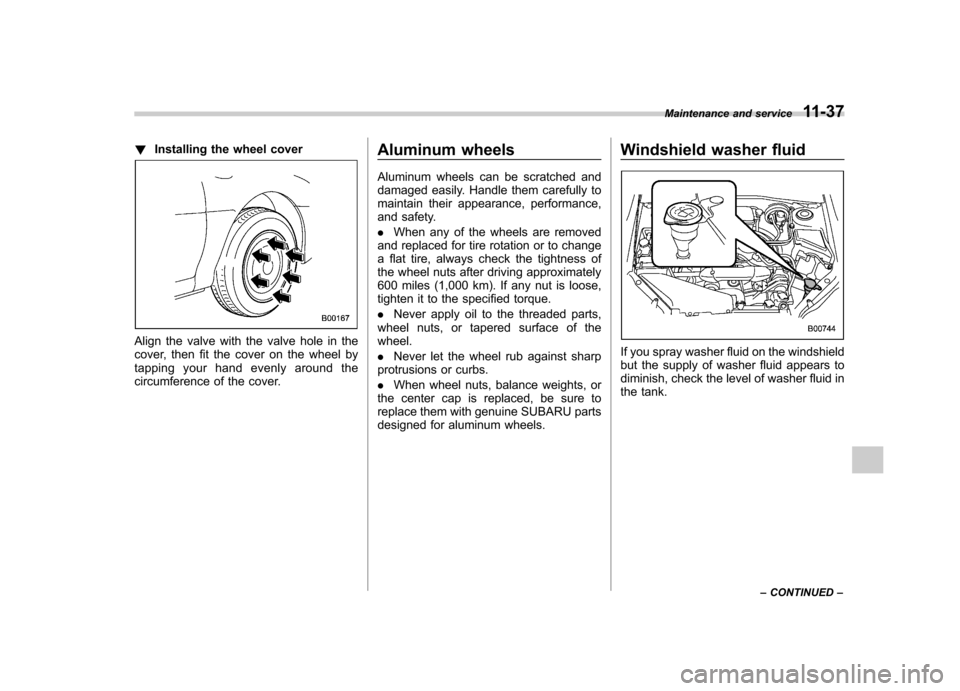
!Installing the wheel cover
Align the valve with the valve hole in the
cover, then fit the cover on the wheel by
tapping your hand evenly around the
circumference of the cover. Aluminum wheels
Aluminum wheels can be scratched and
damaged easily. Handle them carefully to
maintain their appearance, performance,
and safety. .
When any of the wheels are removed
and replaced for tire rotation or to change
a flat tire, always check the tightness of
the wheel nuts after driving approximately
600 miles (1,000 km). If any nut is loose,
tighten it to the specified torque. . Never apply oil to the threaded parts,
wheel nuts, or tapered surface of the wheel. . Never let the wheel rub against sharp
protrusions or curbs.. When wheel nuts, balance weights, or
the center cap is replaced, be sure to
replace them with genuine SUBARU parts
designed for aluminum wheels. Windshield washer fluidIf you spray washer fluid on the windshield
but the supply of washer fluid appears to
diminish, check the level of washer fluid in
the tank.Maintenance and service
11-37
– CONTINUED –
Page 391 of 436
12-2Specifications
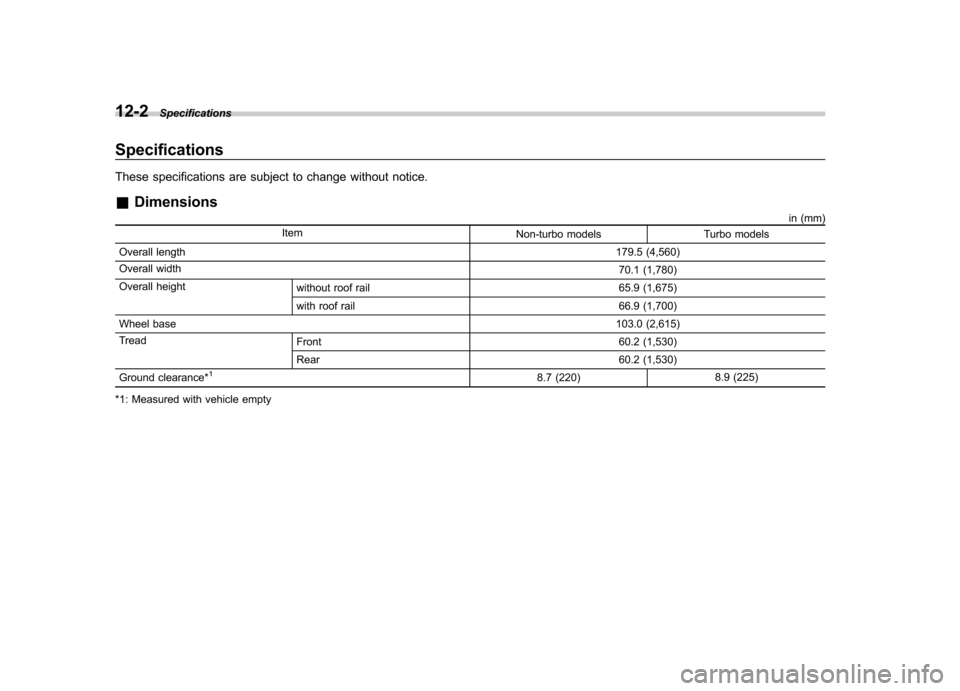
Specifications
These specifications are subject to change without notice. &Dimensions
in (mm)
Item Non-turbo models Turbo models
Overall length 179.5 (4,560)
Overall width 70.1 (1,780)
Overall height without roof rail 65.9 (1,675)
with roof rail 66.9 (1,700)
Wheel base 103.0 (2,615)
Tread Front 60.2 (1,530)
Rear 60.2 (1,530)
Ground clearance*
18.7 (220) 8.9 (225)
*1: Measured with vehicle empty
Page 399 of 436
12-10Specifications
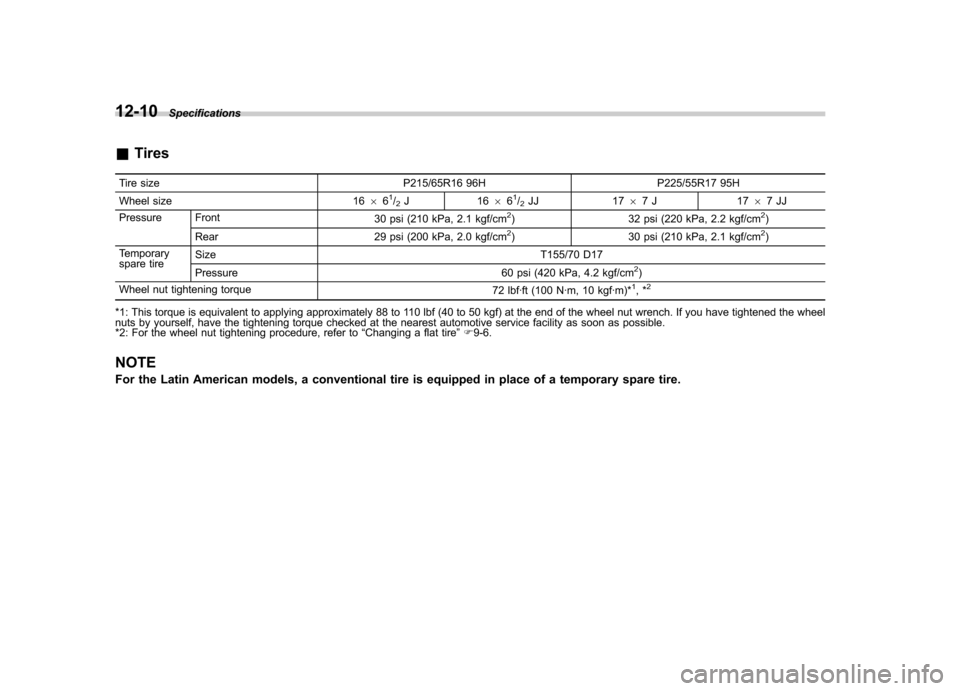
&Tires
Tire size P215/65R16 96H P225/55R17 95H
Wheel size 1666
1/2J1 66 61/2JJ 17 67J 17 67JJ
Pressure Front 30 psi (210 kPa, 2.1 kgf/cm2) 32 psi (220 kPa, 2.2 kgf/cm2)
Rear 29 psi (200 kPa, 2.0 kgf/cm2) 30 psi (210 kPa, 2.1 kgf/cm2)
Temporary
spare tire Size
T155/70 D17
Pressure 60 psi (420 kPa, 4.2 kgf/cm
2)
Wheel nut tightening torque 72 lbf·ft (100 N·m, 10 kgf·m)*1,*2
*1: This torque is equivalent to applying approximately 88 to 110 lbf (40 to 50 kgf) at the end of the wheel nut wrench. If you have tightened the wheel
nuts by yourself, have the tightening torque checked at the nearest automotive service facility as soon as possible.
*2: For the wheel nut tightening procedure, refer to“Changing a flat tire ”F 9-6.
NOTE
For the Latin American models, a conventional tire is equipped in place of a temporary spare tire.
Page 414 of 436
.Passenger car tire
A tire intended for use on passen-
ger cars, multipurpose passenger
vehicles, and trucks, that have a
gross vehicle weight rating (GVWR)
of 10,000 lbs (4,535 kg) or less. . Ply
A layer of rubber-coated parallel cords.. Ply separation
A parting of rubber compound
between adjacent plies.. Pneumatic tire
A mechanical device made of rub-
ber, chemicals, fabric and steel or
other materials, that, when
mounted on an automotive wheel,
provides the traction and contains
the gas or fluid that sustains theload. . Production options weight
The combined weight of those
installed regular production options
weighing over 5.1 lbs (2.3 kg) in
excess of those standard items
which they replace, not previously
considered in curb weight or acces- sory weight, including heavy duty
brakes, ride levelers, roof rack,
heavy duty battery, and special trim.
. Radial ply tire
A pneumatic tire in which the ply
cords that extend to the beads are
laid at substantially 90 degrees to
the centerline of the tread. . Recommended inflation pres-
sure
The cold inflation pressure recom-
mended by a vehicle manufacturer. . Reinforced tire
A tire designed to operate at higher
loads and at higher inflation pres-
sures than the corresponding stan-
dard tire. . Rim
A metal support for a tire or a tire
and tube assembly upon which the
tire beads are seated. . Rim diameter
Nominal diameter of the bead seat. . Rim size designation
Rim diameter and width. .
Rim type designation
The industry of manufacturer ’s des-
ignation for a rim by style or code. . Rim width
Nominal distance between rim flanges. . Section width
The linear distance between the
exteriors of the sidewalls of an
inflated tire, excluding elevations
due to labeling, decoration, or
protective bands. . Sidewall
That portion of a tire between the
tread and bead.. Sidewall separation
The parting of the rubber com-
pound from the cord material in
the sidewall.. Test rim
The rim on which a tire is fitted for
testing, and it may be any rim listed
as appropriate for use with that tire.. Tread
That portion of a tire that comes
into contact with the road.
Consumer information and Reporting safety defects
13-7
– CONTINUED –
Page 415 of 436
13-8Consumer information and Reporting safety defects
. Tread rib
A tread section running circumfer-
entially around a tire. . Tread separation
Pulling away of the tread from the
tire carcass. . Treadwear indicators (TWI)
The projections within the principal
grooves designed to give a visual
indication of the degrees of wear of
the tread. . Vehicle capacity weight
The rated cargo and luggage load
plus 150 lbs (68 kg) times thevehicle ’s designated seating capa-
city. . Vehicle maximum load on the
tire
Load on an individual tire that is
determined by distributing to each
axle its share of the maximum
loaded vehicle weight and dividing
by two. . Vehicle normal load on the tire
Load on an individual tire that is
determined by distributing to each
axle its share of the curb weight, accessory weight, and normal oc-
cupant weight (distributed in accor-
dance with Table 1 that is ap-
pended to the end of this section)
and dividing by 2.
. Wheel-holding fixture
The fixture used to hold the wheel
and tire assembly securely duringtesting.
Page 417 of 436
13-10Consumer information and Reporting safety defects
Replace any damaged or un-
evenly worn tires at the time of
rotation. After tire rotation, adjust
the tire pressures and make sure
the wheel nuts are correctly tigh-
tened. For information about the
tightening torque and tightening
sequence for the wheel nuts, referto “Flat tires ”F 9-6 .
& Vehicle load limit –how to
determine
The load capacity of your vehicle is
determined by weight, not by avail-
able cargo space. The load limit of
your vehicle is shown on the
vehicle placard attached to the
driver ’s side B-pillar. Locate the
statement “The combined weight
of occupants and cargo should
never exceed XXX kg or XXX lbs ”
on your vehicle ’s placard.
The vehicle placard also shows
seating capacity of your vehicle.
The total load capacity includes the
total weight of driver and all pas-
sengers and their belongings, any cargo, any optional equipment such
as a trailer hitch, roof rack or bike
carrier, etc., and the tongue load of
a trailer. Therefore cargo capacity
can be calculated by the followingmethod.
Cargo capacity = Load limit
�(total
weight of occupants + total weight
of optional equipment + tongue
load of a trailer (if applicable))
For information about vehicle load-
ing, refer to “Loading your vehicle ”
F 8-12 .
For information about towing capa-
city and weight limits, refer to“ Trailer towing ”F 8-18 .
! Calculating total and load ca-
pacities varying seating con-
figurations
Calculate the available load capa-
city as shown in the following
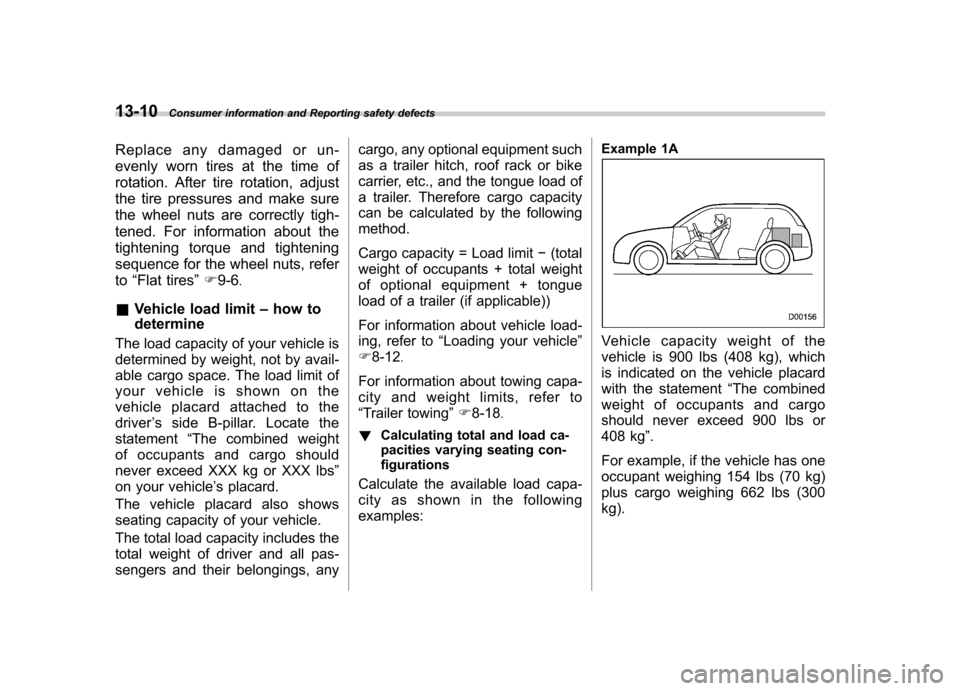
examples: Example 1A
Vehicle capacity weight of the
vehicle is 900 lbs (408 kg), which
is indicated on the vehicle placard
with the statement
“The combined
weight of occupants and cargo
should never exceed 900 lbs or
408 kg ”.
For example, if the vehicle has one
occupant weighing 154 lbs (70 kg)
plus cargo weighing 662 lbs (300kg).