Page 65 of 218

To minimize risk to you and to others,
activate headlamps by turning exterior
lamp switch to position 0002when driving
or when traffic and/or ambient lighting
conditions require you to do so.
In low ambient lighting conditions, only
switch from position 0002to0002 with the
vehicle at a standstill in a safe location.
Switching from position 0002to0002 will
briefly switch off the headlamps. Doing so
while driving in low ambient lighting
conditions may result in an accident.
The automatic headlamp feature is only an
aid to the driver. The driver is responsible
for the operation of the vehicle’s lights at
all times.
X Turn the exterior lamp switch to position
0002.
With the key in starter switch position
1, the tail and parking lamps, the license
plate lamps, and the side marker lamps
will come on and go out automatically
depending on the brightness of the
ambient light.
With the engine running, the low‑beam
headlamps, the tail and parking lamps,
the license plate lamps and the side
marker lamps will come on and go out
automatically depending on the
brightness of the ambient light.
Daytime running lamp mode* In USA, the daytime running lamp mode can
be deactivated.
In Canada, the daytime running lamp mode
is mandatory and therefore in a constant
mode.
Depending on the vehicle equipment, your
vehicle comes either with low-beam
daytime running lamps or with LED daytime
running lamps. Switching on:
X
Start the drive system.
The daytime running lamps are switched
on.
On vehicles with low beam daytime
running lamps the parking lamps also
come on.
Switching off - vehicles without rain-
light sensor*:
X Switch on the parking lamps 0006or the
low‑beam headlamps 0003.
The daytime running lamps are switched
off.
Switching off - vehicles with rain-light
sensor*:
X Switch on the parking lamps 0006or the
low‑beam headlamps 0003.
The daytime running lamps are switched
off.
or
X Turn the exterior lamp switch to position
0002.
With the engine running, the low‑beam
headlamps, the tail and parking lamps,
the license plate lamps and the side
marker lamps will come on and go out
automatically depending on the
brightness of the ambient light.
Deactivating (USA only):
X Switch off the ignition.
X Remove the key from the starter switch.
X Switch on the high-beam flasher and
press button 0006on the key
simultaneously.
An acoustic signal sounds.
The daytime running lamp mode is
deactivated. Lighting
63>> Controls.
* optional Z
Page 66 of 218
:
X
Switch off the ignition.
X Remove the key from the starter switch.
X Switch on the high-beam flasher and
press button 0006on the key
simultaneously.
An acoustic signal sound")
Reactivating (USA only):
X
Switch off the ignition.
X Remove the key from the starter switch.
X Switch on the high-beam flasher and
press button 0006on the key
simultaneously.
An acoustic signal sounds.
The daytime running lamp mode is
reactivated. Combination switch (high beam, high
beam flasher and turn signals)
X Make sure the key is in starter switch
position 1.
High‑beam headlamps and high-beam
flasher X
Make sure the low‑beam headlamps are
switched on (Y page 62).
X Switching on: Push the combination
switch to position 0004.
The high‑beam headlamps come on.
The high‑beam headlamp indicator lamp
0001 in the instrument cluster comes on.
X Switching off: Pull the combination
switch in direction of arrow 0003to its
original position.
The high‑beam headlamps go out.
The high‑beam headlamp indicator lamp
0001 in the instrument cluster goes out.
X High-beam flasher: Pull the combination
switch briefly in direction of arrow 0003.Turn signals
0002
Turn signals, right
0003 Turn signals, left
X Switching on: Push the combination
switch in direction of arrow 0002or0003.
The corresponding turn signals flash.
The corresponding turn signal indicator
lamp 0003 or0002 in the instrument
cluster flashes.
The combination switch resets
automatically after major steering
wheel movement.
i To signal minor directional changes
such as changing lanes, push the
combination switch only to the point of
resistance and release. The
corresponding turn signals will flash
three times. Coming home function
The interior lamps come on and then go out
again after 12 seconds every time when you
lock or unlock the vehicle.
When leaving the vehicle X
Remove the key from the starter switch.
X Exit the vehicle.
X Press button 0004on the key.
The vehicle is locked.
The interior lamps come on and then go
out again after 12 seconds. 64
Lighting>> Controls.
Page 67 of 218

When returning to the vehicle
X
Press button 0006on the key either once or
twice.
The vehicle is either selectively or
globally unlocked.
The interior lamps come on and then go
out again after 12 seconds. Ambient lighting*
The ambient lighting illuminates the
vehicle interior with 6 LEDs when the low-
beam headlamps are switched on. The LEDs
can be dimmed.
The LEDS are located
R in the overhead control panel
R in the door pockets, driver’s and
passenger side
R in the storage trays to the left and right
of the steering wheel
In addition to the ambient lighting, the
footwells on the driver’s and passenger
side are also illuminated by separate
lamps.
i When you open a door, the interior
lighting comes on and the brightness of
lamps in the footwells increases. X
Make sure the key is in starter switch
position 1.
X Switch on the parking lamps.
X To brighten or dim ambient lighting:
Press button 0002on the instrument cluster repeatedly until the desired setting is
reached.
The current setting is stored.
i When adjusting the ambient lighting,
the illumination level for instrument
cluster is also changed (Y page 80). Front fog lamps
G
WARNING
Vehicles with rain-light sensor*:
In low ambient lighting or foggy
conditions, only switch from position
0002 to0002 with the vehicle at a
standstill in a safe location. Switching
from 0002 to0002 will briefly switch off
the headlamps. Doing so while driving in
low ambient lighting conditions may result
in an accident.
i Fog lamps will operat ewith the parking
lamps and/or the low‑beam headlamps on.
Fog lamps should only be used in
conjunction with low‑beam headlamps.
Consult your State or Province Motor
Vehicle Regulation sregarding
permissible lamp operation.
i Vehicle with rain-light sensor*:
Fog lamps cannot be switched on manually
with the exterior lamp switch in
position 0002. To switch on the fog
lamps, turn the exterior lamp switch to
position 0002first. Lighting
65>> Controls.
* optional Z
Page 68 of 218

X
Make sure the parking lamps or the
low‑beam headlamps are switched on.
X Switching on: Press switch0002.
The front fog lamps come on.
The indicator lamp in the switch comes
on.
X Switching off: Press switch0002once
more.
The front fog lamps go out.
The indicator lamp in the switch goes
out. Hazard warning flasher
The hazard warning flasher can be switched
on at all times, even with the key removed
from the starter switch. X
Switching on: Press hazard warning
flasher switch 0002.
All turn signal lamps are flashing.
X Switching off: Press hazard warning
flasher switch 0002once more. Interior lighting
The interior lamp comes on for a period of
time when you open the doors, or lock or
unlock the vehicle with the key.
It goes out
R immediately after switching off the
ignition with all doors closed
R after 30 seconds if the doors are not
opened R
after 15 seconds if all doors are closed
R after 10 minutes if at least one door is
open
The rocker switch can be set to three
different positions. 0002
Interior lamp
0003 Off
002B Switching on the automatic control
002A Continuous operation
Automatic control X
Set the rocker switch to position 002B.
The interior lamp comes on for a period
of time.
Switching off X
Set the rocker switch to position 0003.
The interior lamp is permanently
switched off.
Continuous operation X
Set the rocker switch to position 002A.
The interior lamp is permanently
switched on.
! When leaving the vehicle, make sure the
interior lamp is not set to continuous
operation and none of the doors is left
open for a long period of time.
Doing otherwise could result in a
discharged battery. 66
Lighting>> Controls.
Page 69 of 218

Windshield wipers
Switching windshiel
dwipers on and off Example illustration coupé
X
Make sure the key is in starter switch
position 1.
X Switching on: Turn the wiper switch to
position 0005or0006, depending on the
intensity of the rain.
! Do not operate the windshield wipers
when the windshield is dry. Dust that
accumulates on a windshield might
scratch the glass and/or damage the
wiper blades when wiping occurs on a dry
windshield. If it is necessary to operate
the windshield wipers in dry weather
conditions, always operate the
windshield wipers with windshield
washer fluid.
! If anything blocks the windshield
wipers (leaves, snow, etc.), switch them
off immediately.
For safety reasons, stop the vehicle in a
safe location and
R -
remove the key from the starter
switch
- engage the parking brake
before attempting to remove any
blockage.
R Remove blockage.
R Turn the windshield wipers on again.
X Switching off: Turn the wiper switch to
position 0008. Intermittent wiping
Only switch on intermittent wiping under
wet weather conditions or in the presence
of precipitation.
Vehicle swith rain-ligh tsensor*: When you
select intermittent wiping, the sensor is
activated. The sensor automatically sets a
suitablew iping interval depending on the
wetness of the sensor surface.
! Vehicles with rain-light sensor*:
Do not leave windshield wipers in
intermittent setting when the vehicle is
taken to an automatic car wash or during
windshield cleaning. Windshield wipers
will operate in the presence of water
sprayed on the windshield, and
windshield wipers may be damaged as a
result.
! Vehicles with rain-light sensor*:
If you have set intermittent wiping, dirt
on the surface of the sensor or optical
effects may cause the windshield wipers
to wipe in an undesired fashion. This
could then damage the windshield wiper
blades or scratch the windshield. You
should therefore switch off the
windshield wipers when weather
conditions are dry.
X Make sure the key is in starter switch
position 1.
X Activating intermittent wiping: Turn the
wiper switch to position 0004.
After the initial wipe, pauses between
wipes are automatically controlled
depending on the vehicle speed and by the
rain-light sensor*.
X Deactivating intermittent wiping: Turn
the wiper switch to position 0008. Windshield wipers
67>> Controls.
* optional Z
Page 70 of 218

Wiping with windshield washer fluid
Example illustration coupé
X
Pull the wiper switch in direction of
arrow 0002and hold it in position.
The windshield wipers operate with
windshield washer fluid.
X Release the wiper switch.
The windshield wipers will wipe three
more times.
i To prevent smears on the windshield, or
noisy/chattering wiper blades, wipe
with windshield washer fluid
periodically even when it is raining.
Single wipe X
Pull the wiper switch briefly in
direction of arrow 0002.
The windshield wipers wipe one time
with windshield washer fluid. Rear window wiper/washer (coup
éonly) X
Make sure the key is in starter switch
position 1.
X Activating intermittent wiping: Pushthe
wiper switch to position 0004.
X Wiping with windshield washer fluid:
Push the wiper switch in direction of
arrow 0003and hold in position until the
rear window is clean.
X Release the wiper switch.
The rear window wiper will wipe three
more times.
Intermittent wiping is still activated.
X Deactivating intermittent wiping: Pull
the wiper switch back to start position.
i The rear window wiper wipes one time
when reverse gear Ris engaged with the
windshield wipers switched on. Soft top system (cabriolet only)
Introduction
The soft top system of the smart cabriolet
consists of a
R retractable soft top
R rear soft top
R side rails
You can remove the side rails over the doors
when you open the retractable soft top and
open the rear soft top.
i Opening the rear soft top is possible
after the retractable soft top has been
opened completely. Notes on the soft top system
! When transporting long objects inside
the vehicle, make sure they do not press
against the retractable soft top when it
is closed.
When carrying objects that protrude from
the rear of the vehicle, make sure they
are not resting on the retaining clips. 68
Soft top system (cabriolet only)>> Controls.
Page 71 of 218

on the rear soft t")
When loading, make sure no sharp objects
come into contact with the soft top or the
rear window.
Do not place any evenly distributed loads
with a weight of more than 165 lbs (75 kg)
on the rear soft top when folded down.
Make sure the high-mounted brake lamp
is not concealed.
! Do not block the soft top system’s
locking apertures.
Only place the side rails in the
designated storage space of the tailgate.
! Do not sit on the folded-down rear soft
top.
Do not fold down the rear soft top at
temperatures below 14¦ (-10¥).
Do not place any pointed, sharp-edged,
hot (above 176 ¦[80¥]), incandescent or
burning objects on the soft top’s lining.
Do not apply wax to the soft top fabric and
select only wax-free washing products
when using an automatic car wash.
Only drive with the retaining clips
closed, as exhaust fumes could otherwise
reach the vehicle’s interior.
! Please keep in mind that weather
conditions can sometimes change
rapidly. Make sure to close the
retractable soft top and the rear soft top
when leaving the vehicle. If water enters
the vehicle interior, vehicle
electronics could be damaged which is
not covered by the smart Limited
Warranty. Opening and closing the retractable
soft top
You can open and close the retractable soft
top when the vehicle is either stationary
or in motion. G
WARNING
Never operate the retractable soft top if
there is the possibility of anyone being
harmed by the opening or closing
procedure. G
WARNING
The retractable soft top is made out of
fabric. In the event of an accident, the
fabric may tear. This may result in an
opening in the roof.
In a vehicle rollover, occupants not
wearing their seat belts or not wearing
them properly may be thrown out of the
opening. Such an opening also presents a
potentia lfor injury for occupants wearing
their seat belts properly as entire body
parts or portions of them may protrude from
the passenger compartment. G
WARNING
When leaving the vehicle, always remove the
key from the starter switch, take it with
you, and lock the vehicle. Do not leave
children unattended in the vehicle, or with
access to an unlocked vehicle. A child’s
unsupervised access to a vehicle could
result in an accident and/or serious
personal injury.
! To avoid damaging the seals, do not
transport any objects with sharp edges
which can stick out of the retractable
soft top.
Do not open the retractable soft top if
there is snow or ice on the roof, as this
could result in malfunctions.
If you cannot open or close the
retractable soft top due to a malfunction
contact Roadside Assistance or an
authorized electric drive smart center.
i To avoid draining the battery, leave the
drive system running when opening and
closing the retractable soft top. Soft top system (cabriolet only)
69>> Controls. Z
Page 72 of 218

Opening from outside
You can open the retractable soft top
completely with the key.
Key with remote control
0002
0004Lock button
0003 0005Opening the retractable soft top
002B 0006Unlock button
X Press button 0005on the key for
approximately two seconds.
The retractable soft top opens
completely.
Opening from the inside X
Make sure the key is in starter switch
position 1.
X Press symbol 0003on the retractable soft
top switch until the desired position is reached or the retractable soft top is
opened completely.
or
X Press symbol 0003on the retractable soft
top switch briefly.
The retractable soft top opens
completely.
i Pressing symbol 0002or0003 on the
retractable soft top switch while
opening the retractable soft top will
interrupt the opening procedure.
Closing For safety reasons, you can only close the
retractable soft top using the retractable
soft top switch inside the vehicle.
X
Make sure the key is in starter switch
position 1.
X Press symbol 0002on the retractable soft
top switch until the retractable soft top
is closed. Opening and closing the rear soft top
You can open and close the rear soft top
when the vehicle is either stationary or in
motion. G
WARNING
Never operate the rear soft top if there is
the possibility of anyone being harmed by
the opening or closing procedure.
! Make sure objects are not stacked too
high in the cargo compartment. They
could get damaged when opening or
closing the rear soft top.
! When the rear soft top is folded down,
the side rails are accessible. To prevent
theft, you should remove the side rails
and store them in the storage
compartment of the tailgate or close the
soft top system. 70
Soft top system (cabriolet only)>> Controls.
 1
1 2
2 3
3 4
4 5
5 6
6 7
7 8
8 9
9 10
10 11
11 12
12 13
13 14
14 15
15 16
16 17
17 18
18 19
19 20
20 21
21 22
22 23
23 24
24 25
25 26
26 27
27 28
28 29
29 30
30 31
31 32
32 33
33 34
34 35
35 36
36 37
37 38
38 39
39 40
40 41
41 42
42 43
43 44
44 45
45 46
46 47
47 48
48 49
49 50
50 51
51 52
52 53
53 54
54 55
55 56
56 57
57 58
58 59
59 60
60 61
61 62
62 63
63 64
64 65
65 66
66 67
67 68
68 69
69 70
70 71
71 72
72 73
73 74
74 75
75 76
76 77
77 78
78 79
79 80
80 81
81 82
82 83
83 84
84 85
85 86
86 87
87 88
88 89
89 90
90 91
91 92
92 93
93 94
94 95
95 96
96 97
97 98
98 99
99 100
100 101
101 102
102 103
103 104
104 105
105 106
106 107
107 108
108 109
109 110
110 111
111 112
112 113
113 114
114 115
115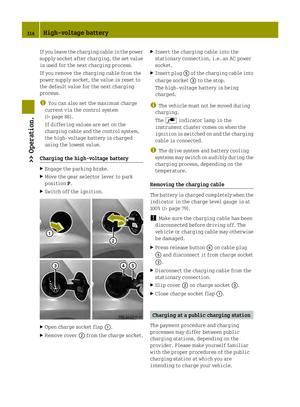 116
116 117
117 118
118 119
119 120
120 121
121 122
122 123
123 124
124 125
125 126
126 127
127 128
128 129
129 130
130 131
131 132
132 133
133 134
134 135
135 136
136 137
137 138
138 139
139 140
140 141
141 142
142 143
143 144
144 145
145 146
146 147
147 148
148 149
149 150
150 151
151 152
152 153
153 154
154 155
155 156
156 157
157 158
158 159
159 160
160 161
161 162
162 163
163 164
164 165
165 166
166 167
167 168
168 169
169 170
170 171
171 172
172 173
173 174
174 175
175 176
176 177
177 178
178 179
179 180
180 181
181 182
182 183
183 184
184 185
185 186
186 187
187 188
188 189
189 190
190 191
191 192
192 193
193 194
194 195
195 196
196 197
197 198
198 199
199 200
200 201
201 202
202 203
203 204
204 205
205 206
206 207
207 208
208 209
209 210
210 211
211 212
212 213
213 214
214 215
215 216
216 217
217