2013 SKODA ROOMSTER clutch
[x] Cancel search: clutchPage 10 of 219

AbbreviationsAbbreviationDefinitionrpmEngine revolutions per minuteABSAnti-lock brake systemAGAutomatic gearboxTCSTraction controlCO2 in g/kmdischarged quantity of carbon dioxide in grams per driven kilo-
meterDPFDiesel particle filterDSGAutomatic double clutch gearboxECEEconomic Commission for EuropeESCElectronic Stability ControlEUEuropean UnionkWKilowatt, measuring unit for the engine outputMGManual gearboxMFDMultifunction displayN1Panel van intended exclusively or mainly for the transporta-
tion of goodsNmNewton meter, measuring unit for the engine torqueTDI CRDiesel engine with turbocharging and common rail injection systemTSIPetrol engine with turbocharging and direct injection
7Abbreviations
Page 22 of 219

Winter tyres
Here, you can set the speed at which an audible signal should sound. This func-
tion is, for example, used for winter tyres where the maximum permissible speed
is lower than the maximum speed of the vehicle.
The following is shown on the information display if this speed is exceeded: Winter tyres: maximum ... km/h.
Units of measurement
The units for the temperature, consumption and distance driven can be set here.
Alt. speed dis.
Display of the second speed in mph 1)
can be activated here.
Service
The days and kilometres remaining until the next service can be displayed here.
Factory setting
The display can be restored to its factory settings here.
Door, boot lid and bonnet warning
First read and observe the introductory information and safety warn-ings
on page 18.
If at least one door is open, or the boot or bonnet is open, the MAXI DOT display
shows the vehicle with the corresponding door or boot/bonnet open.
An audible signal also sounds if the vehicle is travelling at more than 6 km/h.
Auto Check Control
First read and observe the introductory information and safety warn-
ings
on page 18.
Vehicle condition
Certain functions and conditions of individual vehicle systems are checked contin-
uously when the ignition is switched on and also while driving.
Some error messages and other information are displayed in the MAXI DOT dis-
play. The messages are displayed simultaneously with the icons in the MAXI DOT
display or with the warning lights in the instrument cluster » page 20.
The Vehicle status menu item is shown in the main menu of the MAXI DOT dis-
play whenever at least one fault message is present. The first of the fault mes-
sages is displayed after this menu item is selected. Several error messages are
shown on the display under the message e.g. 1/3. This indicates that the first of a
total of three error messages is being displayed.
As long as the operational faults are not rectified, the symbols are always indica- ted again. After they are displayed for the first time, the symbols continue to be
indicated without any extra messages for the driver.
Warning symbolsEngine oil pressure too low» page 21Clutches in the automatic gearbox are too
hot» page 19Check engine oil level,
engine oil sensor defective» page 21
Clutches in the automatic gearbox are too hot
The
symbol in the MAXI DOT display indicates that the temperature of the au-
tomatic gearbox clutches is too high.
The following message is shown in the MAXI DOT display.
Gearbox overheating. Stop. Read manual.
Stop the vehicle, switch off the engine, and wait until the
icon goes out – there
is a risk of gearbox damage. You can continue your journey as soon as the icon
disappears.
WARNINGIf you have to stop for technical reasons, park the vehicle at a safe distance
from the traffic, switch off the engine and switch on the hazard warning lights
system » page 45 . 1)
On models on which the speedometer indicates mph, the second speed is displayed in km/h.
19Instruments and Indicator Lights
Page 55 of 219
Seats and stowing
Front seats
Introduction
This chapter contains information on the following subjects:
Adjusting the front seats
53
Front seat heating
53
The driver's seat should be adjusted in such a way that the pedals can be fully
pressed to the floor with slightly bent legs.
The seat backrest on the driver's seat should be adjusted in such a way that the
upper point of the steering wheel can be easily reached with slightly bent arms.
Correct adjustment of the seats is particularly important:
› for safely and quickly reaching the controls;
› for a relaxed body position that reduces fatigue;
› for achieving maximum protection from the seat belts and the airbag system.
WARNINGGeneral information■Caution when adjusting the seat! You may suffer injuries or bruises as a re-
sult of adjusting the seat without paying proper attention.■
The seat backrests must not be tilted too far back when driving, as this will
impair the function of the seat belts and of the airbag system – risk of injury!
■
Never carry more people than the number of seats in the vehicle.
■
Each occupant must correctly fasten the seat belt belonging to the seat.
Children must be fastened » page 139, Transporting children safely with a
suitable restraint system.
■
The front seats and head restraints must be adjusted to match the body
size at all times and the seat belt must always be fastened properly to provide
the most effective levels of protection to the passengers.
■
Do not carry any objects on the front passenger seat except objects de-
signed for this purpose (e.g. child seat) – risk of accident!
WARNINGInformation for the driver■Only adjust the driver's seat when the vehicle is stationary – risk of accident!■
Maintain a distance of at least 25 cm to the steering wheel. Not maintaining
this minimum distance will mean that the airbag system will not be able to
properly protect you – hazard!
■
Ensure that there are no objects in the driver's footwell, as these may get
caught in the pedal apparatus when driving or braking. You would then no
longer be able to operate the clutch, brake or acceleration pedals.
WARNINGInformation for the front seat passenger■Maintain a distance of at least 25 cm from the dash panel. Not maintaining
this minimum distance will mean that the airbag system will not be able to
properly protect you - there is a risk that you could be killed.■
Always keep your feet in the footwell when the car is being driven - never
place your feet on the instrument panel, out of the window or on the seats.
You will be exposed to increased risk of injury if it becomes necessary to apply
the brakes or in the event of an accident. You may suffer fatal injuries when
an airbag is deployed if you have adopted an incorrect seating position.
Note
After a certain time, play can develop within the adjustment mechanism of the
backrest angle.
52Operation
Page 69 of 219
WARNING■Do not place anything on the dash panel. These objects might slide or fall
down while you are driving (under acceleration or when cornering) and could
distract you from the traffic - there is a risk of an accident.■
Make sure that no objects from the centre console or from other storage
compartments can get into the driver's footwell while you are driving. You
would then no longer be able to apply the brakes or operate the clutch or ac-
celerator pedal – there is a risk of an accident.
■
Ash and cigarette or cigar stubs must only be discarded in ashtrays.
Cupholders
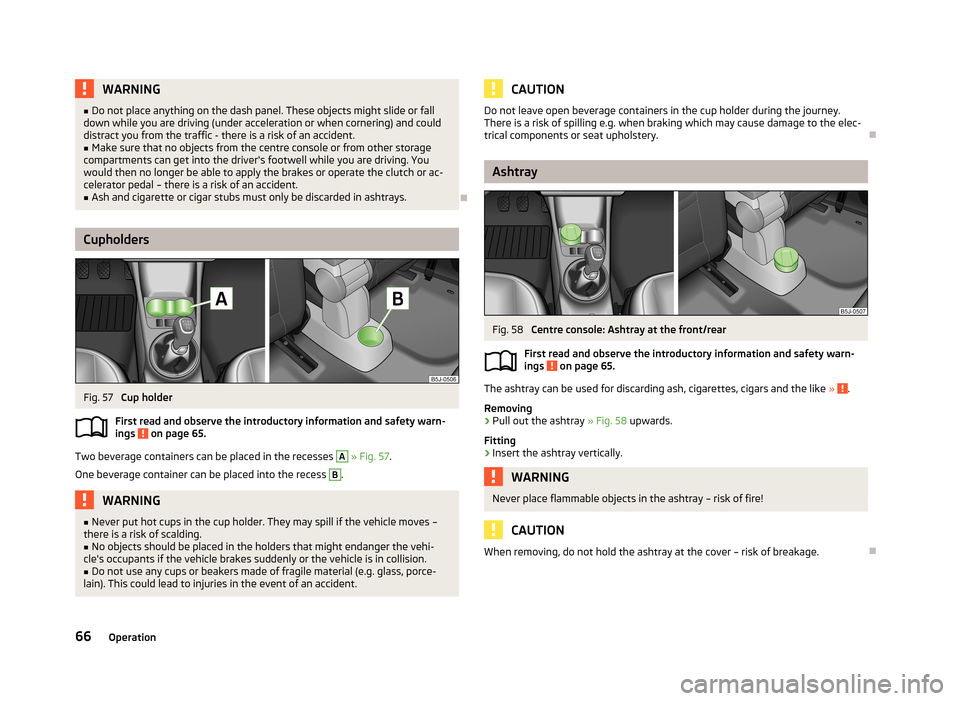
Fig. 57
Cup holder
First read and observe the introductory information and safety warn-
ings
on page 65.
Two beverage containers can be placed in the recesses
A
» Fig. 57 .
One beverage container can be placed into the recess
B
.
WARNING■ Never put hot cups in the cup holder. They may spill if the vehicle moves –
there is a risk of scalding.■
No objects should be placed in the holders that might endanger the vehi-
cle's occupants if the vehicle brakes suddenly or the vehicle is in collision.
■
Do not use any cups or beakers made of fragile material (e.g. glass, porce-
lain). This could lead to injuries in the event of an accident.
CAUTIONDo not leave open beverage containers in the cup holder during the journey.
There is a risk of spilling e.g. when braking which may cause damage to the elec-
trical components or seat upholstery.
Ashtray
Fig. 58
Centre console: Ashtray at the front/rear
First read and observe the introductory information and safety warn-
ings
on page 65.
The ashtray can be used for discarding ash, cigarettes, cigars and the like » .
Removing
›
Pull out the ashtray » Fig. 58 upwards.
Fitting
›
Insert the ashtray vertically.
WARNINGNever place flammable objects in the ashtray – risk of fire!
CAUTION
When removing, do not hold the ashtray at the cover – risk of breakage.
66Operation
Page 72 of 219
stowage compartments in the luggage73Flexible storage compartment73WARNING■Do not place anything on the dash panel. These objects might slide or fall
down while you are driving (under acceleration or when cornering) and could
distract you from the traffic - there is a risk of an accident.■
Make sure that no objects from the centre console or from other storage
compartments can get into the driver's footwell while you are driving. You
would then no longer be able to apply the brakes or operate the clutch or ac-
celerator pedal – there is a risk of an accident.
Storage compartment on the front passenger side
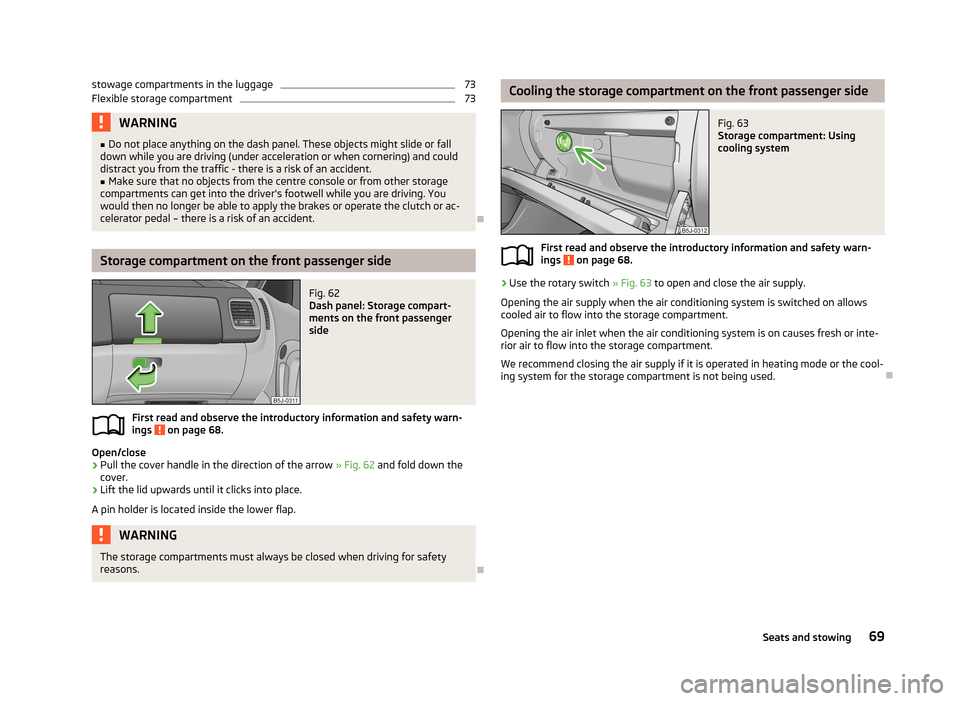
Fig. 62
Dash panel: Storage compart-
ments on the front passenger
side
First read and observe the introductory information and safety warn- ings on page 68.
Open/close
›
Pull the cover handle in the direction of the arrow » Fig. 62
and fold down the
cover.
›
Lift the lid upwards until it clicks into place.
A pin holder is located inside the lower flap.
WARNINGThe storage compartments must always be closed when driving for safety
reasons.
Cooling the storage compartment on the front passenger sideFig. 63
Storage compartment: Using
cooling system
First read and observe the introductory information and safety warn-
ings on page 68.
›
Use the rotary switch » Fig. 63 to open and close the air supply.
Opening the air supply when the air conditioning system is switched on allows
cooled air to flow into the storage compartment.
Opening the air inlet when the air conditioning system is on causes fresh or inte-rior air to flow into the storage compartment.
We recommend closing the air supply if it is operated in heating mode or the cool-ing system for the storage compartment is not being used.
69Seats and stowing
Page 100 of 219
NoteAfter switching off the ignition, the radiator fan can intermittently continue to op-
erate for approx. 10 minutes.
Electronic immobilizer
First read and observe the introductory information and safety warn-ings
on page 96.
An electronic chip is integrated in the head of the key. The immobiliser is deacti-
vated with the aid of this chip when the key is inserted in the ignition lock. The
electronic immobiliser is automatically activated when the ignition key is with-
drawn from the lock.
The engine will not start if a non-authorized ignition key is used.
The MAXI DOT display shows the following: Immobilizer active.
Ignition lock
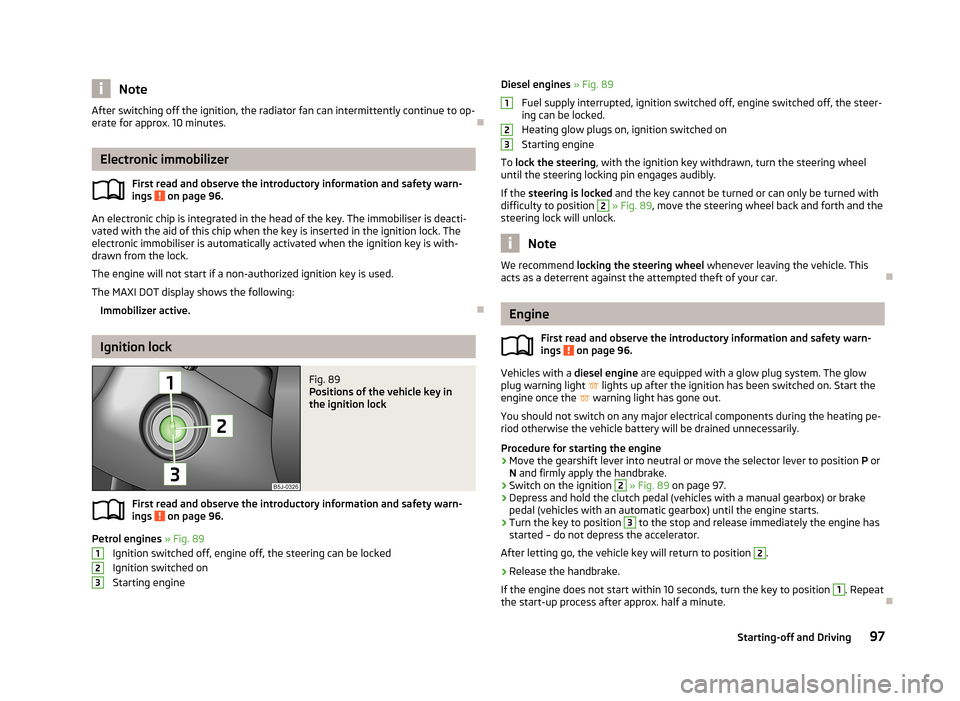
Fig. 89
Positions of the vehicle key in
the ignition lock
First read and observe the introductory information and safety warn-
ings on page 96.
Petrol engines » Fig. 89
Ignition switched off, engine off, the steering can be locked
Ignition switched on Starting engine
123Diesel engines » Fig. 89
Fuel supply interrupted, ignition switched off, engine switched off, the steer-
ing can be locked.
Heating glow plugs on, ignition switched on
Starting engine
To lock the steering , with the ignition key withdrawn, turn the steering wheel
until the steering locking pin engages audibly.
If the steering is locked and the key cannot be turned or can only be turned with
difficulty to position 2
» Fig. 89 , move the steering wheel back and forth and the
steering lock will unlock.
Note
We recommend locking the steering wheel whenever leaving the vehicle. This
acts as a deterrent against the attempted theft of your car.
Engine
First read and observe the introductory information and safety warn-
ings
on page 96.
Vehicles with a diesel engine are equipped with a glow plug system. The glow
plug warning light
lights up after the ignition has been switched on. Start the
engine once the
warning light has gone out.
You should not switch on any major electrical components during the heating pe- riod otherwise the vehicle battery will be drained unnecessarily.
Procedure for starting the engine
›
Move the gearshift lever into neutral or move the selector lever to position P or
N and firmly apply the handbrake.
›
Switch on the ignition
2
» Fig. 89 on page 97.
›
Depress and hold the clutch pedal (vehicles with a manual gearbox) or brake
pedal (vehicles with an automatic gearbox) until the engine starts.
›
Turn the key to position
3
to the stop and release immediately the engine has
started – do not depress the accelerator.
After letting go, the vehicle key will return to position
2
.
›
Release the handbrake.
If the engine does not start within 10 seconds, turn the key to position
1
. Repeat
the start-up process after approx. half a minute.
12397Starting-off and Driving
Page 101 of 219

Switching off the engineFirst read and observe the introductory information and safety warn-ings
on page 96.
Switch off the engine by turning the ignition key to position
1
» Fig. 89 on
page 97.
Brakes
Introduction
This chapter contains information on the following subjects:
Information on braking
98
Handbrake
99WARNING■ Greater physical effort is required for braking when the engine is switched
off – risk of accident!■
The clutch pedal must be depressed when braking on a vehicle with manual
transmission, when the vehicle is in gear and at low revs. Otherwise, the func-
tion of the brake booster may be impaired – risk of accident!
■
If a front spoiler, full wheel trim, etc. is mounted retrospectively, it must be
ensured that the air supply to the front wheel brakes is not reduced. The front
brakes may overheat, which can have a negative impact on the functioning of
the braking system – there is a risk of an accident.
■
Never leave children unattended in the vehicle. The children might, for ex-
ample, release the handbrake or take the vehicle out of gear. The vehicle
could then start to move – risk of accident!
CAUTION
■ Observe the recommendations on the new brake pads » page 104.■Never let the brakes slip with light pressure on the pedal if braking is not neces-
sary. This causes the brakes to overheat and can also result in a longer braking distance and excessive wear.
Information on braking
First read and observe the introductory information and safety warn-
ings
on page 98.
If the brakes are applied in full and the control unit for the braking system consid-
ers the situation to be dangerous for the following traffic, the brake light flashes
automatically.
After the speed was reduced below around 10 km/h or the vehicle was stopped,
the brake light stops flashing and the hazard warning light system switches on.
The hazard warning light system is switched off automatically after accelerating
or driving off again.
Before travelling a long distance down a steep gradient, reduce speed and shift
into the next lowest gear. As a result, the braking effect of the engine will be
used, reducing the load on the brakes. Any additional braking should be comple-
ted intermittently, not continuously.
Wear-and-tear
The wear of the brake pads is dependent on the operating conditions and driving style.
The brake pads wear more quickly if a lot of journeys are completed in towns and
over short distances or if a very sporty style of driving is adopted.
Under these severe conditions , the thickness of the brake pads must also be
checked by a specialist garage between services.
Wet roads or road salt
The performance of the brakes can be delayed as the brake discs and brake pads may be moist or have a coating of ice or layer of salt on them in winter. The
brakes are cleaned and dried by applying the brakes several times.
Corrosion
Corrosion on the brake discs and dirt on the bake pads occur if the vehicle has been parked for a long period and if you do not make much use of the braking
system. The brakes are cleaned and dried by applying the brakes several times.
Faults in the brake surface
If it is found that the braking distance has suddenly become longer and that the brake pedal can be depressed further, the brake system may be faulty.
Visit a specialist garage immediately and adjust your style of driving appropriately as you will not know the exact extent of the damage.
98Driving
Page 102 of 219
Low brake fluid level
An insufficient level of brake fluid may result in problems in the brake system. The
level of the brake fluid is monitored electronically » page 20, Brake system .
Brake booster
The brake booster increases the pressure generated with the brake pedal. The
brake booster only operates when the engine is running.
Handbrake
Fig. 90
Handbrake
First read and observe the introductory information and safety warn- ings on page 98.
Apply
›
Pull the handbrake lever firmly upwards.
Releasing
›
Pull the handbrake lever up slightly and at the same time push in the locking
button » Fig. 90 .
›
Move the lever right down while pressing the lock button.
The handbrake warning light
lights up when the handbrake is applied, provided
the ignition is on.
WARNINGPlease note that the handbrake must be fully released. A handbrake which is
only partially released can result in the rear brakes overheating. This can have
a negative effect on the operation of the brake system – there is a risk of an
accident.
Manual gear changing and pedals
Introduction
This chapter contains information on the following subjects:
Manual gear changing
99
Pedals
100
Manual gear changing
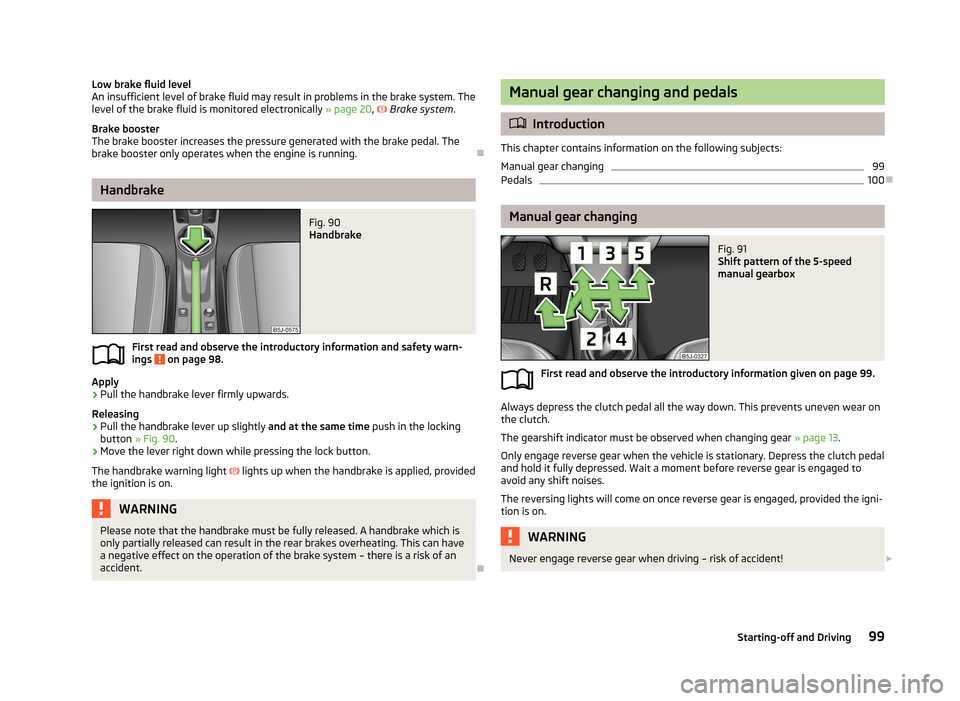
Fig. 91
Shift pattern of the 5-speed
manual gearbox
First read and observe the introductory information given on page 99.
Always depress the clutch pedal all the way down. This prevents uneven wear on the clutch.
The gearshift indicator must be observed when changing gear » page 13.
Only engage reverse gear when the vehicle is stationary. Depress the clutch pedal
and hold it fully depressed. Wait a moment before reverse gear is engaged to
avoid any shift noises.
The reversing lights will come on once reverse gear is engaged, provided the igni- tion is on.
WARNINGNever engage reverse gear when driving – risk of accident! 99Starting-off and Driving