2013 SKODA ROOMSTER heating
[x] Cancel search: heatingPage 124 of 219

The distribution of the weight is very poor if your vehicle is unladen and the trail-
er is laden. Maintain a particularly low speed if you cannot avoid driving with this
combination.
Tyre pressure
Correct the tyre inflation pressure on your vehicle for a “full load” » page 173,
Service life of tyres .
Trailer load
The permissible trailer load must not be exceeded under any circumstan- ces » page 199 , Technical data .
The trailer loads specified apply only to altitudes up to 1 000 metres above mean
sea level.
The engine output falls as altitude increases, as does the ability to climb. There-
fore, for every additional 1000 m in height (or part), the maximum permissible
towed weight must be reduced by 10 %.
The towed weight comprises the actual weights of the (loaded) towing vehicleand the (loaded) trailer.
The trailer and drawbar load information on the type plate of the towing equip-
ment are merely test data for the towing equipment. The vehicle-specific values
are detailed in the vehicle documents.WARNING■ Do not exceed the maximum permissible axle and drawbar load and the
maximum permissible total or towed weight of the vehicle and the trailer –
there is the risk of an accident and serious injury.■
Slipping loads can significantly affect the stability and safety of the vehicle/
trailer combination – there is the risk of an accident and serious injury.
Towing a trailer
First read and observe the introductory information and safety warn-
ings
on page 120.
Exterior mirrors
You have to have additional exterior mirrors fitted if you are not able to see the
traffic behind the trailer with the standard rear-view mirrors. The national legal requirements must be observed.
Headlights
The front of the vehicle can be lifted when a trailer is being towed and the head- lights can dazzle other road users.
Adjust the headlight setting on the headlight range control » page 42, Headlight
beam adjustment .
Driving speed
For safety reasons, do not drive faster than 80 km/h when towing a trailer.
Immediately reduce your speed as soon as even the slightest swaying of the trail- er is detected. Never attempt to stop the trailer from “swaying” by accelerating.
Brakes
Apply the brakes in good time! If the trailer is fitted with a trailer brake, apply the
brakes gently at first, then brake firmly. This will avoid brake jolts resulting from
the trailer wheels locking.
On downhill sections shift down a gear in good time to also use the engine as a
brake.
Engine overheating
The speed must be reduced immediately if the needle for the coolant tempera-
ture gauge moves into the right-hand area or the red area of the scale.
Stop and switch off the engine if the warning light
in the instrument cluster
starts to flash. Wait a few minutes and check the level of coolant » page 166,
Checking the coolant level .
The following guidelines must be observed » page 22,
Coolant .
The coolant temperature can be reduced by switching on the heating.WARNING■ Adapt your speed to the conditions of the road surface and to the traffic sit-
uation.■
Improper or incorrectly connected electric cables can energise the trailer and
cause functional faults to the vehicle's entire electrical system as well as acci-
dents and severe injuries.
■
Work on the electrical system must only be carried out by specialist garages.
■
Never directly connect the trailer's electrical system with the electrical con-
nections for the tail lights or other current sources.
121Towing a trailer
Page 156 of 219
■When removing snow or ice from windows and mirror lenses ensure that the
paintwork of the vehicle is not to damage.■
Do not clean the inside of the windows with sharp-edged objects or corrosive
and acidic cleaning agents – there is a risk of damaging the heating elements or
window aerial.
Headlight lenses
First read and observe the introductory information and safety warn-ings
on page 150.
Clean plastic front headlight lenses using clean, warm water and soap.
CAUTION
■ Never wipe headlights to dry.■Do not use any sharp objects to clean the plastic lenses, as this may damage
the protective paintwork and consequently cause cracks to form on the headlight lenses.■
Do not use any harsh cleaning products or chemical solvents to clean the head-
lights, as this could damage the headlight lenses.
Door lock cylinders
First read and observe the introductory information and safety warn-
ings
on page 150.
Specific products must be used for de-icing door lock cylinders.
CAUTION
When washing your vehicle, ensure as little water as possible gets into the lock-
ing cylinders.
Cavity protection
First read and observe the introductory information and safety warn-
ings
on page 150.
All the cavities of your vehicle which are at risk from corrosion are protected for life by a layer of protective wax applied in the factory.
This wax protection does not need to be inspected or re-applied.
If any small amount of wax flow out of the cavities at high temperatures, these
must be removed with a plastic scraper and the stains cleaned using a petroleum cleaner.WARNINGSafety regulations should be observed when using petroleum cleaner to re-
move wax – risk of fire!
Wheels
First read and observe the introductory information and safety warn-
ings
on page 150.
Wheel rims
Also thoroughly wash the wheel rims when washing the vehicle on a regular ba- sis.
Regularly remove salt and brake abrasion, otherwise the rim material will be cor-
roded.
Damage to the paint layer on the wheel rims must be touched up immediately.
Light alloy wheels
After washing thoroughly and treat the wheel rims with a protective product for
light alloy wheels. Products which cause abrasion must not be used to treat the
wheel rims.
CAUTION
Severe layers of dirt on the wheels can also result in wheel imbalance. This may
show itself in the form of a wheel vibration which is transmitted to the steering
wheel which, in certain circumstances, can cause premature wear of the steering.
This means it is necessary to remove the dirt.
153Car care
Page 157 of 219
Underbody protectionFirst read and observe the introductory information and safety warn-ings
on page 150.
The underside of your vehicle is protected for life against chemical and mechani-
cal influences.
When driving, it cannot be guaranteed that no damage to the protective layer will
occur.
We recommend having the protective layer underneath the vehicle and the chas-
sis checked — preferably before the beginning of winter and at the end of winter.
WARNINGNever use additional underbody protection or anti-corrosion agents for ex-
haust pipes, catalytic converters, diesel particle filters or heat shields. When
the engine reaches its operating temperature, these substances may ignite - risk of fire!
Taking care of the interior
Introduction
This chapter contains information on the following subjects:
Natural leather
155
Synthetic leather, fabrics and Alcantara ®
155
Seat covers
156
Seat belts
156
Regular and proper care helps to ensure efficiency and maintain the
value of your
vehicle.
We recommend using vehicle care products from ŠKODA Original Accessories. These are available from ŠKODA Partners. The usage instructions on the packagemust be observed.
WARNING■ Vehicle care products may be harmful to your health if not used according to
the instructions.■
Always store vehicle care products safely, in particular out of the reach of
children – risk of poisoning!
CAUTION
■ Be sure to check clothing for colourfastness to avoid any damage or visible
stains on the material (leather), panels and textiles.■
Remove fresh stains such as those from ball-point pens, ink, lipstick, shoe pol-
ish, etc., from the material (leather), panels and textiles as quickly as possible.
■
Air fresheners and scents can be hazardous to heath when the temperature in-
side the vehicle is high.
■
Do not attach scent dispensers or air fresheners to the dash panel – risk of
damage to the dash panel.
■
Do not stick any stickers on the inside of the rear windows, the rear side win-
dows and in the vicinity of the heating elements on the windscreen or near the
window aerial. These may get damaged.
■
Do not clean the roof panelling with a brush – risk of damage to the surface of
the panelling.
■
Cleaner that contain solvents can damage the material being cleaned.
■
Apply only a small amount of the cleaning and care product.
For the sake of the environment
Used cans of vehicle care product represent hazardous waste that is harmful to
the environment. These must be disposed of in accordance with national legisla-
tion.
Note
Because of the special tools and knowledge required, and to avoid any potential
problems with the cleaning and care of the interior of your vehicle, we recom-
mend that cleaning and care of the interior of your vehicle be carried out by a
ŠKODA Service Partner.
154General Maintenance
Page 159 of 219
CAUTION■Do not use leather cleaners on Alcantara ®
seat upholstery.■Do not use solvents, floor wax, shoe cream, stain remover or similar agents on
Alcantara ®
seat upholstery.■
Avoid leaving the vehicle in bright sunlight for long periods of time in order to
stop the fabric from bleaching. If the vehicle is parked outside for long periods of
time, cover the fabric to protect it from direct sunlight.
■
Some clothing materials, e.g. dark denim, do not have sufficient colour fastness.
This can cause damage or clearly visible discolouration to seat covers, even when used correctly. This applies particularly to light-coloured seat covers. This does
not relate to a fault in the seat cover, but rather to poor colour fastness of the clothing textiles.
Seat covers
First read and observe the introductory information and safety warn-
ings
on page 154.
Electrically heated seats
Do not clean the covers by moistening, as this can damage the seat heating sys-
tem.
Use a specific cleaning agent such as dry foam or similar to clean the covers.
Seats without seat heating
Thoroughly vacuum the seat covers with a vacuum cleaner before cleaning.
Clean the seat covers with a damp cloth or cleaning products specially designed for this purpose.
Indented points arising on the fabrics by everyday use, can be removed by brush- ing against the direction of hair with a damp brush.
Always clean all parts of the covers, so that there are no visible edges. Then allow the seat to dry completely.
CAUTION
■ Regularly remove dust from the seat covers using a vacuum cleaner.■Electrically heated seats must not be dried after cleaning by switching on the
heater.■
Do not sit on wet seats - risk of seat deformation.
■
Always clean the seats “from seam to seam”.
Seat belts
First read and observe the introductory information and safety warn-
ings
on page 154.
The belt webbing must always be kept clean.
Wash dirty seat belts with mild soapy water.
Remove coarse dirt with a soft brush.
Dirty belt webbing may impair the correct functioning of the inertia reel.
WARNING■ The seat belts must not be removed for cleaning.■Never clean the seat belts chemically as chemical cleaning products could
destroy the fabric.■
The seat belts must not be allowed to come into contact with corrosive liq-
uids (e.g. acids).
■
Check the condition of all the seat belts on a regular basis. If any damage to
the belt webbing, seat belt connections, inertia reel or lock is detected, the
seat belt must be replaced by a specialist garage.
■
The seat belts must be fully dried before being rolled up.
156General Maintenance
Page 160 of 219
Inspecting and replenishing
Fuel
Introduction
This chapter contains information on the following subjects:
Refuelling
157
Unleaded petrol
158
Diesel fuel
159
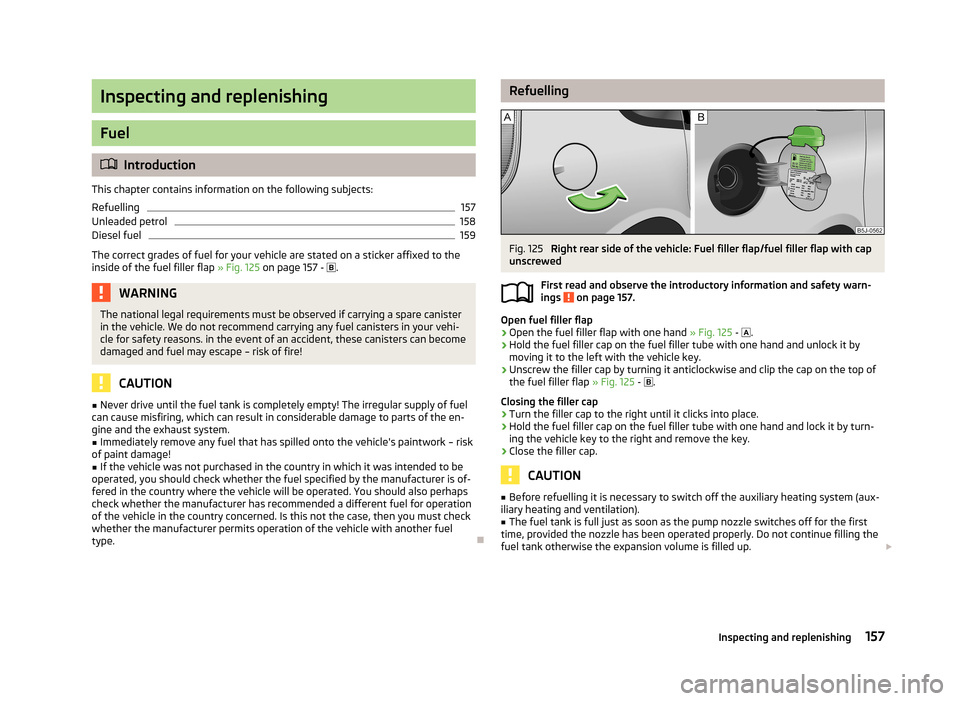
The correct grades of fuel for your vehicle are stated on a sticker affixed to the
inside of the fuel filler flap » Fig. 125 on page 157 -
.
WARNINGThe national legal requirements must be observed if carrying a spare canister
in the vehicle. We do not recommend carrying any fuel canisters in your vehi-
cle for safety reasons. in the event of an accident, these canisters can become damaged and fuel may escape – risk of fire!
CAUTION
■ Never drive until the fuel tank is completely empty! The irregular supply of fuel
can cause misfiring, which can result in considerable damage to parts of the en-
gine and the exhaust system.■
Immediately remove any fuel that has spilled onto the vehicle's paintwork – risk
of paint damage!
■
If the vehicle was not purchased in the country in which it was intended to be
operated, you should check whether the fuel specified by the manufacturer is of-
fered in the country where the vehicle will be operated. You should also perhaps
check whether the manufacturer has recommended a different fuel for operation
of the vehicle in the country concerned. Is this not the case, then you must check
whether the manufacturer permits operation of the vehicle with another fuel
type.
RefuellingFig. 125
Right rear side of the vehicle: Fuel filler flap/fuel filler flap with cap
unscrewed
First read and observe the introductory information and safety warn-
ings
on page 157.
Open fuel filler flap
›
Open the fuel filler flap with one hand » Fig. 125 -
.
›
Hold the fuel filler cap on the fuel filler tube with one hand and unlock it by
moving it to the left with the vehicle key.
›
Unscrew the filler cap by turning it anticlockwise and clip the cap on the top ofthe fuel filler flap » Fig. 125 -
.
Closing the filler cap
›
Turn the filler cap to the right until it clicks into place.
›
Hold the fuel filler cap on the fuel filler tube with one hand and lock it by turn- ing the vehicle key to the right and remove the key.
›
Close the filler cap.
CAUTION
■ Before refuelling it is necessary to switch off the auxiliary heating system (aux-
iliary heating and ventilation).■
The fuel tank is full just as soon as the pump nozzle switches off for the first
time, provided the nozzle has been operated properly. Do not continue filling the fuel tank otherwise the expansion volume is filled up. 157Inspecting and replenishing
Page 169 of 219

■A coolant additive that does not comply with the correct specifications can sig-
nificantly reduce the corrosion protection.■
Any faults resulting from corrosion may cause a loss of coolant and can conse-
quently result in major engine damage!
■
Do not fill the coolant above the mark
A
» Fig. 131 on page 166.
■
If a fault causes the engine to overheat, we recommend visiting a specialist ga-
rage, as otherwise serious engine damage may occur.
Capacity
First read and observe the introductory information and safety warn-
ings
on page 165.
Coolant capacity (in litres) 1)
Petrol enginesCapacity1.2 litres/51 kW5.51.2 litres/63 kW TSI7.71.2 litres/77 kW TSI7.71.4 litres/63 kW5.51.6 litres/77 kW5.5Diesel enginesCapacity1.2 ltr./55 kW TDI CR DPF6.61.6 litres/66 kW TDI CR DPF8.41.6 litres/77 kW TDI CR DPF8.4
Checking the coolant levelFig. 131
Engine compartment: Coolant
expansion reservoir
First read and observe the introductory information and safety warn-
ings on page 165.
The coolant expansion bottle is located in the engine compartment.
›
Switch off the engine.
›
Open the bonnet » page 161.
›
Check the level of coolant at the coolant expansion vessel » Fig. 131. The cool-
ant level when the engine is cold must lie between the
B
(MIN) and
A
(MAX)
markings. The level may also rise slightly above the
A
(MAX) marking when the
engine is warm.
If the coolant level in the coolant expansion tank is too low, this is indicated by
the warning light
lighting up in the instrument cluster » page 22,
Coolant .
We still recommend inspecting the coolant level directly at the reservoir from
time to time.
Loss of coolant
A loss of coolant is first and foremost an indication of a leak in the system. Do
not merely top up the coolant. Have the cooling system checked by a specialist
garage.
1)
The coolant capacity is approximately 1 Litre greater on vehicles that are fitted with an auxiliary heat-
er (auxiliary heating and ventilation).
166General Maintenance
Page 189 of 219
›Remove the empty tyre inflator bottle from the valve.›Screw the valve core back into the tyre valve using the valve remover 1.
Inflating›
Screw the air compressor tyre inflation hose
5
» Fig. 148 on page 185 firmly on-
to the tyre valve.
›
Check that the air release valve
7
is closed.
›
Start the engine and run it in idle.
›
Plug the connector
9
into 12 Volt socket » page 67, 12-volt power outlet .
›
Switch on the air compressor with the ON and OFF switch
8
.
›
Allow the air compressor to run until a pressure of 2.0 - 2.5 bar is achieved. Max-
imum run time of 8 minutes » !
›
Switch off the air compressor.
›
If you cannot reach an air pressure of 2.0 – 2.5 bar, unscrew the tyre inflation
hose
5
from the tyre valve.
›
Drive the vehicle 10 metres forwards or backwards to allow the sealing agent to
“distribute” in the tyre.
›
Firmly screw the tyre inflation hose
5
back onto the tyre valve and repeat the
inflation process.
›
If you cannot reach the required tyre inflation pressure here either, this means
the tyre has sustained too much damage. You cannot seal with tyre with the breakdown kit »
.
›
Switch off the air compressor.
›
Remove the tyre inflation hose
5
from the tyre valve.
Once a tyre pressure of 2.0 – 2.5 bar is reached, the journey may be continued at a maximum speed of 80 km/h (50 mph).
Check the tyre inflation pressure after driving for 10 minutes » page 186.
WARNING■
The tyre inflation hose and air compressor may get hot as the tyre is being
inflated – there is a risk of injury.■
Do not place the hot tyre inflation hose or hot air compressor on flammable
materials – there is a risk of fire.
■
If you cannot inflate the tyre to at least 2.0 bar, this means the damage sus-
tained was too serious. The sealing agent cannot be used to seal the tyre.
Do not drive the vehicle. Seek help from a specialist garage.
CAUTIONSwitch off the air compressor after running 8 minutes at the latest – there is a
risk of overheating. Allow the air compressor to cool a few minutes before switch- ing it on again.
Check after 10 minutes' driving
First read and observe the introductory information and safety warn-ings
on page 184.
Check the tyre inflation pressure after driving for 10 minutes!
If the tyre pressure is 1.3 bar or less
›
Do not drive the vehicle! You cannot properly seal with tyre with the break-
down kit.
If the tyre pressure is 1.3 bar or more
›
Adjust the tyre pressure to the correct value again (see inside of fuel filler cap).
›
Continue driving carefully to the nearest specialist garage at a maximum speed
of 80 km/h (50 mph).
Jump-starting
Introduction
This chapter contains information on the following subjects:
Jump-starting using the battery from another vehicle
187
Jump-starting in vehicles with the START-STOP system
188WARNING■ A discharged vehicle battery may already freeze at temperatures just below
0 °C. If the battery is frozen, do not jump start with the battery of another ve- hicle – there is a risk of explosion.■
Pay attention to the warning instructions relating to working in the engine
compartment » page 159, Engine compartment .
186Do-it-yourself
Page 195 of 219

Fuses in the dash panelFig. 153
Underside of the dash panel:
Distribution board cover.
Fig. 154
Schematic representation of the fuse box for vehicles with left-
hand steering/right-hand steering
First read and observe the introductory information and safety warn-
ings
on page 191.
The fuses are located on the left side of the dash panel behind a cover.
› Carefully remove the cover in the direction of the arrow
» Fig. 153.
› After the fuse has been replaced, replace the cover in the dash panel in the op-
posite direction of the arrow so that the guide lugs are guided into the open- ings of the dash panel. Close the cover until it clicks into place.
Fuse assignment in the dash panel
No.Consumer1S-contact2START-STOP, air-conditioning system3Instrument cluster, headlamp beam adjustmentNo.Consumer4Control unit for ABS, button for START STOP5Petrol engine: Speed regulating system6Reversing light (manual gearbox)7Ignition, engine control unit, automatic gearbox8Brake pedal switch, clutch pedal switch9Operating controls for the heating, control unit for air conditioning sys-
tem, parking aid, control unit for cornering lights, radiator fan, washing nozzles10Windscreen Wiper and Washer System11Mirror adjustment12Control unit for trailer detection13Automatic gearbox control unit14Motor for halogen projector headlights with cornering light function15PDA navigation system16Electrohydraulic power steering17Light switch power supply18Mirror heater19S-contact20Alarm21Reversing light, fog lights with the function CORNER22Operating controls for the heating, control unit for air conditioning sys-
tem, parking aid, mobile phone, instrument cluster, steering angle
sender, ESC, vehicle voltage control unit, multifunction steering wheel23Interior lighting, storage compartment and luggage compartment, side
lights24Central control unit25Seat heaters26Rear window wiper27Telephone preinstallation28Petrol engine: AKF valve, Diesel engine: Control flap29Injection, coolant pump30Fuel pump, ignition, Cruise control system, operation of PTC relay31Lambda probe 192Do-it-yourself