2013 SKODA ROOMSTER inflation pressure
[x] Cancel search: inflation pressurePage 29 of 219
Airbag systemFirst read and observe the introductory information and safety warn-ings
on page 20.
If the warning light lights up, there is a fault in the airbag system.
The following message is shown in the MAXI DOT display. Fault: Airbag
The operational capability of the airbag system is monitored electronically, even if one of the airbags is switched off.
If a front, side or head airbag or belt tensioner has been switched off using the vehicle system tester:
› The
warning light comes on for around 4 seconds after the ignition is switch-
ed on and then flashes for approximately another 12 seconds at 2 second inter-
vals.
The following message is shown in the MAXI DOT display.
Airbag/belt tensioner deactivated.
If the front passenger's front airbag was switched off using the key-operated
switch on the side of the dash panel on the passenger side:
› The
warning light comes on for around 4 seconds after the ignition has been
switched on.
› switching off the airbag is indicated in the middle of the dash panel by the light-
ing up of the yellow indicator light in display
» page 137 .
WARNINGIf there is a fault, have the airbag system checked immediately by a specialist
garage. Otherwise, there is a risk of the airbag not being activated in the
event of an accident.
Tyre pressures
First read and observe the introductory information and safety warn-
ings
on page 20.
The warning light
lights up, if there is a substantial drop in inflation pressure in
one of the tyres. Check and adjust the pressure in all tyres.
The warning light coming on indicates a fault in the system.
Seek help from a specialist garage.
Further information » page 175, Tyre pressure monitor .
Note
If the battery has been disconnected, the warning light illuminates after the ig-
nition is switched on. The warning light should go out after driving a short dis-
tance.
Windscreen washer fluid level
First read and observe the introductory information and safety warn-ings
on page 20.
If the windscreen washer fluid level is too low, the warning light
comes on.
The following message is shown in the MAXI DOT display. Top up wash fluid!
Top up with liquid » page 162.
Traction control (TCS) switched off
First read and observe the introductory information and safety warn-ings
on page 20.
The ASR is switched off by pressing the button » page 111 and the warning light
illuminates.
The following message is shown in the MAXI DOT display.
Traction control (ASR) deactivated.
Turn signal system
First read and observe the introductory information and safety warn-ings
on page 20.
Either the left
or right
warning light flashes depending on the position of the
turn signal lever.
26Operation
Page 109 of 219

The graph » Fig. 96 shows the ratio of fuel consumption to the speed of your ve-
hicle. Fuel consumption will be halved if you drive at only three-quarters of the
possible top speed of your vehicle.
Reducing idling
First read and observe the introductory information and safety warn-
ings
on page 104.
Idling also costs fuel.
In vehicles not equipped with the START-STOP system, turn off the engine when
in a traffic jam, at a level crossing or traffic lights with longer wait times.
Even after just 30 - 40 seconds you will have saved more fuel than that is needed
when you start the engine up again.
If an engine is only idling it takes much longer for it to reach its normal operating
temperature. Wear-and-tear and pollutant emissions, though, are particularly
high in the warming-up phase. Therefore, start driving as soon as the engine has
started, In this case high engine speeds should be avoided.
Avoiding short distances
Fig. 97
Principle sketch: Fuel consump-
tion in l/100 km at different tem-
peratures
First read and observe the introductory information and safety warn- ings on page 104.
Short distances result in an above-average high fuel consumption. We therefore recommend avoiding distances of less than 4 km if the engine is cold.
A cold engine consumes the most fuel immediately after the start. Fuel consump-
tion drops to 10 litres/100 km after just 1 kilometre. The consumption stabilises once the engine and catalytic converter have reached their operating tempera-
ture.
An important factor in this connection is also the ambient temperature. The
graph » Fig. 97 shows the different levels of fuel consumption after driving a cer-
tain distance at a temperature of +20 °C and a temperature of -10 °C.
The vehicle has a higher fuel consumption in winter than in summer.
Checking tyre pressure
First read and observe the introductory information and safety warn-
ings
on page 104.
Tyres which are correctly inflated save fuel.
Always ensure the tyre inflation pressure is correct. If the pressure is too low, the
tyres will have to overcome a higher rolling resistance. This will not only increase
fuel consumption but also tyre wear and the driving behaviour will worsen.
Always check the tyre inflation pressure when the tyres are cold.
Avoiding unnecessary ballast
First read and observe the introductory information and safety warn-
ings
on page 104.
Transporting ballast costs fuel.
Each kilogramme of weight increases the fuel consumption. Therefore we recom-
mend to carry no unnecessary weight.
It is particularly in town traffic, when one is accelerating quite often, that the ve-
hicle weight will have a significant effect upon the fuel consumption. A rule of
thumb here is that an increase in weight of 100 kilograms will cause an increase
in fuel consumption of about 1 litre/100 kilometres.
At a speed of 100 - 120 km/h, a vehicle fitted with a roof rack cross member with-out a load will use about 10 % more fuel than normal due to the increased aero- dynamic drag.
106Driving
Page 124 of 219

The distribution of the weight is very poor if your vehicle is unladen and the trail-
er is laden. Maintain a particularly low speed if you cannot avoid driving with this
combination.
Tyre pressure
Correct the tyre inflation pressure on your vehicle for a “full load” » page 173,
Service life of tyres .
Trailer load
The permissible trailer load must not be exceeded under any circumstan- ces » page 199 , Technical data .
The trailer loads specified apply only to altitudes up to 1 000 metres above mean
sea level.
The engine output falls as altitude increases, as does the ability to climb. There-
fore, for every additional 1000 m in height (or part), the maximum permissible
towed weight must be reduced by 10 %.
The towed weight comprises the actual weights of the (loaded) towing vehicleand the (loaded) trailer.
The trailer and drawbar load information on the type plate of the towing equip-
ment are merely test data for the towing equipment. The vehicle-specific values
are detailed in the vehicle documents.WARNING■ Do not exceed the maximum permissible axle and drawbar load and the
maximum permissible total or towed weight of the vehicle and the trailer –
there is the risk of an accident and serious injury.■
Slipping loads can significantly affect the stability and safety of the vehicle/
trailer combination – there is the risk of an accident and serious injury.
Towing a trailer
First read and observe the introductory information and safety warn-
ings
on page 120.
Exterior mirrors
You have to have additional exterior mirrors fitted if you are not able to see the
traffic behind the trailer with the standard rear-view mirrors. The national legal requirements must be observed.
Headlights
The front of the vehicle can be lifted when a trailer is being towed and the head- lights can dazzle other road users.
Adjust the headlight setting on the headlight range control » page 42, Headlight
beam adjustment .
Driving speed
For safety reasons, do not drive faster than 80 km/h when towing a trailer.
Immediately reduce your speed as soon as even the slightest swaying of the trail- er is detected. Never attempt to stop the trailer from “swaying” by accelerating.
Brakes
Apply the brakes in good time! If the trailer is fitted with a trailer brake, apply the
brakes gently at first, then brake firmly. This will avoid brake jolts resulting from
the trailer wheels locking.
On downhill sections shift down a gear in good time to also use the engine as a
brake.
Engine overheating
The speed must be reduced immediately if the needle for the coolant tempera-
ture gauge moves into the right-hand area or the red area of the scale.
Stop and switch off the engine if the warning light
in the instrument cluster
starts to flash. Wait a few minutes and check the level of coolant » page 166,
Checking the coolant level .
The following guidelines must be observed » page 22,
Coolant .
The coolant temperature can be reduced by switching on the heating.WARNING■ Adapt your speed to the conditions of the road surface and to the traffic sit-
uation.■
Improper or incorrectly connected electric cables can energise the trailer and
cause functional faults to the vehicle's entire electrical system as well as acci-
dents and severe injuries.
■
Work on the electrical system must only be carried out by specialist garages.
■
Never directly connect the trailer's electrical system with the electrical con-
nections for the tail lights or other current sources.
121Towing a trailer
Page 126 of 219
Safety
Passive Safety
General information
Introduction
This chapter contains information on the following subjects:
Safety equipment
123
Before setting off
123
What influences the driving safety?
124
In this section you will find important information, tips and notes on the subject
of passive safety in your vehicle.
We have combined everything here which you should be familiar with, for exam- ple, regarding seat belts, airbags, child seats and safety of children.
WARNING■ This chapter contains important information on how to use the vehicle for
the driver and his occupants.■
You can find further information on safety concerning you and those travel-
ling with you in the following chapters of this owner's manual.
■
The complete on-board literature should always be in the vehicle. This ap-
plies in particular, if you rent out or sell the vehicle.
Safety equipment
First read and observe the introductory information and safety warn-ings
on page 123.
The following list contains only part of the safety equipment in your vehicle.
› Three-point seat belts for all the seats.
› Belt force limiters for the front seats.
› Belt tensioners for the front seats.
› Seat belt height adjusters for the front seats.
›
Front airbag for the driver and the front passenger.
› Side airbags.
› Head airbags.
› Anchoring points for child seats using the ISOFIX system.
› Anchoring points for child seats using the TOP TETHER system.
› Head restraints adjustable for height.
› Adjustable steering column.
The specified safety equipment works together, in order to optimally protect you
and those travelling with you in accident situations.
The safety equipment does not protect you or the people travelling with you, if
you or your occupants adopt an incorrect seated position or the equipment is not
correctly adjusted or used.
If the seat belt is not fastened properly, this may result in injuries if an airbag is
activated in the event of an accident.
Before setting off
First read and observe the introductory information and safety warn-
ings
on page 123.
For your own safety and the safety of the people travelling with you, please pay
attention to the following points before setting off.
› Ensure that the lighting and the turn signal system are functioning properly.
› Check the tyre inflation pressure.
› Ensure that all of the windows offer good visibility to the outside.
› Secure all items of luggage
» page 57.
› Ensure that no objects can obstruct the pedals.
› Adjust the mirrors, the front seat and head restraint to your body size.
› Advise your passengers to adjust the head restraints to their body size.
› Protect children in suitable child seats with correctly fastened seat
belts » page 139 , Transporting children safely .
› Adopt the correct seated position
» page 124. Tell your passengers to assume
the correct seated position.
› Correctly fasten the seat belt. Also inform passengers to fasten the seat belt
correctly » page 127 , Using seat belts .
123Passive Safety
Page 175 of 219
Wheels
Tyres and wheel rims
Introduction
This chapter contains information on the following subjects:
Service life of tyres
173
New tyres
174
Unidirectional tyres
175
Tyre pressure monitor
175
Spare wheel
176
Full wheel trim
177
Wheel bolts
177
Hubcaps
177
Wheel bolts
178WARNING■ The national legal regulations must be observed for the use of tyres.■Observe the national legal regulations relating to the use of snow chains
and the maximum vehicle speed with snow chains.WARNINGThe following instructions for the use of tyres must be observed.■For the first 500 km, new tyres do not yet provide optimum grip, and appro-
priate care should therefore be taken when driving – risk of accident!■
Only use radial tyres of the same type, size (rolling circumference) and tread
pattern on all four wheels.
■
For reasons of driving safety, do not replace tyres individually.
■
Never exceed the maximum permissible load bearing capacity for fitted
tyres – risk of accident!
■
Never exceed the maximum permissible speed for fitted tyres – risk of acci-
dent!
WARNING (Continued)■ Incorrect wheel alignment at the front or rear impairs handling – risk of acci-
dent!■
Unusual vibrations or pulling of the vehicle to one side could be a sign of
tyre damage. If there is any doubt that a wheel is damaged, immediately re-
duce your speed and stop! If no external damage is evident, drive slowly and
carefully to the nearest specialist garage to have the vehicle checked.
■
Only use tyres or wheel rims that have been approved by ŠKODA for your
model of vehicle. Failure to observe this instruction may impair the road safety
of your vehicle – risk of accident!
WARNINGObserve the following information regarding tyre damage and wear.■Never use tyres if you do not know anything about the condition and age.■
Never drive with damaged tyres – risk of accident!
■
Immediately replace damaged wheel rims or tyres.
■
You must have your tyres replaced with new ones at the latest when the
wear indicators have been worn down.
■
Worn tyres impair necessary adhesion to the road surface, particularly at
high speeds on wet roads. This could lead to “aquaplaning” (uncontrolled ve- hicle movement – “swimming” on a wet road surface).
WARNINGObserve the following information regarding the tyre inflation pressure.■The tyre control display does not absolve the driver of the responsibility to
ensure the correct tyre inflation pressure. Check the tyre inflation pressure at
regular intervals.■
Insufficient or excessive inflation pressure impairs handling – risk of acci-
dent!
■
If the inflation pressure is too low, the tyre will have to overcome a higher
rolling resistance. This will cause a significant increase in the temperature of
the tyre, especially at higher speeds. This can result in tread separation and a
tyre blowout.
172General Maintenance
Page 176 of 219
WARNINGObserve the following information regarding the wheel bolts.■The wheel bolts must be clean and must turn easily. Never apply grease or
oil.■
The prescribed tightening torque of the wheel bolts for steel and light alloy
wheels is 120 Nm.
■
If the wheel bolts are tightened to an insufficient tightening torque, the
rims may come loose when the car is moving – risk of accident! A tightening
torque which is too high can damage the bolts and threads and this can result
in permanent deformation of the contact surfaces on the rim.
■
If the wheel bolts are handled incorrectly, the wheel may come loose when
the car is moving – risk of accident!
WARNINGObserve the following information regarding the spare wheel.■Only use the spare wheel for as long as is necessary.■
Never drive with more than one spare wheel attached.
■
The snow chains cannot be used on the spare wheel.
CAUTION
■ If a spare wheel is used that is not identical to the fitted tyres, the following
must be observed » page 176, Spare wheel .■
Protect the tyres from contact with oil, grease and fuel.
■
Replace lost valve caps.
■
If, in the event of a puncture, it is necessary to fit a spare wheel with a tyre
without a dedicated running direction or with the opposite direction of rotation, drive carefully as the optimal characteristics of the tyre are no longer applicable in
this situation.
For the sake of the environment
Tyres that are insufficiently inflated increase your fuel consumption.
Note
■ We recommend that any work on the wheels or tyres be carried out by a spe-
cialist garage.■
We recommend that you use wheel rims, tyres, full wheel trims and snow chains
from ŠKODA Original Accessories.
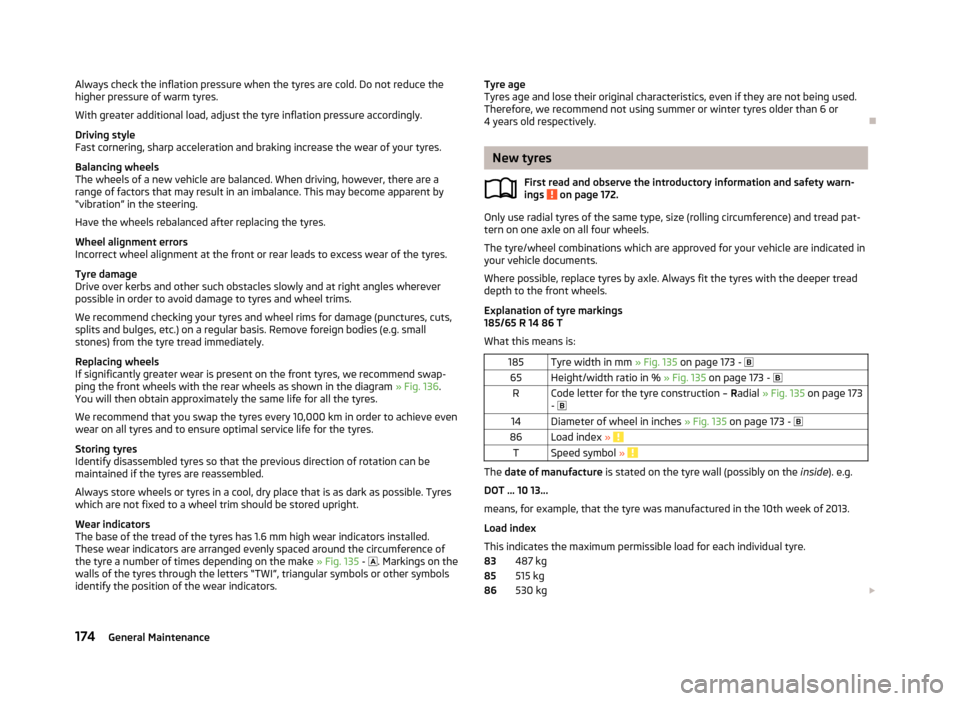
Service life of tyresFig. 135
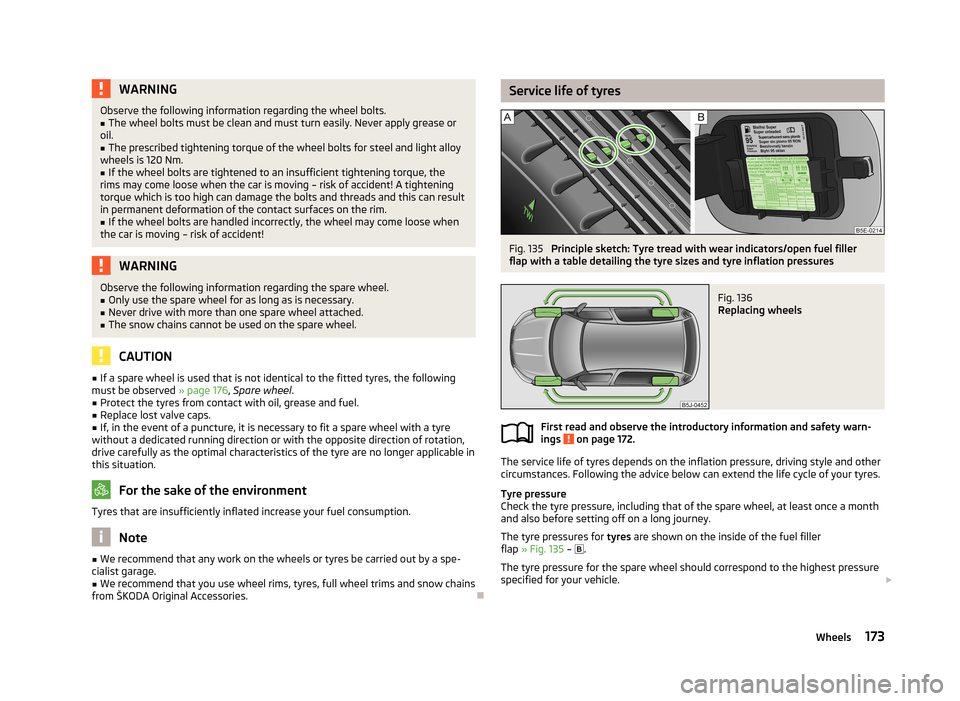
Principle sketch: Tyre tread with wear indicators/open fuel filler
flap with a table detailing the tyre sizes and tyre inflation pressures
Fig. 136
Replacing wheels
First read and observe the introductory information and safety warn-
ings on page 172.
The service life of tyres depends on the inflation pressure, driving style and other
circumstances. Following the advice below can extend the life cycle of your tyres.
Tyre pressure
Check the tyre pressure, including that of the spare wheel, at least once a month and also before setting off on a long journey.
The tyre pressures for tyres are shown on the inside of the fuel filler
flap » Fig. 135 –
.
The tyre pressure for the spare wheel should correspond to the highest pressure
specified for your vehicle.
173Wheels
Page 177 of 219
Always check the inflation pressure when the tyres are cold. Do not reduce the
higher pressure of warm tyres.
With greater additional load, adjust the tyre inflation pressure accordingly.
Driving style
Fast cornering, sharp acceleration and braking increase the wear of your tyres.
Balancing wheels
The wheels of a new vehicle are balanced. When driving, however, there are a
range of factors that may result in an imbalance. This may become apparent by
“vibration” in the steering.
Have the wheels rebalanced after replacing the tyres.
Wheel alignment errors
Incorrect wheel alignment at the front or rear leads to excess wear of the tyres.
Tyre damage
Drive over kerbs and other such obstacles slowly and at right angles wherever
possible in order to avoid damage to tyres and wheel trims.
We recommend checking your tyres and wheel rims for damage (punctures, cuts,
splits and bulges, etc.) on a regular basis. Remove foreign bodies (e.g. small
stones) from the tyre tread immediately.
Replacing wheels
If significantly greater wear is present on the front tyres, we recommend swap-
ping the front wheels with the rear wheels as shown in the diagram » Fig. 136.
You will then obtain approximately the same life for all the tyres.
We recommend that you swap the tyres every 10,000 km in order to achieve evenwear on all tyres and to ensure optimal service life for the tyres.
Storing tyres
Identify disassembled tyres so that the previous direction of rotation can be
maintained if the tyres are reassembled.
Always store wheels or tyres in a cool, dry place that is as dark as possible. Tyres
which are not fixed to a wheel trim should be stored upright.
Wear indicators
The base of the tread of the tyres has 1.6 mm high wear indicators installed.
These wear indicators are arranged evenly spaced around the circumference of the tyre a number of times depending on the make » Fig. 135 -
. Markings on the
walls of the tyres through the letters “TWI”, triangular symbols or other symbols identify the position of the wear indicators.Tyre age
Tyres age and lose their original characteristics, even if they are not being used.
Therefore, we recommend not using summer or winter tyres older than 6 or 4 years old respectively.
New tyres
First read and observe the introductory information and safety warn-
ings
on page 172.
Only use radial tyres of the same type, size (rolling circumference) and tread pat-
tern on one axle on all four wheels.
The tyre/wheel combinations which are approved for your vehicle are indicated in
your vehicle documents.
Where possible, replace tyres by axle. Always fit the tyres with the deeper tread
depth to the front wheels.
Explanation of tyre markings
185/65 R 14 86 T
What this means is:
185Tyre width in mm » Fig. 135 on page 173 - 65Height/width ratio in % » Fig. 135 on page 173 - RCode letter for the tyre construction – Radial » Fig. 135 on page 173
- 14Diameter of wheel in inches » Fig. 135 on page 173 - 86Load index » TSpeed symbol »
The date of manufacture is stated on the tyre wall (possibly on the inside). e.g.
DOT ... 10 13...
means, for example, that the tyre was manufactured in the 10th week of 2013.
Load index
This indicates the maximum permissible load for each individual tyre. 487 kg
515 kg
530 kg
838586174General Maintenance
Page 179 of 219

WARNING■When the warning light illuminates, immediately reduce the speed and
avoid sudden steering and brake manoeuvres. Stop the vehicle as soon as
possible and inspect the tyres and their inflation pressure.■
Under certain circumstances (e.g. a racy style of driving, wintry or unpaved
roads), the warning light may be delayed or does not light up at all.
CAUTION
■
The tyre control display does therefore not replace the regular tyre inflation
pressure control, as the system cannot detect an even loss of pressure.■
The system cannot warn in case of very rapid loss of tyre pressure, e.g. in the
event of a sudden puncture. In this case carefully bring the vehicle to a standstill without sudden steering movements or sharp braking.
■
The basic setting must be repeated every 10,000 km or once a year to ensure
proper functioning of the tyre pressure monitor.
Spare wheel
Fig. 138
Boot: Spare wheel
First read and observe the introductory information and safety warn-
ings on page 172.
The spare wheel is located in a well under the floor covering in the luggage com-
partment and held by a special nut » Fig. 138.
Taking the wheel out
›
Open the tailgate.
›
Lift up the floor in the luggage compartment.
›
Remove the box with the tool kit.
›
Unscrew the nut » Fig. 138 anticlockwise.
›Take out the wheel.
Stowing the wheel›
Stow the replaced wheel in the spare wheel well with the rim facing down.
›
Screw on the nut » Fig. 138 clockwise until the wheel is safely secured.
›
Replace the box with the tool kit into the spare wheel and secure it with the
tape.
›
Fold back the floor in the luggage compartment.
›
Close the boot lid.
Fit a wheel in the appropriate dimensions and design as soon as possible.
If the dimensions or design of the spare wheel differ from the tyres fitted to the
vehicle (e.g. winter tyres or low-profile tyres), it must only be used briefly in the
event of a puncture and if an appropriately cautious style of driving is adop-
ted »
.
Temporary spare wheel
A warning label is displayed on the rim of the temporary spare wheel.
Please note the following if you intend to use the temporary spare wheel. › The warning label must not be covered after installing the wheel.
› Be particularly observant when driving.
› The inflation pressure for the temporary spare wheel is identical to the maxi-
mum inflation pressure for the standard tyres.
› Only use this temporary spare wheel to reach the nearest specialist garage, as it
is not intended for long-term use.
WARNING■ Never use the temporary spare wheel if it is damaged.■If the dimensions or design of the temporary spare wheel differ from the fit-
ted tyres, never drive faster than 80 km/h (or 50 mph).■
Avoid accelerating at full throttle, sharp braking and fast cornering.
CAUTION
Observe the instructions on the warning sticker on the temporary spare wheel.
176General Maintenance