Page 162 of 193

Removing/installing the towing eye›Manually screw the towing eye as far as it will go in the direction of the ar-
row 2
» Fig. 146 » .
For tightening purposes, we recommend, for example, using the wheel
wrench, towing eye from another vehicle or a similar object that can be pushed through the eye.
›
Unscrew the towing eye against the direction of the arrow
2
.
WARNINGThe towing eye must always be screwed in fully and firmly tightened, oth-
erwise the towing eye can tear when towing or tow-starting.
Rear towing eye
Fig. 147
Rear towing eye
Read and observe and on page 159 first.
The rear towing eye is located below the bumper on the right.
Remove the protective cap before using the towing eye. » Fig. 147. Replace the
protective cap after using the towing eye.
Vehicles with a tow hitch
Read and observe
and on page 159 first.
For vehicles with a factory-fitted towing device, the pre-installed detachable
tow-bar may be used » page 112, Hitch .
Towing the vehicle using the towing device is a viable alternative solution to using the towing eye.
CAUTIONThe detachable ball rod and/or the vehicle can be damaged if an unsuitable
tow bar is used.
Note
The detachable ball rod must always be in the vehicle so that it can be used for
towing, if necessary.
Remote control
Introduction
This chapter contains information on the following subjects:
Replacing the battery in the remote control key
161
Synchronising the remote control
161
CAUTION
■ The replacement battery must have the same specification as the original
battery.■
We recommend having faulty rechargeable batteries replaced by a ŠKODA
service partner.
■
Pay attention to the correct polarity when changing the battery.
For the sake of the environment
Dispose of the used battery in accordance with national legal provisions.160Do-it-yourself
Page 163 of 193

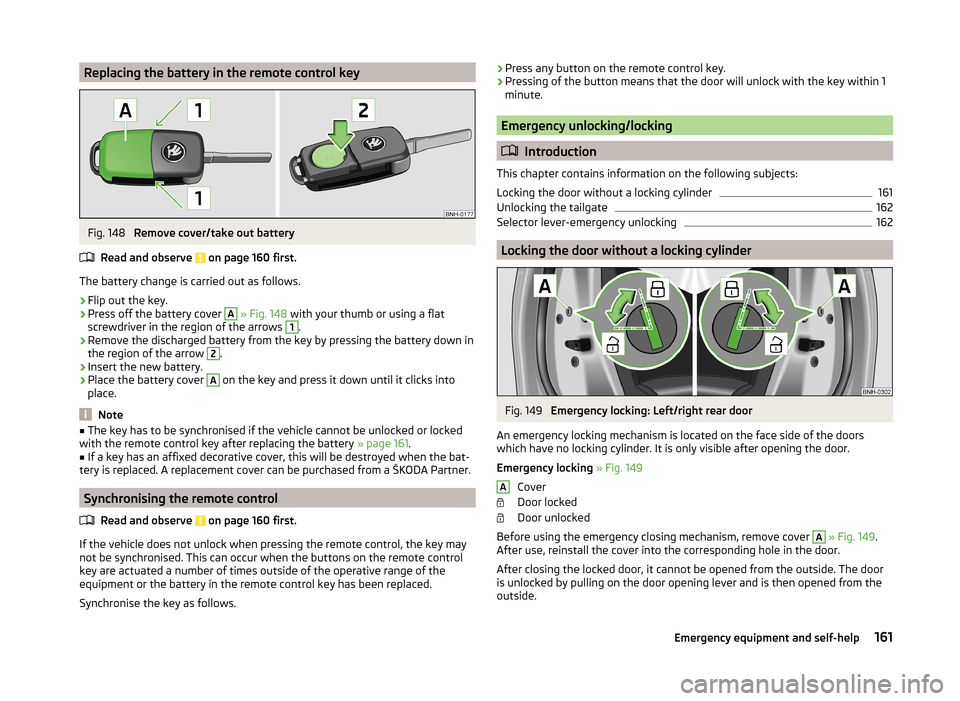
Replacing the battery in the remote control keyFig. 148
Remove cover/take out battery
Read and observe
on page 160 first.
The battery change is carried out as follows.
›
Flip out the key.
›
Press off the battery cover
A
» Fig. 148 with your thumb or using a flat
screwdriver in the region of the arrows
1
.
›
Remove the discharged battery from the key by pressing the battery down in
the region of the arrow
2
.
›
Insert the new battery.
›
Place the battery cover
A
on the key and press it down until it clicks into
place.
Note
■ The key has to be synchronised if the vehicle cannot be unlocked or locked
with the remote control key after replacing the battery » page 161.■
If a key has an affixed decorative cover, this will be destroyed when the bat-
tery is replaced. A replacement cover can be purchased from a ŠKODA Partner.
Synchronising the remote control
Read and observe
on page 160 first.
If the vehicle does not unlock when pressing the remote control, the key may
not be synchronised. This can occur when the buttons on the remote control
key are actuated a number of times outside of the operative range of the
equipment or the battery in the remote control key has been replaced.
Synchronise the key as follows.
› Press any button on the remote control key.›Pressing of the button means that the door will unlock with the key within 1
minute.
Emergency unlocking/locking
Introduction
This chapter contains information on the following subjects:
Locking the door without a locking cylinder
161
Unlocking the tailgate
162
Selector lever-emergency unlocking
162
Locking the door without a locking cylinder
Fig. 149
Emergency locking: Left/right rear door
An emergency locking mechanism is located on the face side of the doors
which have no locking cylinder. It is only visible after opening the door.
Emergency locking » Fig. 149
Cover
Door locked
Door unlocked
Before using the emergency closing mechanism, remove cover
A
» Fig. 149 .
After use, reinstall the cover into the corresponding hole in the door.
After closing the locked door, it cannot be opened from the outside. The door
is unlocked by pulling on the door opening lever and is then opened from the
outside.
A161Emergency equipment and self-help
Page 187 of 193

Manual gear changingrefer to gear changing101
MAXI DOT See MAXI DOT display
42
MAXI DOT display42
Main menu42
Operation37
Settings42
Maximum permissible weights
172
Maximum speed176
MDI96
MFD See multifunction display
39
Mirror Exterior mirror
63
Make-up60
Mobile phone89
Connecting to the hands-free system91
Modifications119
Modifications and technical alterations Airbags
121
Service120
Spoiler121
Multifunction display Functions
39
Information40
Memory39
Operation37
Multimedia94
Multimedia holder72
N
N1
79
Nameplate172
Nets76
O
Oil Information messages
31
See Engine oil135
Oil pressure Information messages
31
On-board computer See multifunction display
39
Operating weight172
Operation in winter Diesel fuel
131
Vehicle battery140
Original accessories120
Outside temperature40
Overview Engine compartment
133
Indicator lights30
P
Parking
100
Parking aid107
Parking aid107
Function108
Parking light53
Parking space100
Park the vehicle Parking
100
Passive safety Before setting off
6
Driving safety6
Safety equipment6
Passive Safety6
Payload172
Pedals101
Footmats101
Petrol see fuel
130
Plastic parts124
Pockets on the front seat rests74
Polishing vehicle paint work see vehicle care
123
Power outlet 12 V
71
Power steering Warning light
32
Practical equipment Net pockets on the front seat rests
74
Reflective vest149
Practical features 12-Volt power outlet
71
Storage pockets on the front seats74
Waste container72
R
Radiator fan
133
Raise vehicle153
Rear fog light56
Warning light33
Rear interior light59
Rear mirror62
Exterior mirror63
Interior mirror62
Refuelling129
Fuel129
Remote control Locking
46
Replacing the battery161
Synchronisation process161
Unlocking46
Remote control key Replacing the battery
161
Repairs and technical alterations119
Replacement parts119
Replacing Bulb for main beam, daytime running lights andparking light
168
Bulb for the fog light168
185Index