2013 SKODA OCTAVIA light
[x] Cancel search: lightPage 7 of 57

Equipment overview
Introduction
This chapter contains information on the following subjects:
Description of the device
5
Touch screen
5
Switching the unit on/off
6
Device menus
6
Adjusting volume
6
First and foremost, pay attention to the safety instructions » page 4 , Important
notes .
Description of the device
Fig. 1
Description of the device
First read and observe the introductory information given on page 5.
Description of the device
- Switch unit on/off, adjust volume
Operation and confirmation RADIO
- Radio menu » page 21
MEDIA - Media menu » page 26
Depending on equipment fitted:
› MUTE
- Mute
› PHONE - Phone menu
» page 34
Depending on equipment fitted: › TP
- Traffic news
» page 23
› VOICE - Voice control
» page 13
SETUP - Unit settings » page 17
SOUND - Sound settings » page 18
CAR - Settings of the vehicle system » page 44
MENU - Displays the unit menus » page 6
Touch screen » page 8
Touch screen
First read and observe the introductory information given on page 5.
The unit is equipped with a so-called touch screen which can only be operated bythe touch of a finger.
CAUTION
■ The screen can be operated by a slight touch of a finger. Do not apply pressure
to the screen - risk of damage!■
Do not use any objects to operate the screen - risk of damage!
■
Do not use solvents such as benzene or turpentine for cleaning, since they may
damage the screen surface.
12345678910115Introductory information
Page 8 of 57

Note■Use a soft cloth and, if necessary, methylated spirits, to remove fingerprints
from the screen. When doing so, ensure that you do not cause damage to other parts of the interior.■
It is not possible to operate the screen with your fingernails or while wearing
gloves.
■
Do not affix anything to the area of the unit below the screen. This could affect
the functioning of the sensors for the zoom effect.
■
To protect the screen, you can use a suitable screen protector for touchpads
that does not affect its functionality.
■
The brightness of the screen is adjusted automatically depending on the bright-
ness of the interior lighting. The automatic setting can be adjusted manual-
ly » page 18 .
Switching the unit on/off
First read and observe the introductory information given on page 5.
›
Press the knob to switch the device on or off.
When the device is switched on, the audio source and operating mode that were active before switching off the device will be restored.
If telephone mode was active before you switched off the unit and the ignitionand Bluetooth ®
function is not switched on, the screen displays the mes-
sage » page 35 . Switch on the ignition or the Bluetooth ®
function » page 20 .
If the vehicle key is pulled out of the ignition lock while the unit is switched on,
the unit will switch off automatically. After switching on the ignition, the unit is
turned on automatically.
If the device was switched off using the knob
, then the device will not switch
on automatically after switching on the ignition.
If your vehicle is fitted with the KESSY system, the device will switch off automat-
ically after the engine has been turned off and the door opened. If you open the driver's door before switching off the engine, the device will also switch off.
When the ignition is switched off, the device switches off automatically after ap-
prox. half an hour (discharge protection of the vehicle battery).
Device menusFig. 2
Unit menus
First read and observe the introductory information given on page 5.
Call up the main menu
›
Press the button MENU.
Function keys in the main MENU - Radio » page 21
- Media » page 26
- Sound settings » page 18
- Unit settings » page 17
- Vehicle systems settings » page 44
- Phone menu » page 34
Adjusting volume
First read and observe the introductory information given on page 5.
Increase the volume
›
Turn the knob to the right.
Reduce the volume
›
Turn the knob to the left.
Muting
›
Press the MUTE button or rotate the
knob and adjust the audio volume to 0.
6Introductory information
Page 10 of 57
Device operation
operate via the device screen
Introduction
This chapter contains information on the following subjects:
Operation
8
Input screen with keyboard
9
Input screen with numeric keyboard
9
First and foremost, pay attention to the safety instructions » page 4 , Important
notes .
This chapter covers the instrument operation and the work with the touch screen and with various types of input keyboards.
Operation
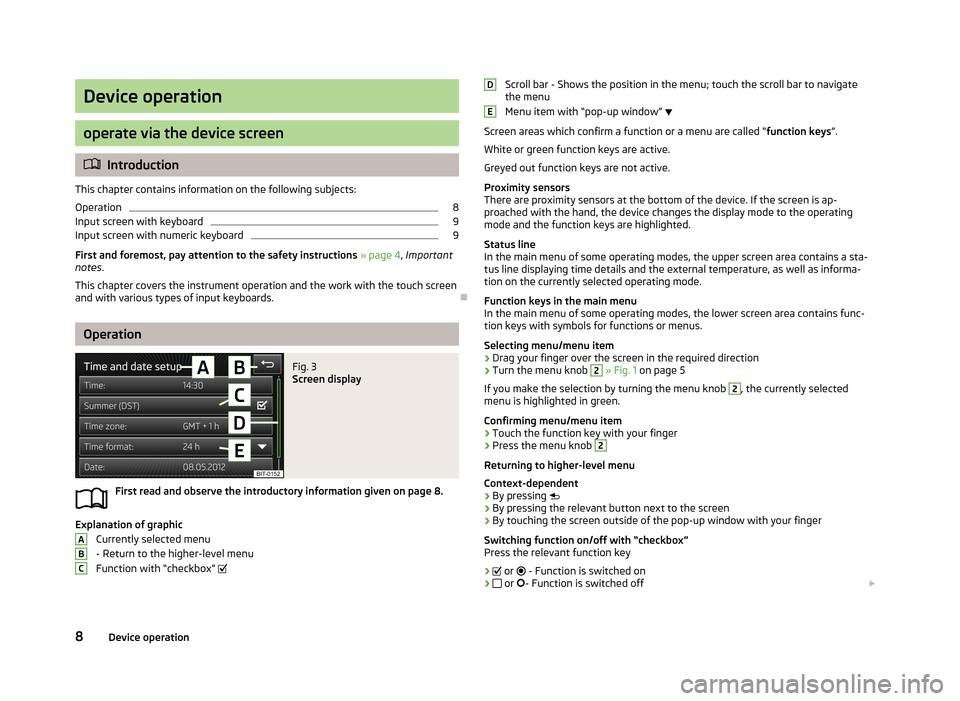
Fig. 3
Screen display
First read and observe the introductory information given on page 8.
Explanation of graphic
Currently selected menu
- Return to the higher-level menu
Function with “checkbox”
ABCScroll bar - Shows the position in the menu; touch the scroll bar to navigate
the menu
Menu item with “pop-up window”
Screen areas which confirm a function or a menu are called “ function keys”.
White or green function keys are active.
Greyed out function keys are not active.
Proximity sensors
There are proximity sensors at the bottom of the device. If the screen is ap- proached with the hand, the device changes the display mode to the operating
mode and the function keys are highlighted.
Status line
In the main menu of some operating modes, the upper screen area contains a sta-
tus line displaying time details and the external temperature, as well as informa- tion on the currently selected operating mode.
Function keys in the main menu
In the main menu of some operating modes, the lower screen area contains func-
tion keys with symbols for functions or menus.
Selecting menu/menu item
› Drag your finger over the screen in the required direction
› Turn the menu knob 2
» Fig. 1 on page 5
If you make the selection by turning the menu knob
2
, the currently selected
menu is highlighted in green.
Confirming menu/menu item
› Touch the function key with your finger
› Press the menu knob
2
Returning to higher-level menu
Context-dependent
› By pressing
› By pressing the relevant button next to the screen
› By touching the screen outside of the pop-up window with your finger
Switching function on/off with “checkbox” Press the relevant function key
›
or
- Function is switched on
›
or
- Function is switched off
DE8Device operation
Page 12 of 57
Operation via the Maxi DOT display
Introduction
This chapter contains information on the following subjects:
Operate using the buttons on the operating lever
10
operation via the buttons / dials on the multifunction steering wheel -
Audio
11
operation via the buttons / dials on the multifunction steering wheel - Telephone
12
First and foremost, pay attention to the safety instructions » page 4 , Important
notes .
Some of the device's features are also displayed in the MAXI DOT display 1)
. De-
pending on the equipment, these features can be operated as follows.
■ With the buttons on the operating lever » page 10
■ With the buttons and wheels on the multifunction steering wheel » page 11
Note
If the ignition and the side light are switched on, the buttons and dials on the
multifunction steering wheel will also be illuminated.
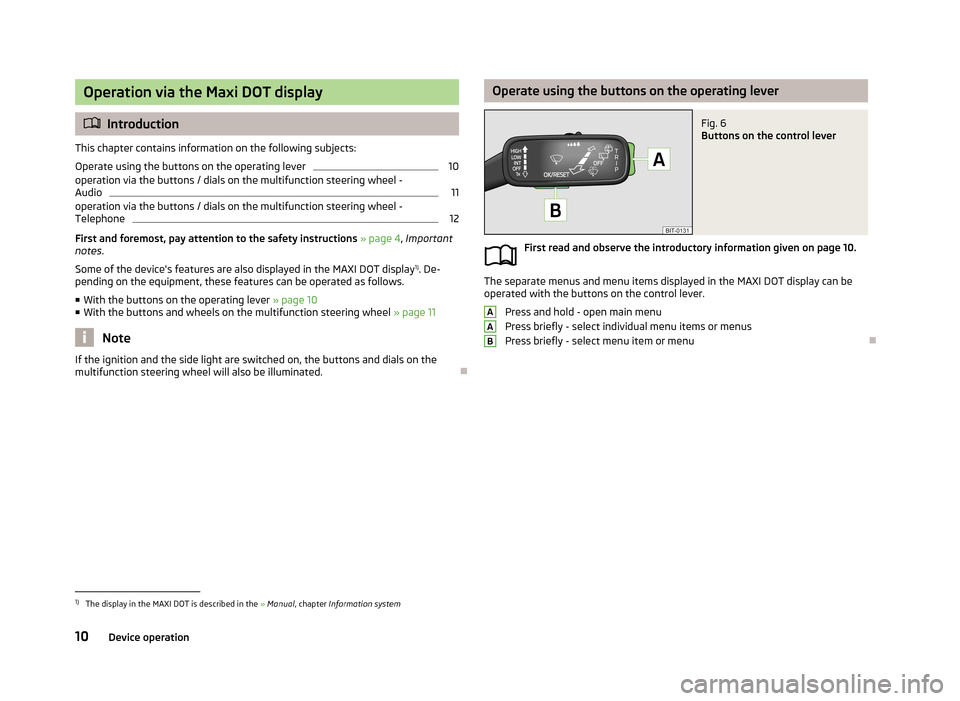
Operate using the buttons on the operating leverFig. 6
Buttons on the control lever
First read and observe the introductory information given on page 10.
The separate menus and menu items displayed in the MAXI DOT display can be
operated with the buttons on the control lever.
Press and hold - open main menu
Press briefly - select individual menu items or menus
Press briefly - select menu item or menu
AAB1)
The display in the MAXI DOT is described in the » Manual , chapter Information system
10Device operation
Page 17 of 57
›Press a button on the unit (with the exception of brief pressing of the button
VOICE).
› Utter the voice command
Cancel voice control.
Help for voice control
First read and observe the introductory information and safety warn-ings
on page 13.
Start introduction
When you give the voice command Start tutorial, the unit plays one of the seven
parts of the voice control tutorial.
Individual parts of the introduction can be called separately by issuing the voice command introduction part ... and the number 1 through 7.
Help
When you give the voice command Help, the unit displays a menu containing pos-
sible context dependent voice commands. In some cases issuing the voice com-
mand help again will cause another section of the help to be shown with further
possible voice commands in a menu.
The help does not contain all possible commands.
Operation
First read and observe the introductory information and safety warn-
ings
on page 13.
The voice control system can usually be operated through the method “ say what
you see. ”
Speak the descriptions of the function keys highlighted in green. For example, the
function key No. select call can be accessed through the voice command “ call
number. ”
Voice control settings » page 20.
Icons in the voice control menu a voice output is played
a voice command is awaited
a voice command entry is stopped » page 15
a voice command is recognized
As long as the system is playing a voice output, it is not necessary to await the end of the message playback. The message can be ended by briefly pressing the VOICE
button or the button on the multifunction steering wheel. In this way
the voice output is aborted and a new voice command is expected.
not recognizing a voice command
First read and observe the introductory information and safety warn-
ings
on page 13.
If a voice command is not recognised, the system answers with Pardon? and you
can give a new command.
If the system does not recognise the second voice command, the help message is provided again and you can give a new command.
If the system does not recognise the third voice command, the system plays theVoice control cancelled message and the dialogue is ended.
override a voice command input
First read and observe the introductory information and safety warn-
ings
on page 13.
A voice command can be corrected, modified or re-entered by briefly pressing the VOICE button on the unit or the symbol
on the multifunction steering wheel.
However, this is only possible if the icon
appears.
You do not have to wait until the voice command is recognized by the system.
stop/restore voice command input
First read and observe the introductory information and safety warn-
ings
on page 13.
In some menus, the procedure for entering voice commands can be stopped by
turning the knob
2
» Fig. 1 on page 5 .
The symbol displayed on the unit screen or in the information display then
changes from
to
.
15Device operation
Page 46 of 57
Vehicle systems
Vehicle settings
Introduction
This chapter contains information on the following subjects:
Selecting driving mode
44
Vehicle data
45
Auxiliary heater and ventilation
46
ESC system
47
Tyre
47
Driver assistance
47
Parking and manoeuvring
47
Light
48
mirrors and wiper
48
Opening and closing
49
Seats
49
Multifunction display
49
Service
49
Restore factory settings
50
Climatronic settings
50
First and foremost, pay attention to the safety instructions » page 4 , Important
notes .
Settings relating to the vehicle systems can only be made when the ignition is
switched on.
Note
■ The individual systems are described in the » Vehicle Owner's Manual .■For safety reasons, if any system functions are disabled, then some functions,
such as parts of the ESC system, are automatically enabled again after switching
the ignition off and on.■
When you press the button CAR, the system displays the last displayed menu
.
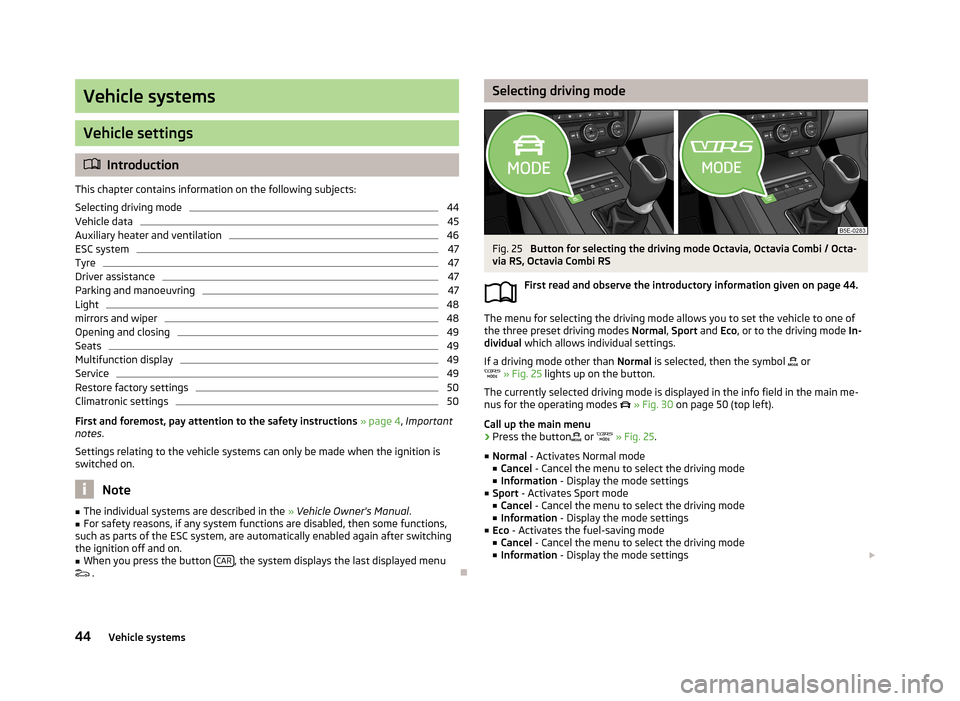
Selecting driving modeFig. 25
Button for selecting the driving mode Octavia, Octavia Combi / Octa-
via RS, Octavia Combi RS
First read and observe the introductory information given on page 44.
The menu for selecting the driving mode allows you to set the vehicle to one of
the three preset driving modes Normal, Sport and Eco, or to the driving mode In-
dividual which allows individual settings.
If a driving mode other than Normal is selected, then the symbol
or
» Fig. 25 lights up on the button.
The currently selected driving mode is displayed in the info field in the main me- nus for the operating modes
» Fig. 30 on page 50 (top left).
Call up the main menu
›
Press the button
or
» Fig. 25 .
■ Normal - Activates Normal mode
■ Cancel - Cancel the menu to select the driving mode
■ Information - Display the mode settings
■ Sport - Activates Sport mode
■ Cancel - Cancel the menu to select the driving mode
■ Information - Display the mode settings
■ Eco - Activates the fuel-saving mode
■ Cancel - Cancel the menu to select the driving mode
■ Information - Display the mode settings
44Vehicle systems
Page 47 of 57
■Individual - Activates the Individual mode
■ Cancel - Cancel the menu to select the driving mode
■ Setup - Individual setting
■ Steering: - Set the power steering characteristics
■ Normal - Normal
■ Sport - Sports
■ Engine: - Set the engine (drive) characteristics
■ Normal - Normal
■ Sport - Sports
■ Eco - Economical
■ ACC: - Set the vehicle acceleration when adaptive cruise control is activated
■ Normal - Normal
■ Sport - Sports
■ Eco - Economical
■ Dynamic bend light.: - Set the characteristics of the adaptive headlights
■ Normal - Normal
■ Sport - Sports
■ Eco - Economical
■ Air conditioning: - Sets the Climatronic characteristics
■ Normal - Normal
■ Eco - Economical
■ Reset mode - Sets the profile Normal
Note
If you do not operate the unit for longer than approx. 10 seconds in the "Select
driving mode" menu, it will switch to the last selected menu or switch itself off.
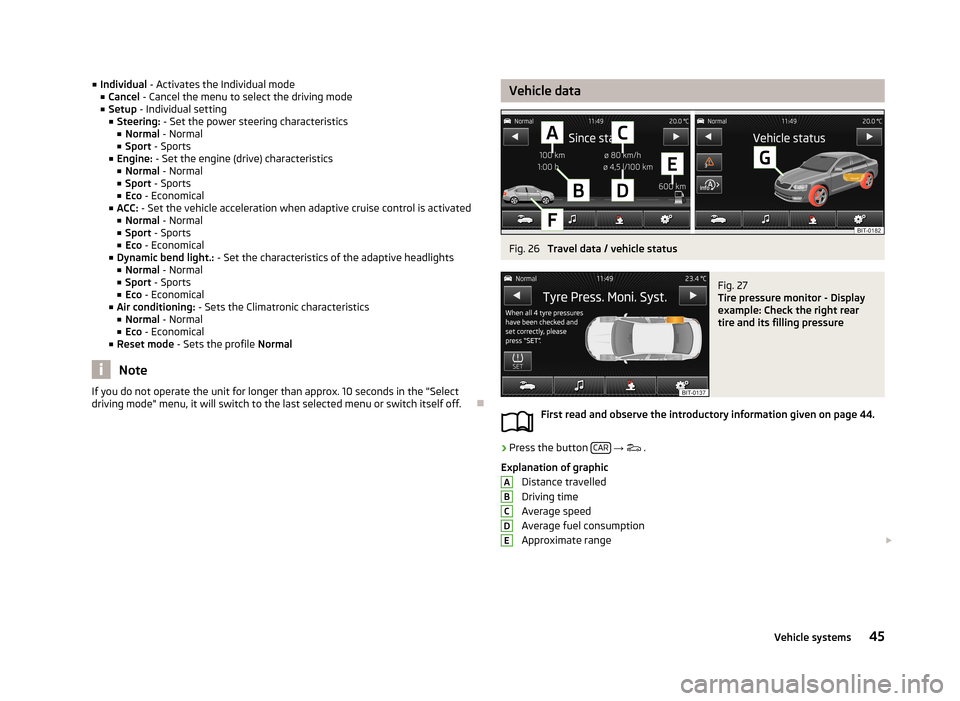
Vehicle dataFig. 26
Travel data / vehicle status
Fig. 27
Tire pressure monitor - Display
example: Check the right rear
tire and its filling pressure
First read and observe the introductory information given on page 44.
›
Press the button CAR
→
.
Explanation of graphic Distance travelled
Driving time
Average speed
Average fuel consumption
Approximate range
ABCDE45Vehicle systems
Page 48 of 57

Range (if the estimated range is less than 300 km, the vehicle starts to ap-
proach the symbol: )
Vehicle representation (the zones of the vehicle are shown in different col- ours, corresponding to any warning messages that occur. The warning mes-
sages are displayed once you touch vehicle)
■ Driving data - Display travel data » Fig. 26
You can display one of three trip memories on the screen:
■ Since start - Driving data for the individual trip
■ Long-term - Long-term driving data
■ Since refuelling - Data since last refuelling
Change between the individual travel data storage locations with
/
.
■ Convenience consumers - Displays up to three devices which use the largest
share of fuel and displays the fuel consumption required to run all conv. con- sumers » Vehicle Owner's Manual , chapter Commercial driving and environmen-
tal compatibility
■ Vehicle status - Displays vehicle status » Fig. 26 or tyre pressure monitoring in-
formation
■ Vehicle status - Displays vehicle status information
■ /
- No message/warning messages relating to vehicle status or number
of messages (if there is only one message, one warning message text is dis-
played)
■ - Display information about the status of the START-STOP system
■ TPMS - function of the tire pressure monitor » Fig. 27
■ SET - Start a new calibration process
Switch between the individual menus with
/
.
Note
For more information on the warning messages concerning the vehicle status and
information on the START-STOP system, see the » Vehicle Owner's Manual .FGAuxiliary heater and ventilationFig. 28
Auxiliary heater: Main menu/set preset time
First read and observe the introductory information given on page 44.
Press the button CAR/SETUP on the Climatronic unit
→
.
Set-up Departure time: Day and time when the vehicle is to be ready foruse » Fig. 28
Heating/ventilation: Set the operating mode Select the preset time, switch off the preset time
Set the preset times 1 to 3 and the duration (10 - 60 minutes)
When the heating or ventilation is running, the windows are highlighted in red or blue
Note
■ Only one preset time can be active. The activated preset time will be deactiva-
ted again after it has started automatically. For the next start, activate one of the preset times.■
In the selection of the day in the preset time, there is an option between Sun-
day and Monday without the specified day. If this setting is made, the vehicle will
be ready for use at the selected time, regardless of the current day.
■
The system in operation switches off on expiration of the operating duration or
can be deactivated by pressing the direct on/off icon or by using the radio re-
mote control.
■
If a different time is set » page 19, time and date settings , the activated preset
time is automatically deactivated. The preset time must be reactivated.
ABCDE46Vehicle systems