2013 SKODA OCTAVIA display
[x] Cancel search: displayPage 4 of 57

Table of Contents
Abbreviations
Introductory information
Important notes
4
Equipment overview
5
Device operation
operate via the device screen
8
Operation via the Maxi DOT display
10
voice control
13
device settings
setup menu
17
Radio
Operation
21
Radio settings
24
Media
Operation
26
Signal source
28
Communication
Telephones and two-way radio systems
34
Connect the device with the mobile phone
37
Telephone functions
40Vehicle systems
Vehicle settings44
Index
2Table of Contents
Page 6 of 57

Introductory information
Important notes
Introduction
This chapter contains information on the following subjects:
Declaration of conformity
4
Component protection
4
These operating instructions describe all possible equipment variants without
identifying them as special equipment, model variants or market-dependent
equipment.
Consequently, this vehicle does not need to contain all of the equipment compo-
nents described in these operating instructions.
The level of equipment of your vehicle refers to your purchase contract of the ve-
hicle. More information is available from the ŠKODA 1)
Partner where you bought
the vehicle.
Please note that these instructions are meant only as an addendum to the infor- mation presented in the Owner's Manual of your vehicle. Therefore, they can be used only in conjunction with the latest manual for this vehicle. For a detailed de-
scription of some functions listed in these instructions, see the Vehicle Manual
for your vehicle.
The illustrations can differ in minor details from your device; they are only inten-
ded for general information.
WARNING■ Concentrate fully at all times on your driving! As the driver you are fully re-
sponsible for the operation of your vehicle.■
Only use the device in a way that you are in full control of your vehicle in ev-
ery traffic situation – there is the risk of accidents!
WARNING (Continued)■ Adjust the volume to ensure that acoustic signals from outside, e.g. sirens
from vehicles which have the right of way, such as police, ambulance and fire
brigade vehicles, can be heard at all time.■
High volumes can cause hearing damage.
Declaration of conformity
First read and observe the introductory information and safety warn-
ings
on page 4.
ŠKODA AUTO a.s. hereby declares that the ŠKODA Infotainment systems meet the
basic requirements and additional provisions of Directive 1999/5/EC.
Component protection First read and observe the introductory information and safety warn-
ings
on page 4.
Some electronic control units are factory-equipped with component protection.
The component protection was developed as a protection mechanism for:
› impairment of factory- or garage-fitted control units after installation in another
vehicle (for example, after a theft);
› impairment of components operated outside of the vehicle;
› the possibility of a legitimate installation or change of control units for repairs
at a ŠKODA 1)
specialist garage.
When component protection is enabled, the following message appears on the display of the device Component theft protection: the infotainment system is
not fully available at present. Please switch on the ignition.
If the component protection does not activate by switching on the ignition,
please contact a ŠKODA specialist garage.
1)
Terms used » manual , chapter Preface.
4Introductory information
Page 7 of 57

Equipment overview
Introduction
This chapter contains information on the following subjects:
Description of the device
5
Touch screen
5
Switching the unit on/off
6
Device menus
6
Adjusting volume
6
First and foremost, pay attention to the safety instructions » page 4 , Important
notes .
Description of the device
Fig. 1
Description of the device
First read and observe the introductory information given on page 5.
Description of the device
- Switch unit on/off, adjust volume
Operation and confirmation RADIO
- Radio menu » page 21
MEDIA - Media menu » page 26
Depending on equipment fitted:
› MUTE
- Mute
› PHONE - Phone menu
» page 34
Depending on equipment fitted: › TP
- Traffic news
» page 23
› VOICE - Voice control
» page 13
SETUP - Unit settings » page 17
SOUND - Sound settings » page 18
CAR - Settings of the vehicle system » page 44
MENU - Displays the unit menus » page 6
Touch screen » page 8
Touch screen
First read and observe the introductory information given on page 5.
The unit is equipped with a so-called touch screen which can only be operated bythe touch of a finger.
CAUTION
■ The screen can be operated by a slight touch of a finger. Do not apply pressure
to the screen - risk of damage!■
Do not use any objects to operate the screen - risk of damage!
■
Do not use solvents such as benzene or turpentine for cleaning, since they may
damage the screen surface.
12345678910115Introductory information
Page 8 of 57

Note■Use a soft cloth and, if necessary, methylated spirits, to remove fingerprints
from the screen. When doing so, ensure that you do not cause damage to other parts of the interior.■
It is not possible to operate the screen with your fingernails or while wearing
gloves.
■
Do not affix anything to the area of the unit below the screen. This could affect
the functioning of the sensors for the zoom effect.
■
To protect the screen, you can use a suitable screen protector for touchpads
that does not affect its functionality.
■
The brightness of the screen is adjusted automatically depending on the bright-
ness of the interior lighting. The automatic setting can be adjusted manual-
ly » page 18 .
Switching the unit on/off
First read and observe the introductory information given on page 5.
›
Press the knob to switch the device on or off.
When the device is switched on, the audio source and operating mode that were active before switching off the device will be restored.
If telephone mode was active before you switched off the unit and the ignitionand Bluetooth ®
function is not switched on, the screen displays the mes-
sage » page 35 . Switch on the ignition or the Bluetooth ®
function » page 20 .
If the vehicle key is pulled out of the ignition lock while the unit is switched on,
the unit will switch off automatically. After switching on the ignition, the unit is
turned on automatically.
If the device was switched off using the knob
, then the device will not switch
on automatically after switching on the ignition.
If your vehicle is fitted with the KESSY system, the device will switch off automat-
ically after the engine has been turned off and the door opened. If you open the driver's door before switching off the engine, the device will also switch off.
When the ignition is switched off, the device switches off automatically after ap-
prox. half an hour (discharge protection of the vehicle battery).
Device menusFig. 2
Unit menus
First read and observe the introductory information given on page 5.
Call up the main menu
›
Press the button MENU.
Function keys in the main MENU - Radio » page 21
- Media » page 26
- Sound settings » page 18
- Unit settings » page 17
- Vehicle systems settings » page 44
- Phone menu » page 34
Adjusting volume
First read and observe the introductory information given on page 5.
Increase the volume
›
Turn the knob to the right.
Reduce the volume
›
Turn the knob to the left.
Muting
›
Press the MUTE button or rotate the
knob and adjust the audio volume to 0.
6Introductory information
Page 9 of 57
Note■The change in volume is displayed on the screen of the unit.■The following symbol appears in the display when the sound is muted .■
Excessively high volumes can cause sound resonance in the vehicle.
■
The car speakers may be damaged if the volume is set too loud or is distorted.
■
The loudspeakers in the vehicle are designed for a power output of the device
of 4x20 W.
■
When equipped with a sound system the speakers are matched for a total am-
plifier power output of 570 W.
7Introductory information
Page 10 of 57
Device operation
operate via the device screen
Introduction
This chapter contains information on the following subjects:
Operation
8
Input screen with keyboard
9
Input screen with numeric keyboard
9
First and foremost, pay attention to the safety instructions » page 4 , Important
notes .
This chapter covers the instrument operation and the work with the touch screen and with various types of input keyboards.
Operation
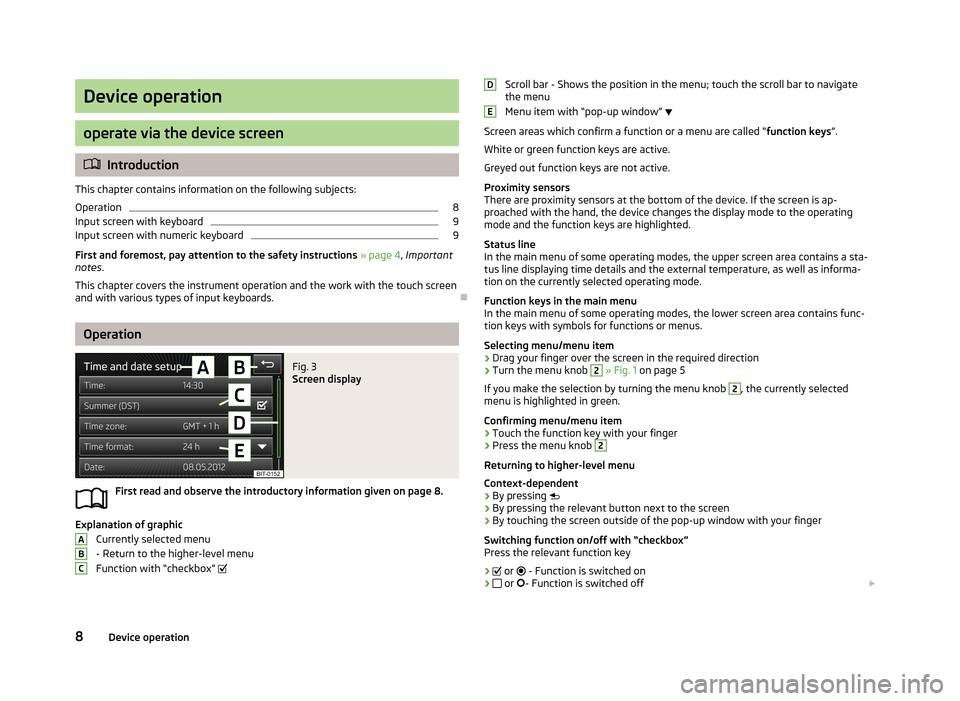
Fig. 3
Screen display
First read and observe the introductory information given on page 8.
Explanation of graphic
Currently selected menu
- Return to the higher-level menu
Function with “checkbox”
ABCScroll bar - Shows the position in the menu; touch the scroll bar to navigate
the menu
Menu item with “pop-up window”
Screen areas which confirm a function or a menu are called “ function keys”.
White or green function keys are active.
Greyed out function keys are not active.
Proximity sensors
There are proximity sensors at the bottom of the device. If the screen is ap- proached with the hand, the device changes the display mode to the operating
mode and the function keys are highlighted.
Status line
In the main menu of some operating modes, the upper screen area contains a sta-
tus line displaying time details and the external temperature, as well as informa- tion on the currently selected operating mode.
Function keys in the main menu
In the main menu of some operating modes, the lower screen area contains func-
tion keys with symbols for functions or menus.
Selecting menu/menu item
› Drag your finger over the screen in the required direction
› Turn the menu knob 2
» Fig. 1 on page 5
If you make the selection by turning the menu knob
2
, the currently selected
menu is highlighted in green.
Confirming menu/menu item
› Touch the function key with your finger
› Press the menu knob
2
Returning to higher-level menu
Context-dependent
› By pressing
› By pressing the relevant button next to the screen
› By touching the screen outside of the pop-up window with your finger
Switching function on/off with “checkbox” Press the relevant function key
›
or
- Function is switched on
›
or
- Function is switched off
DE8Device operation
Page 11 of 57
Set value› by touching the function keys with the symbols
/ , / , - / +
› Touch or move your finger over the scale
Note
For some menus or menu items, the current setting is displayed, e.g.
Distance: km
or Distance: mi
Input screen with keyboard
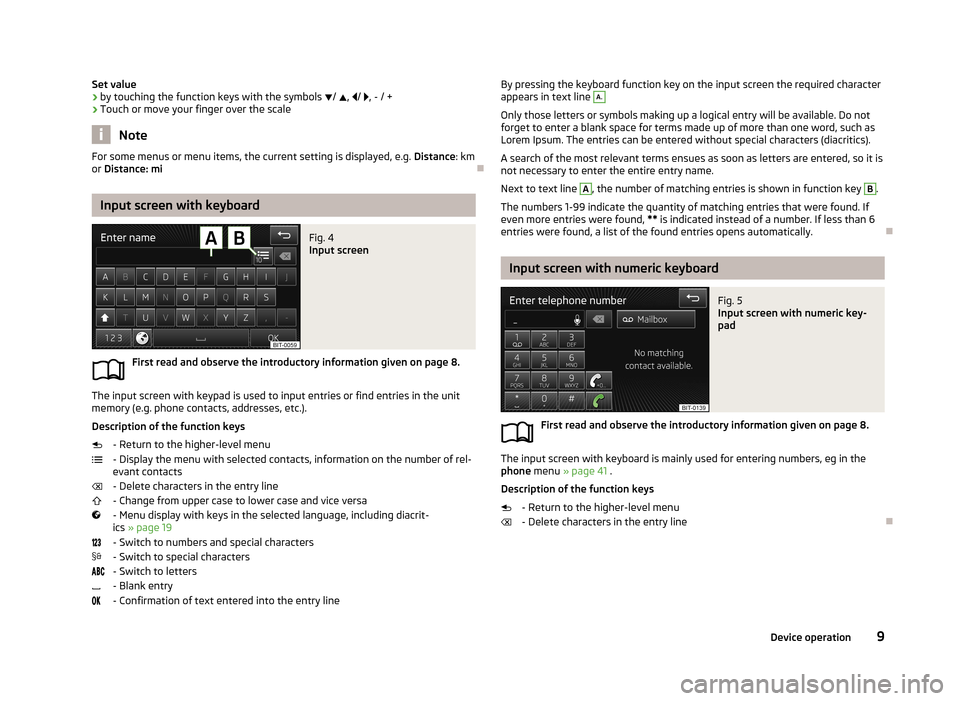
Fig. 4
Input screen
First read and observe the introductory information given on page 8.
The input screen with keypad is used to input entries or find entries in the unit
memory (e.g. phone contacts, addresses, etc.).
Description of the function keys - Return to the higher-level menu
- Display the menu with selected contacts, information on the number of rel-
evant contacts
- Delete characters in the entry line
- Change from upper case to lower case and vice versa
- Menu display with keys in the selected language, including diacrit- ics » page 19
- Switch to numbers and special characters - Switch to special characters
- Switch to letters
- Blank entry
- Confirmation of text entered into the entry line
By pressing the keyboard function key on the input screen the required character
appears in text line A.
Only those letters or symbols making up a logical entry will be available. Do not
forget to enter a blank space for terms made up of more than one word, such as
Lorem Ipsum. The entries can be entered without special characters (diacritics).
A search of the most relevant terms ensues as soon as letters are entered, so it is
not necessary to enter the entire entry name.
Next to text line
A
, the number of matching entries is shown in function key
B
.
The numbers 1-99 indicate the quantity of matching entries that were found. If even more entries were found, ** is indicated instead of a number. If less than 6
entries were found, a list of the found entries opens automatically.
Input screen with numeric keyboard
Fig. 5
Input screen with numeric key-
pad
First read and observe the introductory information given on page 8.
The input screen with keyboard is mainly used for entering numbers, eg in the phone menu » page 41 .
Description of the function keys
- Return to the higher-level menu
- Delete characters in the entry line
9Device operation
Page 12 of 57
Operation via the Maxi DOT display
Introduction
This chapter contains information on the following subjects:
Operate using the buttons on the operating lever
10
operation via the buttons / dials on the multifunction steering wheel -
Audio
11
operation via the buttons / dials on the multifunction steering wheel - Telephone
12
First and foremost, pay attention to the safety instructions » page 4 , Important
notes .
Some of the device's features are also displayed in the MAXI DOT display 1)
. De-
pending on the equipment, these features can be operated as follows.
■ With the buttons on the operating lever » page 10
■ With the buttons and wheels on the multifunction steering wheel » page 11
Note
If the ignition and the side light are switched on, the buttons and dials on the
multifunction steering wheel will also be illuminated.
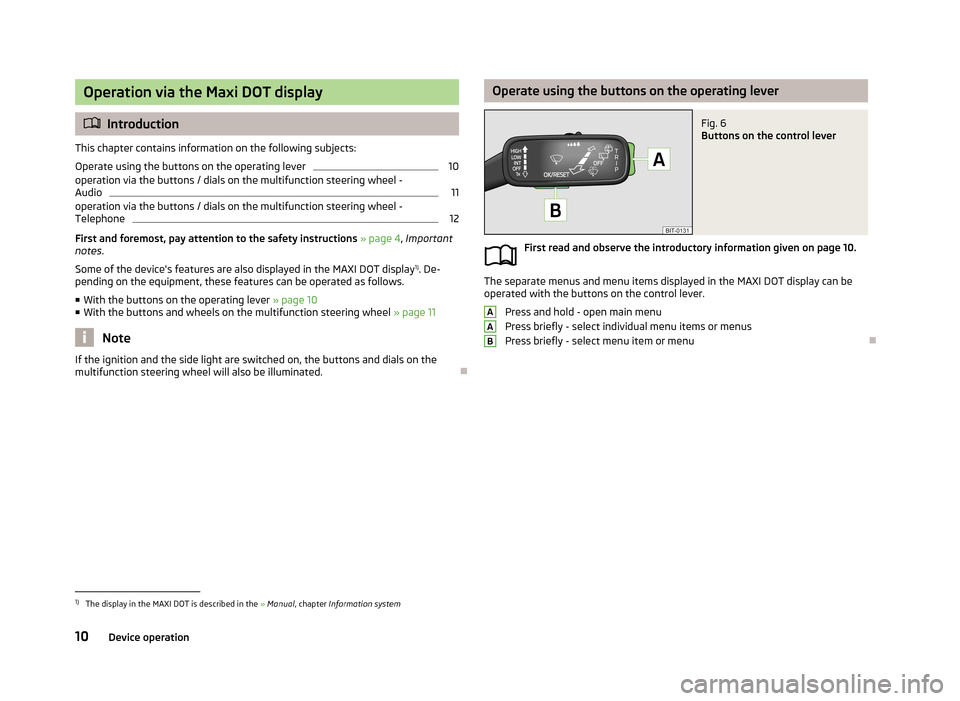
Operate using the buttons on the operating leverFig. 6
Buttons on the control lever
First read and observe the introductory information given on page 10.
The separate menus and menu items displayed in the MAXI DOT display can be
operated with the buttons on the control lever.
Press and hold - open main menu
Press briefly - select individual menu items or menus
Press briefly - select menu item or menu
AAB1)
The display in the MAXI DOT is described in the » Manual , chapter Information system
10Device operation