Page 1 of 83
SIMPLY CLEVER
Infotainment Navigation AmundsenOwner's Manual
Page 3 of 83
Preface
You have chosen a ŠKODA vehicle, which is fitted with the Infotainment Navigation Amundsen (hereafter
called the unit) – we thank you for your confidence in us. The new operating concept allows you to configure vehicle settings and to operate some electronic systemscentrally from the unit.
In addition to this Owner's Manual, please also carefully read the Vehicle Manual, as operation in accordance
with these instructions is a prerequisite for proper use of the vehicle.
If you have any questions about your unit, please contact a ŠKODA Partner.Your ŠKODA AUTO a.s. (hereinafter referred to as ŠKODA)
Page 4 of 83
Table of Contents
Abbreviations
Familiarization with the unit
Introductory information
4
Important notes
4
Equipment overview
5
Unit operation
8
In the unit screen
8
In MAXI DOT Display
10
Voice control
14
Device settings
18
Setup menu
18
Audio
Radio
23
Operation
23
Radio settings
26
Media
28
Operation
28
Signal sources
30
Phone
Communication
35
Telephones and two-way radio systems
35
Connect to the mobile phone
38
Telephone functions
41Navigation
Description of the navigation system45
Preface to navigation
45
Navigation settings
46
Map operation
48
Extra window
50
Navigation
54
New destination entry
54
Entry of saved destinations
56
POI
57
POI categories
60
Route guidance
61
Traffic reports
63
Destination management
65
Vehicle
Vehicle systems
67
Vehicle settings
67
Index
2Table of Contents
Page 7 of 83
Please contact a ŠKODA Service Partner if component protection does not deacti-
vate when the ignition is switched on.
Equipment overview
Introduction
This chapter contains information on the following subjects:
Description of the device
5
touch screen
6
Switching the unit on/off
6
Unit menus
6
Adjusting volume
7
First and foremost, pay attention to the safety instructions » page 4 , Important
notes .
Description of the deviceFig. 1
Description of the device
First read and observe the introductory information given on page 5.
Description of the device - Switch unit on/off, adjust volume
Operation and confirmation RADIO
- Radio menu » page 23
MEDIA - Media menu » page 28
PHONE - Phone menu » page 35
VOICE - Voice control » page 14
NAV - Navigation Menu » page 45
TRAFFIC - List of traffic reports » page 64
CAR - Settings of the vehicle system » page 67
MENU - Displays the unit menus » page 6
Touch screen » page 8
12345678910115Introductory information
Page 9 of 83
- Navigation menu » page 45
- Phone menu » page 35
Adjusting volume
First read and observe the introductory information given on page 5.
Increase the volume
›
Turn the knob to the right.
Reduce the volume
›
Turn the knob to the left.
Muting
›
Set the volume to 0 using the knob.
Note
■
The change in volume is displayed on the screen of the unit.■The following symbol appears in the display when the sound is muted: .■
High volumes can cause sound resonance in the vehicle.
■
The car speakers may be damaged if the volume is set too loud or is distorted.
■
The loudspeakers in the vehicle are designed for a power output of the device
of 4x20 W.
■
When equipped with a sound system, the speakers are adapted for a total pow-
er output from the amplifier of 570 W.
7Introductory information
Page 11 of 83

Set value› by touching the function keys with the symbols
/ , / , - / +
› Touch or move your finger over the scale
Note
For some menus or menu items, the current selected setting is displayed, e.g.
Dis-
tance km and/or Distance: mi .
Input screen with keyboard
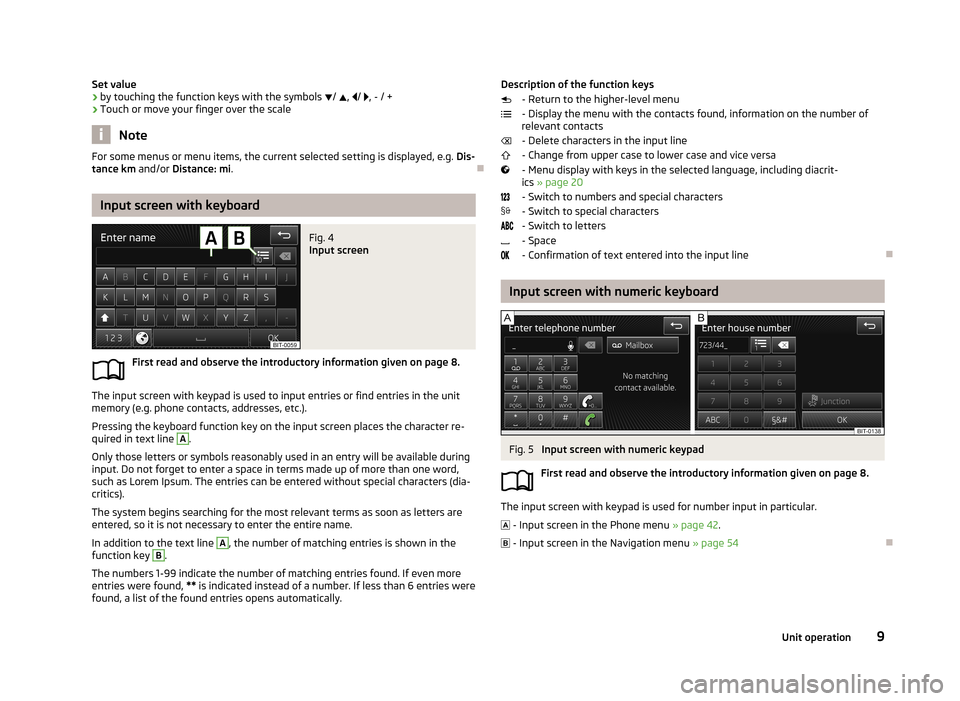
Fig. 4
Input screen
First read and observe the introductory information given on page 8.
The input screen with keypad is used to input entries or find entries in the unit
memory (e.g. phone contacts, addresses, etc.).
Pressing the keyboard function key on the input screen places the character re-quired in text line
A
.
Only those letters or symbols reasonably used in an entry will be available during
input. Do not forget to enter a space in terms made up of more than one word,
such as Lorem Ipsum. The entries can be entered without special characters (dia-
critics).
The system begins searching for the most relevant terms as soon as letters are
entered, so it is not necessary to enter the entire name.
In addition to the text line
A
, the number of matching entries is shown in the
function key
B
.
The numbers 1-99 indicate the number of matching entries found. If even more
entries were found, ** is indicated instead of a number. If less than 6 entries were
found, a list of the found entries opens automatically.
Description of the function keys
- Return to the higher-level menu
- Display the menu with the contacts found, information on the number of relevant contacts
- Delete characters in the input line
- Change from upper case to lower case and vice versa
- Menu display with keys in the selected language, including diacrit- ics » page 20
- Switch to numbers and special characters - Switch to special characters
- Switch to letters
- Space
- Confirmation of text entered into the input line
Input screen with numeric keyboard
Fig. 5
Input screen with numeric keypad
First read and observe the introductory information given on page 8.
The input screen with keypad is used for number input in particular. - Input screen in the Phone menu » page 42.
- Input screen in the Navigation menu » page 54
9Unit operation
Page 12 of 83

In MAXI DOT Display
Introduction
This chapter contains information on the following subjects:
Operate using the lever
10
Multifunction steering wheel- Radio/Media
10
Multifunction steering wheel - Phone
12
Multifunction steering wheel - Navigation
13
First and foremost, pay attention to the safety instructions » page 4 , Important
notes .
This chapter discusses operation of the unit and its menus using the operating
lever or the buttons on the multifunction steering wheel. Information about the
device functions appears in the MAXI DOT display.
The keys can only control the menu functions in the MAXI DOT display.
Note
If the ignition and the side lights are switched on, the buttons and dials on the
multifunction steering wheel will also be illuminated.
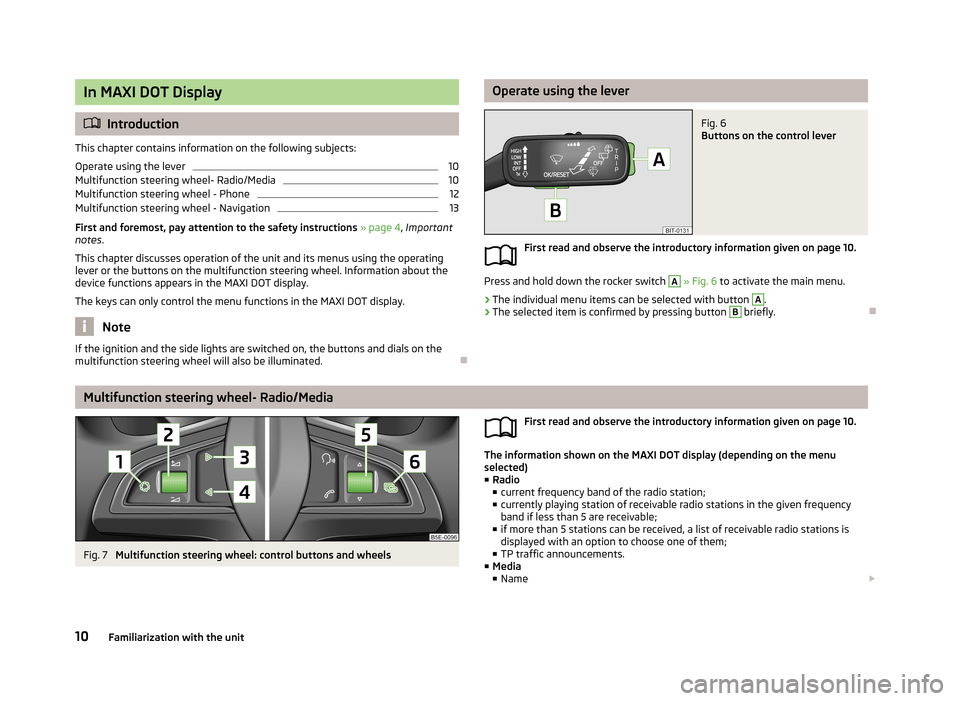
Operate using the leverFig. 6
Buttons on the control lever
First read and observe the introductory information given on page 10.
Press and hold down the rocker switch
A
» Fig. 6 to activate the main menu.
›
The individual menu items can be selected with button
A
.
›
The selected item is confirmed by pressing button
B
briefly.
Multifunction steering wheel- Radio/Media
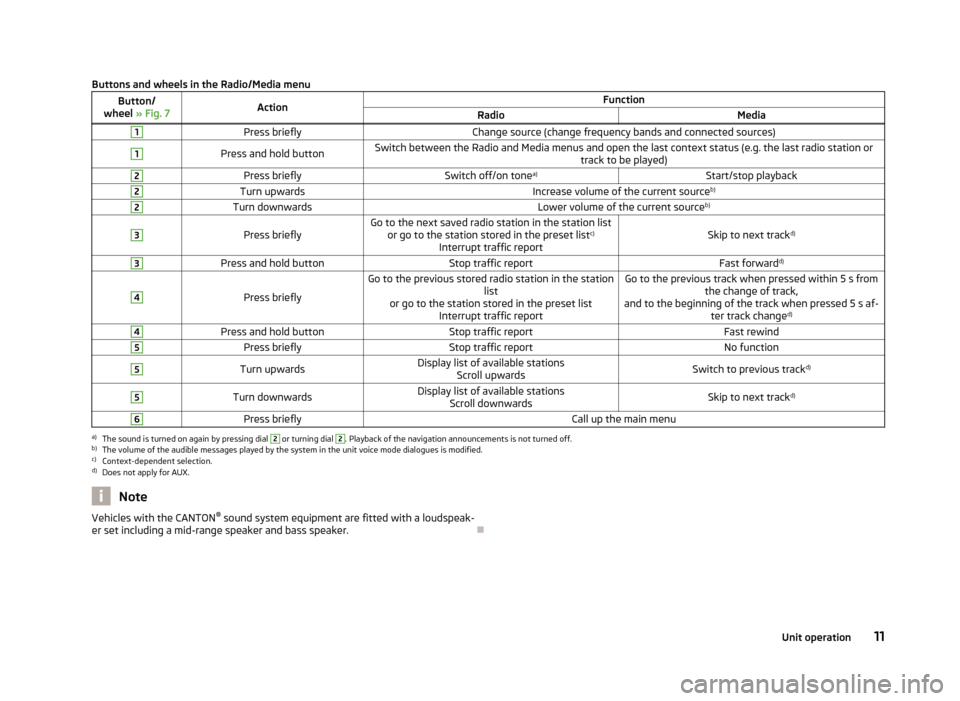
Fig. 7
Multifunction steering wheel: control buttons and wheels
First read and observe the introductory information given on page 10.
The information shown on the MAXI DOT display (depending on the menu
selected) ■ Radio
■ current frequency band of the radio station;
■ currently playing station of receivable radio stations in the given frequency
band if less than 5 are receivable;
■ if more than 5 stations can be received, a list of receivable radio stations is
displayed with an option to choose one of them;
■ TP traffic announcements.
■ Media
■ Name
10Familiarization with the unit
Page 13 of 83

Buttons and wheels in the Radio/Media menuButton/
wheel » Fig. 7ActionFunctionRadioMedia1Press brieflyChange source (change frequency bands and connected sources)1Press and hold buttonSwitch between the Radio and Media menus and open the last context status (e.g. the last radio station or
track to be played)2Press brieflySwitch off/on tonea)Start/stop playback2Turn upwardsIncrease volume of the current source b)2Turn downwardsLower volume of the current sourceb)3
Press brieflyGo to the next saved radio station in the station list
or go to the station stored in the preset list c)
Interrupt traffic reportSkip to next track d)
3Press and hold buttonStop traffic reportFast forwardd)4
Press briefly
Go to the previous stored radio station in the station
list
or go to the station stored in the preset list Interrupt traffic reportGo to the previous track when pressed within 5 s from the change of track,
and to the beginning of the track when pressed 5 s af- ter track changed)4Press and hold buttonStop traffic reportFast rewind5Press brieflyStop traffic reportNo function5Turn upwardsDisplay list of available stations
Scroll upwardsSwitch to previous track d)5Turn downwardsDisplay list of available stations
Scroll downwardsSkip to next track d)6Press brieflyCall up the main menua)
The sound is turned on again by pressing dial
2
or turning dial
2
. Playback of the navigation announcements is not turned off.
b)
The volume of the audible messages played by the system in the unit voice mode dialogues is modified.
c)
Context-dependent selection.
d)
Does not apply for AUX.
NoteVehicles with the CANTON ®
sound system equipment are fitted with a loudspeak-
er set including a mid-range speaker and bass speaker.
11Unit operation