Page 9 of 28

Use one of the following methods to unlatch the liftgate,
then pull the liftgate up to open:
Press thebutton 01 on the NISSAN Intelligent")
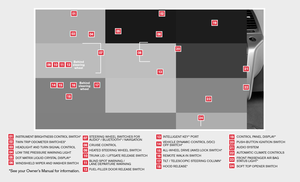
POWER LIFTGATE RELEASE (Hardtop models - if so equipped)
Use one of the following methods to unlatch the liftgate,
then pull the liftgate up to open:
Press thebutton 01 on the NISSAN Intelligent
Key® for more than 1 second.
Push the liftgate opener switch 02 while carrying
the Intelligent Key with you (that is, in your pocket
or purse).
From inside the vehicle, push the power liftgate switch
03 , located on the instrument panel to the left of the
steering wheel.
For more information, refer to the “Pre-driving checks and adjustments
(section 3)” of your Owner’s Manual.
TRUNK LID RELEASE (CrossCabriolet models)
Use one of the following methods to unlatch the trunk lid,
then pull the lid up to open the trunk:
Press theHOLD button 01 on the NISSAN Intelligent
Key® for more than 1 second.
Push the trunk open request switch 02 while
carrying the Intelligent Key with you (that is, in
your pocket or purse).
From inside the vehicle, push the trunk lid release
switch
03 , located on the instrument panel to the
left of the steering wheel.
For more information, refer to the “Pre-driving checks and adjustments
(section 3)” of your Owner’s Manual.
7
01
01
03
03
02
02
To view detailed instructional videos regarding these and other features, please go to www.nissanownersinfo.mobi.
Page 10 of 28

To slide the seat forward or backward, pull up on
the lever
01 under the front of the seat and slide
forward or backward. Release the lever")
FRONT SEAT ADJUSTMENTS
MANUAL SEATS (if so equipped)
To slide the seat forward or backward, pull up on
the lever
01 under the front of the seat and slide
forward or backward. Release the lever to lock the
seat in position.
To adjust your seatback forward or backward, lift the
lever
02 on the side of the seat.
Release the lever when you have found a comfortable
angle and the seat belt fi ts properly.
SEAT LI FTE R (if so equipped)
To adjust the seat height, pull up or push down on
the adjusting lever
03 repeatedly.
LUMBAR SUPPORT (if so equipped)
Your driver’s seat lumbar support 04 is located on
the inboard side of the driver’s front seat.
Adjust by moving the lever up or down.
8
first drive features
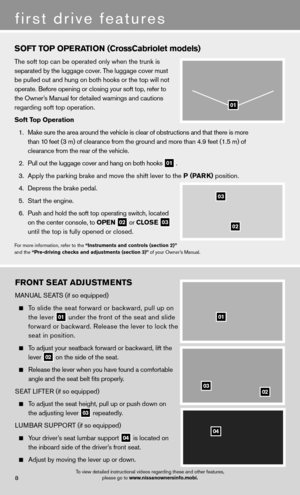
SOFT TOP OPERATION (CrossCabriolet models)
The soft top can be operated only when the trunk is
separated by the luggage cover. The luggage cover must
be pulled out and hung on both hooks or the top will not
operate. Before opening or closing your soft top, refer to
the Owner’s Manual for detailed warnings and cautions
regarding soft top operation.
Soft Top Operation
1. Make sure the area around the vehicle is clear of obstructions and that \
there is more
than 10 feet (3 m) of clearance from the ground and more than 4.9 feet (1.5 m) of\
clearance from the rear of the vehicle.
2. Pull out the luggage cover and hang on both hooks
01 .
3. Apply the parking brake and move the shift lever to the P (PARK) position.
4. Depress the brake pedal.
5. Start the engine.
6. Push and hold the soft top operating switch, located
on the center console, to OPEN
02 or CLOSE
03
until the top is fully opened or closed.
For more information, refer to the “Instruments and controls (section 2)”
and the “Pre-driving checks and adjustments (section 3)” of your Owner’s Manual.
02
03
01
01
0203
04
P
S
L
F
O
To view detailed instructional videos regarding these and other features, please go to www.nissanownersinfo.mobi.
Page 11 of 28

To slide the seat forward or backward, push the
control switch
01 forward or backward.
To recline the seatback, push the switch 02
forward or")
9
POWER SEATS (if so equipped)
To slide the seat forward or backward, push the
control switch
01 forward or backward.
To recline the seatback, push the switch 02
forward or backward.
SEAT LIFTER (if so equipped for driver’s seat)
To adjust the angle of the front seat cushion or height
of the seat, push the front or rear end of the switch
01 up or down.
LUMBAR SUPPORT (if so equipped for driver’s seat)
To adjust the seat lumbar support, push the front or back end of the switch 03 .
For more information, refer to the “Safety –– Seats, seat belts and supplemental restraint system (section 1)” of your
Owner’s Manual.
010203
REAR SEAT ADJUSTMENTS (Hardtop models)
FOLDING DOWN THE REAR SEAT
To fold the seats fl at, release the connector tongue
of the rear center seat belt from the buckle, then
store the connector and seat belt tongues in the
retractor base on the ceiling
01 .
Fold the seatback forward using either the pull
strap
02 located on the outside edge of the rear
seat or the release lever 03 in the cargo area.
To raise the seatback manually, lift up each seatback
and push it to the upright position until it is latched.
To raise the seatback automatically (if so equipped),
push and hold the power seatback switch located
in the cargo area
04 or the corresponding seat
switch on the lower side of the instrument panel 05 .
– A beep sounds once and the seatback begins to
move automatically.
– A beep sounds twice when the seatback is fully
returned to the upright seating position.
04
02
01
03
05
To view detailed instructional videos regarding these and other features, please go to www.nissanownersinfo.mobi.
Page 12 of 28

DRIVER’S SIDE
To enter the rear seat, push and hold the front end of
the slide switch
01 to slide the driver’s seat forward.
Then pu")
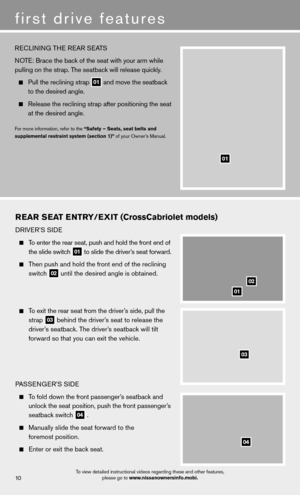
R EAR S EAT E NTRY/EXIT (CrossCabriolet models)
DRIVER’S SIDE
To enter the rear seat, push and hold the front end of
the slide switch
01 to slide the driver’s seat forward.
Then push and hold the front end of the reclining
switch
02 until the desired angle is obtained.
To exit the rear seat from the driver’s side, pull the
strap
03 behind the driver’s seat to release the
driver’s seatback. The driver’s seatback will tilt
forward so that you can exit the vehicle.
PASSENGER’S SIDE
To fold down the front passenger’s seatback and
unlock the seat position, push the front passenger’s
seatback switch
04 .
Manually slide the seat forward to the
foremost position.
Enter or exit the back seat.
01
02
03
04
first drive features
10
RECLINING THE REAR SEATS
NOTE: Brace the back of the seat with your arm while
pulling on the strap. The seatback will release quickly.
Pull the reclining strap 01 and move the seatback
to the desired angle.
Release the reclining strap after positioning the seat
at the desired angle.
For more information, refer to the “Safety – Seats, seat belts and
supplemental restraint system (section 1)” of your Owner’s Manual.
01
O
F
F
s
A
F
To view detailed instructional videos regarding these and other features,
please go to www.nissanownersinfo.mobi.
Page 13 of 28

11
OUTSIDE MIRROR CONTROL SWITCH
To select the right or left side mirror, turn the control
switch
01 right or left.
To adjust the mirror angle, move the control switch
up, down, right or left.
To prevent accidentally moving the mirror, turn and
set the switch to the middle “neutral” position.
For more information, refer to the “Pre-driving checks and adjustments (section 3)” of your Owner’s Manual.
05
06
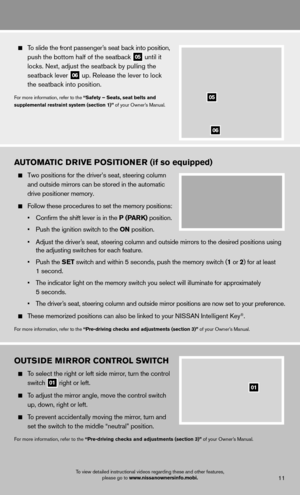
To slide the front passenger’s seat back into position,
push the bottom half of the seatback
05 until it
locks. Next, adjust the seatback by pulling the
seatback lever
06 up. Release the lever to lock
the seatback into position.
For more information, refer to the “Safety – Seats, seat belts and
supplemental restraint system (section 1)” of your Owner’s Manual.
AUTOMATIC DRIVE POSITIONER (if so equipped)
Two positions for the driver’s seat, steering column
and outside mirrors can be stored in the automatic
drive positioner memory.
Follow these procedures to set the memory positions:
• Confi rm the shift lever is in the P (PARK) position.
• Push the ignition switch to the ON position.
• Adjust the driver’s seat, steering column and outside mirrors to the desired positions usi\
ng
the adjusting switches for each feature.
• Push the SET switch and within 5 seconds, push the memory switch (1 or 2) for at least
1 second.
• The indicator light on the memory switch you select will illuminate for approximately
5 seconds.
• The driver’s seat, steering column and outside mirror positions are now set to your\
preference.
These memorized positions can also be linked to your NISSAN Intelligent Key®.
For more information, refer to the “Pre-driving checks and adjustments (section 3)” of your Owner’s Manual.
01
To view detailed instructional videos regarding these and other features,
please go to www.nissanownersinfo.mobi.
Page 14 of 28

HEADLIGHT CONTROL SWITCH
HEADLIGHT CONTROL
Turn the headlight control switch to the
position
01 to turn on the front parking, side
marker, tail, license plate and instrument panel
lights. Turn the switch to the
position
02 to
turn on the headlights.
AUTOLIGHT SYSTEM (if so equipped)
The autolight system will automatically turn the headlights on when it is\
dark and off when it
is light. The system will keep the headlights on for a period of time after you tur\
n the ignition
off and all doors are closed.
To activate the autolight system, turn the headlight control switch to the AUTO position
03
then push the ignition switch to ON. To deactivate the autolight system, turn the headlight
control switch to the OFF,
01 or
position
02 .
HIGH BEAM SELECT
Push the headlight control switch forward 04 to
select the high beam function. The blue indicator
light
illuminates in the instrument panel. Pull
the headlight switch back to the original position to
select the low beam. The blue indicator light goes off.
Pull and release the headlight control switch 05 to
fl ash the headlight high beams on and off.
12
first drive features
01
03
02
STARTING/STOPPING THE EN GINE
Depress the brake pedal.
Press the ignition switch START/STOP button to
start the engine.
NOTE: It is important to make sure the NISSAN Intelligent
Key
® is with you (that is, in your pocket or purse).
TURNING THE ENGINE OFF
Move the shift lever to the P (PARK) position and
apply the parking brake.
Press the ignition switch START/STOP button to
turn the engine off.
For more information, refer to the “Starting and driving (section 5)” of your Owner’s Manual.
04
05
W
s
To view detailed instructional videos regarding these and other features,
please go to www.nissanownersinfo.mobi.
Page 15 of 28
 - One sweep operation of the
front wipers.
02")
13
WINDSHIELD WIPER AND WASHER SWITCH
Move the lever to the following positions to operate
the windshield wipers:
01 Mist (MIST) - One sweep operation of the
front wipers.
02 Auto (AUTO) (Hardtop Models – if so equipped)
Operates the rain-sensing auto front wiper
system. The rain sensor sensitivity level can be
adjusted by twisting the time control ring
03 .
04 Low (LO) - Front wipers operate at a continuous
low speed.
05 High (HI) - Front wipers operate at a continuous
high speed.
06 Pull the lever toward you to activate the
front washer. The front wipers will operate
several times.
REAR WINDSHIELD WIPER AND WASHER
(Hardtop models)
07 Intermittent (INT) - Rear wiper
operates intermittently.
08 Low (ON) - Rear wiper operates at a
continuous low speed.
09 Push the lever forward to activate the rear
washer. The rear wiper will operate several times.
For more information, refer to the “Instruments and controls (section 2)” of your Owner’s Manual.
01
02
04
05
MIST
OFF
INT
LO
HI
06
09
03
INT
ON07
08
FOG LIGHT SWITCH (if so equipped)
NOTE: The headlights must be on and the low beams
selected for the fog lights to operate.
Turn the switch (inside collar) to the position
06
to turn the fog lights on.
Turn the switch (inside collar) to the OFF position to
turn the fog lights off.
For more information, refer to the “Instruments and controls (section 2)” of your Owner’s Manual.
06
To view detailed instructional videos regarding these and other features,
please go to www.nissanownersinfo.mobi.
Page 16 of 28

01 AUTO BUTTON/DRIVER’S SIDE TEMPERATURE CONTROL DIAL
The auto mode may be used year-round. Press the AUTO button to turn the system on
and t")
AUTOMATIC CLIMATE CONTROLS (if so equipped)
01 AUTO BUTTON/DRIVER’S SIDE TEMPERATURE CONTROL DIAL
The auto mode may be used year-round. Press the AUTO button to turn the system on
and the system will automatically control the inside temperature (autom\
atic cooling and/
or dehumidifi ed heating), air fl ow distribution and fan speed.
Turn the driver’s side temperature control dial to the left for cooler air or right for \
warmer air.
02 DUAL BUTTON/PASSENGER’S SIDE TEMPERATURE CONTROL DIAL
Press the DUAL button to turn the passenger’s side temperature controls on or off. This
will allow the passenger’s side temperature to be adjusted independently from the driver’s
side by turning the passenger’s side temperature control dial.
Turn the passenger’s side temperature control dial left for cooler air or right for warmer \
air.
03 ON•OFF BUTTON/FAN SPEED CONTROL KNOB
Turn the fan speed control knob left to decrease fan speed or right to in\
crease fan speed.
Press the button to turn the system on or off.
04 MODE BUTTON
Press the MODE button
to cycle through the following air fl ow outlets:
Air fl ows from the center and side vents.
Air fl ows from the center, side and foot vents.
Air fl ows mainly from the foot vents.
Air fl ows from the defroster and foot vents.
05 INTAKE AIR CONTROL BUTTON
AIR RECIRCULATION
Press the intake air control button to recirculate interior air inside the vehicle. The
indicator light on the button will come on. This system is used to avoid certain outside
odors and helps to adjust the inside vehicle temperature more effectivel\
y.
The air recirculation mode cannot be activated when the air conditioner i\
s in the front
defrosting mode
.
030201
0506
0904
0708
first drive features
14
To view detailed instructional videos regarding these and other features,
please go to www.nissanownersinfo.mobi.