Page 67 of 402

CAUTION
As the quick charge connector is heavier in comparison to the other
charge connectors, allowing it to drop
could cause damage to the vehicle or
charge connector or personal injury.
When removing the connector, be sure
to pull it out straight and as carefully
as possible.
CHARGE CONNECTOR LOCK
SWITCH
The normal or trickle charge connector can be
locked to the normal charge port. The charge
connector lock mode can be selected by using
the charge connector lock switch, AUTO, LOCK
and UNLOCK.
NOTE:
The charge connector lock can be acti-
vated when the shift lever is in the “P”
position and the charge connector is con-
nected. The charge connector lock will not
be activated if the charge connector is not
properly connected.
AUTO mode
To select AUTO mode, push the AUTO side�1of
the charge connector lock switch. The indicator
light on the switch
�3will illuminate.
When AUTO mode is selected, the charge con-
nector is locked while charging is in process. The
charge connector will be unlocked automatically
when charging is completed.
LOCK mode
To select the LOCK mode, push the LOCK side
�2of the charge connector lock switch. The
indicator light on the switch
�4will illuminate.
When LOCK mode is selected, the charge con-
nector will remain locked. The charge connector
will be unlocked when UNLOCK mode is se-
lected or temporary unlock operation is per-
formed.
UNLOCK mode
To select UNLOCK mode, return the charge con-
nector lock switch to the level position. Make sure
the indicator light on the switch turns off.
When UNLOCK mode is selected, the charge
connector will remain unlocked.
CH-18Charging
Page 68 of 402
Temporary unlock position
When the charge connector lock switch is in the
AUTO or LOCK position, the charge connector
lock can be unlocked temporarily by using the
Intelligent Key or the charge port lid opener
switch.
Unlock operation using Intelligent Key:
1. Push the charge connector unlock button onthe Intelligent Key for more than 1 second.
2. The charging status indicator light flashes 3 times and a beep sounds 3 times. The charge
connector lock is unlocked for 30 seconds.
3. After 30 seconds, the charge connector lock is locked.
Unlock operation using charge port lid
opener switch:
1. Push the charge port lid opener switch.
2. The charging status indicator light flashes 3times and a beep sounds 3 times. The charge
connector lock is unlocked for 30 seconds.
3. After 30 seconds, the charge connector lock is locked.
ChargingCH-19
Page 73 of 402

and the vehicle timer are both set, and the
two timers are not set to operate at the
same time, it is possible that the charger
will not start or the battery will not be
charged to the level expected.
If the Li-ion battery warmer is operating
while the Climate Ctrl. Timer or Remote
Climate Control is being used, perfor-
mance of the Climate Control will be re-
duced.
The Li-ion battery may not charge to the
expected level using the Charging Timer
When a Start time and End time are set
while the Li-ion battery warmer operates.
Set only the Charging Timer End time
when charging in cold weather. The ve-
hicle automatically determines when to
start charging to fully charge the Li-ion
battery, even if the Li-ion battery warmer
operates. Charging ends before the set
End time if the Li-ion battery is fully
charged.
The 12-volt battery can become dis-
charged if the charging timer is operated
repeatedly between the Li-ion battery
charges while the vehicle is not used for
an extended period of time.
Without navigation system
1. Push theswitch�Aon the left side of
the combination meter panel. 2. Push the
switch�Bto highlight “Charg-
ing Timer” on the dot matrix liquid crystal
display and then push the switch.
CH-24Charging
Page 74 of 402
3. The “Charging Timer” screen is displayed. Tochange the time or turn the timer on or off,
push the
switch. 4. To turn the timer on or off, use the
switch to highlight “On” or “Off” and then
push the
switch. If “On” is selected, an
additional screen is displayed that allows you
to change the time of the charging timer. 5. The hour portion of the time is highlighted on
the screen. Push the
switch to change
the hour field in increments of one hour. Push
the
switch to move to the minutes field.
6. Push the
switch to change the minute
field in increments of ten minutes. Push the
switch to finish setting the charging
timer.
ChargingCH-25
Page 76 of 402
3. Touch [Set Timer 1] or [Set Timer 2].4. Touch [% Charge].5. Touch [80% Charging (Improves Battery Lon-
gevity)]. The indicator light illuminates when
the long life mode is set to on.
6. Touch [BACK] to return to the previous screen.
7. Touch [Save Timer] when the settings are complete and a settings confirmation screen
is displayed.
ChargingCH-27
Page 78 of 402
1.Push the(Zero Emission menu) button .2. Touch [Settings].
3. Touch [Long life mode (80% Charge)] The
indicator light illuminates when long life mode
is set to on.
ChargingCH-29
Page 79 of 402
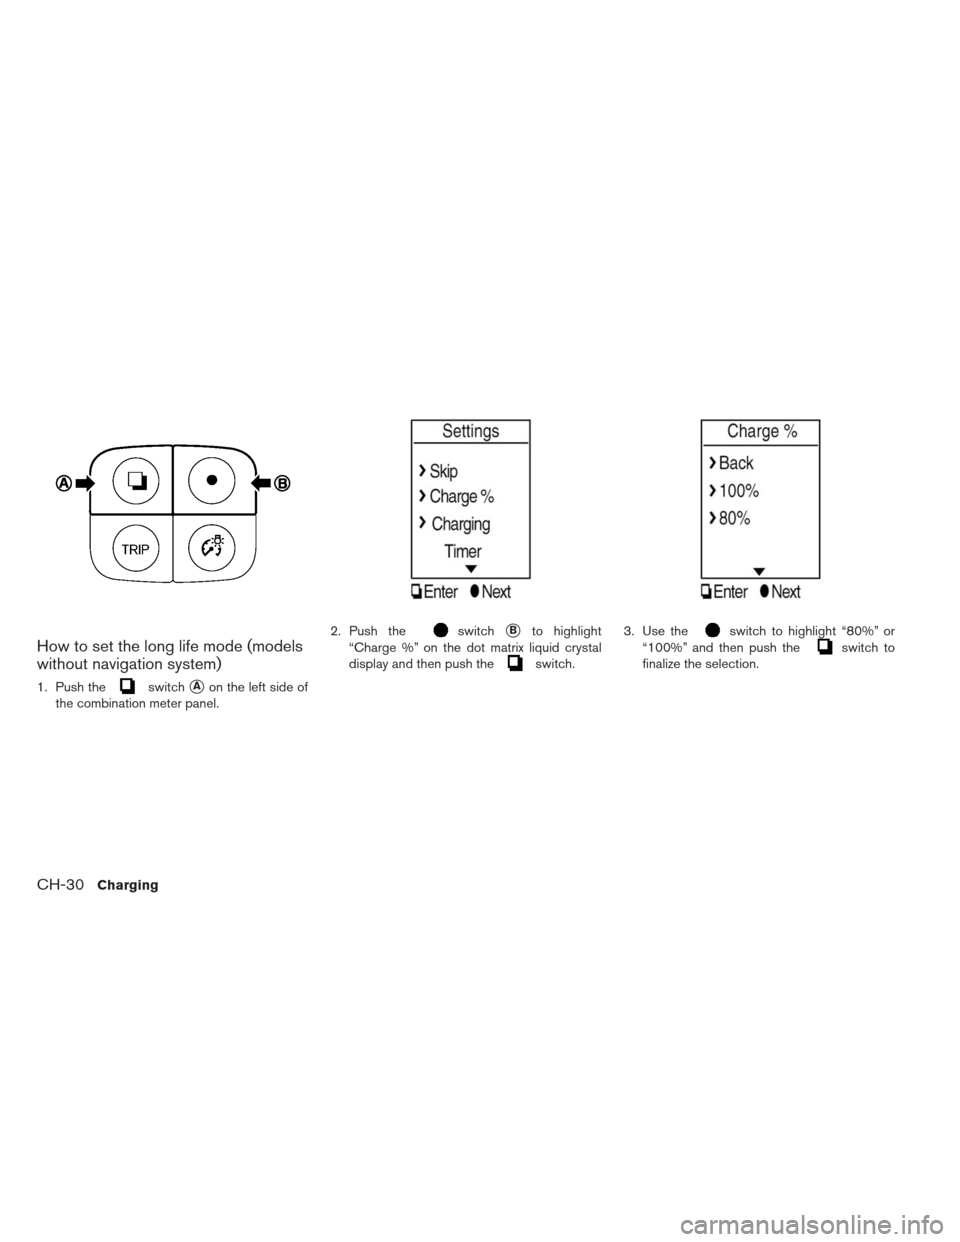
How to set the long life mode (models
without navigation system)
1. Push theswitch�Aon the left side of
the combination meter panel. 2. Push the
switch�Bto highlight
“Charge %” on the dot matrix liquid crystal
display and then push the
switch. 3. Use the
switch to highlight “80%” or
“100%” and then push the
switch to
finalize the selection.
CH-30Charging
Page 80 of 402

IMMEDIATE CHARGE
When a charging timer is not turned on, charging
automatically starts when a normal or trickle
charge connector is connected to the vehicle.
Use the immediate charge mode anytime you
want to start charging when a charging timer is
turned on by performing the following:
1. Place the power switch in the OFF position.
2. Press the immediate charge switch.
3. Connect the normal or trickle charge cablewhen the charging status indicator light changes to display immediate charge mode.
See
�Charging status indicator light�.
NOTE:
You have 15 minutes to connect a normal
or trickle charge connector to the vehicle
after the immediate charge switch is
pressed. If a charge connector is not con-
nected to the vehicle within 15 minutes,
the vehicle automatically returns to the
previous setting.
Immediate charge will be available for 15
minutes before returning automatically to
the previous setting.
To cancel immediate charge mode press
the immediate charge switch again.
If charge cable is disconnected, the Li-ion
battery automatically switches to charg-
ing timer. To perform an immediate
charge again, press the immediate charge
switch and connect charge cable.
If the charge cable is already connected,
press the immediate charge switch to
start performing an immediate charge.
CHARGING RELATED REMOTE
FUNCTION (MODELS WITH
NAVIGATION SYSTEM)
This vehicle incorporates a communication de-
vice that is called a TCU (Telematics Communi-
cation Unit) . The communication connection be-
tween this unit and NISSAN CARWINGS™ Data
Center allows for various remote function ser-
vices.
Li-ion battery status check:
The charging status of the Li-ion battery can
be checked using your personal computer or
internet enabled smart phone even if you are
not in the vehicle.
Remote charge:
The function of starting Li-ion battery charge
or starting the heater and air conditioner is
available using your personal computer or in-
ternet enabled smart phone.
Unplugged status:
A notification e-mail will be sent to your per-
sonal computer or internet enabled smart
phone if the plug is not connected at the
certain time you selected, after you turning off
the power switch in registered place.
ChargingCH-31


![NISSAN LEAF 2013 1.G Owners Manual 3. Touch [Set Timer 1] or [Set Timer 2].4. Touch [% Charge].5. Touch [80% Charging (Improves Battery Lon-
gevity)]. The indicator light illuminates when
the long life mode is set to on.
6. Touch [BACK](/manual-img/5/325/w960_325-75.png "NISSAN LEAF 2013 1.G Owners Manual 3. Touch [Set Timer 1] or [Set Timer 2].4. Touch [% Charge].5. Touch [80% Charging (Improves Battery Lon-
gevity)]. The indicator light illuminates when
the long life mode is set to on.
6. Touch [BACK")
![NISSAN LEAF 2013 1.G Owners Manual 1.Push the(Zero Emission menu) button .2. Touch [Settings].
3. Touch [Long life mode (80% Charge)] The
indicator light illuminates when long life mode
is set to on.
ChargingCH-29](/manual-img/5/325/w960_325-77.png "NISSAN LEAF 2013 1.G Owners Manual 1.Push the(Zero Emission menu) button .2. Touch [Settings].
3. Touch [Long life mode (80% Charge)] The
indicator light illuminates when long life mode
is set to on.
ChargingCH-29")