2013 NISSAN LEAF AUX
[x] Cancel search: AUXPage 21 of 275
1 Getting Started
Control buttons and functions ................................................ 1-2Control panel ........................................................................\
1-2
Steering wheel switches .................................................... 1-4
USB connector and Auxiliary input jack ........................ 1-4
Start-up screen ........................................................................\
.. 1-5
Functions disabled while driving ............................................ 1-6
Basic operation ........................................................................\
.. 1-7 Selecting item ....................................................................... 1-7
Adjusting volume and others ............................................ 1-7
Scrolling message or list ................................................... 1-7
How to input letters and numbers .................................. 1-7
Viewing display screens........................................................... 1-9
Map screen........................................................................\
.... 1-9
Zero Emission menu screen ............................................. 1-9 Menu screen ....................................................................... 1-9
Status screen................................................................... 1-10
FM·AM radio screen ....................................................... 1-10
SiriusXM Satellite Radio screen ................................. 1-10
CD·AUX screen ............................................................... 1-10
Items to be set initially .......................................................... 1-11
Subscription to CARWINGS
TMservice.................... 1-11
Inputting user ID and password ................................. 1-11
Storing home location ................................................... 1-12
Connecting cellular phone ........................................... 1-13
Display adjustment ......................................................... 1-14
Volume settings ............................................................... 1-16
Clock settings .................................................................. 1-16
Language and unit settings.......................................... 1-17
Page 22 of 275
1-2Getting Started
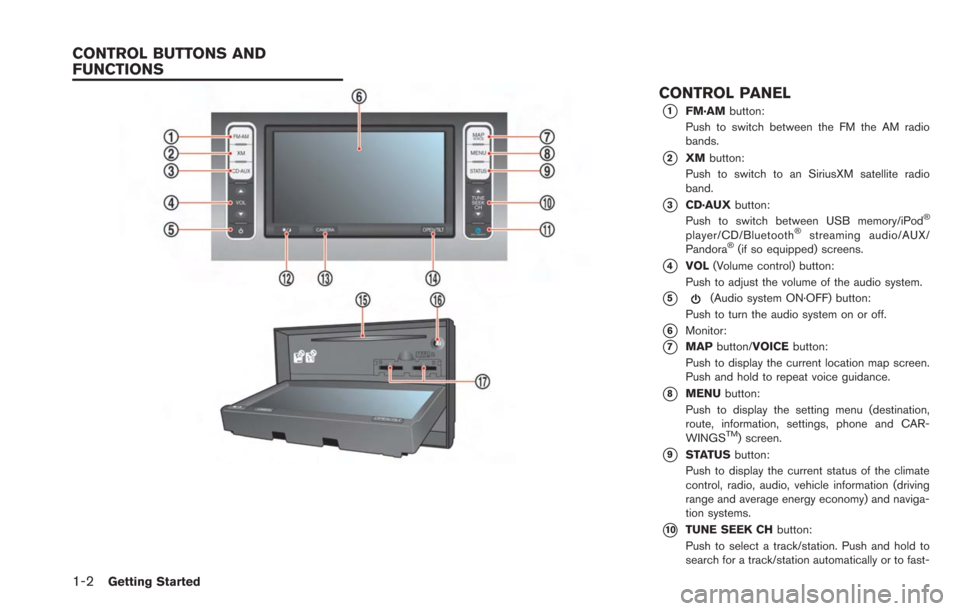
CONTROL PANEL
*1FM·AMbutton:
Push to switch between the FM the AM radio
bands.
*2XM button:
Push to switch to an SiriusXM satellite radio
band.
*3CD·AUX button:
Push to switch between USB memory/iPod®
player/CD/Bluetooth®streaming audio/AUX/
Pandora®(if so equipped) screens.
*4VOL (Volume control) button:
Push to adjust the volume of the audio system.
*5(Audio system ON·OFF) button:
Push to turn the audio system on or off.
*6Monitor:
*7MAP button/VOICE button:
Push to display the current location map screen.
Push and hold to repeat voice guidance.
*8MENU button:
Push to display the setting menu (destination,
route, information, settings, phone and CAR-
WINGS
TM) screen.
*9STATUS button:
Push to display the current status of the climate
control, radio, audio, vehicle information (driving
range and average energy economy) and naviga-
tion systems.
*10TUNE SEEK CH button:
Push to select a track/station. Push and hold to
search for a track/station automatically or to fast-
CONTROL BUTTONS AND
FUNCTIONS
Page 24 of 275
1-4Getting Started
When theOPEN/TILT button is pushed while
the monitor is closed, the monitor will open.
When the OPEN/TILT button is pushed while
the monitor is open, the monitor will close.
Adjusting monitor angle
The angle of the monitor can be adjusted to
select from 3 different preset angles. Once the
angle of the monitor is selected and stored in the
system, the selected angle is always set after
performing the open/close operation of the
monitor.
Push and hold the OPEN/TILTbutton until a
chime sounds. When the button is released, the
next preset angle will be selected. Continue this
procedure until the preferred angle is obtained.
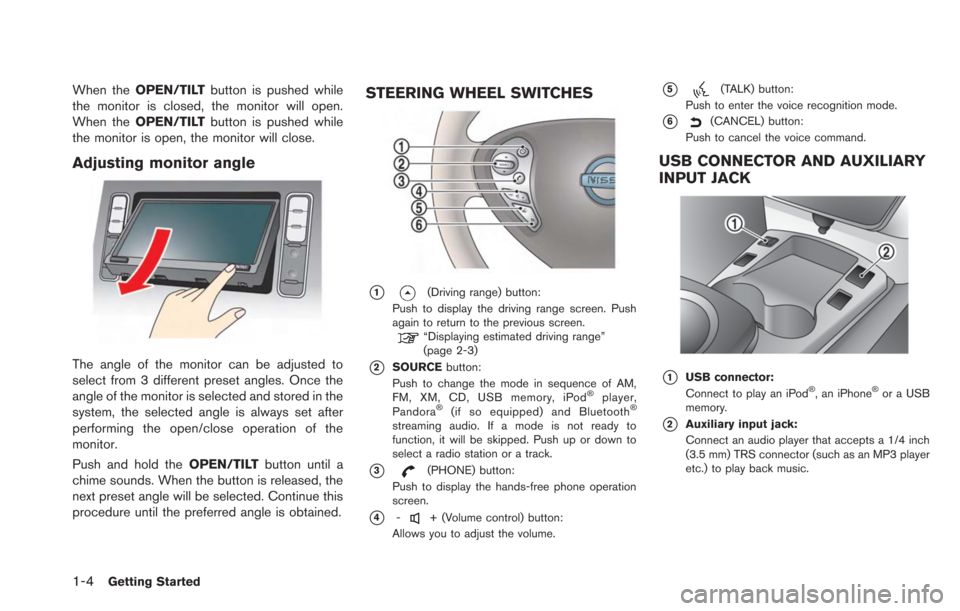
STEERING WHEEL SWITCHES
*1(Driving range) button:
Push to display the driving range screen. Push
again to return to the previous screen.
“Displaying estimated driving range”
(page 2-3)
*2SOURCE button:
Push to change the mode in sequence of AM,
FM, XM, CD, USB memory, iPod
®player,
Pandora®(if so equipped) and Bluetooth®
streaming audio. If a mode is not ready to
function, it will be skipped. Push up or down to
select a radio station or a track.
*3(PHONE) button:
Push to display the hands-free phone operation
screen.
*4-+ (Volume control) button:
Allows you to adjust the volume.
*5(TALK) button:
Push to enter the voice recognition mode.
*6(CANCEL) button:
Push to cancel the voice command.
USB CONNECTOR AND AUXILIARY
INPUT JACK
*1USB connector:
Connect to play an iPod®, an iPhone®or a USB
memory.
*2Auxiliary input jack:
Connect an audio player that accepts a 1/4 inch
(3.5 mm) TRS connector (such as an MP3 player
etc.) to play back music.
Page 30 of 275
![NISSAN LEAF 2013 1.G Navigation Manual 1-10Getting Started
.[CARWINGS]:
Information feeds are displayed and settings
for CARWINGS
TMcan be performed.“5. CARWINGSTM”
STATUS SCREEN
Push the STATUS button to display the current
status of NISSAN LEAF 2013 1.G Navigation Manual 1-10Getting Started
.[CARWINGS]:
Information feeds are displayed and settings
for CARWINGS
TMcan be performed.“5. CARWINGSTM”
STATUS SCREEN
Push the STATUS button to display the current
status of](/manual-img/5/324/w960_324-29.png)
1-10Getting Started
.[CARWINGS]:
Information feeds are displayed and settings
for CARWINGS
TMcan be performed.“5. CARWINGSTM”
STATUS SCREEN
Push the STATUS button to display the current
status of the navigation system.
Each time the STATUSbutton is pushed,
displayed information is switched in the order
of climate control, vehicle information and
navigation route information.
There are different status screens displayed
depending on various factors, such as the
currently active mode, whether a destination
has been set or not, etc.
FM·AM RADIO SCREEN
Push the FM·AMbutton to turn on the radio and
display the radio screen. Push the switch to
toggle the radio mode: AM?FM1?FM2.
“FM-AM-SAT radio operation” (page 4-12)
SIRIUSXM SATELLITE RADIO
SCREEN
Push the XMbutton to turn on the satellite radio
and display the SiriusXM Satellite Radio screen.
Push the switch to toggle the radio mode:
XM1?XM2?XM3.
“FM-AM-SAT radio operation” (page 4-12)
CD·AUX SCREEN
Push the CD·AUXbutton to turn on the audio
system and display the audio screen. Push the
CD·AUX button to toggle the mode: iPod
player
*1/USB memory/Pandora® *1*2? CD?
Bluetooth®streaming audio*1?AUX.
*1 Screen only displays when a device capable of
playback is connected.
*2 The Pandora
®is only available in U.S.
“Compact Disc (CD) player operation”
(page 4-14)
“iPod®player operation” (page 4-16)“USB memory operation” (page 4-19)“Bluetooth®streaming audio” (page 4-11)“Auxiliary input jack” (page 4-23)“Pandora®operation” (page 4-17)
Page 135 of 275
4 Audio system
Audio operation precautions ................................................... 4-2Radio ........................................................................\
............... 4-2
Compact Disc (CD) player ................................................ 4-3
USB (Universal Serial Bus) ............................................... 4-4
iPod
®player and iPhone®................................................. 4-6
Compressed Audio Files (MP3/WMA) .......................... 4-7
Bluetooth
®streaming audio ........................................... 4-11
FM-AM-SAT radio with compact disc (CD) player ........ 4-11 Audio main operation ....................................................... 4-11 FM-AM-SAT radio operation ........................................ 4-12
Compact Disc (CD) player operation........................ 4-14
iPod
®player operation .................................................. 4-16
Pandora®operation (if so equipped) ........................ 4-17
USB memory operation ................................................. 4-19
Bluetooth
®streaming audio operation ...................... 4-20
Auxiliary input jack .......................................................... 4-23
Steering wheel switches for audio control .............. 4-24
Page 145 of 275
BLUETOOTH®STREAMING AUDIO
.Some Bluetooth®audio devices may not be
recognized by the in-vehicle audio system.
. It is necessary to set up the wireless
connection between a compatible Blue-
tooth
®audio device and the in-vehicle
Bluetooth®module before using the Blue-
tooth®streaming audio.
. The Bluetooth®streaming audio may be
stopped under the following conditions:
— Receiving a hands-free call.
— Checking the connection to the hands-
free phone.
— Connecting the hands-free phone or the audio device.
— Downloading the phonebook memory from the connected cellular phone.
. Do not place a Bluetooth
®audio device in
an area surrounded by metal or far away
from the in-vehicle Bluetooth
®module to
prevent tone quality degradation and wire-
less connection disruption.
. While an audio device is connected through
a Bluetooth
®wireless connection, the bat-
tery of the device may discharge quicker
than usual. .
This system supports the Bluetooth
®Audio
Distribution Profile (A2DP, AVRCP).
. Wireless LAN (Wi-Fi) and the Bluetooth
®
functions share the same frequency band
(2.4 GHz) . Using the Bluetooth®and the
wireless LAN functions at the same time may
slow down or disconnect the communica-
tion and cause undesired noise. It is
recommended that you turn off the wireless
LAN (Wi-Fi) when using the Bluetooth
®
functions.
. Bluetooth®trademark:
Bluetooth®is a trademark owned
by Bluetooth SIG, Inc., and
licensed to Clarion.
AUDIO MAIN OPERATION
Turning audio system on/off
Push the power switch to the "ACC" or "ON"
position, and then push thebutton while the
system is off to turn on the last audio source,
that was playing immediately before the system
was turned off. While the system is on, pushing
the
button turns the system off.
Switching audio screen
. FM/AM radio band select:
Pushing the FM·AMbutton will change the
band as follows:
AM ?FM1 ?FM2 ?AM
. SiriusXM satellite radio band select:
Pushing the XMbutton will change the
band as follows:
XM1 ?XM2 ?XM3 ?XM1
. Audio mode select:
Pushing the CD·AUXbutton will switch the
displays as follows:
USB memory/iPod
®player*1/Pandora® *1*2
? CD ?Bluetooth®streaming audio*1?
AUX ?USB memory/iPod®player*1/Pan-
dora®*1*2
*1 Screen only displays when a device capable of
playback is connected.
Audio system4-11
FM-AM-SAT RADIO WITH
COMPACT DISC (CD) PLAYER
Page 150 of 275
4-16Audio system
iPod®PLAYER OPERATION
Connecting iPod
®
Connect the iPod®cable to the USB connector.
If the iPod®supports charging via USB, the
battery of the iPod®will be charged while
connected to the vehicle.
Depending on the model and firmware version of
the iPod
®, the display on the iPod®shows a
NISSAN or Accessory Attached screen when
the connection is completed. When the iPod
®is
connected to the vehicle, the iPod®music library
can only be operated by the vehicle audio
controls.
iPod
®and iPhone®are a trademark of Apple
Inc., registered in the U.S. and other countries.
CAUTION
. Do not force the iPod®cable into
the USB port. Inserting the iPod®
cable tilted or up-side-down into the
port may damage the iPod®cable
and the port. Make sure that the
iPod
®cable is connected correctly
into the USB port. (Some iPod®
cable come with amark as a
guide. Make sure that the mark is
facing the correct direction before
inserting the iPod
®cable.)
. Do not locate objects near the iPod®
cable to prevent the objects from
leaning on the iPod®cable and the
port. Pressure from the objects may
damage the iPod
®cable and the
port.
Playing iPod®
Push the power switch to the "ACC" or "ON"
position. Then, push the CD·AUXbutton
repeatedly to switch to the iPod
®mode. If the
system has been turned off while the iPod®was
playing, pushing thebutton will start the
iPod®.
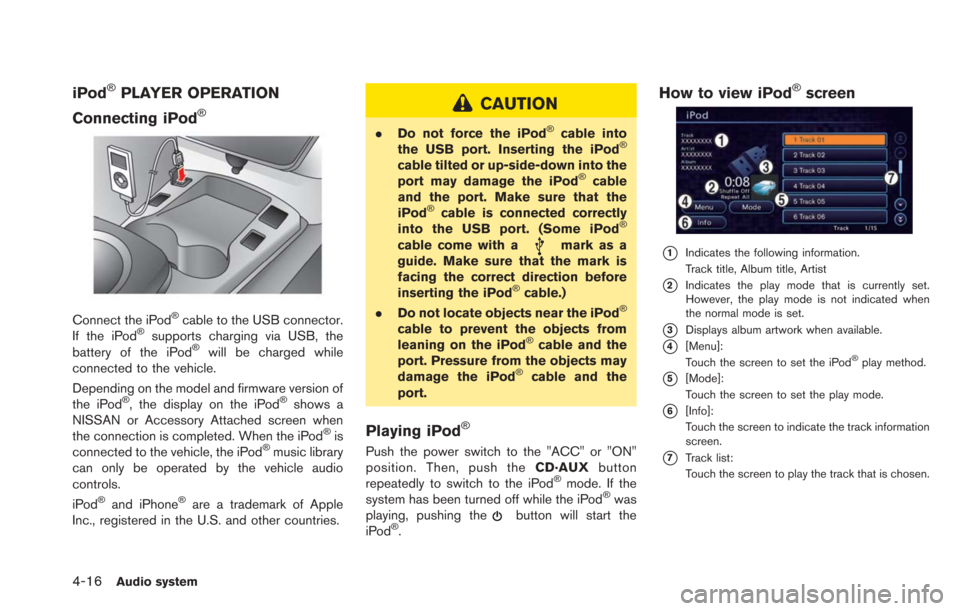
How to view iPod®screen
*1Indicates the following information.
Track title, Album title, Artist
*2Indicates the play mode that is currently set.
However, the play mode is not indicated when
the normal mode is set.
*3Displays album artwork when available.
*4[Menu]:
Touch the screen to set the iPod®play method.
*5[Mode]:
Touch the screen to set the play mode.
*6[Info]:
Touch the screen to indicate the track information
screen.
*7Track list:
Touch the screen to play the track that is chosen.
Page 152 of 275
4-18Audio system
Compatibility:
The following models are available.
.iPhone
®3GS
. iPhone®4
. iPhone®4S
. iPod touch®4G
Playing Pandora®
Push the vehicle’s power switch to the "ACC" or
"ON" position. Then, push the CD·AUXbutton
repeatedly to switch to the Pandora
®mode. If
the system was turned off while the Pandora®
was playing, pushing thebutton will start the
Pandora®.
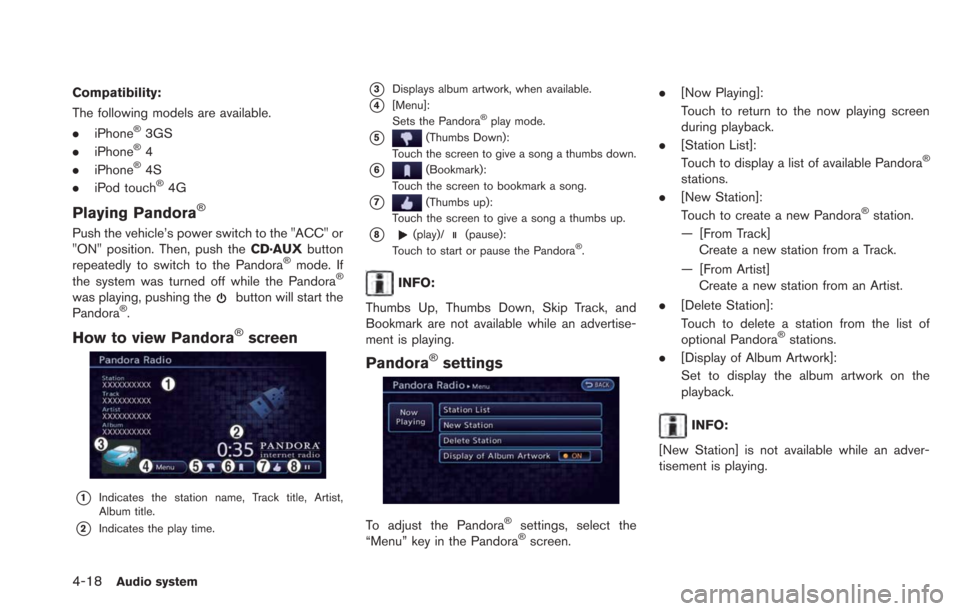
How to view Pandora®screen
*1Indicates the station name, Track title, Artist,
Album title.
*2Indicates the play time.
*3Displays album artwork, when available.
*4[Menu]:
Sets the Pandora®play mode.
*5(Thumbs Down):
Touch the screen to give a song a thumbs down.
*6(Bookmark):
Touch the screen to bookmark a song.
*7(Thumbs up):
Touch the screen to give a song a thumbs up.
*8(play)/(pause):
Touch to start or pause the Pandora®.
INFO:
Thumbs Up, Thumbs Down, Skip Track, and
Bookmark are not available while an advertise-
ment is playing.
Pandora®settings
To adjust the Pandora®settings, select the
“Menu” key in the Pandora®screen. .
[Now Playing]:
Touch to return to the now playing screen
during playback.
. [Station List]:
Touch to display a list of available Pandora
®
stations.
. [New Station]:
Touch to create a new Pandora
®station.
— [From Track] Create a new station from a Track.
— [From Artist] Create a new station from an Artist.
. [Delete Station]:
Touch to delete a station from the list of
optional Pandora
®stations.
. [Display of Album Artwork]:
Set to display the album artwork on the
playback.
INFO:
[New Station] is not available while an adver-
tisement is playing.