2013 NISSAN GT-R display
[x] Cancel search: displayPage 156 of 315

3-28Audio system
Music Library:
There are some options available during play-
back. Select one of the following options that
are displayed on the screen if necessary.
.Artists
Play tracks by an artist whose music is
currently being played. The artists are sorted
in alphabetical order.
. Albums
Play tracks in each album. The albums are
sorted in alphabetical order.
. All Songs
Play tracks from all recorded tracks. The
tracks are sorted in alphabetical order.
. Genres
Play tracks by a selected genre.
My Playlists:
Displays the Playlist and edits the Playlist if
necessary.
Select [Edit].
The following items are available
. Add Current Songs
Add a current track to the Playlist.
. Add Songs by Album
Displays a list of albums in alphabetical
order. Selecting an album displays all of the
tracks in the album. Select tracks from the list to add to the Playlist.
. Add Songs by Artist
Displays a list of artists in alphabetical order.
Selecting an artist displays all of the tracks
by the artist. Select tracks from the list to
add to the Playlist.
. Edit Songs Order
Reorder the tracks in the Playlist by select-
ing a track and specifying the order.
. Edit Name
Edit the name of the Playlist using the
keypad displayed on the screen.
“How to input letters and numbers”
(page 1-16)
. Delete Songs
Delete tracks in the Playlist by selecting from
the displayed song list.
Play Mode:
Choose the preferred play mode from the
following items.
. Normal
. 1 Album Repeat
. 1 Track Repeat
. 1 Playlist Random
. 1 Artist Random .
1 Album Random
. All Track Random
Edit Music Information:
Displays the following information about the
Music Box to edit if necessary.
. Edit Information of Current Song
Edit the “Track”, “Artist” and “Genre” in-
formation of the current track using the
keypad displayed on the screen.
“How to input letters and numbers”
(page 1-16)
Edit the “Mode”?information by selecting
from the list.
. Edit Information by Album
Edit the displayed name and of a selected
album and the track information in the album.
. Update Gracenote from USB Device
Update the in-vehicle Gracenote Database
using a USB memory. Search the title from a
information acquired on the Internet.
Visit www.nissanusa.com/gracenote/ for de-
tails.
. Transfer Missing Titles to USB
Transfer the information of an album re-
corded without titles to a USB memory.
Visit www.nissanusa.com/gracenote/ for de-
tails.
Page 157 of 315
![NISSAN GT-R 2013 R35 Multi Function Display Owners Manual .Update Gracenote from HDD
Search the title using the database in the
hard disk.
Music Box settings
To set the Music box to your preferred settings,
select [Menu] during playback, and [Music Box
Setti NISSAN GT-R 2013 R35 Multi Function Display Owners Manual .Update Gracenote from HDD
Search the title using the database in the
hard disk.
Music Box settings
To set the Music box to your preferred settings,
select [Menu] during playback, and [Music Box
Setti](/manual-img/5/316/w960_316-156.png)
.Update Gracenote from HDD
Search the title using the database in the
hard disk.
Music Box settings
To set the Music box to your preferred settings,
select [Menu] during playback, and [Music Box
Settings] with the center dial, and then push
Music Box Used/Free Space:
Information about “Saved Album”, “Saved Track”
and “Remaining Time” is displayed.
Automatic Recording:
When this item is turned to ON, the Music Box
automatically starts recording when a CD is
inserted. Delete Songs from Music Box:
Deletes the current song, selected songs or
albums by choosing from the list, or all songs/
albums in the Music Box.
Recording Quality:
Set the recording quality of 105 kbps or 132
kbps. The default is set to 105 kbps.
CDDB Version:
The version of the built-in Gracenote Database
is displayed.
Gracenote
NOTICE
.
The information contained in the
Gracenote Database is not fully
guaranteed.
. The service of the Gracenote Data-
base on the Internet may be
stopped without prior notice for
maintenance.
End-User License Agreement
USE OF THIS PRODUCT IMPLIES ACCEP-
TANCE OF THE TERMS BELOW .
Gracenote
®MusicID®Terms of Use
This application or device contains software
from Gracenote, Inc. of Emeryville, California
(“Gracenote”) . The software from Gracenote
(the “Gracenote Software”) enables this appli-
cation to perform disc and/or file identification
and obtain music-related information, including
name, artist, track, and title information (“Grace-
note Data”) from online servers or embedded
databases (collectively, “Gracenote Servers”)
and to perform other functions. You may use
Gracenote Data only by means of the intended
End-User functions of this application or device.
You agree that you will use Gracenote Data, the
Gracenote Software, and Gracenote Servers for
your own personal non-commercial use only.
You agree not to assign, copy, transfer or
transmit the Gracenote Software or any Grace-
note Data to any third party. YOU AGREE NOT
TO USE OR EXPLOIT GRACENOTE DATA,
THE GRACENOTE SOFTWARE, OR GRACE-
NOTE SERVERS, EXCEPT AS EXPRESSLY
PERMITTED HEREIN.
You agree that your non-exclusive license to use
the Gracenote Data, the Gracenote Software,
and Gracenote Servers will terminate if you
Audio system3-29
Page 163 of 315

.If the Bluetooth®Hands-Free Phone System
seems to be malfunctioning, please visit
www.nissanusa.com/bluetooth for trouble-
shooting help.
. Some cellular phones or other devices may
cause interference or a buzzing noise to
come from the audio system speakers.
Storing the device in a different location
may reduce or eliminate the noise.
. Refer to the cellular phone Owner’s Manual
regarding the telephone pairing procedure
specific to your phone, battery charging,
cellular phone antenna, etc.
. The antenna display on the monitor will not
coincide with the antenna display of some
cellular phones.
. Keep the interior of the vehicle as quiet as
possible to hear the caller’s voice clearly as
well as to minimize its echoes.
. If reception between callers is unclear,
adjusting the incoming or outgoing call
volume may improve the clarity.REGULATORY INFORMATION
FCC Regulatory information
.CAUTION: To maintain compliance with
FCC’s RF exposure guidelines, use only
the supplied antenna. Unauthorized antenna,
modification, or attachments could damage
the transmitter and may violate FCC regula-
tions.
. Operation is subject to the following two
conditions:
1. this device may not cause interference and
2. this device must accept any interference, including interference that may cause un-
desired operation of the device
IC Regulatory information
.Operation is subject to the following two
conditions: (1) this device may not cause
interference, and (2) this device must accept
any interference, including interference that
may cause undesired operation of the
device.
. This Class B digital apparatus meets all
requirements of the Canadian Interference-
Causing Equipment Regulations. Bluetooth trademark:
BLUETOOTH®is a trademark
owned by Bluetooth SIG, Inc.,
VOICE COMMANDS
You can use voice commands to operate various
Bluetooth®Hands-Free Phone System features
using the NISSAN Voice Recognition system.
“8. Voice recognition”
Bluetooth®Hands-Free Phone System4-3
Page 164 of 315
![NISSAN GT-R 2013 R35 Multi Function Display Owners Manual 4-4Bluetooth®Hands-Free Phone System
CONTROL BUTTONS
&1PHONE button&2button
CONNECTING PROCEDURE
1. Push<PHONE> or<>, and select
[Connect Phone].
2. When a PIN code appears on the screen, operate the NISSAN GT-R 2013 R35 Multi Function Display Owners Manual 4-4Bluetooth®Hands-Free Phone System
CONTROL BUTTONS
&1PHONE button&2button
CONNECTING PROCEDURE
1. Push<PHONE> or<>, and select
[Connect Phone].
2. When a PIN code appears on the screen, operate the](/manual-img/5/316/w960_316-163.png)
4-4Bluetooth®Hands-Free Phone System
CONTROL BUTTONS
&1PHONE button&2button
CONNECTING PROCEDURE
1. Push
[Connect Phone].
2. When a PIN code appears on the screen, operate the compatible Bluetooth®cellular
phone to enter the PIN code.
The connecting procedure of the cellular
phone varies according to each cellular
phone. See the cellular phone Owner’s
Manual for the details. You can also visit
www.nissanusa.com/bluetooth or call NISSAN Consumer Affairs Department for
instructions on pairing NISSAN recom-
mended cellular phones.
When the connection process is completed,
the screen will return to the Phone menu
display.
PHONE SELECTION
Up to 5 cellular phones can be registered to the
system. To switch to connect another cellular
phone, push
Phone]. The registered cellular phones are
shown on the list. If you select a cellular phone
that is different from the one currently con-
nected, the newly selected phone will be
connected to the system.
VEHICLE PHONEBOOK
This vehicle has two phonebooks available for
hands-free use. Depending on the phone, the
system may automatically download the entire
cell phone’s phonebook into the “Handset
Phonebook”.
“Phone setting” (page 4-7)
If a phonebook does not automatically down-
load, the vehicle phonebook may be set for up to
1,000 entries. This phonebook allows the
recording of a name to speak while using voice
recognition.
Page 165 of 315
![NISSAN GT-R 2013 R35 Multi Function Display Owners Manual 1. Push<PHONE> and select [Vehicle Pho-
nebook].
2. Select [Add New] at the top of the screen.
3. Choose the method for entering the phone- book entry. For this example, select [Enter
Number by Keypad NISSAN GT-R 2013 R35 Multi Function Display Owners Manual 1. Push<PHONE> and select [Vehicle Pho-
nebook].
2. Select [Add New] at the top of the screen.
3. Choose the method for entering the phone- book entry. For this example, select [Enter
Number by Keypad](/manual-img/5/316/w960_316-164.png)
1. Push
nebook].
2. Select [Add New] at the top of the screen.
3. Choose the method for entering the phone- book entry. For this example, select [Enter
Number by Keypad].
4. Enter the digits and select the “OK” key.
“How to input letters and numbers”
(page 1-16)
5. Select [Voicetag] to record a name to speak when using NISSAN Voice Recognition
system.
6. Select [Store] and prepare to speak the name after the tone.
7. When the voicetag is successfully saved, select [OK] to save the phonebook entry.
8. After the phonebook entry is saved, it will show a screen that is ready to call the
number. Press
Vehicle Phonebook.
There are different methods to input a phone
number. Select one of the following options
instead of [Enter Number by Keypad] in step 3.
. [Copy from Call History]:
The system will show a list of incoming,
outgoing or missed calls that were down-
loaded from the connected cellular phone
(depending on the phone’s compatibility) .
Select one of these entries to save in the vehicle phonebook.
. [Copy from the Handset]:
The system will show the connected cellular
phone’s phonebook that was downloaded
(depending on the phone’s compatibility) .
Select one of these entries to save in the
vehicle phonebook.Editing the Vehicle Phonebook
1. Push
nebook].
2. Select the desired entry from the displayed list.
3. Select [Edit].
4. Select the desired item to change.
Bluetooth®Hands-Free Phone System4-5
Page 166 of 315
![NISSAN GT-R 2013 R35 Multi Function Display Owners Manual 4-6Bluetooth®Hands-Free Phone System
The following editing items are available:
.[Entry #]:
Changes the displayed number of the
selected entry.
. [Name]:
Edit the name of the entry using the keypad
d NISSAN GT-R 2013 R35 Multi Function Display Owners Manual 4-6Bluetooth®Hands-Free Phone System
The following editing items are available:
.[Entry #]:
Changes the displayed number of the
selected entry.
. [Name]:
Edit the name of the entry using the keypad
d](/manual-img/5/316/w960_316-165.png)
4-6Bluetooth®Hands-Free Phone System
The following editing items are available:
.[Entry #]:
Changes the displayed number of the
selected entry.
. [Name]:
Edit the name of the entry using the keypad
displayed on the screen.
. [Number]:
Edit the phone number using the keypad
displayed on the screen.
. [Type]:
Select an icon from the icon list.
. [Voicetag]:
Confirm and store the voicetag. Voicetags
allow easy dialing using the NISSAN Voice
Recognition system.
“8. Voice recognition”
To delete an entry, select [Delete] at step 3.
MAKING A CALL
To make a call, follow this procedure.
1. Push
>. The “PHONE”
screen will appear on the display.
2. Select [Handset Phonebook] on the “PHONE” menu.
3. Select the desired entry from the list.
4. Confirm the correct entry by selecting for the correct number from the list.
5. Select [Call] to start dialing the number.
There are different methods to make a call.
Select one of the following options instead of
[Handset Phonebook] in step 2 above.
.[Vehicle Phonebook]:
Select an entry stored in the Vehicle’s
Phonebook.
. [Call History]:
Select an outgoing, incoming or missed call
downloaded from your cell phone (depend-
ing on your phone’s compatibility) .
. [Dial Number]:
Input the phone number manually using the
keypad displayed on the screen.
“How to input letters and numbers”
(page 1-16)
RECEIVING A CALL
When you hear a phone ring, the display will
change to the incoming call mode. To receive a
Page 167 of 315
![NISSAN GT-R 2013 R35 Multi Function Display Owners Manual call, perform one of the following procedures
listed below.
1. Select [Answer].
2. Push<PHONE> on the instrument panel.
3. Push <
>on the steering wheel.
There are some options available when receivin NISSAN GT-R 2013 R35 Multi Function Display Owners Manual call, perform one of the following procedures
listed below.
1. Select [Answer].
2. Push<PHONE> on the instrument panel.
3. Push <
>on the steering wheel.
There are some options available when receivin](/manual-img/5/316/w960_316-166.png)
call, perform one of the following procedures
listed below.
1. Select [Answer].
2. Push
3. Push <
>on the steering wheel.
There are some options available when receiving
a call. Select one of the following displayed on
the screen.
. [Answer]:
Accept an incoming call to talk.
. [Hold Call]:
Put an incoming call on hold.
. [Reject Call]:
Reject an incoming call.
To finish the call, perform one of the
following procedures listed below.
1. Select [Hang up].
2. Push
3. Push <
>on the steering wheel.
DURING A CALL
There are some options available during a call.
Select one of the following displayed on the
screen if necessary.
. [Hang up]:
Finish the call.
. [Use Handset]:
Transfer the call to the cellular phone.
. [Mute]:
Mute your voice to the person.
. [Keypad]:
Using the touch tone, send digits to the
connected party for using services such as
voicemail.
. [Cancel Mute]:
This will appear after [Mute] is selected.
Mute will be canceled.
To adjust the person’s voice to be louder or
quieter, push the volume control switch (+ or −)on the steering wheel or turn the volume control
knob on the instrument panel while talking on
the phone. This adjustment is also available in
the SETTING mode.
PHONE SETTING
To set up the Bluetooth®Hands-Free Phone
System to your preferred settings, push
Edit Vehicle Phonebook
Phonebook registration and editing/deleting the
registered phonebook can be performed.
Delete Phonebook
The vehicle phonebook entries can be deleted
all at the same time or one by one.
Bluetooth®Hands-Free Phone System4-7
Page 172 of 315

5-2Heater and air conditioner
WARNING
.The air conditioner cooling function
operates only when the engine is
running.
. Do not leave children or adults who
would normally require the support
of others alone in your vehicle. Pets
should not be left alone either. On
hot, sunny days, temperatures in a
closed vehicle could quickly become
high enough to cause severe or
possibly fatal injuries to people or
animals.
. Do not use the recirculation mode
for long periods as it may cause the
interior air to become stale and the
windows to fog up.
Start the engine and operate the heater and air
conditioner system.
You can individually set the driver and front
passenger side temperature using each tem-
perature control button.
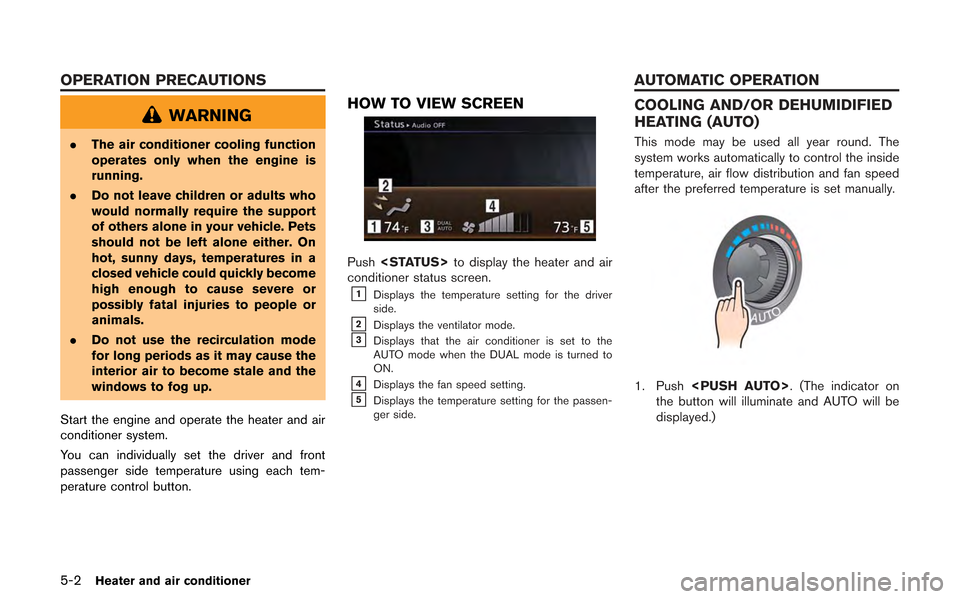
HOW TO VIEW SCREEN
Push
conditioner status screen.
&1Displays the temperature setting for the driver
side.
&2Displays the ventilator mode.&3Displays that the air conditioner is set to the
AUTO mode when the DUAL mode is turned to
ON.
&4Displays the fan speed setting.&5Displays the temperature setting for the passen-
ger side.
COOLING AND/OR DEHUMIDIFIED
HEATING (AUTO)
This mode may be used all year round. The
system works automatically to control the inside
temperature, air flow distribution and fan speed
after the preferred temperature is set manually.
1. Push
the button will illuminate and AUTO will be
displayed.)
OPERATION PRECAUTIONS AUTOMATIC OPERATION