2013 NISSAN ALTIMA COUPE display
[x] Cancel search: displayPage 2 of 26
*See your Owner’s Manual for information.
02
05
01
03
04
09
15
06
12
16
13
14
11
10
07
08
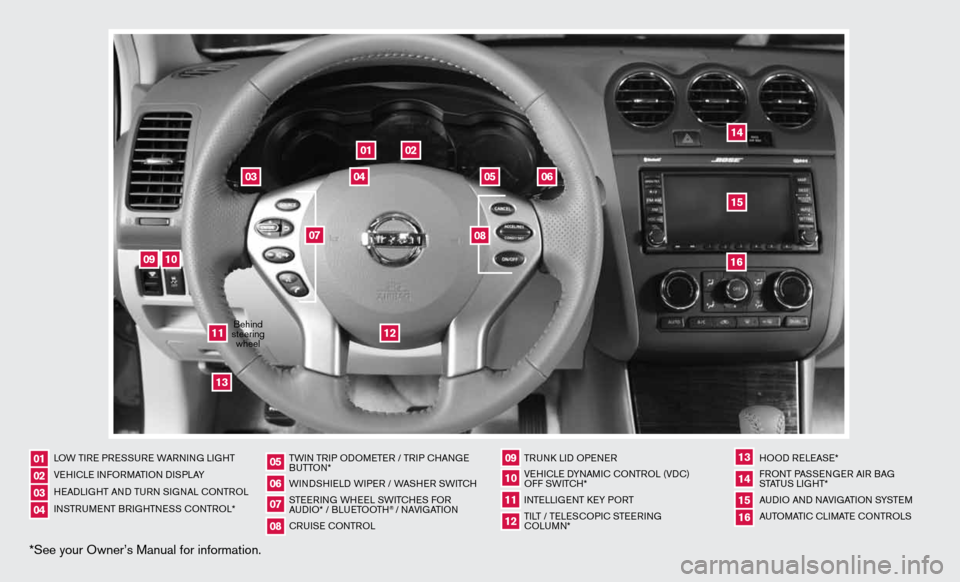
LOW TiRe PRe SSuRe WARnin G LiGHT
V e H icL e inf ORMAT iOn diSPLAY
H eAd LiGHT And Tu Rn S iG nAL c OnTROL
in STR uM enT BR iGHTne SS cOnTROL* TW
in TR iP O dOM eTe R / TR iP c HAn Ge
B uTTO n*
W ind SHieL d W iPeR / WASHeR SW iT c H
STee Rin G WH eeL SW iTc HeS fOR
A udi O* / BLueTOOTH
® / nAVi GATiOn
cR uiSe cOn TROL TRunk
Lid OP eneR
Ve Hic Le d YnAM ic cOnTROL (Vdc)
O ff SW iTc H*
inTe LLiGenT keY PORT
Ti LT / Te LeSc OP ic STee Rin G
c OLu Mn* HOO
d ReLeAS e*
f RO nT PASS enGeR Ai R BAG
STATu S LiGHT*
A udi O And nAVi GATiOn SYSTe M
A uTOMATic c LiMATe c OnTROLS
01020304
05
09
13
06
10
141516
07
11
08
12
Behind
steering wheel
Page 3 of 26
TABLe Of cOnTenTS
ESSENTIAL INFORMATION
Loose fuel cap . . . . . . . . . . . . . . . . . . . . . . . . . . . . . . . . . . . .\
. . . . . . . . . . . . 2
Tire Pressure Monitoring System (TPMS) ...........................2
FIRST DRIVE FEATURES
ni SSAn intelligent k ey
® System.................................. 3
Trunk Lid Release ............................................... 4
Power Seat Adjustments (if so equipped) ...........................4
Passenger Rear Seat entry/ exit................................... 5
Outside Mirror control Switch .................................... 5
Starting/Stopping the engine ..................................... 5
Headlight control Switch ........................................ 6
Windshield Wiper/Washer Switch ................................. 7
Automatic climate controls (if so equipped) ........................ 7
f M/AM/SiriusXM
™ Satellite Radio with cd/ dVd Player (if so equipped) ..... 9
u SB/iPod® interface (if so equipped) ............................. 10
cruise control ................................................ 10
fuel-filler door ................................................ 11
SYSTEM GUIDE
Vehicle information display ...................................... 12
Bluetooth
® Hands-free Phone System (if so equipped) ...............12
System Operating Tips ....................................... 12
Bluetooth
® System without navigation (if so equipped) ............ 13
Bluetooth® System with navigation (if so equipped) ...............15
navigation System (if so equipped) ...............................17
d Vd Player (if so equipped) ..................................... 18
HomeLink
® universal Transceiver (if so equipped) ...................18
• A cellular telephone should not be used for any purpose while
driving so full attention may be given to vehicle operation.
• Always wear your seat belt.
• Supplemental air bags do not replace proper seat belt usage.
• Children 12 and under should always ride in the rear seat
properly secured in child restraints or seat belts according to
their age and weight.
• Do not drink and drive.
f or more information, refer to the “Safety –– Seats, seat belts and
supplemental restraint system (section 1)” , the “Monitor, climate,
audio, phone and voice recognition systems (section 4)” and the
“Starting and driving (section 5)” of your Owner’s Manual.
Additional information about your vehicle is also available in your Owner’s Manual, navigation System Owner’s Manual and at www.nissanusa.com.
To view detailed
instructional videos, go to
www.nissanownersinfo.mobi/2013/ altimacoupe
or snap this barcode with an appropriate barcode reader.
Page 4 of 26
LOOSE FUEL CAP
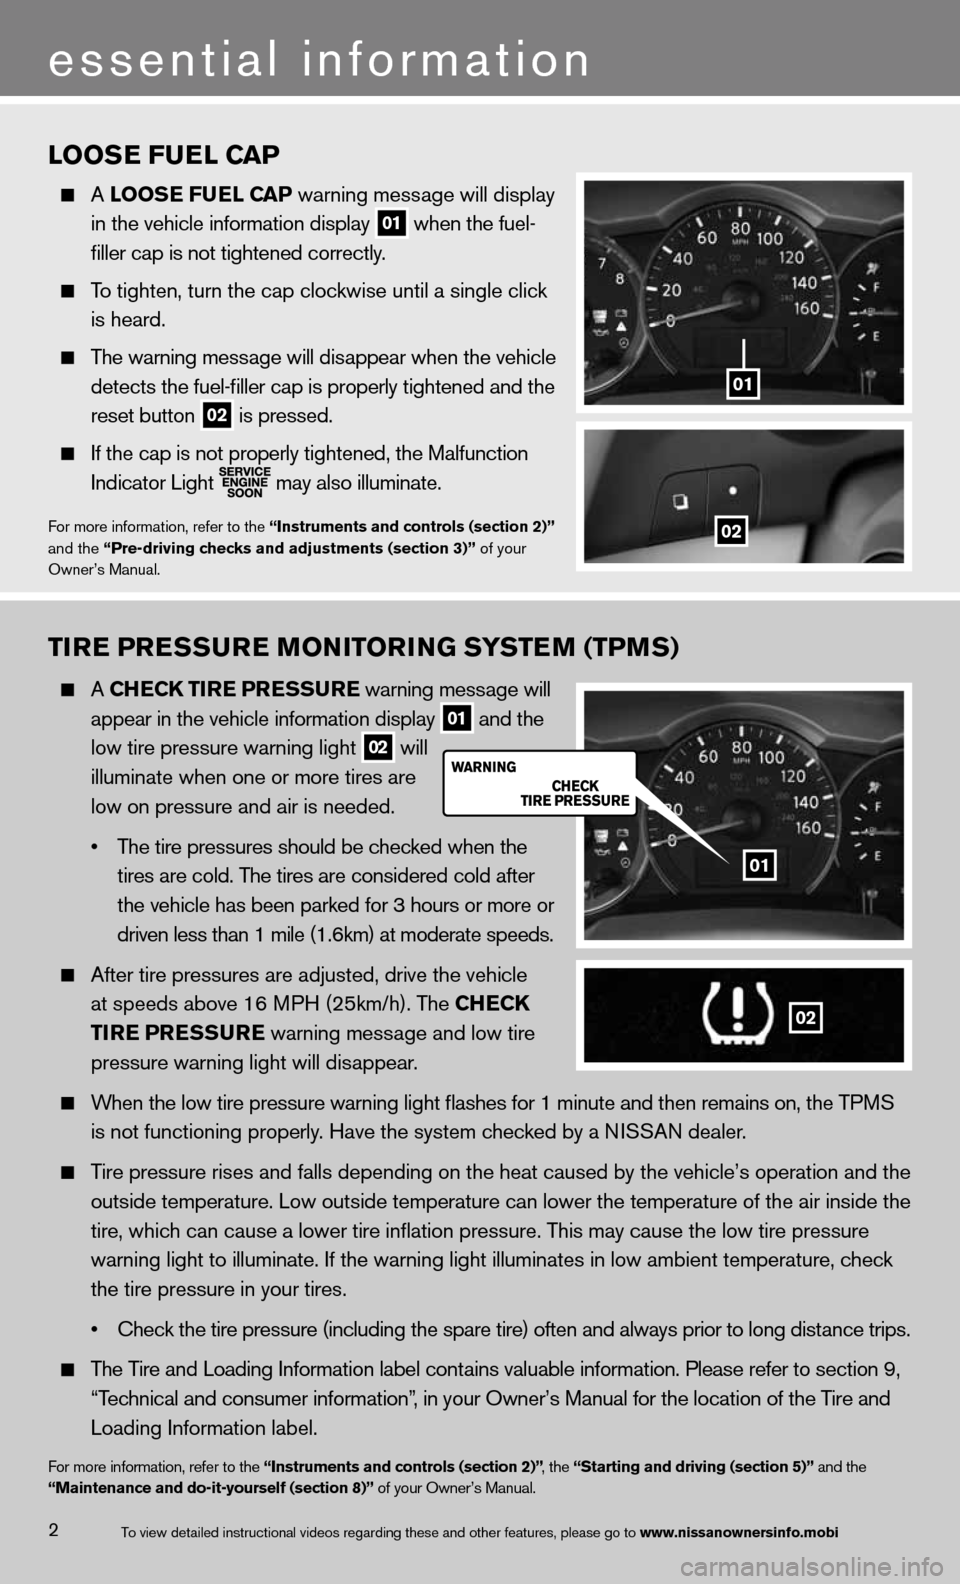
A LOOSE FUEL C AP warning message will display
in the vehicle information display
01 when the fuel-
filler cap is not tightened correctly.
To tighten, turn the cap clockwise until a single click
is heard.
The warning message will disappear when the vehicle
detects the fuel-filler cap is properly tightened and the
reset button
02 is pressed.
if the cap is not properly tightened, the Malfunction
indicator Light
may also illuminate.
f
or more information, refer to the “Instruments and controls (section 2)”
and the “Pre-driving checks and adjustments (section 3)” of your
Owner’s Manual.
TIRE PRESSURE MONITORING SYSTEM (TPMS)
A ChEC k TIRE PRESSURE warning message will
appear in the vehicle information display
01 and the
low tire pressure warning light
02 will
illuminate when one or more tires are
low on pressure and air is needed.
• The tire pressures should be checked when the
tires are cold. The tires are considered cold after
the vehicle has been parked for 3 hours or more or
driven less than 1 mile (1.6km) at moderate speeds.
After tire pressures are adjusted, drive the vehicle
at speeds above 16 MPH (25km/h). The Ch ECk
TIRE PRESSURE warning message and low tire
pressure warning light will disappear.
When the low tire pressure warning light flashes for 1 minute and then \
remains on, the TPMS
is not functioning properly. Have the system checked by a NISSAN dealer.
Tire pressure rises and falls depending on the heat caused by the vehicle’s operation and the
outside temperature. Low outside temperature can lower the temperature o\
f the air inside the
tire, which can cause a lower tire inflation pressure. This may cause the low tire pressure
warning light to illuminate. If the warning light illuminates in low ambient temperature, check
the tire pressure in your tires.
• Check the tire pressure (including the spare tire) often and always prior to long distance trips.
The Tire and Loading Information label contains valuable information. Please refer to section 9,
“Technical and consumer information”, in your Owner’s Manual for the location of the Tire and
Loading Information label.
for more information, refer to the “Instruments and controls (section 2)” , the “Starting and driving (section 5)” and the
“Maintenance and do-it-yourself (section 8)” of your Owner’s Manual.
01
2
essential information
02
02
01
To view detailed in\fstructional videos\f regarding these a\fnd other features\f \fplease go to www.nissanownersin\hfo.mobi
Page 5 of 26
NISSAN INTELLIGENT kEY® SYSTE M
The niSSAn intelligent k ey® system allows you to lock
or unlock the vehicle, open the trunk and start the engine.
n OTe: it is important to make sure the intelligent k ey is
with you (that is, in your pocket or purse).
The operating range of the intelligent k ey is within
31.5 in (80 cm) from each request switch.
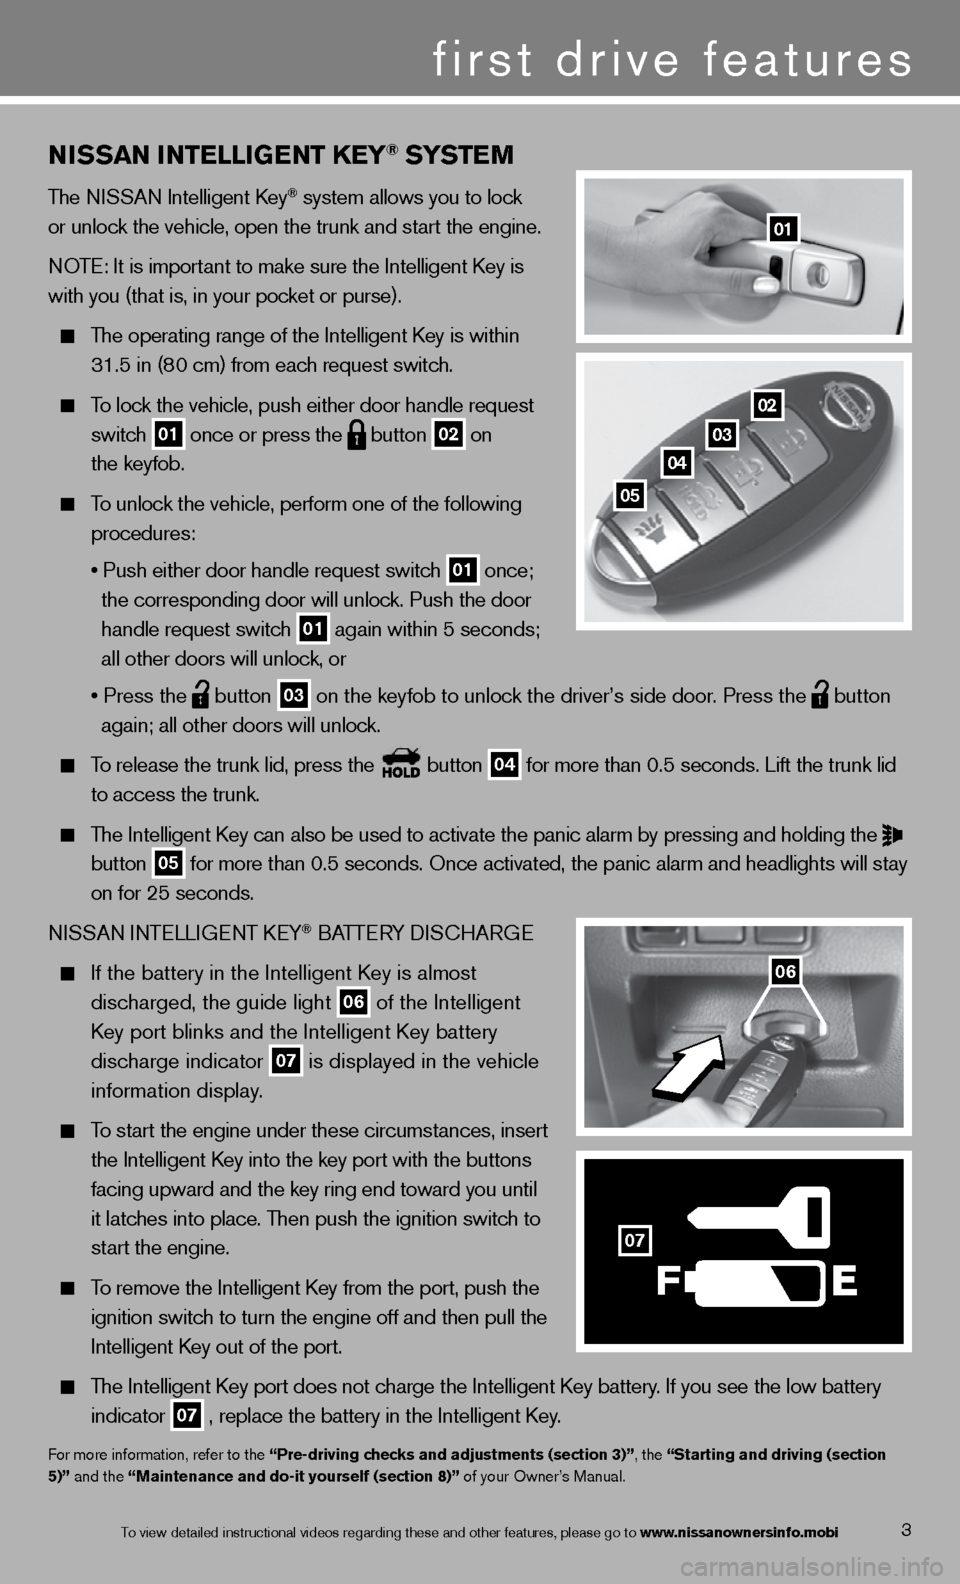
To lock the vehicle, push either door handle request
switch
01 once or press the
button
02 on
the keyfob.
To unlock the vehicle, perform one of the following
procedures:
• Push either door handle request switch
01 once;
the corresponding door will unlock. Push the door
handle request switch
01 again within 5 seconds;
all other doors will unlock, or
• Press the
button
03 on the keyfob to unlock the driver’s side door. Press the
button
again; all other doors will unlock.
To release the trunk lid, press the button
04 for more than 0.5 seconds. Lift the trunk lid
to access the trunk.
The Intelligent Key can also be used to activate the panic alarm by pressing and holding the
button
05 for more than 0.5 seconds. Once activated, the panic alarm and headlight\
s will stay
on for 25 seconds.
ni SSAn inTe LLiGenT keY
® BATTe RY diSc HARG e
If the battery in the Intelligent Key is almost
discharged, the guide light
06 of the intelligent
Key port blinks and the Intelligent Key battery
discharge indicator
07 is displayed in the vehicle
information display.
To start the engine under these circumstances, insert
the Intelligent Key into the key port with the buttons
facing upward and the key ring end toward you until
it latches into place. Then push the ignition switch to
start the engine.
To remove the intelligent k ey from the port, push the
ignition switch to turn the engine off and then pull the
intelligent k ey out of the port.
The Intelligent Key port does not charge the Intelligent Key battery. If you see the low battery
indicator
07 , replace the battery in the Intelligent Key.
f
or more information, refer to the “Pre-driving checks and adjustments (section 3)”, the “Starting and driving (section
5)” and the “Maintenance and do-it yourself (section 8)” of your Owner’s Manual.
01
3
first drive features
02
03
04
05
06
F
07
To view detailed in\fstructional videos\f regarding these a\fnd other features\f \fplease go to www.nissanownersin\hfo.mobi
Page 11 of 26
9
FM/AM/SiriusXM™* SATELLITE RADIO WITh CD/DVD PLAYER
(if so equipped)
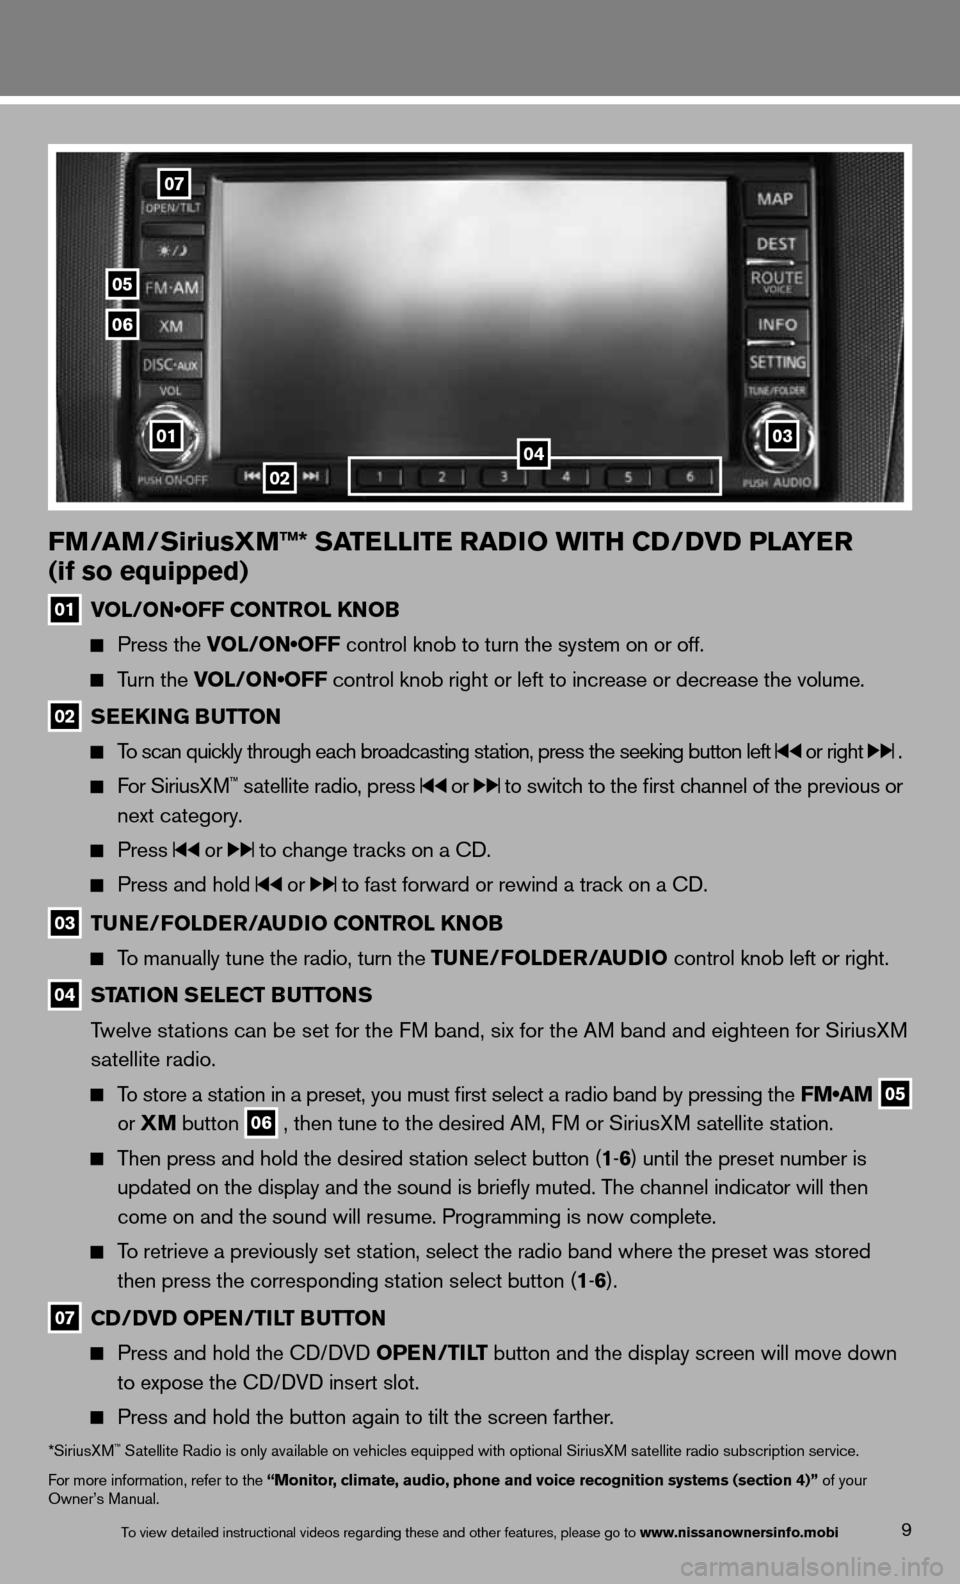
01 VOL/ON•OFF CONTROL KNOB
Press the VOL/ON•OFF control knob to turn the system on or off.
Turn the VOL/ON•OFF control knob right or left to increase or decrease the volume.
02 SEEk
ING BUTTON
To scan quickly through each broadcasting station, press the seeking button left or right .
f or SiriusXM™ satellite radio, press or to switch to the first channel of the previous or
next category.
Press or to change tracks on a cd.
Press and hold or to fast forward or rewind a track on a cd.
03 TUNE/FOLDER/AUDIO CONTROL k
NOB
To manually tune the radio, turn the TUNE/FOLDER/AUDIO control knob left or right.
04 STATION SELECT BUTTONS
Twelve stations can be set for the FM band, six for the AM band and eighteen for SiriusXM
satellite radio.
To store a station in a preset, you must first select a radio band by pressing the FM•AM
05
or
XM button
06 , then tune to the desired AM, f
M or SiriusXM satellite station.
Then press and hold the desired station select button (1 -6 ) until the preset number is
updated on the display and the sound is briefly muted. The channel indicator will then
come on and the sound will resume. Programming is now complete.
To retrieve a previously set station, select the radio band where the preset was stored
then press the corresponding station select button (1 -6 ).
07 CD/DVD OPEN/TILT BUTTON
Press and hold the cd/ dVd OPEN/TILT button and the display screen will move down
to expose the cd/ dVd insert slot.
Press and hold the button again to tilt the screen farther.
*SiriusXM™ Satellite Radio is only available on vehicles equipped with optional SiriusXM satellite radio subscription service.
for more information, refer to the “Monitor, climate, audio, phone and voice recognition systems (section 4)” of your
Owner’s Manual.
02
07
05
06
010304
To view detailed in\fstructional videos\f regarding these a\fnd other features\f \fplease go to www.nissanownersin\hfo.mobi
Page 13 of 26
2013 Altima coupe delivery checklist
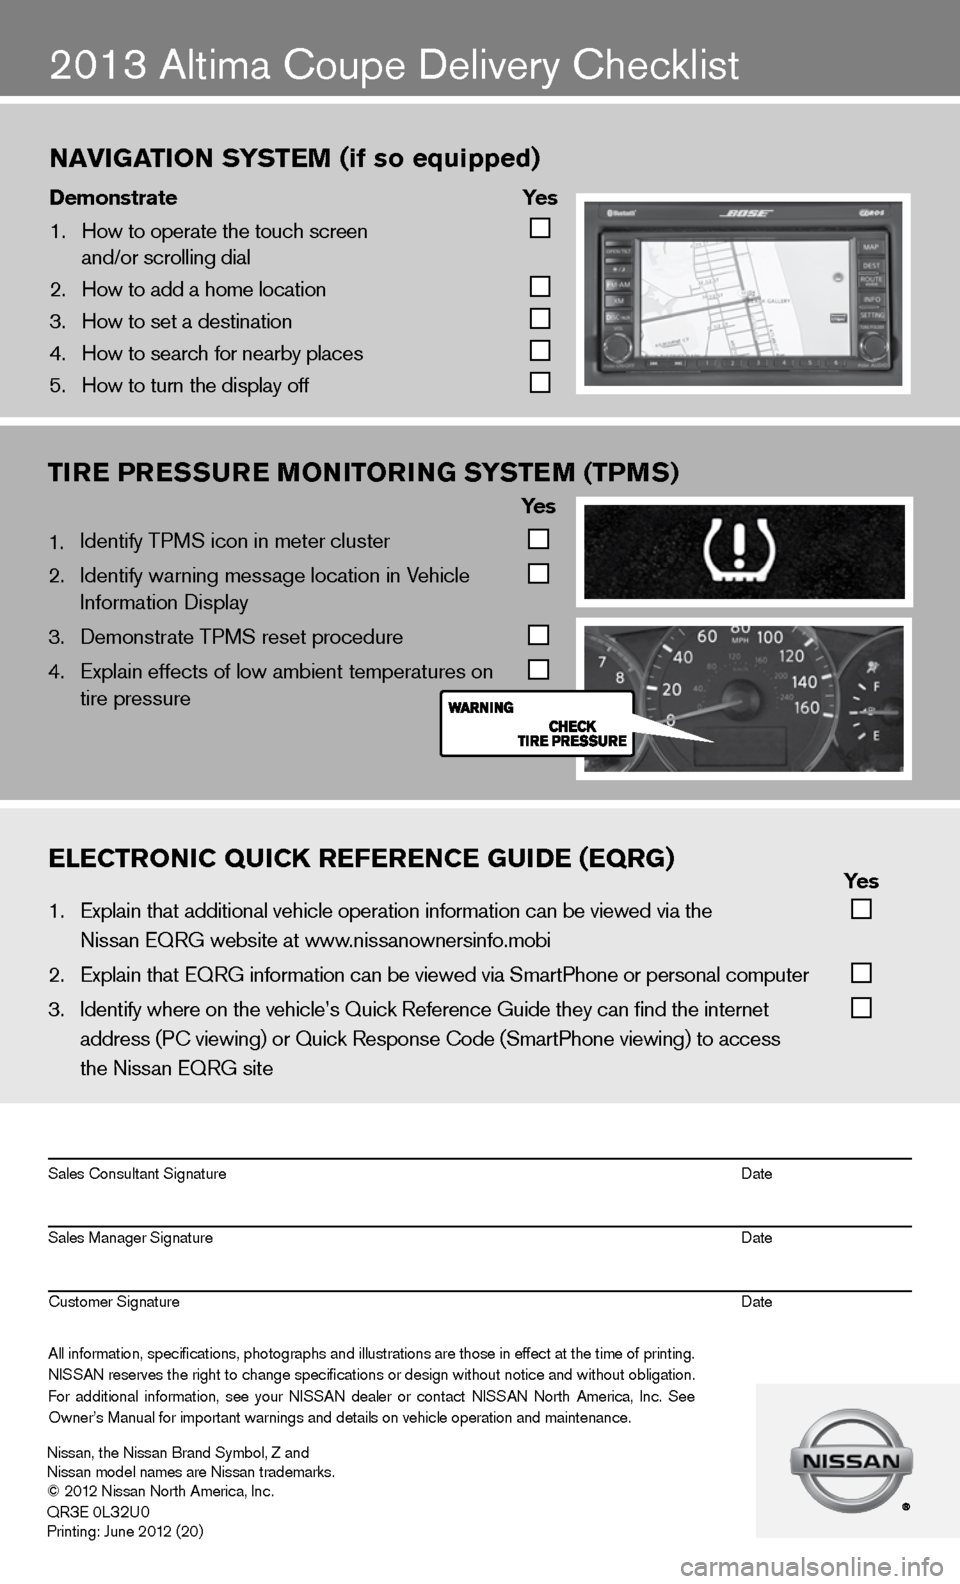
naVigation s ystem (if so equipped)
\bemonstrate yes
1. How to operate the\f touch screen
and/or scrolling d\fial
2. How to add a home \flocation
3. How to set a desti\fnation
4. How to search for n\fearby places
5. How to turn the di\fsplay off
TIRE PRESSURE MONITORING SYSTEM (TPMS)
Ye s
1. identify TPMS icon in meter cluster
2. identify warning message location in Vehicle
information display
3. demonstrate TPMS reset procedure
4. Explain effects of low ambient temperatures on
tire pressure
eleCtroniC QuiCK referenCe gui\be (eQrg) yes
1. Explain that addit\fional vehicle oper\fation information c\fan be viewed via t\fhe
Nissan EQRG websit\fe at www.nissanownersinfo.mo\fbi
2. Explain that EQRG \finformation can be \fviewed via SmartPh\fone or personal co\fmputer
3. Identify where on th\fe vehicle’s Quick \fReference Guide the\fy can find the inter\fnet
address (P\b viewing\f) or Quick Respons\fe \bode (SmartPhone \fviewing) to access\f
the Nissan EQRG si\fte
All information\f specifications\f photographs and illustrations are those in effect at the time of printing.
NISSAN reserves the right to change specifications or design without notice and without obligation.
For additional information\f see your NISSAN dealer or contact NISSAN North America\f Inc. See
Owner’s Manual for \fimportant warnings\f and details on ve\fhicle operation an\fd maintenance. Sales \bonsultant Si\fgnature Date
Sales Manager Sign\fature Date
\bustomer Signature Date
Nissan\f the Nissan \fBrand Symbol\f Z and
Nissan model names\f are Nissan tradem\farks.
© 2012 Nissan North Ame\frica\f Inc.
QR
3E 0L32U0Printing: June 2012 (20)
Page 16 of 26
BLUETOOTh® hANDS-FREE PhONE SYSTEM (if so equipped)
With an overhead microphone and sound
transmitted through the audio system speakers,
the Bluetooth
® Hands-free Phone System utilizes
Bluetooth wireless technology and voice recognition
to provide hands-free cellular phone communication.
Bluetooth Streaming Audio (available with Navigation
System only) allows you to use a compatible Bluetooth
phone to play audio files on your device. Your
compatible cellular phone can be connected to the
vehicle’s audio system allowing audio files to play
through the vehicle’s speakers.
A cellular telephone should not be used while driving
so full attention may be given to vehicle operation.*
SYSTe M OPeRATin G TiPS
close all windows. Surrounding noises may interfere
with system operation and performance.
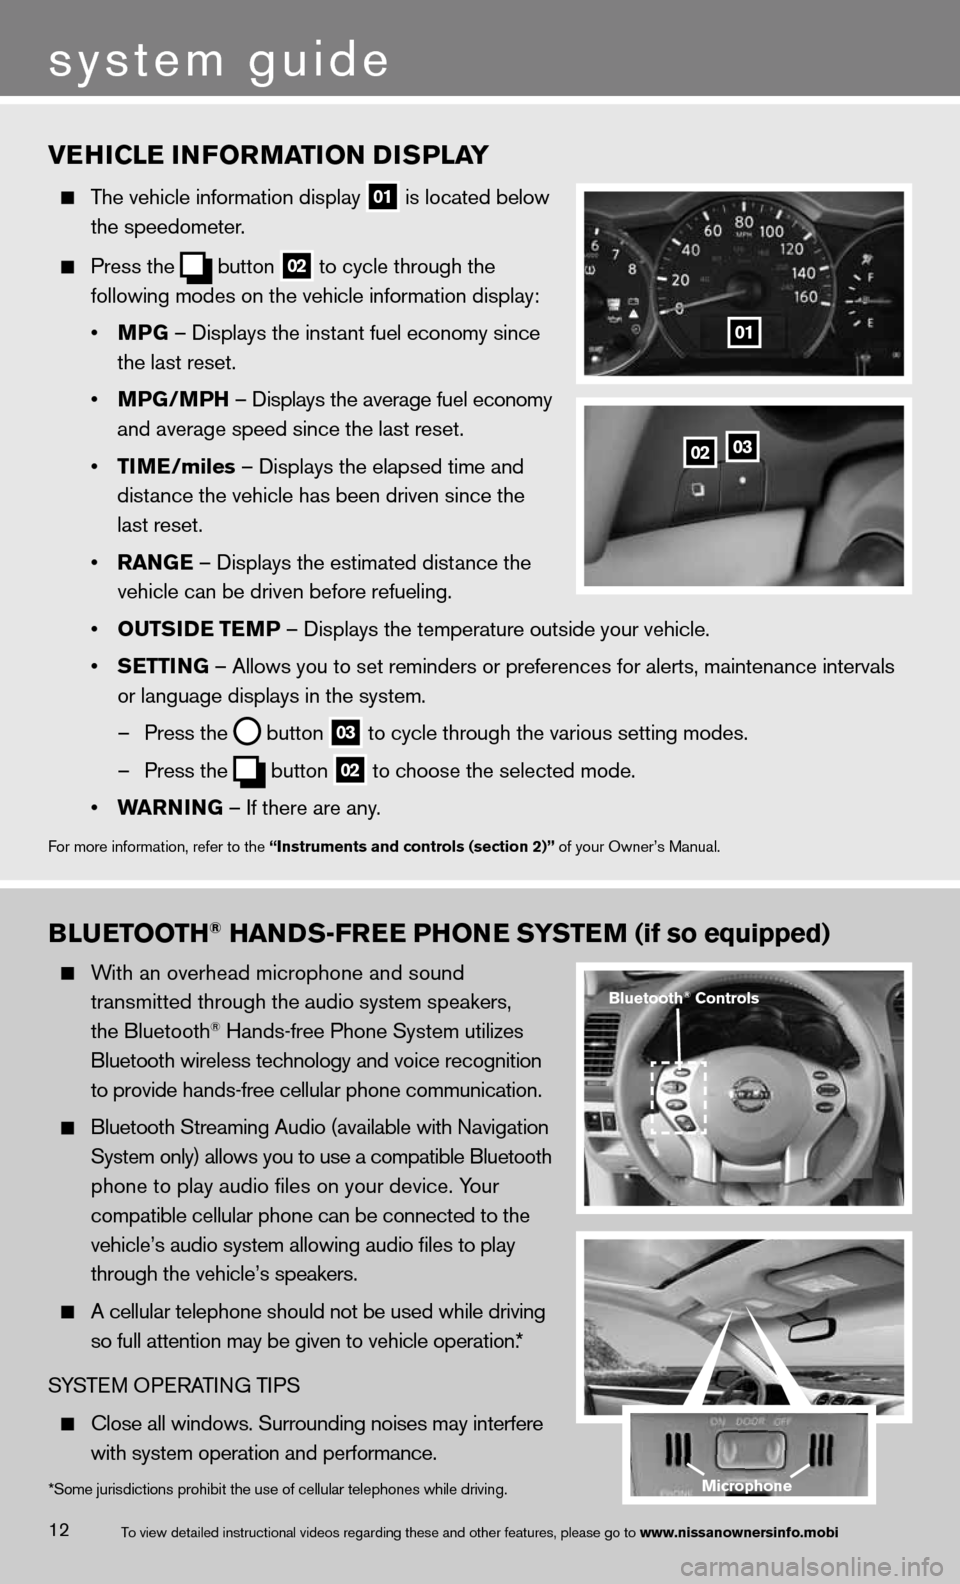
VEhICLE INFORMATION DISPLAY
The vehicle information display
01 is located below
the speedometer.
Press the
button
02 to cycle through the
following modes on the vehicle information display:
• MPG – displays the instant fuel economy since
the last reset.
• MPG/MP h – displays the average fuel economy
and average speed since the last reset.
• TIME/miles – displays the elapsed time and
distance the vehicle has been driven since the
last reset.
• RANGE – displays the estimated distance the
vehicle can be driven before refueling.
• OUTSIDE TEMP – displays the temperature outside your vehicle.
• SETTING – Allows you to set reminders or preferences for alerts, maintenance\
intervals
or language displays in the system.
– Press the
button
03 to cycle through the various setting modes.
– Press the
button
02 to choose the selected mode.
• WARNING – if there are any.
for more information, refer to the “Instruments and controls (section 2)” of your Owner’s Manual.
0203
01
*Some jurisdictions prohibit the use of cellular telephones while driving.
Bluetooth® Controls
Microphone
system guide
12To view detailed in\fstructional videos\f regarding these a\fnd other features\f \fplease go to www.nissanownersin\hfo.mobi
Page 19 of 26
Bluetooth System with Navigation* (if so equipped)
cOnnecTinG PROcedu Re
NOTE: The vehicle must be stationary when connecting
the phone.
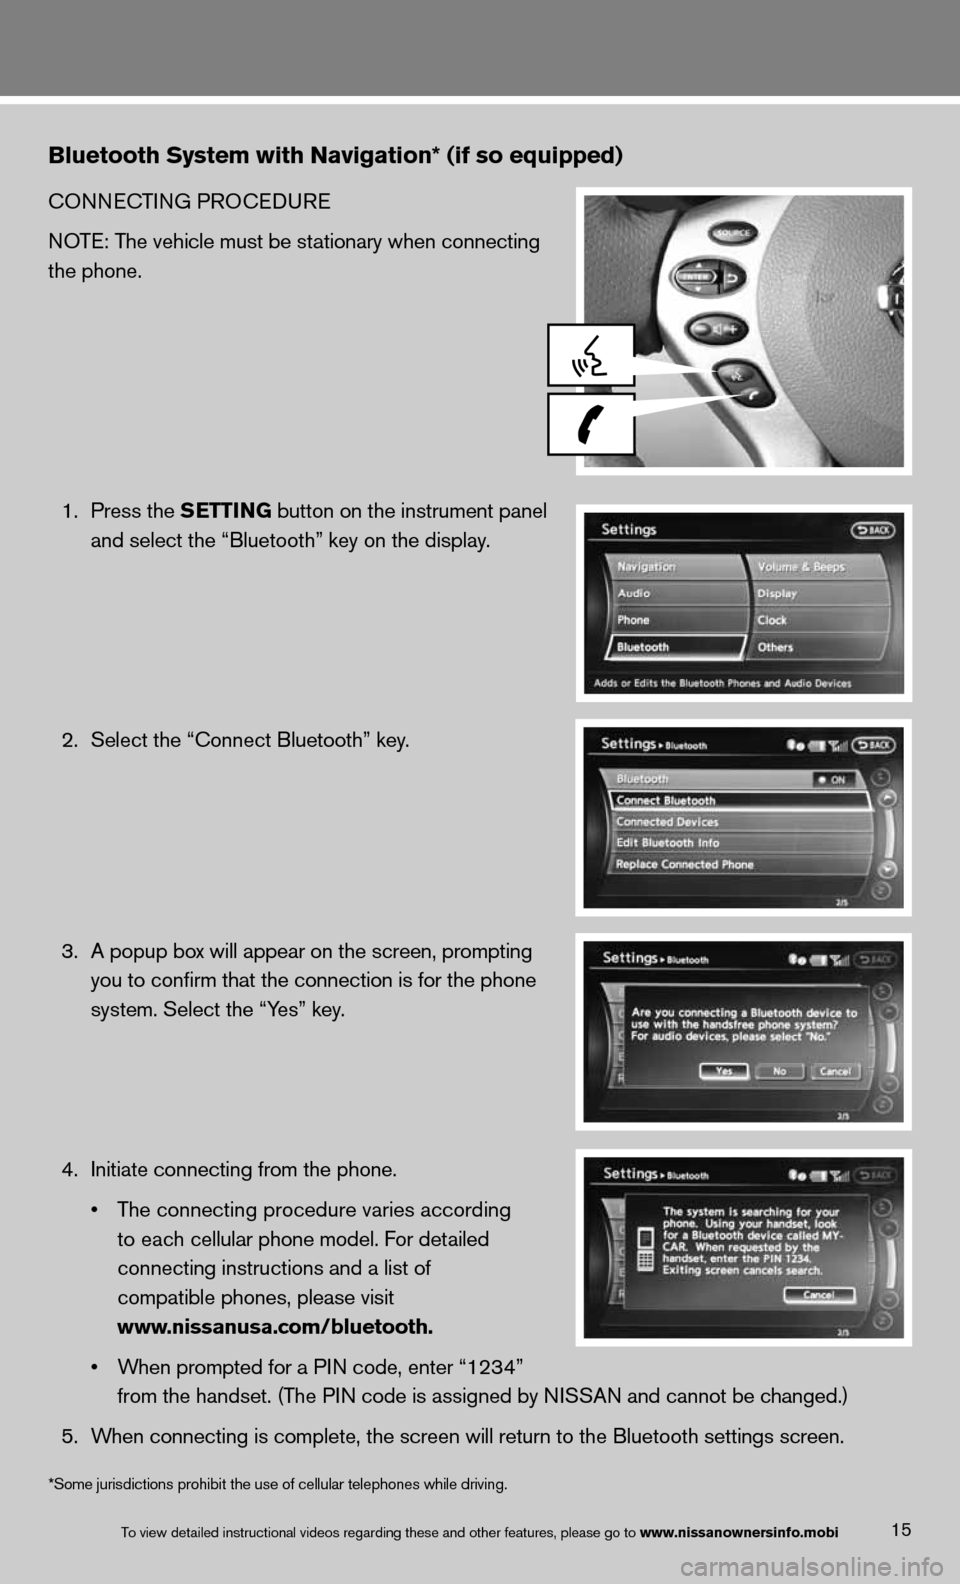
1. Press the SETTING button on the instrument panel
and select the “Bluetooth” key on the display.
2. Select the “connect Bluetooth” key.
3. A popup box will appear on the screen, prompting
you to confirm that the connection is for the phone
system. Select the “Yes” key.
4. initiate connecting from the phone.
• The connecting procedure varies according
to each cellular phone model. f or detailed
connecting instructions and a list of
compatible phones, please visit
www.nissanusa.com/bluetooth.
• When prompted for a PIN code, enter “1234”
from the handset. (The PIN code is assigned by NISSAN and cannot be changed.)
5. When connecting is complete, the screen will return to the Bluetooth sett\
ings screen.
15To view detailed in\fstructional videos\f regarding these a\fnd other features\f \fplease go to www.nissanownersin\hfo.mobi
*Some jurisdictions prohibit the use of cellular telephones while driving.