Page 331 of 706

3-238 Features and controls
3
4. The headlights will come on in the low beam setting for
about 30 seconds. After the headlights go off, the head-
lights can be turned on again in the low beam setting for
about 30 seconds by pulling the turn signal lever toward
you within 60 seconds of turning the ignition switch to the
“LOCK” position. To turn on the headlights again after 60
seconds of turning the ignition switch to the “LOCK”
position, repeat the process from step 1.NOTE�While the coming home light function is operating, per-
form one of the following operations to cancel the func-
tion.
• Pull the turn signal lever toward you.
• Turn the combination headlights and dimmer switch to
the “ ” or “ ” position.
• Turn the ignition switch to the “ON” position.
�It is possible to modify functions as follows:
• The time that the headlights remain on can be changed.
• The coming home light function can be deactivated.
For details, consult a Mitsubishi Motors dealer.
On vehicles equipped with a Mitsubishi Multi-Communi-
cation System, screen operations can be used to make the
adjustment.
Refer to the separate owner’s manual for details.
Headlight leveling switch
(if so equipped)
N00537100062
The direction of the headlight beam (the direction in which the
light shines) alters according to the number of people and the
load in the vehicle. Lower the headlight angle if it is too high
due to the number of people and/or the load in the vehicle so
that the headlights’ glare does not distract the drivers of
approaching vehicles. First set the light switch to the “ ”
position, then turn the headlight leveling switch knob to lower
the beam. The greater the number on the headlight leveling
switch knob, the lower the beam will point.
Set the switch to the appropriate position so that the headlight
beam is level with the road.
BK0151000US.book 238 ページ 2012年3月29日 木曜日 午後6時8分
Page 333 of 706

3-240 Features and controls
3
NOTE�A light in the instrument panel flashes to show when the
front and rear turn signal lights are working properly.
If this light flashes faster than usual, check for a burned
out light bulb or malfunctioning connection.
If the panel light does not come on when the lever is
moved, check for a blown fuse or a burned out bulb in the
panel.
Have the vehicle inspected by an authorized Mitsubishi
Motors dealer or a repair facility of your choice.
�It is possible to modify functions as follows:
• Deactivate the turn signal light 3-flash function for lane
changes.
• Adjust the time required to operate the lever for the 3-
flash function.
See your authorized Mitsubishi Motors dealer for details.
For vehicles equipped with the Mitsubishi Multi-Commu-
nication System, adjustments can be made using screen
operations. For further details, refer to the separate
owner’s manual.
Hazard warning flasher switch
N00522700233
If you press the flasher switch, the front and rear turn signals
will flash intermittently, and so will the hazard warning lights.
This is an emergency warning system and should not be used
when the vehicle is in motion, except for emergencies.
If you need to leave your vehicle, the flashers will keep work-
ing after the ignition switch is turned off. NOTE�If you keep the flashers on for several hours with the
engine turned off, the battery will run down.
BK0151000US.book 240 ページ 2012年3月29日 木曜日 午後6時8分
Page 384 of 706

Features and controls
3-291
3
Reading lights
N00553800070
Regardless of the dome light switch position, when you press
the lens, the light on the side that is pressed illuminates; when
you press the lens again, the light goes off.
NOTE�When the engine is started using the key while the
doors and rear hatch are closed, if you remove the key,
the dome light will illuminate for approximately 30
seconds before going off.
�When the engine is started using the F.A.S.T.-key while
the doors and rear hatch are closed, if the ignition
switch is moved to the “LOCK” position, the dome
light will illuminate for approximately 30 seconds
before going off.
�The time until the light goes off can be adjusted. See
your authorized Mitsubishi Motors dealer for details.
For vehicles equipped with the Mitsubishi Multi-Com-
munication System, adjustments can be made using
screen operations. For details, refer to the separate
owner’s manual.
2- (OFF)
The dome light goes off.
BK0151000US.book 291 ページ 2012年3月29日 木曜日 午後6時8分
Page 386 of 706

Features and controls
3-293
3
Cargo room light
N00526200063
NOTE�When the engine is started using the key while the
doors and the rear hatch are closed, if you remove the
key, the dome light will illuminate for approximately 30
seconds before going off.
�When the engine is started using the F.A.S.T.-key while
the doors and the rear hatch are closed, if the ignition
switch is moved to the “LOCK” position, the dome
light will illuminate for approximately 30 seconds
before going off.
�The time until the light goes off can be adjusted. See
your authorized Mitsubishi Motors dealer for details.
For vehicles equipped with the Mitsubishi Multi-Com-
munication System, adjustments can be made using
screen operations. For details, refer to the separate
owner’s manual.
3- (OFF)
The dome light goes off.1- (ON)
The light illuminates regardless of whether the rear hatch is
open or closed.
2-
The light illuminates when the rear hatch is opend, and goes
off when the rear hatch is closed.
3- (OFF)
The light remains off regardless of whether the rear hatch is
open or closed.
BK0151000US.book 293 ページ 2012年3月29日 木曜日 午後6時8分
Page 387 of 706

N00526300383
If any of the interior lights are left on with the ignition switch
in the “LOCK” posit")
3-294 Features and controls
3
Interior light auto-cutout function (dome light
and other lights)
N00526300383
If any of the interior lights are left on with the ignition switch
in the “LOCK” position, the lights go off automatically after
about 30 minutes.
The lights come on again if the ignition switch is turned to the
“ON” or “ACC” position, any door or the rear hatch is opened
and closed, or the keyless entry system or F.A.S.T.-key is oper-
ated.NOTE�The interior light auto-cutout function can be deactivated.
The time until the lights automatically go off can be
adjusted. See your authorized Mitsubishi Motors dealer
for details.
For vehicles equipped with the Mitsubishi Multi-Commu-
nication System, adjustments can be made using screen
operations. For details, refer to the separate owner’s man-
ual.
Storage spaces
N00526400498
NOTE�Do not leave valuables in any storage space when leaving
the vehicle.
CAUTION
!�Never leave lighters, carbonated drink cans, or spec-
tacles in the cabin when parking the vehicle in hot
sunshine. The cabin will become extremely hot, so
lighters and other flammable items may catch fire
and unopened drink cans (including beer cans) may
rupture. The heat may also deform or crack plastic
spectacle parts.�Keep the lids of storage spaces closed while driving
the vehicle. A lid or the contents of a storage space
could otherwise cause injuries during a sudden stop.
BK0151000US.book 294 ページ 2012年3月29日 木曜日 午後6時8分
Page 639 of 706
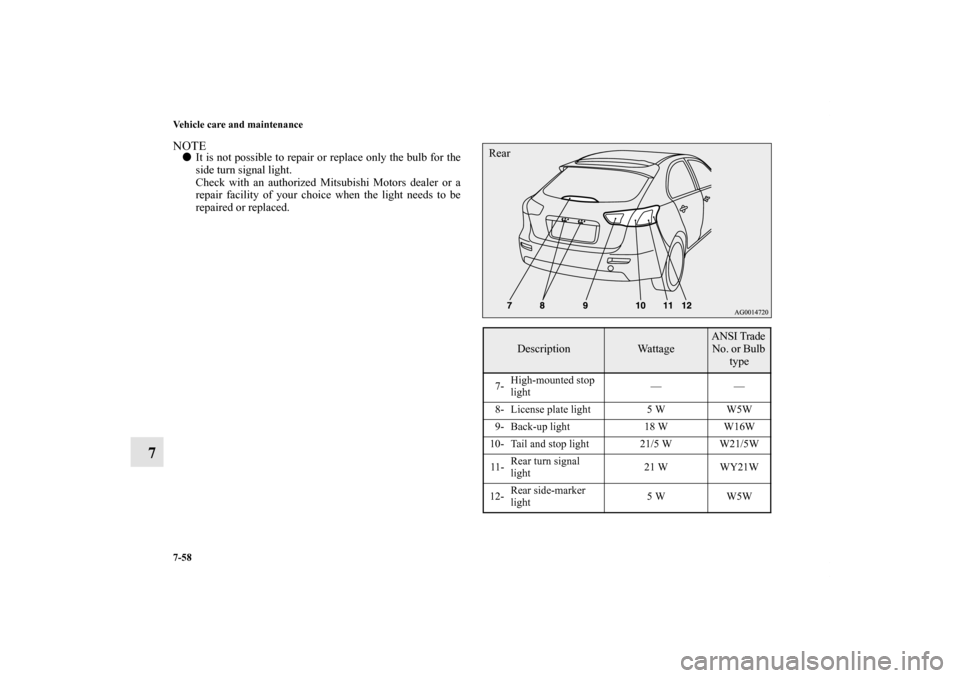
7-58 Vehicle care and maintenance
7
NOTE�It is not possible to repair or replace only the bulb for the
side turn signal light.
Check with an authorized Mitsubishi Motors dealer or a
repair facility of your choice when the light needs to be
repaired or replaced.
Description
Wattage
ANSI Trade
No. or Bulb
type
7-High-mounted stop
light——
8- License plate light 5 W W5W
9- Back-up light 18 W W16W
10- Tail and stop light 21/5 W W21/5W
11-Rear turn signal
light21 W WY21W
12-Rear side-marker
light5 W W5WRear
BK0151000US.book 58 ページ 2012年3月29日 木曜日 午後6時8分
Page 662 of 706
Vehicle care and maintenance
7-81
7
Rear combination lights
N00943700429
Tail and stop lights, rear turn signal lights and rear
side-marker lights1. Insert a screwdriver at the edge of the cover and pry gen-
tly to remove the cover. NOTE�Wrap a cloth around the tip of the screwdriver to keep
from scratching the cover.2. Remove the socket and bulb assemblies by turning them
counterclockwise.
A- Rear side-marker light
B- Rear turn signal light
C- Tail and stop light
BK0151000US.book 81 ページ 2012年3月29日 木曜日 午後6時8分
Page 663 of 706
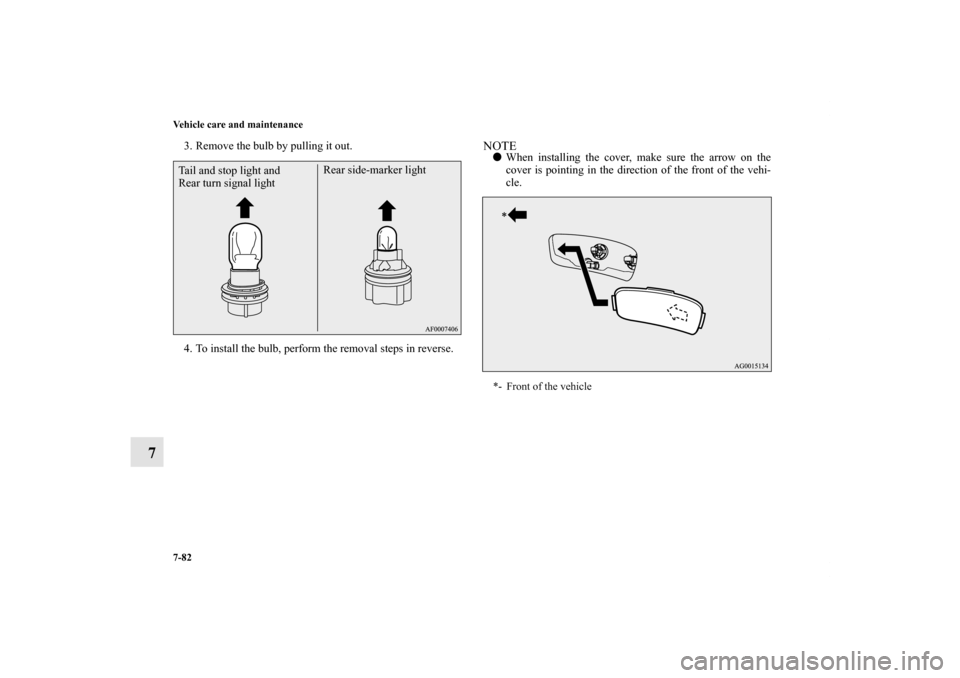
7-82 Vehicle care and maintenance
7
3. Remove the bulb by pulling it out.
4. To install the bulb, perform the removal steps in reverse.
NOTE�When installing the cover, make sure the arrow on the
cover is pointing in the direction of the front of the vehi-
cle.
Tail and stop light and
Rear turn signal lightRear side-marker light
*- Front of the vehicle
BK0151000US.book 82 ページ 2012年3月29日 木曜日 午後6時8分