Page 317 of 706

3-224 Features and controls
3Indicators
N00519900127
Turn signal indicators/Hazard warning lights
N00520000229
The arrows will flash in time with the corresponding exterior
turn signals when the turn signal lever is used.
Both arrows will flash when the hazard warning flasher switch
is pressed.NOTE�If the indicator flashes faster than usual or if the indicator
stays on without flashing, check for a malfunctioning turn
signal light bulb or turn signal connection.High beam indicator
N00520100086
A blue light comes on when the headlights are on high beam.Front fog light indicator
N00520200218
This indicator comes on while the front fog lights are on.Position indicator
N00551300026
This indicator light illuminates while the position lights are on.
Warning lights
N00520300147
Brake warning light
N00520400366
When the ignition switch is turned to the “ON” position, this
indicator normally comes on and goes out a few seconds later.
A warning is also displayed in the multi-information display.
The warning light also illuminates after starting the engine
under the following conditions:
�When the parking brake is still applied.
�When the brake fluid level is low.
�When the brake system circuit is not working properly.
Before driving, be sure that the parking brake is fully released
and brake warning light is off.
CAUTION
!�If the brake warning light and the anti-lock braking
system warning light are illuminated at the same
time, the braking force distribution function will not
operate, so the vehicle may be destabilized during
sudden braking under the following conditions.
• When the brake warning light does not go out even
when the parking brake is released.
• When the brake warning light stays on while driv-
ing.
• If the above occurs, avoid sudden braking and
high-speed driving. Park the vehicle in a safe
place, and contact an authorized Mitsubishi
Motors dealer or a repair facility of your choice as
soon as possible.
BK0151000US.book 224 ページ 2012年3月29日 木曜日 午後6時8分
Page 637 of 706

7-56 Vehicle care and maintenance
7Replacement of light bulbs
N00942900219
Before replacing a bulb, be sure the light is off. Do not touch
the glass part of the new bulb with your bare fingers; the oil
from your skin will stay on the glass and dim or destroy the
bulb when it gets hot.NOTE�If you are unsure of how to carry out the work as required,
it is recommended that these procedures be carried out by
an authorized Mitsubishi Motors dealer or a repair facility
of your choice.
�Be careful not to scratch the vehicle body when removing
a light and lens.
�When it rains, or when the vehicle has been washed, the
inside of the lens sometimes becomes temporarily foggy.
This is the same phenomenon as when window glass mists
up on a humid day, and does not indicate a functional
problem.
When the light is switched on, the heat will remove the
fog. However, if water gathers inside the light, please
have it checked by an authorized Mitsubishi Motors
dealer or a repair facility of your choice.
Bulb capacity
N00943000158
The bulb should only be replaced with a new bulb with the
same rating and type. The type and rating are listed on the base
of the bulb.Outside
N00950300818
CAUTION
!�Bulbs are extremely hot immediately after being
turned off.
When replacing a bulb, wait for it to cool sufficiently
before touching it. You could otherwise be burned.
Front
BK0151000US.book 56 ページ 2012年3月29日 木曜日 午後6時8分
Page 638 of 706
![MITSUBISHI LANCER SPORTBACK 2013 8.G Owners Manual Vehicle care and maintenance
7-57
7
[For vehicles without high intensity discharge headlights] [For vehicles equipped with high intensity discharge head-
lights]
Description
Wattage
ANSI Trade
No. or](/manual-img/19/7504/w960_7504-637.png "MITSUBISHI LANCER SPORTBACK 2013 8.G Owners Manual Vehicle care and maintenance
7-57
7
[For vehicles without high intensity discharge headlights] [For vehicles equipped with high intensity discharge head-
lights]
Description
Wattage
ANSI Trade
No. or")
Vehicle care and maintenance
7-57
7
[For vehicles without high intensity discharge headlights] [For vehicles equipped with high intensity discharge head-
lights]
Description
Wattage
ANSI Trade
No. or Bulb
type
1-Front turn signal
light21 W WY21W
2- Headlight, high beam 60 W9005
HB3
3-Headlight, low beam
(Halogen bulb)51 W9006
HB4
4- Front fog light 55 W H11
5-Front side-marker
and parking light5 W WY5W
6- Side turn signal light 5 W —
Description
Wattage or Candle
power
ANSI Trade
No. or Bulb
type
1-Front turn signal
light21 W WY21W
2-Daytime running
light27 W
32 cp1156
3-Headlight, low/high
beam (Discharge
bulb)35 W —
4- Front fog light 55 W H11
5-Front side-marker
and parking light5 W WY5W
6- Side turn signal light 5 W —
WA R N I N G
!�Check with an authorized Mitsubishi Motors dealer
or a repair facility of your choice when it is neces-
sary to repair a discharge headlight or to replace the
bulb.
The power circuit, bulb and electrodes generate high
voltages that may cause a severe electrical shock.
BK0151000US.book 57 ページ 2012年3月29日 木曜日 午後6時8分
Page 654 of 706
Vehicle care and maintenance
7-73
7
3. Remove the bulb by pulling it out.
4. To install the bulb, perform the removal steps in reverse.
Front fog lights (Type 1)
(if so equipped)
N00943600734
1. Remove the screw (A) and pull the cover out.
BK0151000US.book 73 ページ 2012年3月29日 木曜日 午後6時8分
Page 656 of 706
Vehicle care and maintenance
7-75
7
3. Push the connector (D) to disconnect and remove the fog
light. 4. Remove the bulb assembly (E) by turning it counterclock-
wise.
5. To install the bulb, perform the removal steps in reverse.
BK0151000US.book 75 ページ 2012年3月29日 木曜日 午後6時8分
Page 657 of 706
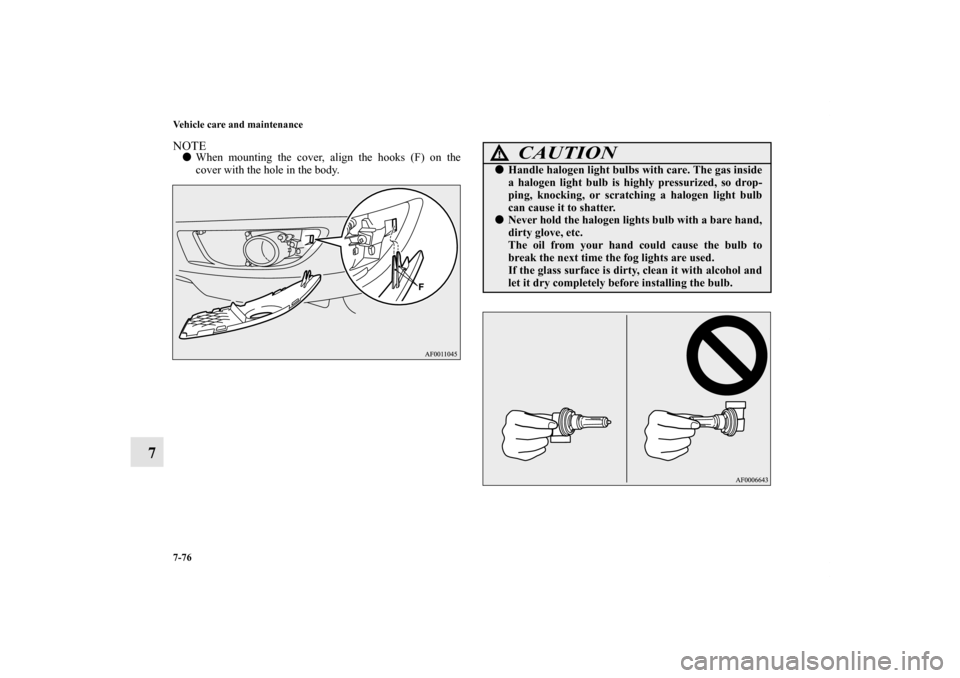
7-76 Vehicle care and maintenance
7
NOTE�When mounting the cover, align the hooks (F) on the
cover with the hole in the body.
CAUTION
!�Handle halogen light bulbs with care. The gas inside
a halogen light bulb is highly pressurized, so drop-
ping, knocking, or scratching a halogen light bulb
can cause it to shatter.�Never hold the halogen lights bulb with a bare hand,
dirty glove, etc.
The oil from your hand could cause the bulb to
break the next time the fog lights are used.
If the glass surface is dirty, clean it with alcohol and
let it dry completely before installing the bulb.
BK0151000US.book 76 ページ 2012年3月29日 木曜日 午後6時8分
Page 660 of 706
Vehicle care and maintenance
7-79
7
4. Push the connector (D) to disconnect and remove the fog
light. 5. Remove the bulb assembly (E) by turning it counterclock-
wise.
6. To install the bulb, perform the removal steps in reverse.
BK0151000US.book 79 ページ 2012年3月29日 木曜日 午後6時8分
Page 661 of 706
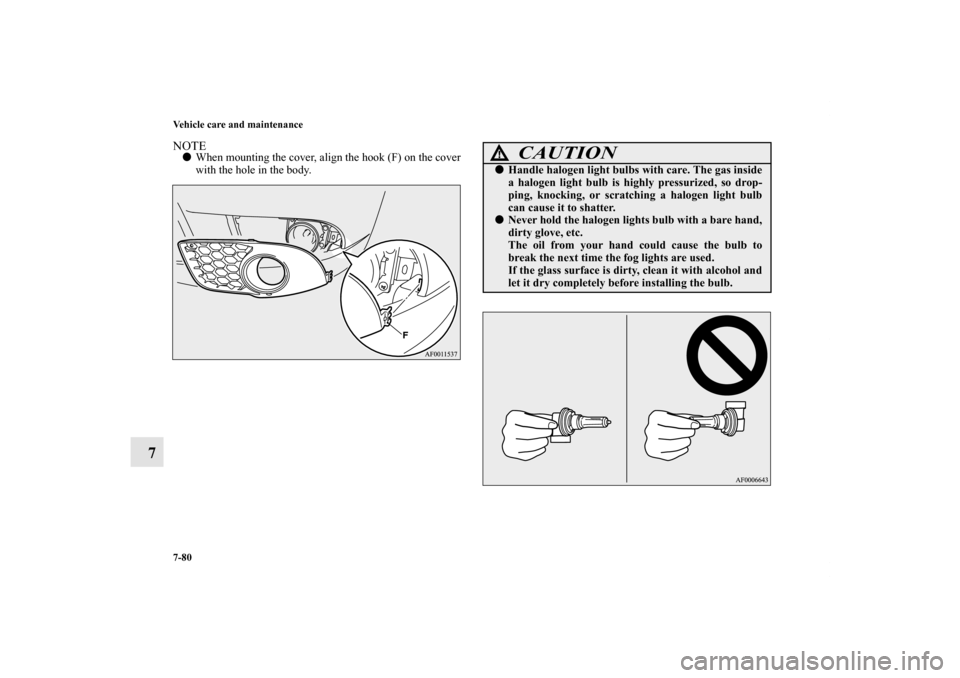
7-80 Vehicle care and maintenance
7
NOTE�When mounting the cover, align the hook (F) on the cover
with the hole in the body.
CAUTION
!�Handle halogen light bulbs with care. The gas inside
a halogen light bulb is highly pressurized, so drop-
ping, knocking, or scratching a halogen light bulb
can cause it to shatter.�Never hold the halogen lights bulb with a bare hand,
dirty glove, etc.
The oil from your hand could cause the bulb to
break the next time the fog lights are used.
If the glass surface is dirty, clean it with alcohol and
let it dry completely before installing the bulb.
BK0151000US.book 80 ページ 2012年3月29日 木曜日 午後6時8分

(if so equipped)
N00943600734
1. Remo")
 to disconnect and remove the fog
light. 4. Remove the bulb assembly (E) by turning it counterclock-
wise.
5. To install the bulb, perform")
 to disconnect and remove the fog
light. 5. Remove the bulb assembly (E) by turning it counterclock-
wise.
6. To install the bulb, perform")