Page 269 of 706

3-176 Features and controls
3
Rheostat meter illumination button
N00554900179
Each time you press this button, there is a sound and the bright-
ness of the instruments changes.
NOTE�You can adjust to 8 different levels respectively for when
the tail lights are illuminated and when they are not.
�If the vehicle is equipped with the automatic light control,
when the light switch is in a position other than the “OFF”
position, the meter illumination switches automatically to
the adjusted brightness, depending on the brightness out-
side the vehicle.
�The brightness level of the instruments is stored in mem-
ory when the ignition switch is turned off.
�If you press and hold the button for longer than about 1
second when the parking lights are illuminated, the bright-
ness level changes to the maximum level. Pressing and
holding the button for longer than about 1 second again
returns the brightness level to the previous level.
1- Brightness display
2- Rheostat illumination button
BK0151000US.book 176 ページ 2012年3月29日 木曜日 午後6時8分
Page 284 of 706

Features and controls
3-191
3
NOTE�Warning display screens with a “ ” or “ ” mark dis-
played in the upper right of the screen can be switched. If
you want to switch the display, press the multi-informa-
tion meter switch as follows.
“ ”: Press lightly.
“ ”: Press for about 2 seconds or more.
Redisplay of a warning display screenWhen the warning is displayed, if you lightly press the
multi-information meter switch a few times, the warning dis-
play screen you switched from is redisplayed.Other interrupt displaysThe operation status of each system is displayed on the infor-
mation screen.
For further details, refer to the appropriate page in the warning
display list.
Refer to “Other interrupt displays (With ignition switch in the
“ON” position)” on page 3-222.Selector lever position display screen {continu-
ously variable transmission (CVT)}
N00556400051
Shows the position of the selector lever.
Refer to “Selector lever operation” on page 3-98.Gearshift lever position display screen (Twin
Clutch SST)
N00545800068
Shows the position of the gearshift lever.
Refer to “Gearshift lever operation” on page 3-112.
Ty p e 1
Ty p e 2
BK0151000US.book 191 ページ 2012年3月29日 木曜日 午後6時8分
Page 291 of 706
.
�If no operations are made")
3-198 Features and controls
3
NOTE�To return the menu screen to the function setting screen,
press and hold the multi-information meter switch (for
about 2 seconds or more).
�If no operations are made within about 15 seconds of the
menu screen being displayed, the display returns to the
function setting screen.
4. Select the item to change on the menu screen and change
to the desired setting. For further details on the operation
methods, refer to the following sections.
Refer to “Changing the reset mode for average fuel con-
sumption and average speed” on page 3-198.
Refer to “Changing the fuel consumption display unit” on
page 3-200.
Refer to “Changing the temperature unit” on page 3-202.
Refer to “Changing the display language” on page 3-203.
Refer to “Changing the language on Mitsubishi Multi-
Communication System or Bluetooth
® 2.0 interface to
match the multi-information display (if so equipped)” on
page 3-203.
Refer to “Operation sound setting” on page 3-205.
Refer to “Changing the amount of time until “REST
REMINDER” is displayed” on page 3-206.
Refer to “Changing the turn signal sound” on page 3-207.
Refer to “Changing the momentary fuel consumption dis-
play (Type 2)” on page 3-208.
Refer to “Returning to the factory settings” on page 3-
209.
Changing the reset mode for average fuel consumption
and average speed
N00557000197
You can change the mode condition for the average fuel con-
sumption and average speed display to “Auto reset” or “Man-
ual reset”.
1. Press and hold the multi-information meter switch (for
about 2 seconds or more) to switch from the setting mode
screen to the menu screen.
Refer to “Changing the function settings (With ignition
switch in the “ON” position)” on page 3-197.
2. Lightly press the multi-information meter switch to select
“AVG” (average fuel consumption and average speed set-
ting).
BK0151000US.book 198 ページ 2012年3月29日 木曜日 午後6時8分
Page 323 of 706
3-230 Features and controls
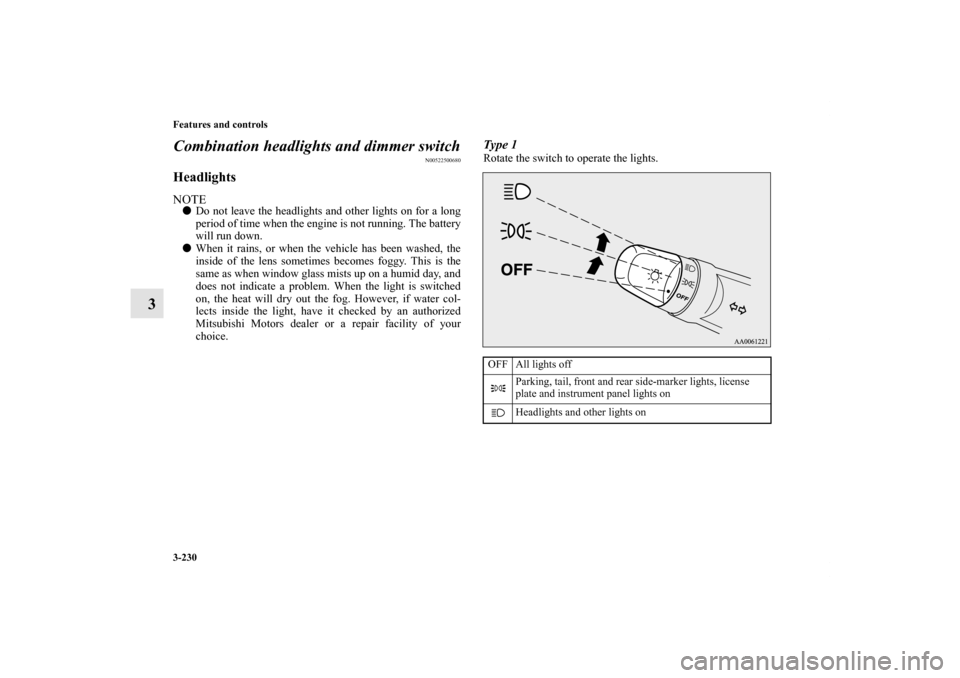
3Combination headlights and dimmer switch
N00522500680
Headlights NOTE�Do not leave the headlights and other lights on for a long
period of time when the engine is not running. The battery
will run down.
�When it rains, or when the vehicle has been washed, the
inside of the lens sometimes becomes foggy. This is the
same as when window glass mists up on a humid day, and
does not indicate a problem. When the light is switched
on, the heat will dry out the fog. However, if water col-
lects inside the light, have it checked by an authorized
Mitsubishi Motors dealer or a repair facility of your
choice.
Type 1Rotate the switch to operate the lights.OFF All lights off
Parking, tail, front and rear side-marker lights, license
plate and instrument panel lights on
Headlights and other lights on
BK0151000US.book 230 ページ 2012年3月29日 木曜日 午後6時8分
Page 324 of 706

Features and controls
3-231
3
If your vehicle is equipped with daytime running lights, the
combinations of switch operations and illuminated lights differ
in accordance with the following conditions.
[When the engine is started and the parking brake is released]
The daytime running lights will be illuminated.NOTE�Once the daytime running light come on, they do not go
out until the ignition switch is turned to the “LOCK” or
“ACC” position.
[The engine is not running, or the engine is running but the
parking brake has not been released]
The engine starts when the lights are off.
Type 2Rotate the switch to operate the lights.
OFF The daytime running lights illuminated
The daytime running lights illuminated
Parking, tail, front and rear side-marker lights, license
plate and instrument panel lights on
Headlights and other lights on
OFF All lights off
Parking, tail, front and rear side-marker lights, license
plate and instrument panel lights on
Headlights and other lights on
OFF All lights off
AUTOHeadlights and other lights turn on and off automati-
cally in accordance with outside light level.
Parking, tail, front and rear side-marker lights, license
plate and instrument panel lights on
Headlights and other lights on
BK0151000US.book 231 ページ 2012年3月29日 木曜日 午後6時8分
Page 325 of 706

3-232 Features and controls
3
If your vehicle is equipped with daytime running lights, the
combinations of switch operations and illuminated lights differ
in accordance with the following conditions.
[When the engine is started, and the parking brake is released]
The daytime running lights will be illuminated.NOTE�Once the daytime running light come on, they do not go
out until the ignition switch is turned to the “LOCK” or
“ACC” position.[When the engine is not running, or when the engine is running
but the parking brake is not released]
The engine starts when the lights are off.
NOTE�The sensitivity of the automatic on/off control can be
adjusted.
For further information, please contact your authorized
Mitsubishi Motors dealer or a repair facility of your
choice.
On vehicles equipped with Mitsubishi Multi-Communica-
tion System, screen operations can be used to make the
adjustment.
Refer to the separate owner’s manual for details.
OFF The daytime running lights illuminated
AUTOThe daytime running lights illuminated
Headlights and other lights turn on and off automati-
cally in accordance with outside light level.
The daytime running lights illuminated
Parking, tail, front and rear side-marker lights, license
plate and instrument panel lights on
Headlights and other lights on
OFF All lights off
AUTOHeadlights and other lights turn on and off automati-
cally in accordance with outside light level.
Parking, tail, front and rear side-marker lights, license
plate and instrument panel lights on
Headlights and other lights on
BK0151000US.book 232 ページ 2012年3月29日 木曜日 午後6時8分
Page 327 of 706

3-234 Features and controls
3
NOTE�The light auto-cutout function can be deactivated.
See your authorized Mitsubishi Motors dealer for details.
For vehicles equipped with the Mitsubishi Multi-Commu-
nication System, adjustments can be made using screen
operations. For further details, refer to the separate
owner’s manual.When you want to keep the lights on: If the light switch is turned to the “ ” or “ ” position again
after the engine is turned off, the about 3 minutes auto-cutout
function described above will not work. The lights (the parking
lights, tail lights and license plate lights) will stay on and will
not turn off automatically. NOTE�When the engine is started using the key, if the driver’s
door is opened and the key is removed, the headlight
reminder buzzer intermittently emits a high-pitched
sound. If the key is still in the ignition the key reminder
buzzer intermittently emits a low-pitched sound.
The buzzer stops when the driver’s door is closed. (A
warning is also displayed in the multi-information dis-
play.)
�When the engine is started using the F.A.S.T.-key, if the
driver’s door is opened and the ignition switch is in the
“LOCK” position, the headlight reminder buzzer intermit-
tently emits a high-pitched sound. If the ignition switch is
in any position other than “LOCK”, the ignition switch on
reminder buzzer intermittently emits a low-pitched sound.
The buzzer stops when the driver’s door is closed. (A
warning is also displayed in the multi-information dis-
play.)
Headlight reminder buzzer
N00549800167
When using a key to start the engineIf the driver’s door is opened with the key in the “LOCK” or
“ACC” position or removed from the ignition switch while the
lights are on, the buzzer will sound to remind you to turn off
the lights.When using the F.A.S.T.-key to start the engineIf the driver’s door is opened with the ignition switch in the
“LOCK” or “ACC” position, or if the ignition switch is moved
to the “LOCK” position while the lights are on, the buzzer will
sound to remind you to turn off the lights.
In either case, the lights and buzzer will turn off automatically.
Or you can turn the light switch to the “OFF” position to stop
the buzzer.
BK0151000US.book 234 ページ 2012年3月29日 木曜日 午後6時8分
Page 330 of 706

Features and controls
3-237
3
�It is possible to modify functions as follows:
• The headlights can be set to come on in the low beam
setting.
• The welcome light function can be deactivated.
For details, consult a Mitsubishi Motors dealer.
On vehicles equipped with a Mitsubishi Multi-Communi-
cation System, screen operations can be used to make the
adjustment.
Refer to the separate owner’s manual for details.
Coming home light
N00547300096
This function turns on the headlights in the low beam setting
for about 30 seconds after the ignition switch is turned to the
“LOCK” position.
1. Turn the combination headlights and dimmer switch to the
“OFF” or “AUTO” position (for vehicles equipped with
the automatic light control).
2. Turn the ignition switch to the “LOCK” position. Also, if
a key was used to start the engine, remove the key from
the ignition switch.
3. Within 60 seconds of turning the ignition switch to the
“LOCK” position, pull the turn signal lever toward you.
BK0151000US.book 237 ページ 2012年3月29日 木曜日 午後6時8分