2013 MITSUBISHI iMiEV brake
[x] Cancel search: brakePage 35 of 258

WARNING
l When the quick charge connector is con-
nected to the quick charge port, prevent
foreign matter such as water or dust
from entering in the port.
Connection with foreign matter such as
water or dust may cause fire or an elec-
tric shock. Do not perform charging if
there might be strong exposure to water
at the connection.
l During charging, the cooling fans inside
the bonnet room may automatically be op-
erated even if the electric motor switch is
in the “LOCK” position.
Keep your hands away from the cooling
fan during charging.
NOTE l If
the charge connector is not easily connec-
ted to the charge port due to foreign material
entering, never force the connection. Doing
so could damage the charging equipment or
the vehicle. Contact a MITSUBISHI
MOTORS Authorized Service Point.
l The quick charger might be installed in the
public parking space, some chargers are not
suitable for this vehicle. Check the manual of
each quick charger when charging.
l The charge connector and the EV charging ca-
ble stick out of the vehicle body while charg-
ing, so be careful that your body does not get
stuck with them or they do not touch the next
vehicle. l
The
vehicle equipped with a quick charge
port is compatible with most CHAdeMO (Jap-
anese industry standard) connectors on charg-
ing stations.
l Make sure to lock the doors to prevent theft,
etc. during charging.
1. Fully apply the parking brake and move the selector lever to the “P” (PARK) position.
2. Stop the electric devices such as lamps, air conditioning, etc. and turn the electric motor
switch to the “LOCK” position.
3. Pull the quick charging lid opener (A) at the bottom left/right of the driver’s seat to open
the quick charging lid (B) at the left rear side
of the vehicle. 4. Press the tab (C) to open the inner lid (D). WARNING
l Do
not touch the metal terminal of the
quick charge port (E) and the quick
charge connector.
Doing so could cause an electric shock and/
or malfunction. CAUTION
l
Be sure to insert the quick charge connec-
tor
straight into the quick charge port
right up to the base.
Failure to do so may result in the traction
battery not charging or could cause dam-
age to the charging equipment.
l Do not leave for a long time with the in-
ner lid opened. It becomes impossible to
charge if a foreign material is entered to
the quick charge port. Charging
1-13 1
OHAE13E1
Page 103 of 258

Energy usage indicator
E00529600014
The
consumption power of the electric motor unit
and the air conditioning, and charged power of elec-
tric energy generated from the regenerative brake
are indicated.
When the ready indicator illuminates, the indicat-
ing needle moves to the standard position (A) and
moves to the left or right according to the use con-
ditions of the vehicle.
[When the indicating needle moves to the right of
the standard position]
Indicates consumption power of the electric motor
unit and the air conditioning.
The more the needle moves to the right, the more
electrical power is being consumed.
[When the indicating needle moves to the left of
the standard position]
Indicates charged power of electric energy gener-
ated from regenerative braking.
The more the needle moves to the left, the more
electric energy is charged. Odometer/Tripmeter/Meter illumina-
tion control/Service reminder/Cruis-
ing range indicator
E00500601214
With
the electric motor switch in the “ON” posi-
tion, the odometer, tripmeter, meter illumination
control, service reminder and cruising range indica-
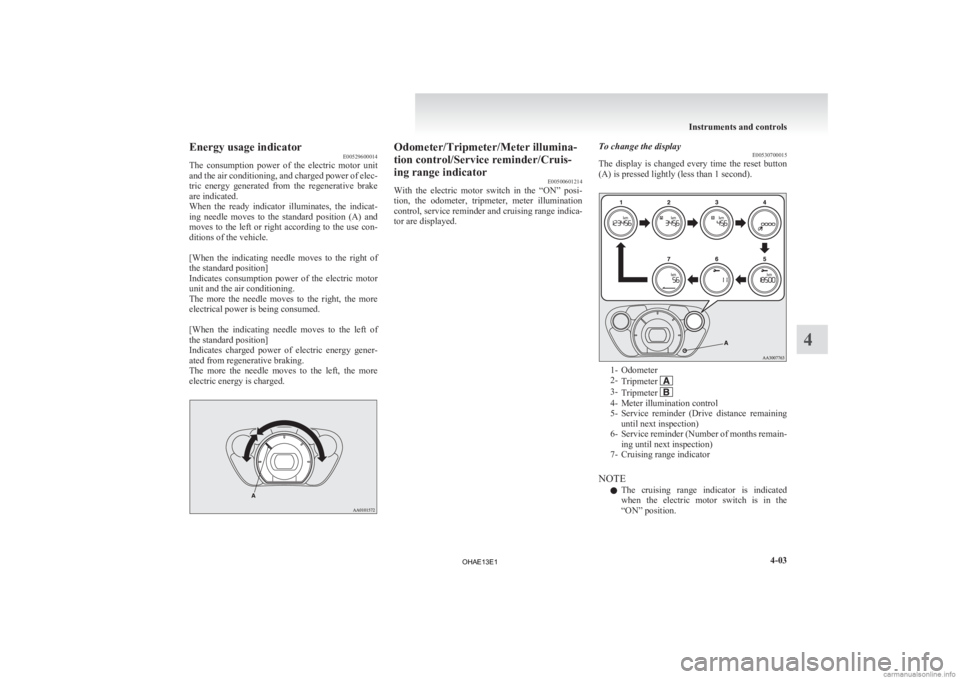
tor are displayed. To change the display
E00530700015
The
display is changed every time the reset button
(A) is pressed lightly (less than 1 second). 1- Odometer
2-
Tripmeter 3-
Tripmeter 4- Meter illumination control
5- Service
reminder (Drive distance remaining
until next inspection)
6- Service reminder (Number of months remain- ing until next inspection)
7- Cruising range indicator
NOTE l The cruising range indicator is indicated
when the electric motor switch is in the
“ON” position. Instruments and controls
4-03 4
OHAE13E1
Page 108 of 258

Indication and warning lamps
E00501502220Type 1Type 21-
Low energy warning indicator
® p. 4-07
2. Selector lever position indicator ® p. 5-10
3- High-beam indication lamp ® p. 4-09
4- Turn-signal indication lamps/Hazard warning indication lamps ® p. 4-09
5- Position lamp indication lamp ® p. 4-09
6- Front fog lamp indication lamp* ® p. 4-09
7- Service reminder ® p. 4-04
8- Driver’s and front passenger’s seat belt warning lamp ® p. 3-09
9- Supplement Restraint System (SRS) warning lamp ® p. 3-29
10- Rear fog lamp indication lamp ® p. 4-09
11- Ready indicator ® p. 4-09 12-
Auxiliary battery charge warning lamp ® p. 4-10
13- Electric power steering system (EPS) warning lamp ® p. 5-17
14- Electric motor unit warning lamp ® p. 4-10
15- Brake warning lamp ® p. 4-09
16- Anti-lock brake system (ABS) warning lamp ® p. 5-15
17- Power down warning lamp ® p. 4-11
18- Active stability control (ASC) indication lamp ® p. 5-19
19- Active stability control (ASC) OFF indication lamp ® p. 5-19
20- Charging indicator ® p. 4-09
21- Door ajar warning lamp ® p. 4-10
22- Rear passenger’s seat belt warning lamps* ® p. 3-10Instruments and controls
4-08 4
OHAE13E1
Page 109 of 258

Indication lamps
E00501600012Turn-signal indication lamps/
Hazard warning indication
lamps
E00501700374
These
indication lamps blink on and off
when a turn-signal lamp is operating.
NOTE
l If the blinking is too fast, the
cause may be a blown lamp bulb
or a faulty turn-signal connection.
When the hazard warning lamp switch is
pressed, all turn-signal lamps will flash
on and off continuously. High-beam indication lamp
E00501800072
This
indication lamp illuminates when
the high-beam is used. Front fog lamp indication
lamp*
E00501900132
This
indication lamp illuminates while
the front fog lamps are on. Rear fog lamp indication lamp
E00502000084
This
indication lamp illuminates while
the rear fog lamp is on. Position lamp indication lamp
E00508900102
This
lamp illuminates with the lamp
switch at “ ” or “ ” position
Ready indicator
E00530100019
This
indicator illuminates when the elec-
tric motor switch is turned to “START”
and driving becomes possible. Charging indicator
E00530200010
This
indicator flashes when the regular
charging cable or quick charging cable
is connected.
After that, the lamp switches to being il-
luminated when charging starts and goes
out when charging is completed. Warning lamps
E00502400017 Brake warning lamp
E00502502621
This
lamp comes on when the electric
motor switch is turned to the “ON” posi-
tion, and goes off after a few seconds
when the parking brake is released. Be-
fore driving your vehicle, release the
parking brake and make certain that the
brake warning lamp has gone off.
If the lamp stays on when the parking
brake is fully released, the service brake
system is not working properly or the
brake fluid level is low. WARNING
l If
any of the following condi-
tions occur, the brake effort
may significantly increase. Stop
the vehicle in a safe location,
avoiding where possible any
sudden brake application, and
contact a MITSUBISHI
MOTORS Authorized Service
Point. • The brake warning lampdoes not come on when the
electric motor switch is
turned to the “ON” position. Instruments and controls
4-09 4
OHAE13E1
Page 110 of 258

WARNING
• The brake warning lamp does not illuminate while
the parking brake is applied
and the electric motor
switch is in the “ON” posi-
tion.
• The brake warning lamp stays on when the parking
brake is not applied.
NOTE l When
the brake warning lamp illu-
minates, the warning buzzer may
also sound.
l When the brake pedal has been re-
peatedly depressed over a short pe-
riod of time, the brake warning
lamp may come on and the brake
warning buzzer may sound. The
service brake system is working
normally, if the warning lamp
goes out and the buzzer stops
sounding after a few seconds.
l At times, you may hear the brake
electric vacuum pump for the pow-
er brakes operating when the
ready indicator illuminates or the
brake pedal is depressed.
This sound is normal and does not
indicate a malfunction. Auxiliary battery charge warn-
ing lamp
E00502701251
This
warning lamp will illuminate when
there is a fault with the charging system
of the auxiliary battery.
Normally, when the electric motor
switch is turned to the “ON” position,
this warning lamp will illuminate. Then,
when the electric motor unit is started
and the ready indicator illuminates, the
warning lamp will go out. CAUTION
l
If the warning lamp stays on af-
ter
the ready indicator illumi-
nates, there may be a problem
with the charging system for
the auxiliary battery. • Immediately park your vehi-cle in a safe place and we rec-
ommend you to have it
checked.
• Do not charge the auxiliary battery. Door ajar warning lamp
E00503300840
This
lamp illuminates when either of the
doors (also, the tailgate) is not complete-
ly closed. If the vehicle speed exceeds about
8
km/h (5 mph) with a door ajar, the warn-
ing lamp will flash 16 times and, at the
same time, the buzzer will sound 16
times to notify the driver that a door is
ajar. CAUTION
l
Before
moving your vehicle,
check that the warning lamp is
OFF.
NOTE l The
flashing of the warning lamp
and the buzzer can be disabled.
For further information, we recom-
mend you to consult a
MITSUBISHI MOTORS Author-
ized Service Point.
l When the driver’s door is open,
the door ajar warning buzzer does
not sound because the electric mo-
tor reminder or selector lever re-
minder sounds. Electric motor unit warning
lamp
E00530400012
This
warning lamp will illuminate when
there is a fault at the high voltage area.
Refer to “Service precautions” on page
8-06. Instruments and controls
4-10
4
OHAE13E1
Page 121 of 258

Economical driving.......................................................................5-02
Driving, alcohol and drugs
........................................................... 5-02
Safe driving techniques ................................................................ 5-03
Parking brake................................................................................ 5-03
Parking.......................................................................................... 5-04
Inside rear-view mirror ................................................................. 5-05
Outside rear-view mirrors ............................................................. 5-05
Electric motor switch .................................................................... 5-07
Steering wheel lock ...................................................................... 5-08
Starting the electric motor unit ..................................................... 5-08
Transmission................................................................................. 5-09
Driving the vehicle ....................................................................... 5-11
Inspection
and maintenance following rough road oper-
ation.......................................................................................... 5-12
Acoustic Vehicle Alerting System (AVAS) .................................5-12
Braking......................................................................................... 5-14
Brake assist system....................................................................... 5-15
Anti-lock brake system (ABS) ..................................................... 5-15
Electric power steering system (EPS) ..........................................5-17
Active stability control (ASC) ...................................................... 5-18
Cargo loads................................................................................... 5-20
Trailer towing ............................................................................... 5-21Starting and driving
5
OHAE13E1
Page 123 of 258

Safe driving techniques
E00600300635
Driving
safety and protection against injury cannot
be fully ensured. However, we recommend that
you pay extra attention to the following:
Seat belts
Before starting the vehicle, make sure that you and
your passengers have fastened your seat belts.
Floor mats WARNING
l Keep
floor mats clear of the pedals by cor-
rectly laying floor mats that are suitable
for the vehicle.
To prevent the floor mats from slipping
out of position, securely retain them us-
ing the hook etc.
Note that laying a floor mat over a pedal
or laying one floor mat on top of another
can obstruct pedal operation and lead to
a serious accident. Carrying children in the vehicle
l Never leave your vehicle unattended with the
key
and children inside the vehicle. Children
may play with the driving controls and this
could lead to an accident.
l Make sure that infants and small children are
properly restrained in accordance with the
laws and regulations, and for maximum pro-
tection in case of an accident.
l Prevent children from playing in the luggage
compartment. It is quite dangerous to allow
them to play there while the vehicle is moving.
Loading luggage
When loading luggage, be careful not to load
above the height of seats. This is dangerous not on-
ly because rearward vision will be obstructed, but
also the luggage may be projected into the passen-
ger compartment under hard braking. Parking brake
E00600501647
To
park the vehicle, first bring it to a complete
stop, fully apply the parking lever sufficiently to
hold the vehicle.
To apply the parking brake 1- Firmly
depress and hold the brake pedal,
then pull the lever up without pushing the but-
ton at the end of hand grip. CAUTION
l
When
you intend to apply the parking
brake, firmly press the brake pedal to
bring the vehicle to a complete stop be-
fore pulling the parking brake lever.
Pulling the parking brake lever with the
vehicle moving could make the rear
wheels lock up, thereby making the vehi-
cle unstable. It could also make the park-
ing brake malfunction. Starting and driving
5-03 5
OHAE13E1
Page 124 of 258

NOTE
l Apply
sufficient force to the parking brake
lever to hold the vehicle stationary after the
foot brake is released.
l If the parking brake does not hold the vehicle
stationary after the foot brake is released,
have your vehicle checked immediately.
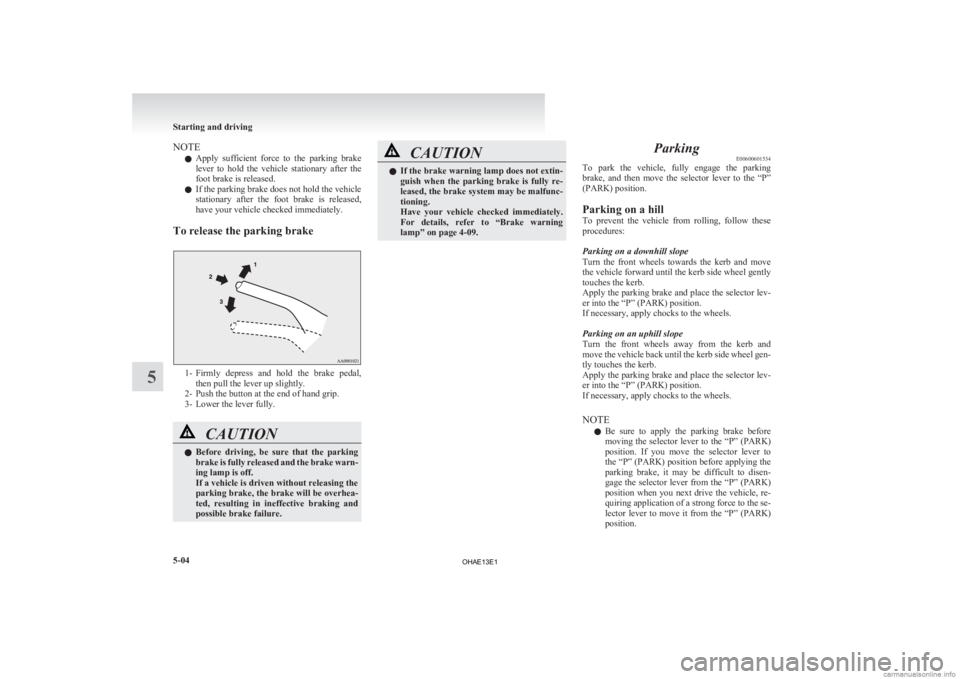
To release the parking brake 1- Firmly
depress and hold the brake pedal,
then pull the lever up slightly.
2- Push the button at the end of hand grip.
3- Lower the lever fully. CAUTION
l
Before
driving, be sure that the parking
brake is fully released and the brake warn-
ing lamp is off.
If a vehicle is driven without releasing the
parking brake, the brake will be overhea-
ted, resulting in ineffective braking and
possible brake failure. CAUTION
l
If
the brake warning lamp does not extin-
guish when the parking brake is fully re-
leased, the brake system may be malfunc-
tioning.
Have your vehicle checked immediately.
For details, refer to “Brake warning
lamp” on page 4-09. Parking
E00600601534
To
park the vehicle, fully engage the parking
brake, and then move the selector lever to the “P”
(PARK) position.
Parking on a hill
To prevent the vehicle from rolling, follow these
procedures:
Parking on a downhill slope
Turn the front wheels towards the kerb and move
the vehicle forward until the kerb side wheel gently
touches the kerb.
Apply the parking brake and place the selector lev-
er into the “P” (PARK) position.
If necessary, apply chocks to the wheels.
Parking on an uphill slope
Turn the front wheels away from the kerb and
move the vehicle back until the kerb side wheel gen-
tly touches the kerb.
Apply the parking brake and place the selector lev-
er into the “P” (PARK) position.
If necessary, apply chocks to the wheels.
NOTE
l Be sure to apply the parking brake before
moving the selector lever to the “P” (PARK)
position. If you move the selector lever to
the “P” (PARK) position before applying the
parking brake, it may be difficult to disen-
gage the selector lever from the “P” (PARK)
position when you next drive the vehicle, re-
quiring application of a strong force to the se-
lector lever to move it from the “P” (PARK)
position. Starting and driving
5-04
5
OHAE13E1