2013 MERCEDES-BENZ SLS-CLASS reset
[x] Cancel search: resetPage 18 of 286

Trip odometer
Calling up ....................................... 148
Resetting (on-board computer) ......149
see Trip odometer
Trunk
Emergency release ..........................73
Important safety guidelines .............71
Locking separately ...........................72
Opening (automatically from
inside) .............................................. 72
Trunk lid
Display message ............................ 180
Opening/closing ........................71, 72
Trunk load (maximum)
see Technical data
Turn signals
Display message ............................ 170
Switching on/off .............................. 94
see Turn signals
Type identification plate
see Vehicle identification plate U
Unlocking Emergency unlocking .......................69
From inside the vehicle (central
unlocking button) ............................. 68
Upshift indicator ............................... 124V
Vanity mirror (in the sun visor) ........198
Vehicle Correct use ...................................... 22
Data acquisition ............................... 23
Display message ............................ 180
Equipment ....................................... 19
Individual settings ..........................153
Limited Warranty ............................. 23
Loading .......................................... 258
Locking (in an emergency) ...............70
Locking (SmartKey) .......................... 62
Lowering ........................................ 236
Maintenance .................................... 20
Parking for a long period ................ 130
Raising ........................................... 233
Reporting problems .........................22Towing away
.................................. 242
Transporting .................................. 244
Unlocking (in an emergency) ...........69
Unlocking (SmartKey) ................62, 67
Vehicle data
see Technical data
Vehicle dimensions ...........................283
see Technical data
Vehicle emergency locking ................70
Vehicle identification number see VIN
Vehicle identification plate ..............275
Vehicle tool kit .................................. 228
Vehicle weights see Technical data
Video (DVD) ........................................ 151
VIN ...................................................... 275 W
Warning and indicator lamps ABS ................................................ 189
Brakes ................................... 186, 189
Cruise control ................................ 135
Engine diagnostics .........................191
ESP ®
.............................................. 190
Fuel tank ........................................ 192
Overview .......................................... 28
PASSENGER AIR BAG OFF
indicator lamp .................................. 42
Reserve fuel ................................... 192
Seat belt ........................................ 187
SPORT handling mode ...................190
SRS ................................................ 190
Tire pressure monitor ....................193
Warranty ............................................ 275
Washer fluid Display message ............................ 181
see Windshield washer system
Weight
see Technical data
Wheel bolt tightening torque ...........236
Wheel chock ...................................... 232
Wheels Changing a wheel .......................... 232
Checking ........................................ 249
Cleaning ......................................... 221
Important safety notes ..................24816
IndexProCarManuals.com
Page 24 of 286

operation of the vehicle systems. This can
impair the operating safety of your vehicle
while driving. There is a risk of an accident.
Do not connect any equipment to the on-
board diagnostics connection. G
WARNING
Loose equipment or equipment cables which
are connected to the on-board diagnostics
connection can obstruct the area around the
pedals. The equipment or the cables could
come between the pedals in the event of
sudden braking or acceleration. This may
affect the function of the pedals. There is a
risk of an accident.
Do not attach any equipment or cables in the
driver's footwell.
! If the engine is switched off and
equipment on the diagnostics connection
is used, the starter battery may discharge.
The diagnostics connection is only intended
for the connection of diagnostic equipment at
a qualified specialist workshop.
Connecting equipment to the diagnostics
connection can, for example, lead to
emissions monitoring information being
reset. This may lead to the vehicle failing to
meet the requirements of the next emissions
test during the main inspection. Qualified specialist workshop
An authorized Mercedes-Benz Center is a
qualified specialist workshop. It has the
necessary specialist knowledge, tools and
qualifications to correctly carry out the work
required on your vehicle. This is especially the
case for work relevant to safety.
Observe the notes in the Maintenance
Booklet.
Always have the following work carried out at
an authorized Mercedes-Benz Center:
R work relevant to safety
R service and maintenance work R
repair work
R alterations, installation work and
modifications
R work on electronic components Correct use
G
WARNING
There are various warning stickers affixed to
your vehicle. Their purpose is to alert you and
others to various dangers. Therefore, do not
remove any warning stickers unless the
sticker clearly states that you may do so.
If you remove any warning stickers, you or
others could fail to recognize certain dangers
and be injured.
When driving your vehicle observe the
following information:
R the safety notes in this manual
R the Technical Data section in this manual
R traffic rules and regulations
R laws and safety standards pertaining to
motor vehicles Problems with your vehicle
If you should experience a problem with your
vehicle, particularly one that you believe may
affect its safe operation, we urge you to
contact an authorized Mercedes-Benz Center
immediately to have the problem diagnosed
and rectified. If the problem is not resolved to
your satisfaction, please discuss the problem
again with a Mercedes-Benz Center or
contact us at one of the following addresses.
In the USA
Customer Assistance Center
Mercedes-Benz USA, LLC
One Mercedes Drive
Montvale, NJ 07645-0350
In Canada
Customer Relations Department
Mercedes-Benz Canada, Inc. 22
IntroductionProCarManuals.com
Page 43 of 286
trim panels including, for example, the
addition of door speakers.
Improper repair work on the doors or the
modification or addition of components to the
doors create a risk of rendering the side
impact air bags inoperative or causing
unintended air bag deployment. Work on the
doors must therefore only be performed by
qualified technicians. Contact an authorized
Mercedes-Benz Center. G
WARNING
Only use seat covers which have been tested
and approved by Mercedes-Benz for your
vehicle model. Using other seat covers may
interfere with or prevent the deployment of
the side impact air bags. Contact an
authorized Mercedes-Benz Center for
availability.
When deployed, the side impact air bags offer
additional protection for the thorax of the
vehicle occupants on the side of the vehicle
on which the impact occurs. However, they
do not protect the:
R head
R neck
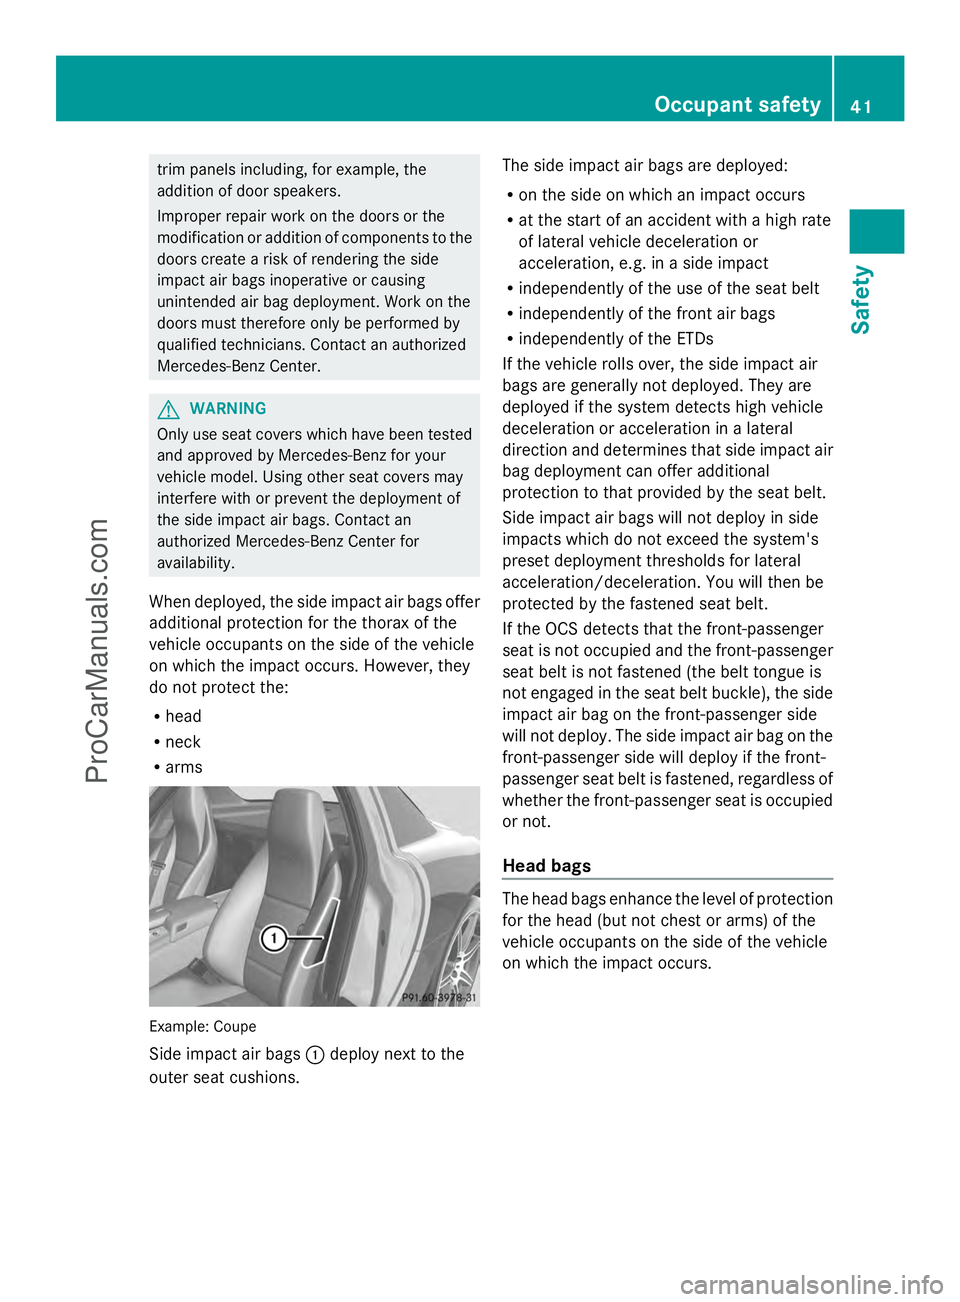
R arms Example: Coupe
Side impact air bags
:deploy next to the
outer seat cushions. The side impact air bags are deployed:
R
on the side on which an impact occurs
R at the start of an accident with a high rate
of lateral vehicle deceleration or
acceleration, e.g. in a side impact
R independently of the use of the seat belt
R independently of the front air bags
R independently of the ETDs
If the vehicle rolls over, the side impact air
bags are generally not deployed. They are
deployed if the system detects high vehicle
deceleration or acceleration in a lateral
direction and determines that side impact air
bag deployment can offer additional
protection to that provided by the seat belt.
Side impact air bags will not deploy in side
impacts which do not exceed the system's
preset deployment thresholds for lateral
acceleration/deceleration. You will then be
protected by the fastened seat belt.
If the OCS detects that the front-passenger
seat is not occupied and the front-passenger
seat belt is not fastened (the belt tongue is
not engaged in the seat belt buckle), the side
impact air bag on the front-passenger side
will not deploy. The side impact air bag on the
front-passenger side will deploy if the front-
passenger seat belt is fastened, regardless of
whether the front-passenger seat is occupied
or not.
Head bags The head bags enhance the level of protection
for the head (but not chest or arms) of the
vehicle occupants on the side of the vehicle
on which the impact occurs. Occupant safety
41Safety Z
ProCarManuals.com
Page 44 of 286
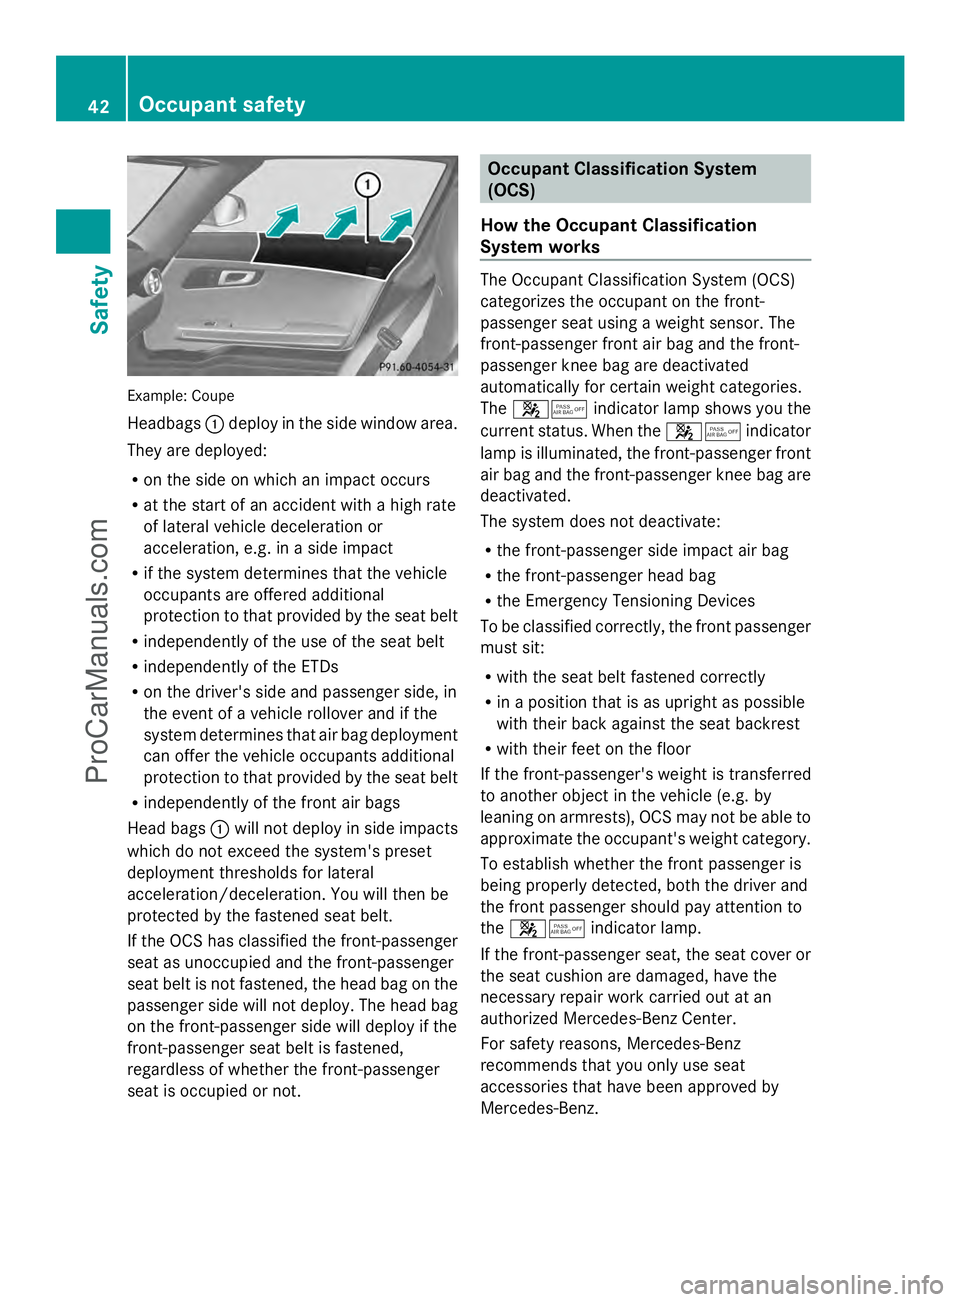
Example: Coupe
Headbags
:deploy in the side window area.
They are deployed:
R on the side on which an impact occurs
R at the start of an accident with a high rate
of lateral vehicle deceleration or
acceleration, e.g. in a side impact
R if the system determines that the vehicle
occupants are offered additional
protection to that provided by the seat belt
R independently of the use of the seat belt
R independently of the ETDs
R on the driver's side and passenger side, in
the event of a vehicle rollover and if the
system determines that air bag deployment
can offer the vehicle occupants additional
protection to that provided by the seat belt
R independently of the front air bags
Head bags :will not deploy in side impacts
which do not exceed the system's preset
deployment thresholds for lateral
acceleration/deceleration. You will then be
protected by the fastened seat belt.
If the OCS has classified the front-passenger
seat as unoccupied and the front-passenger
seat belt is not fastened, the head bag on the
passenger side will not deploy. The head bag
on the front-passenger side will deploy if the
front-passenger seat belt is fastened,
regardless of whether the front-passenger
seat is occupied or not. Occupant Classification System
(OCS)
How the Occupant Classification
System works The Occupant Classification System (OCS)
categorizes the occupant on the front-
passenger seat using a weight sensor. The
front-passenger front air bag and the front-
passenger knee bag are deactivated
automatically for certain weight categories.
The
45 indicator lamp shows you the
current status. When the 45indicator
lamp is illuminated, the front-passenger front
air bag and the front-passenger knee bag are
deactivated.
The system does not deactivate:
R the front-passenger side impact air bag
R the front-passenger head bag
R the Emergency Tensioning Devices
To be classified correctly, the front passenger
must sit:
R with the seat belt fastened correctly
R in a position that is as upright as possible
with their back against the seat backrest
R with their feet on the floor
If the front-passenger's weight is transferred
to another object in the vehicle (e.g. by
leaning on armrests), OCS may not be able to
approximate the occupant's weight category.
To establish whether the front passenger is
being properly detected, both the driver and
the front passenger should pay attention to
the 45 indicator lamp.
If the front-passenger seat, the seat cover or
the seat cushion are damaged, have the
necessary repair work carried out at an
authorized Mercedes-Benz Center.
For safety reasons, Mercedes-Benz
recommends that you only use seat
accessories that have been approved by
Mercedes-Benz. 42
Occupant safetySafety
ProCarManuals.com
Page 45 of 286
G
WARNING
If the 45 indicator lamp lights up when
the front-passenger seat is occupied by an
adult or a larger person, ask the passenger to
reposition themselves on the seat so that the
45 indicator lamp goes out.
In the event of a collision, the air bag control
unit will not allow front-passenger front air
bag and front-passenger knee bag
deployment when the OCS has classified the
front-passenger occupant as weighing as
much as or less than a typical 12-month-old
child in a standard child restraint or if the
front-passenger seat is classified as being
unoccupied.
If OCS has detected that the front passenger
weighs the same as or less than a typical 12-
month-old child in a standard child restraint
system, the 45indicator lamp lights
up when the engine is started and remains lit.
This indicates that the front-passenger front
air bag is deactivated.
If OCS determines that the front-passenger
seat is unoccupied, the 45indicator
lamp lights up once the engine has been
started and remains lit. This shows that the
front-passenger front air bag and front-
passenger knee bag are deactivated.
If OCS determines that the front passenger
weighs more than a typical 12 month old child
in a standard child restraint system and
classifies this as a small person (e.g. a
teenager or small adult), the 45
indicator lamp lights up for approximately 6
seconds when the engine is started.
Depending on occupant weight sensor
readings from the seat, it will then remain
illuminated or go out. If the 45
indicator lamp is illuminated, the front-
passenger front air bag is deactivated. With
the 45 indicator lamp out, the front-
passenger front air bag and front-passenger
knee bag are deactivated.
If OCS has determined that the front
passenger is an adult or medium sized person,
the 45 indicator lamp lights up for approximately 6 seconds when the engine is
started and then goes out. This shows that the
front-passenger front air bag and front-
passenger knee bag are activated.
If the
45 indicator lamp is illuminated,
the front-passenger front air bag and the
front-passenger knee bag are deactivated and
are not deployed.
If the 45 indicator lamp does not light
up, the front-passenger air bag is enabled and
will be deployed:
R in the event of certain frontal impacts
R if the impact exceeds a preset deployment
threshold
R independently of the other air bags
If the front-passenger air bag is deployed, the
rate of inflation is influenced by:
R the rate of vehicle deceleration as assessed
by the air bag control unit
R the front passenger's weight category as
determined by the OCS
For further information, see "Air bag display
messages" (Y page 167). G
WARNING
Children 12 years old and under must be
seated and properly secured in an appropriate
infant restraint, toddler restraint, or booster
seat recommended for the size and weight of
the child.
The infant or child restraint must be properly
secured with the vehicle's seat belt fully in
accordance with the child seat
manufacturer's instructions.
Occupants, especially children, should always
sit as upright as possible, wear the seat belt
properly and use an appropriately sized infant
restraint, toddler restraint, or booster seat
recommended for the size and weight of the
child. Occupant safety
43Safety
Z
ProCarManuals.com
Page 50 of 286
Have all work carried out only by qualified
technicians. Contact an authorized
Mercedes-Benz Center.
Correct use of the seat belts G
WARNING
USE SEAT BELTS PROPERLY
R Seat belts can only work when used
properly. Never wear seat belts in any other
way than as described in this section, as
that could result in serious injuries in the
event of an accident.
R Each occupant should wear their seat belt
at all times, because seat belts help reduce
the likelihood of and potential severity of
injuries in accidents, including rollovers.
The integrated restraint system includes
SRS (driver front air bag, knee bags, front-
passenger front air bag, side impact air
bags, head air bags), Emergency
Tensioning Devices (ETDs) and seat belt
force limiters. The system is designed to
enhance the protection offered to properly
belted occupants in certain frontal (front air
bags, knee bags and ETDs) and side (side
impact air bags, head air bags and ETDs)
impacts which exceed preset deployment
thresholds.
R Never wear the shoulder belt under your
arm, across your neck or off your shoulder.
In a frontal crash, your body would move
too far forward. That would increase the
chance of head and neck injuries. The seat
belt would also apply too much force to the
ribs or abdomen, which could severely
injure internal organs such as your liver or
spleen.
Adjust the seat belt so that the shoulder
section is located as close as possible to
the middle of the shoulder (it should not
touch the neck).
R Position the lap belt as low as possible on
your hips and not across the abdomen. If
the lap belt is positioned across your abdomen, it could cause serious injuries in
a crash.
R Never wear seat belts over rigid or
breakable objects in or on your clothing,
such as eyeglasses, pens, keys etc., as
these might cause injuries.
R Make sure the seat belt is always fitted
snugly. Take special care of this when
wearing loose clothing.
R Never use a seat belt for more than one
person at a time. Do not fasten a seat belt
around a person and another person or
other objects at the same time.
R Seat belts should not be worn twisted. In a
crash, you would not have the full width of
the seat belt to distribute impact forces.
The twisted seat belt against your body
could cause injuries.
R Pregnant women should also always use a
lap-shoulder belt. The lap belt portion
should be positioned as low as possible on
the hips to avoid any possible pressure on
the abdomen.
R Place the seat backrest in a position that is
as upright as possible.
R Check your seat belt during travel to make
sure it is properly positioned.
R Never place your feet on the instrument
panel, dashboard, or on the seat. Always
keep both feet on the floor in front of the
seat.
R When using a seat belt to secure infant
restraints, toddler restraints, or children in
booster seats, always follow the child seat
manufacturer's instructions. G
WARNING
Do not pass seat belts over sharp edges. They
could tear.
Do not allow the seat belt to get caught in the
door or in the seat adjustment mechanism.
This could damage the seat belt.
Never attempt to make modifications to seat
belts. This could impair the effectiveness of
the seat belts. 48
Occupant safetySafety
ProCarManuals.com
Page 90 of 286

the exterior mirror to the desired position.
You should have a good overview of traffic
conditions.
Folding the exterior mirrors in or out
electrically X
Select SmartKey position 1or 2with the
Start/Stop button.
X Briefly press button ?.
Both exterior mirrors fold in or out.
i Make sure that the exterior mirrors are
always folded out fully while the vehicle is
in motion, as they may otherwise vibrate.
i If you are driving faster than
30 mph (47 km/h ), youcan no longer fold
in the exterior mirrors.
Setting the exterior mirrors If the battery has been disconnected or
completely discharged, the exterior mirrors
must be reset. The exterior mirrors will
otherwise not fold in when you select the
"Fold in mirrors when locking" function in the
on-board computer (Y page 156).
X Select SmartKey position 1using the
Start/Stop button.
X Briefly press button ?.
Folding the exterior mirrors in or out
automatically If the "Fold in mirrors when locking" function
is activated in the on-board computer
(Y page 156): R
the exterior mirrors fold in automatically as
soon as you lock the vehicle from the
outside.
R the exterior mirrors fold out again
automatically as soon as you unlock the
vehicle and then open the driver's or front-
passenger door.
i The mirrors do not fold out if they have
been folded in manually.
Exterior mirror pushed out of position If an exterior mirror has been pushed out of
position, proceed as follows:
X
Vehicles without electrically folding
exterior mirrors: move the exterior mirror
into the correct position manually.
X Vehicles with electrically folding
exterior mirrors: press and hold mirror-
folding button until you hear a click and
then the mirrors engage in position
(Y page 88).
The mirror housing is engaged again and
you can adjust the exterior mirrors as usual
(Y page 87). Automatic anti-glare mirrors
G
WARNING
If incident light from headlamps is prevented
from striking the sensor in the rear-view
mirror, for instance, by luggage piled too high
in the vehicle, the mirror's automatic anti-
glare function will not operate.
Incident light could then blind you. This may
distract you from the traffic conditions and,
as a result, you may cause an accident.
The rear-view mirror and the exterior mirror
on the driver's side automatically go into anti-
glare mode if the following conditions are met
simultaneously:
R the ignition is switched on and
R incident light from headlamps strikes the
sensor in the rear-view mirror. 88
MirrorsSeats, steering wheel and mirrors
ProCarManuals.com
Page 91 of 286
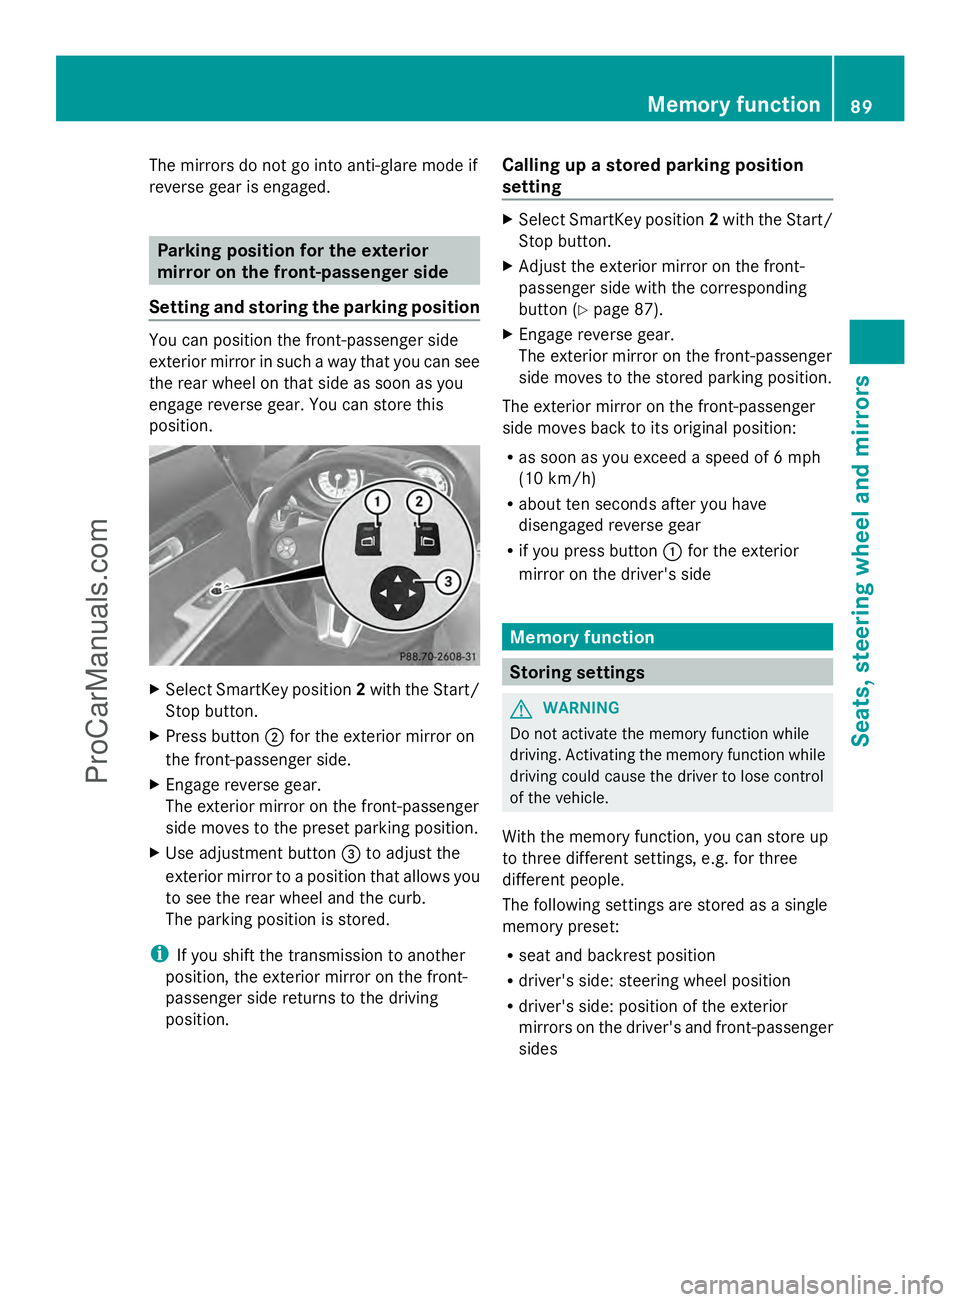
The mirrors do not go into anti-glare mode if
reverse gear is engaged. Parking position for the exterior
mirror on the front-passenger side
Setting and storing the parking position You can position the front-passenger side
exterior mirror in such a way that you can see
the rear wheel on that side as soon as you
engage reverse gear. You can store this
position. X
Select SmartKey position 2with the Start/
Stop button.
X Press button ;for the exterior mirror on
the front-passenger side.
X Engage reverse gear.
The exterior mirror on the front-passenger
side moves to the preset parking position.
X Use adjustment button =to adjust the
exterior mirror to a position that allows you
to see the rear wheel and the curb.
The parking position is stored.
i If you shift the transmission to another
position, the exterior mirror on the front-
passenger side returns to the driving
position. Calling up a stored parking position
setting X
Select SmartKey position 2with the Start/
Stop button.
X Adjust the exterior mirror on the front-
passenger side with the corresponding
button (Y page 87).
X Engage reverse gear.
The exterior mirror on the front-passenger
side moves to the stored parking position.
The exterior mirror on the front-passenger
side moves back to its original position:
R as soon as you exceed a speed of 6 mph
(10 km/h)
R about ten seconds after you have
disengaged reverse gear
R if you press button :for the exterior
mirror on the driver's side Memory function
Storing settings
G
WARNING
Do not activate the memory function while
driving. Activating the memory function while
driving could cause the driver to lose control
of the vehicle.
With the memory function, you can store up
to three different settings, e.g. for three
different people.
The following settings are stored as a single
memory preset:
R seat and backrest position
R driver's side: steering wheel position
R driver's side: position of the exterior
mirrors on the driver's and front-passenger
sides Memory function
89Seats, steering wheel and mirrors Z
ProCarManuals.com