2013 MERCEDES-BENZ SLS-CLASS ESP
[x] Cancel search: ESPPage 58 of 286
G
WARNING
If the BAS malfunctions, the brake system still
functions, but without the additional brake
boost available that the BAS would normally
provide in an emergency braking maneuver.
Therefore, the braking distance may increase. ESP
®
(Electronic Stability Program)
General notes i
Observe the "Important safety notes"
section (Y page 56).
ESP ®
monitors driving stability and traction,
i.e. power transmission between the tires and
the road surface.
If ESP ®
detects that the vehicle is deviating
from the direction desired by the driver, one
or more wheels are braked to stabilize the
vehicle. The engine output is also modified to
keep the vehicle on the desired course within
physical limits. ESP ®
assists the driver when
pulling away on wet or slippery roads. ESP ®
can also stabilize the vehicle during braking.
ETS (Electronic Traction System) i
Observe the "Important safety notes"
section (Y page 56).
Traction control is part of ESP ®
.
Traction control brakes the drive wheels
individually if they spin. This enables you to
pull away and accelerate on slippery surfaces,
for example if the road surface is slippery on
one side.
Traction control remains active, even if you
deactivate ESP ®
.
Important safety notes G
WARNING
If ESP ®
is malfunctioning, ESP ®
is unable to
stabilize the vehicle. Additionally, further
driving safety systems are deactivated. This
increases the risk of skidding and an accident. Drive on carefully. Have ESP
®
checked at a
qualified specialist workshop.
! Switch the ignition off when:
R the electric parking brake is being tested
using a brake dynamometer.
R the vehicle is being towed with the rear
axle raised.
Application of the brakes by ESP ®
may
otherwise destroy the brake system.
When SPORT handling mode is activated, the
M warning lamp lights up in the instrument
panel.
When ESP ®
is deactivated, the åand
h warning lamps light up in the instrument
panel.
Observe the information on warning lamps
(Y page 190) and display messages which
may be shown in the instrument cluster
(Y page 166).
i Only use wheels with the recommended
tire sizes. Only then will ESP ®
function
properly.
Characteristics of ESP ® ESP
®
is activated automatically when the
engine is started.
If ESP ®
intervenes, the hESP®
warning
lamp flashes in the instrument cluster.
If ESP ®
intervenes:
X Do not deactivate ESP ®
under any
circumstances.
X Only depress the accelerator pedal as far
as necessary when pulling away.
X Adapt your driving style to suit the
prevailing road and weather conditions.
Deactivating/activating ESP ® Important safety notes
i Observe the "Important safety notes"
section (Y page 54). 56
Driving safety systemsSafety
ProCarManuals.com
Page 59 of 286
You can select between the following states
of ESP ®
:
R ESP ®
is activated.
R SPORT handling mode is activated.
R ESP ®
is deactivated. G
WARNING
When SPORT handling mode is activated,
there is a greater risk of skidding and
accidents.
Only activate SPORT handling mode in the
situations described in the following. G
WARNING
If you deactivate ESP ®
, ESP ®
no longer
stabilizes the vehicle. There is an increased
risk of skidding and an accident.
Only deactivate ESP ®
in the situations
described in the following.
In the following situations, it may be better to
activate SPORT handling mode or deactivate
ESP ®
:
R when using snow chains
R in deep snow
R on sand or gravel
R when driving on designated roads when the
vehicle's own oversteering and
understeering characteristics are desired
Driving in SPORT handling mode or without
ESP ®
requires an extremely qualified and
experienced driver.
i Activate ESP ®
as soon as the situations
described above no longer apply. ESP ®
will
otherwise not be able to stabilize the
vehicle if the vehicle starts to skid or a
wheel starts to spin.
! Avoid spinning the driven wheels for an
extended period with ESP ®
deactivated.
You could otherwise damage the drivetrain. Deactivating/activating ESP
® X
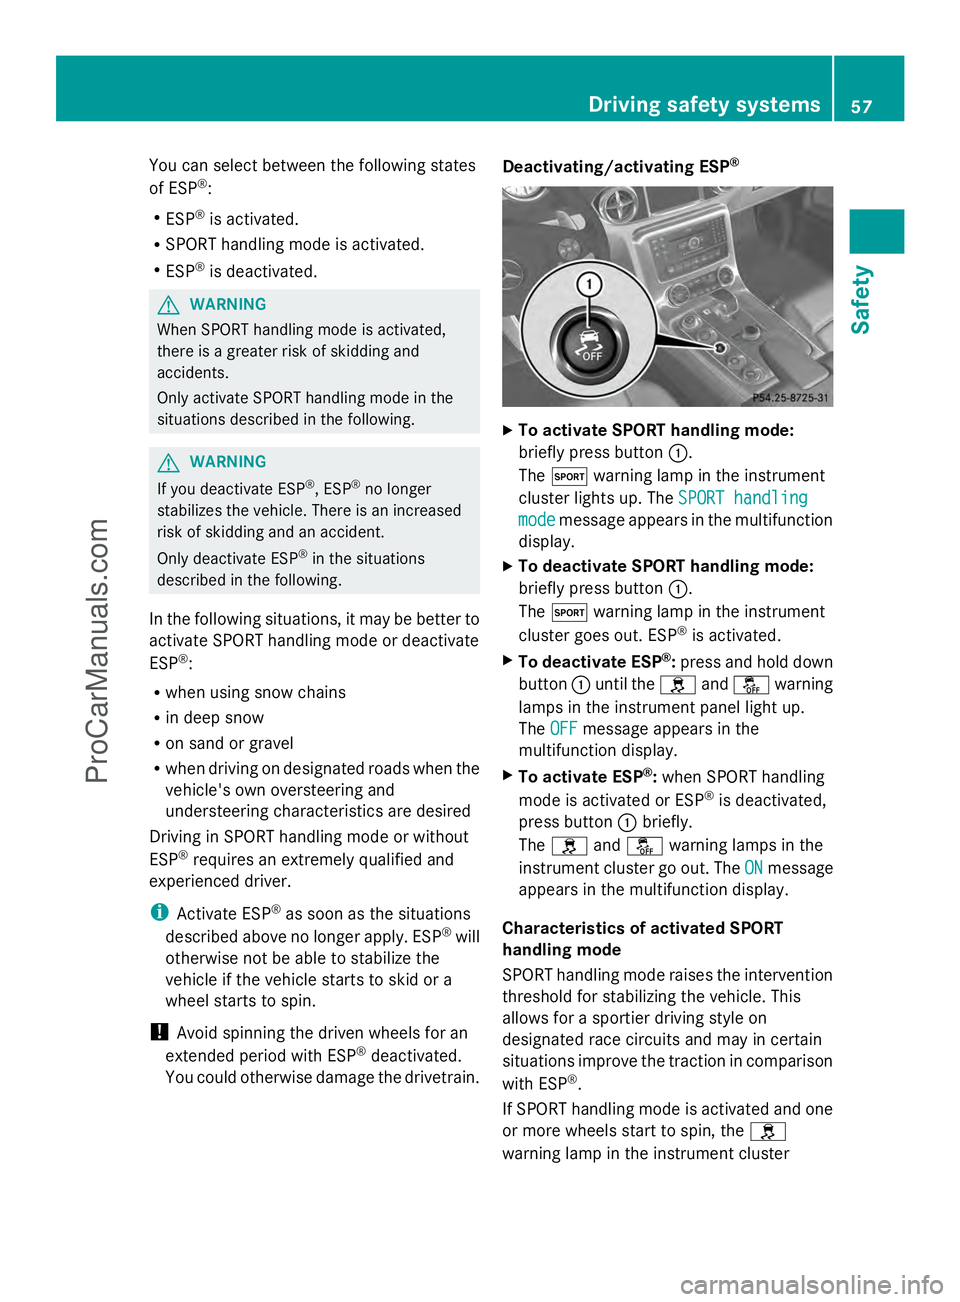
To activate SPORT handling mode:
briefly press button :.
The M warning lamp in the instrument
cluster lights up. The SPORT handling SPORT handling
mode
mode message appears in the multifunction
display.
X To deactivate SPORT handling mode:
briefly press button :.
The M warning lamp in the instrument
cluster goes out. ESP ®
is activated.
X To deactivate ESP ®
:press and hold down
button :until the handå warning
lamps in the instrument panel light up.
The OFF OFF message appears in the
multifunction display.
X To activate ESP ®
:when SPORT handling
mode is activated or ESP ®
is deactivated,
press button :briefly.
The h andå warning lamps in the
instrument cluster go out. The ON
ONmessage
appears in the multifunction display.
Characteristics of activated SPORT
handling mode
SPORT handling mode raises the intervention
threshold for stabilizing the vehicle. This
allows for a sportier driving style on
designated race circuits and may in certain
situations improve the traction in comparison
with ESP ®
.
If SPORT handling mode is activated and one
or more wheels start to spin, the h
warning lamp in the instrument cluster Driving safety systems
57Safety Z
ProCarManuals.com
Page 60 of 286
flashes. ESP
®
only stabilizes the vehicle to a
limited degree.
When SPORT handling mode is activated:
R ESP ®
only improves driving stability to a
limited degree.
R traction control is still activated.
R ESP ®
still provides support when you brake
firmly.
R engine torque is only restricted to a limited
degree, and the drive wheels are able to
spin. The spinning wheels produce a
cutting effect for better traction.
Characteristics when ESP ®
is deactivated
If ESP ®
is deactivated and one or more wheels
start to spin, the hwarning lamp in the
instrument cluster does not flash. In such
situations, ESP ®
will not stabilize the vehicle.
If you deactivate ESP ®
:
R ESP ®
no longer improves driving stability.
R traction control is still activated.
R ESP ®
still provides support when you brake
firmly.
R engine torque is no longer limited and the
drive wheels are able to spin. The spinning
wheels produce a cutting effect for better
traction. EBD (electronic brake force
distribution)
Observe the "Important safety notes" section
(Y page 56).
EBD monitors and controls the brake
pressure on the rear wheels to improve
driving stability while braking. G
WARNING
If the EBD malfunctions, the brake system will
still function with full brake boost. However,
the rear wheels could lock up during
emergency braking situations, for example.
You could lose control of the vehicle and
cause an accident. Adapt your driving style to the changed
driving characteristics. ADAPTIVE BRAKE
Observe the "Important safety notes" section
(Y page 54).
ADAPTIVE BRAKE enhances braking safety
and offers increased braking comfort. In
addition to the braking function, ADAPTIVE
BRAKE also features the hill start assist
function ( Ypage 115). For further
information, see Driving tips (Y page 131). Theft deterrent locking system
Immobilizer
The immobilizer prevents your vehicle from
being started without the correct SmartKey.
When leaving the vehicle, always take the
SmartKey with you and lock the vehicle. The
engine can be started by anyone with a valid
SmartKey that is left inside the vehicle.
X To activate with KEYLESS-GO: switch the
engine off and open the driver's door.
X To activate with the SmartKey: remove
the SmartKey from the ignition lock.
X To deactivate: switch on the ignition.
i The immobilizer is always deactivated
when you start the engine.
In the event that the engine cannot be
started when the starter battery is fully
charged, the immobilizer may be faulty.
Contact an authorized Mercedes-Benz
Center or call 1-800-FOR-MERCedes (in the
USA) or 1-800-387-0100 (in Canada). ATA (anti-theft alarm system)
A visual and audible alarm is triggered if the
alarm system is armed and you open:
R a door
R the trunk lid 58
Theft deterrent locking systemSafety
ProCarManuals.com
Page 74 of 286
!
The trunk lid swings upwards when
opened. Therefore, make sure that there is
sufficient clearance above the trunk lid.
Coupe: to fully open the trunk lid, a minimum
height of 5.5 ft (1.68 m) from the ground is
necessary.
Roadster: to fully open the trunk lid, a
minimum height of 5.7 ft (1.75 m) from the
ground is necessary.
The trunk lid can be:
R opened automatically from outside
R opened automatically from inside
R locked separately
R unlocked with the mechanical key
R opened with the emergency release button Opening/closing the trunk
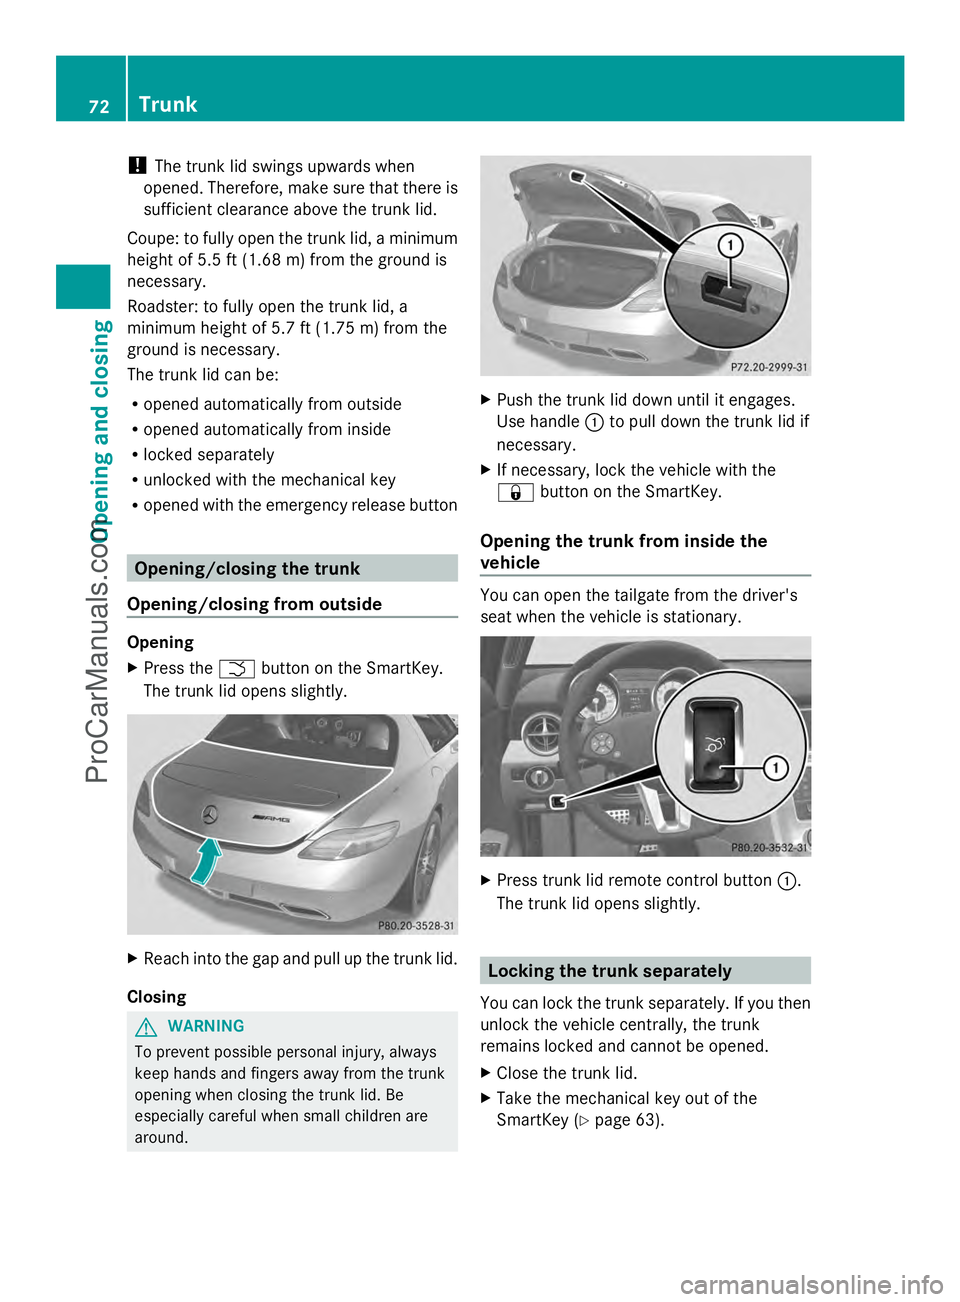
Opening/closing from outside Opening
X
Press the Fbutton on the SmartKey.
The trunk lid opens slightly. X
Reach into the gap and pull up the trunk lid.
Closing G
WARNING
To prevent possible personal injury, always
keep hands and fingers away from the trunk
opening when closing the trunk lid. Be
especially careful when small children are
around. X
Push the trunk lid down until it engages.
Use handle :to pull down the trunk lid if
necessary.
X If necessary, lock the vehicle with the
& button on the SmartKey.
Opening the trunk from inside the
vehicle You can open the tailgate from the driver's
seat when the vehicle is stationary.
X
Press trunk lid remote control button :.
The trunk lid opens slightly. Locking the trunk separately
You can lock the trunk separately. If you then
unlock the vehicle centrally, the trunk
remains locked and cannot be opened.
X Close the trunk lid.
X Take the mechanical key out of the
SmartKey (Y page 63).72
TrunkOpening and closing
ProCarManuals.com
Page 76 of 286
features. If, in automatic operation mode, a
side window encounters an obstruction that
blocks its path, the anti-entrapment feature
will stop the side window and open it slightly.
The side windows operate differently when
the switch is pulled and held. These details
can be found in the "Closing a blocked side
window" section in this chapter.
The closing of the side windows can be
immediately halted by releasing the switch or,
if the switch was pulled past the resistance
point and released, by pressing or pulling the
respective switch.
If a side window encounters an obstruction
that blocks its path when you are closing the
side windows by pressing and holding the
& button on the SmartKey, the anti-
entrapment feature will not operate. G
WARNING
Do not keep any part of your body up against
the window pane when opening a window. The
downward motion of the pane may pull that
part of your body down between the window
pane and the door frame and trap it there. If
there is a risk of entrapment, release the
switch and pull it to close the window.
Observe the important safety notes in the
"Children in the vehicle" section (Y page 51). Opening and closing the side
windows
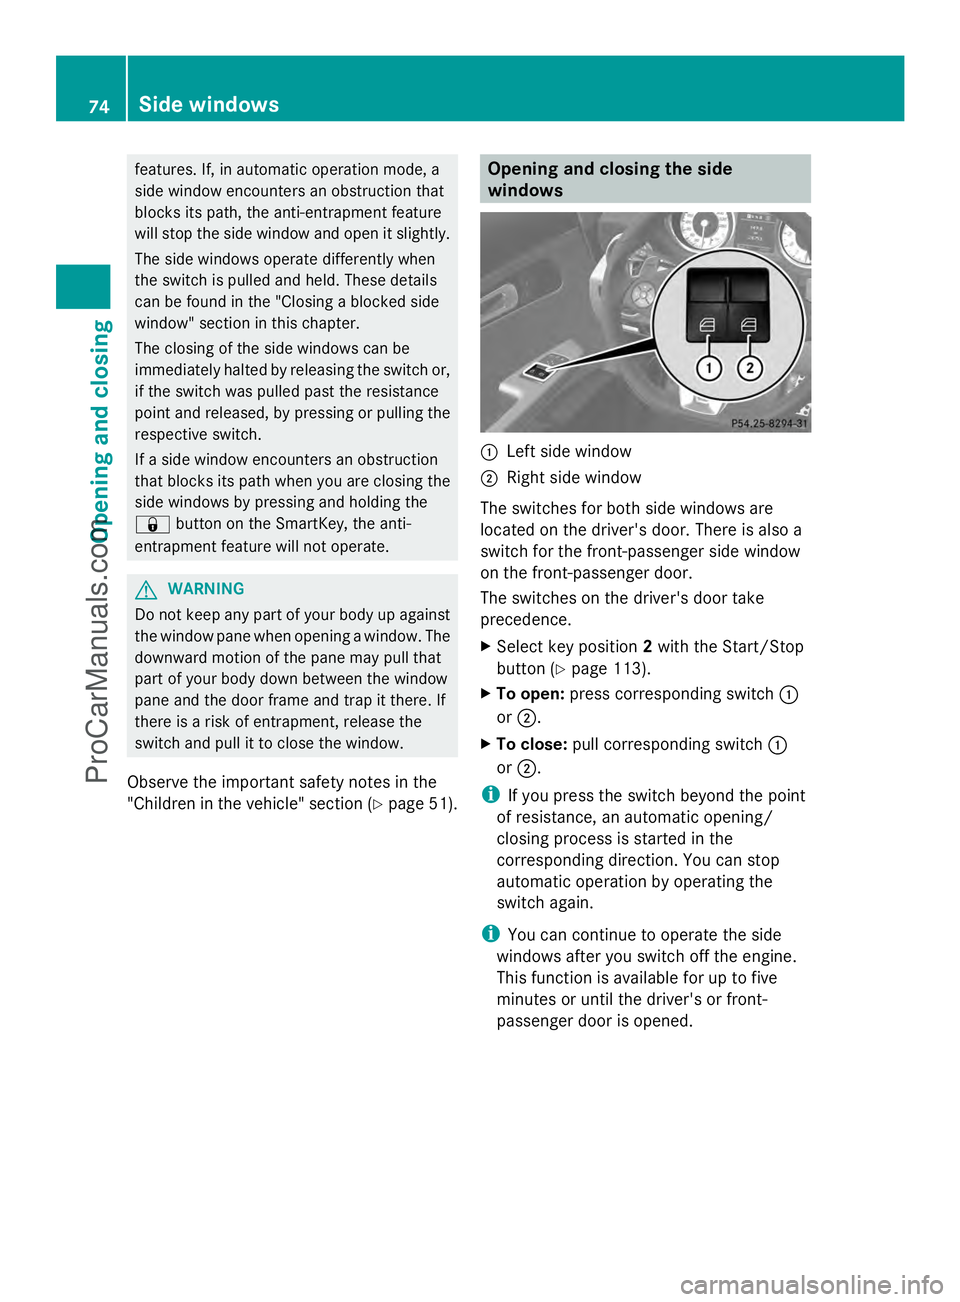
:
Left side window
; Right side window
The switches for both side windows are
located on the driver's door. There is also a
switch for the front-passenger side window
on the front-passenger door.
The switches on the driver's door take
precedence.
X Select key position 2with the Start/Stop
button (Y page 113).
X To open: press corresponding switch :
or ;.
X To close: pull corresponding switch :
or ;.
i If you press the switch beyond the point
of resistance, an automatic opening/
closing process is started in the
corresponding direction. You can stop
automatic operation by operating the
switch again.
i You can continue to operate the side
windows after you switch off the engine.
This function is available for up to five
minutes or until the driver's or front-
passenger door is opened. 74
Side windowsOpening and closing
ProCarManuals.com
Page 78 of 286
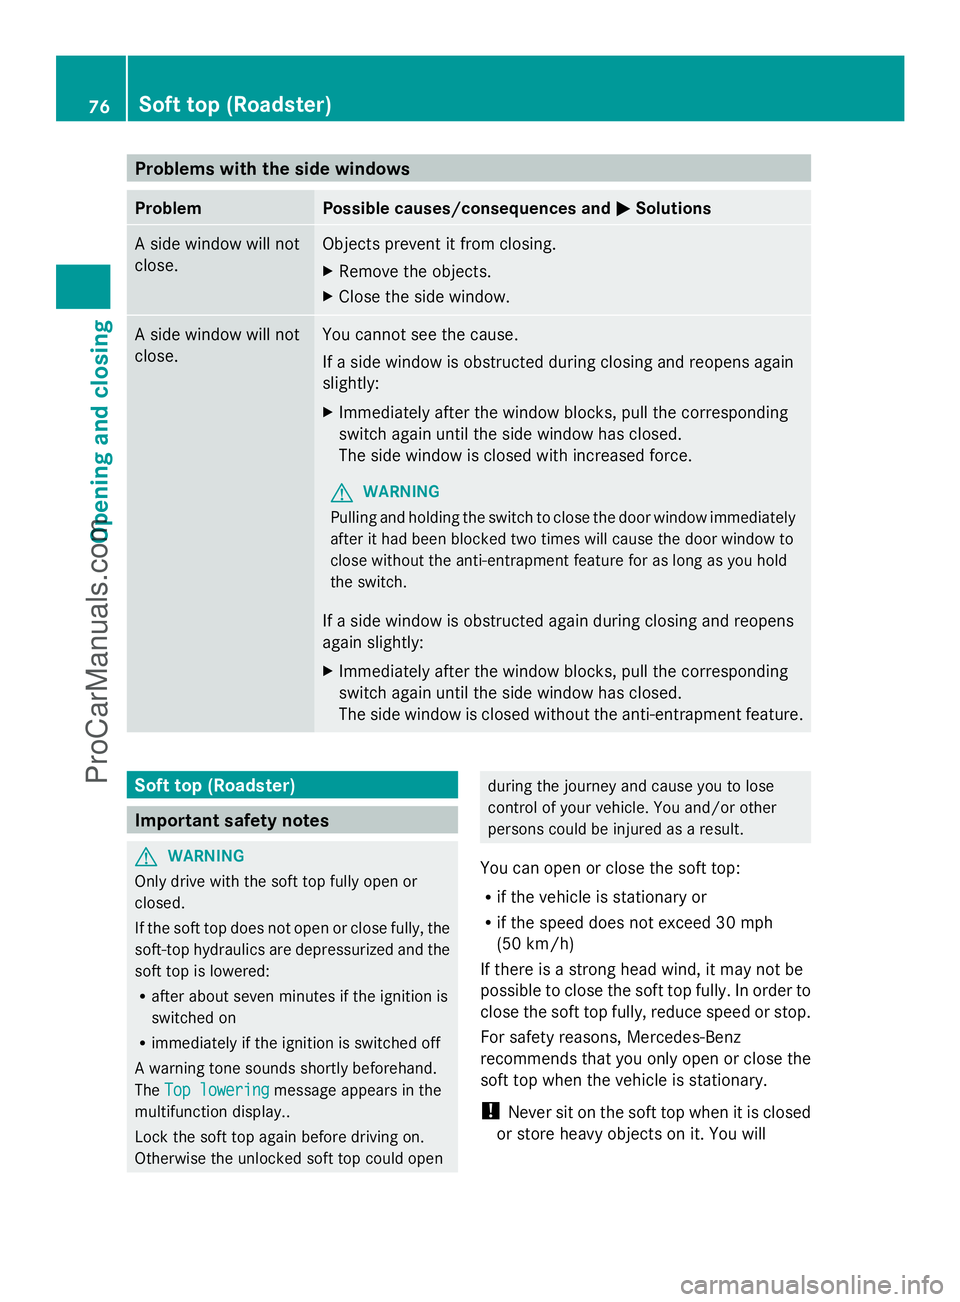
Problems with the side windows
Problem Possible causes/consequences and
M
MSolutions A side window will not
close. Objects prevent it from closing.
X
Remove the objects.
X Close the side window. A side window will not
close. You cannot see the cause.
If a side window is obstructed during closing and reopens again
slightly:
X
Immediately after the window blocks, pull the corresponding
switch again until the side window has closed.
The side window is closed with increased force.
G WARNING
Pulling and holding the switch to close the door window immediately
after it had been blocked two times will cause the door window to
close without the anti-entrapment feature for as long as you hold
the switch.
If a side window is obstructed again during closing and reopens
again slightly:
X Immediately after the window blocks, pull the corresponding
switch again until the side window has closed.
The side window is closed without the anti-entrapment feature. Soft top (Roadster)
Important safety notes
G
WARNING
Only drive with the soft top fully open or
closed.
If the soft top does not open or close fully, the
soft-top hydraulics are depressurized and the
soft top is lowered:
R after about seven minutes if the ignition is
switched on
R immediately if the ignition is switched off
A warning tone sounds shortly beforehand.
The Top lowering
Top lowering message appears in the
multifunction display..
Lock the soft top again before driving on.
Otherwise the unlocked soft top could open during the journey and cause you to lose
control of your vehicle. You and/or other
persons could be injured as a result.
You can open or close the soft top:
R if the vehicle is stationary or
R if the speed does not exceed 30 mph
(50 km/h)
If there is a strong head wind, it may not be
possible to close the soft top fully. In order to
close the soft top fully, reduce speed or stop.
For safety reasons, Mercedes-Benz
recommends that you only open or close the
soft top when the vehicle is stationary.
! Never sit on the soft top when it is closed
or store heavy objects on it. You will 76
Soft top (Roadster)Opening and closing
ProCarManuals.com
Page 89 of 286

Position of the steering wheel for
driving The steering wheel is moved to the last
selected position when:
R the driver's door is closed.
R you press the Start/Stop button once.
When you close the driver's door with the
ignition switched on, the steering wheel is
also automatically moved to the previously
set position.
The last position of the steering wheel is
stored after each manual setting or when you
store the setting with the memory function
(Y page 89).
Crash-responsive EASY-EXIT feature If the crash-responsive EASY-EXIT feature is
triggered in an accident, the steering column
will move upwards when the driver's door is
opened. This occurs irrespective of the
position of the SmartKey in the ignition lock.
This makes it easier to exit the vehicle and
rescue the occupants.
The crash-responsive EASY-EXIT feature is
only operational if the EASY-EXIT/ENTRY
feature is activated in the on-board computer. Mirrors
Rear-view mirror
X
Anti-glare mode: flick anti-glare
switch :forwards or back. Exterior mirrors
Adjusting the exterior mirrors G
WARNING
Exercise care when using the passenger-side
exterior rear view mirror. The mirror surface
is convex (outwardly curved surface for a
wider field of view). Objects in mirror are
closer than they appear. Check your interior
rear view mirror and glance over your
shoulder before changing lanes.
The convex exterior mirrors provide a larger
field of vision.
The exterior mirrors are heated automatically
if the rear window defroster is switched on
and the outside temperature is low. Mirror
heating lasts up to 10 minutes.
i You can also heat up the exterior mirrors
manually by switching on the rear window
defroster. X
Select SmartKey position 1or 2with the
Start/Stop button.
X Press button :for the left-hand exterior
mirror or button ;for the right-hand
exterior mirror.
The indicator lamp in the corresponding
button lights up in red.
The indicator lamp goes out again after
some time. You can adjust the selected
mirror using adjustment button =as long
as the indicator lamp is lit.
X Press adjustment button =up, down, or
to the left or right until you have adjusted Mirrors
87Seats, steering wheel and mirrors Z
ProCarManuals.com
Page 91 of 286
The mirrors do not go into anti-glare mode if
reverse gear is engaged. Parking position for the exterior
mirror on the front-passenger side
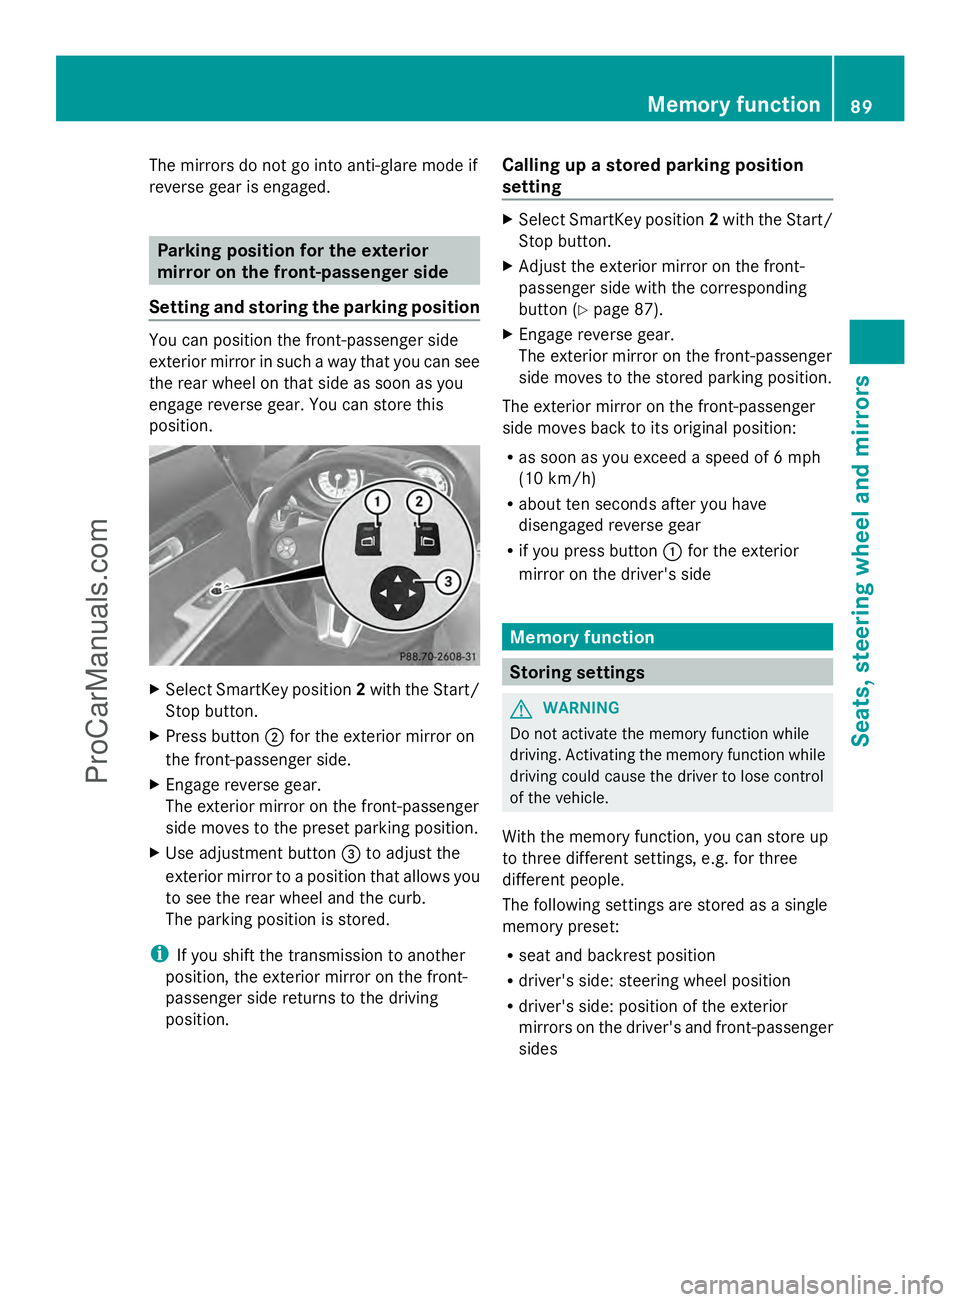
Setting and storing the parking position You can position the front-passenger side
exterior mirror in such a way that you can see
the rear wheel on that side as soon as you
engage reverse gear. You can store this
position. X
Select SmartKey position 2with the Start/
Stop button.
X Press button ;for the exterior mirror on
the front-passenger side.
X Engage reverse gear.
The exterior mirror on the front-passenger
side moves to the preset parking position.
X Use adjustment button =to adjust the
exterior mirror to a position that allows you
to see the rear wheel and the curb.
The parking position is stored.
i If you shift the transmission to another
position, the exterior mirror on the front-
passenger side returns to the driving
position. Calling up a stored parking position
setting X
Select SmartKey position 2with the Start/
Stop button.
X Adjust the exterior mirror on the front-
passenger side with the corresponding
button (Y page 87).
X Engage reverse gear.
The exterior mirror on the front-passenger
side moves to the stored parking position.
The exterior mirror on the front-passenger
side moves back to its original position:
R as soon as you exceed a speed of 6 mph
(10 km/h)
R about ten seconds after you have
disengaged reverse gear
R if you press button :for the exterior
mirror on the driver's side Memory function
Storing settings
G
WARNING
Do not activate the memory function while
driving. Activating the memory function while
driving could cause the driver to lose control
of the vehicle.
With the memory function, you can store up
to three different settings, e.g. for three
different people.
The following settings are stored as a single
memory preset:
R seat and backrest position
R driver's side: steering wheel position
R driver's side: position of the exterior
mirrors on the driver's and front-passenger
sides Memory function
89Seats, steering wheel and mirrors Z
ProCarManuals.com