2013 MERCEDES-BENZ SLK-Class key
[x] Cancel search: keyPage 85 of 358

X
To open all side windows: press
switch 0003to the point of resistance.
X To open all side windows fully: press
switch 0003beyond the point of resistance.
All side windows open simultaneously.
i If, after opening the windows, you then
close a side window using the switch on the
door control panel, the othe rside windows
will remain open .To close the other side
windows, you must pull the switch on the
center console and hold it. The front side
window will close first, then the rear side
windows.
X To close all side windows: pull
switch 0003.
The rear side windows close after the front
side windows.
X Make sure that all the side windows are
fully closed.
i When the roof is open, only the two front
side windows can be operated using the
switch on the center console.
Using the SmartKey G
WARNING
Make sure that nobody can become trapped
as you close the side windows.
Proceed as follows if there is a risk of
entrapment:
R release the 000Fkey.
R press and hold the 0010key until the side
windows open again. You can use the SmartKey to open or close
all side windows simultaneously.
X
Close the roof (Y page 86).
X Open the trunk partition (Y page 88).
X Vehicles without KEYLESS-GO: point the
tip of the SmartKey at the door handle on
the driver's door.
X Vehicles with KEYLESS-GO: the
SmartKey must be within 6 ft (2 m) of the
vehicle.
X To open all side windows: press
the 0010 button on the SmartKey until the
side windows are fully opened.
X To interrupt the opening procedure:
release the 0010button.
X To close all side windows: press the
000F button on the SmartKey until the side
windows are fully closed.
X To interrupt the closing procedure:
release the 000Fbutton.
Convenience closing with KEYLESS-GO G
WARNING
When using the convenience closing feature,
make sure that nobody can become trapped.
Proceed as follows if there is a risk of
entrapment:
R release the locking button on the door
handle.
R pull the door handle immediately and hold
it.
The side windows open.
With KEYLESS-GO you can close all side
windows simultaneously. The KEYLESS-GO
key must be outside the vehicle. All the doors
must be closed. Side windows
83Opening/closing Z
Page 86 of 358
X
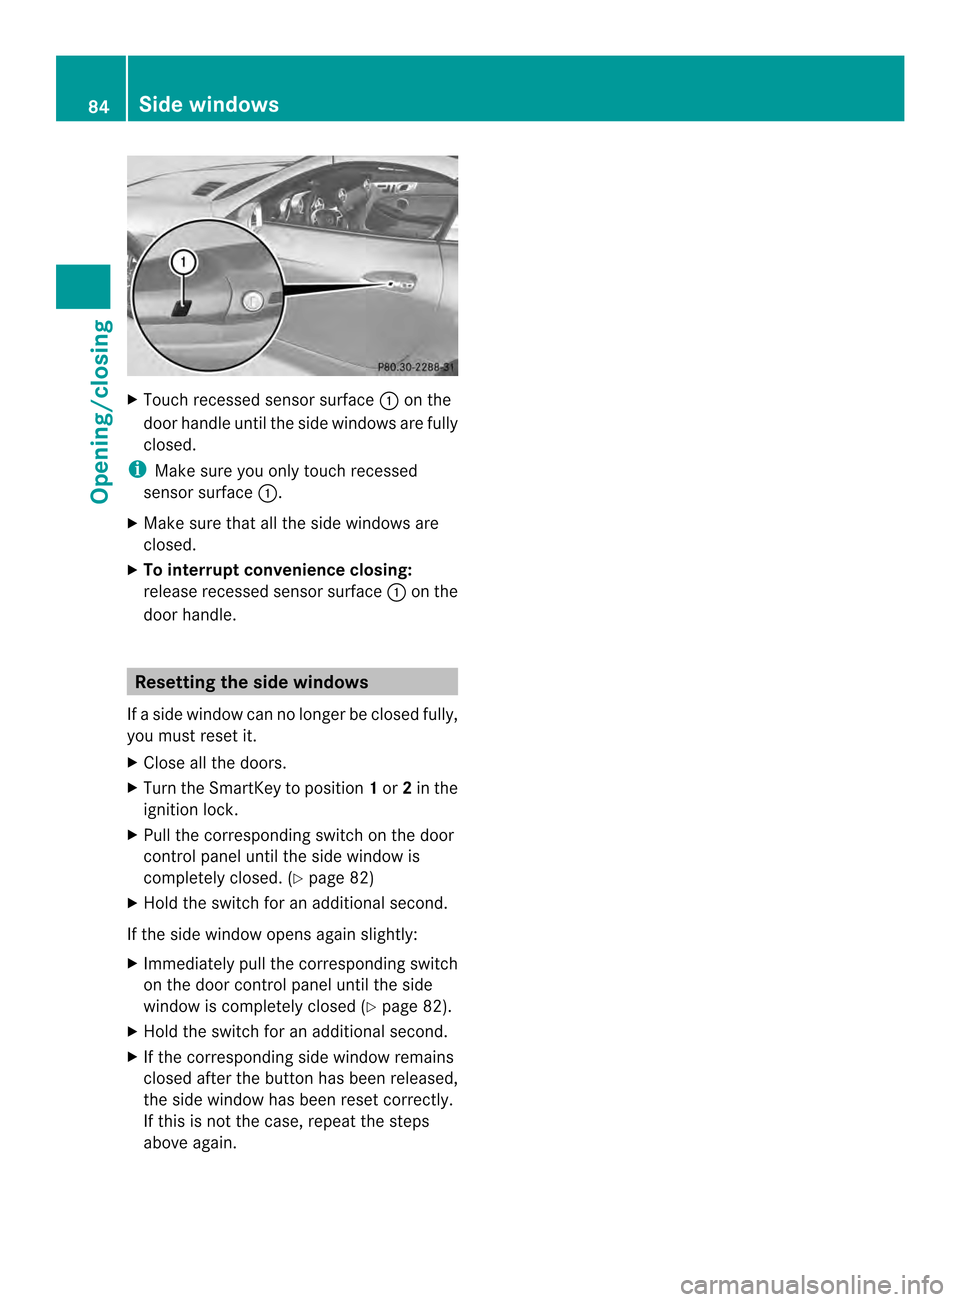
Touch recessed sensor surface 0003on the
door handle until the side windows are fully
closed.
i Make sure you only touch recessed
sensor surface 0003.
X Make sure that all the side windows are
closed.
X To interrupt convenience closing:
release recessed sensor surface 0003on the
door handle. Resetting the side windows
If a side window can no longer be closed fully,
you must reset it.
X Close all the doors.
X Turn the SmartKey to position 1or 2in the
ignition lock.
X Pull the corresponding switch on the door
control panel until the side window is
completely closed. (Y page 82)
X Hold the switch for an additional second.
If the side window opens again slightly:
X Immediately pull the corresponding switch
on the door control panel until the side
window is completely closed (Y page 82).
X Hold the switch for an additional second.
X If the corresponding side window remains
closed after the button has been released,
the side window has been reset correctly.
If this is not the case, repeat the steps
above again. 84
Side windowsOpening/closing
Page 88 of 358

Attempting to manually close the roof may
cause damage to the roo fand/o rinjury.
For this reason, the manual closing process
should only be carried ou tataqualified
specialist workshop.
! Never sit on the rear shelf or store heavy
objects there. You will otherwise damage
the roof and the rear shelf of your vehicle.
! Do not forget that the weather can
change abruptly. Make certain that the roof
is closed when you leave the vehicle. The
vehicle electronics can be damaged if
water enters the vehicle interior.
! When opening and closing the roof, make
sure that:
R there is sufficien tclearance, as the roof
swings upwards.
R there is sufficien tclearance behind the
vehicle, as the trunk lid swings
backwards beyond the bumper.
R the trunk is only loaded to below the
trunk partition.
R the trunk partition is not pushed up by
the load.
R the trunk partition is closed.
R the trunk lid is closed.
R the outside temperature is above 5‡
( 001A 15 †).
You could otherwise damage the roof,
trunk and other parts of the vehicle.
i Make sure that the roof and rear window
are clea nand dry before opening the roof.
Otherwise, water or dirt could ente rthe
vehicle interior or trunk. Opening and closing using the roof
switch
Important safety notes G
WARNING
Before operating the retractable hardtop
(vario-roof), make sure there is no danger of anyone being injured by the moving parts
(retractable hardtop, roof frame, and trunk
lid).
Hands must never be placed near the roof
frame, upper windshield area, hardtop, shelf
behind roll bars, or trunk lid while the
retractable hardtop is being raised or
lowered. Serious personal injury may occur.
If potential danger exists, release the
retractable hardtop switch or the 0010or
000F button on the SmartKey. This
immediately interrupts the raising or lowering
procedure. You can then operate the
retractable hardtop switch or press the
0010 or000F button on the SmartKey to raise
or lower the retractable hardtop away from
the danger zone.
Opening/closing X
Secure the vehicle against rolling away
(Y page 155).
X Close the trunk partition (Y page 88).
X Close the trunk lid.
X Turn the SmartKey to position 2in the
ignition lock.
X Open the cover in the lower center console.
Roof switch 0003is located under the cover.
X To open: pull roof switch 0003until the roof
has been fully retracted into the trunk and
the Vario-Roof in Operation message
disappears from the multifunction display.
All of the side windows open.
X To close: press roof switch 0003until the roof
is fully closed and the Vario-Roof in86
RoofOpening/closing
Page 89 of 358

Operation message disappears from the
multifunction display.
All of the side windows open.
X To close all side windows, pull the switch
under the cover of the center console
(Y page 82).
i If you operate the roof switch and the
Trunk Partition Open message appears
in the multifunction display, the trunk
partition has not been closed correctly. Opening and closing using the
SmartKey
Important safety notes G
WARNING
Before operating the retractable hardtop
(vario-roof), make sure there is no danger of
anyone being injured by the moving parts
(retractable hardtop, roof frame, and trunk
lid).
Hands must never be placed near the roof
frame, upper windshield area, hardtop, shelf
behind roll bars, or trunk lid while the
retractable hardtop is being raised or
lowered. Serious personal injury may occur.
If potential danger exists, release the
retractable hardtop switch or the 0010or
000F button on the SmartKey. This
immediately interrupts the raising or lowering
procedure. You can then operate the
retractable hardtop switch or press the
0010 or000F button on the SmartKey to raise
or lower the retractable hardtop away from
the danger zone.
Opening/closing X
Close the trunk partition (Y page 88).
X Close the trunk lid (Y page 79).
X Vehicles without KEYLESS-GO: point the
tip of the SmartKey at the door handle on
the driver's door. X
Vehicles with KEYLESS-GO: the
SmartKey must be within 6 ft (2 m) of the
vehicle.
X To open: press and hold the 0010button
on the SmartKey until the roof is fully
opened.
The roof and the rear side windows open.
The front side windows close.
X To interrupt the opening procedure:
release the 0010button.
X To open the front side windows: press
and hold the 0010button on the SmartKey
again.
X To close: press and hold the 000Fbutton
on the SmartKey until the roof is fully
closed.
The roof and the side windows close.
X To interrupt the closing procedure:
release the 000Fbutton.
i When the roof is closed and the trunk
partition is open, the roof cannot be
opened using the SmartKey functions.
Instead, all of the side windows open or
close simultaneously (Y page 82).
Additionally, the Trunk Partition Open message appears in the multifunction
display. Locking the roof again
Important safety notes G
WARNING
Stop the vehicle in a safe location or as soon
as it is safe to do so and lock the retractable
hardtop before continuing to drive. You could
otherwise endanger yourselfa nd others. Roof
87Opening/closing Z
Page 90 of 358

The roof is not locked if:
R
the 0008 symbol and Vario-Roof In Operation message appear in the
multifunction display
R the 0008 symbol and Open/Close Vario-
Roof Completely message appear and
you hear a warning tone
R you hear a warning tone for up to
10 seconds when pulling away or while
driving.
Locking You can lock the roof again if it is not locked
fully.
X Pull over and stop the vehicle safely as soon
as possible, paying attention to road and
traffic conditions.
X Make sure that the SmartKey is in position
2in the ignition lock.
X Press the roof switch (Y page 86).Trunk partition
General notes !
To avoid damaging the roof or luggage
when folding back the roof, you should:
R only load the trunk to below the trunk
partition
R not place any objects on or in frontoft he
trunk partition
R not place any objects on the cover
behind the roll bars
R not allow the cargo to push the trunk
partition upwards
The trunk partition can be used to cover
luggage and loads in the trunk. Opening/closing X
To close: pull back trunk partition 0003by
the handle in the direction of the arrow until
it engages on both sides in the eyelets on
the cargo compartment lip.
X To open: grip the handle of trunk
partition 0003.
X Press the release button in the handle of
trunk partition 0003.
Trunk partition 0003is unlocked.
X Pull trunk partition 0003up out of the eyelets
on the cargo compartment lip.
X Push trunk partition 0003forwards against
the direction of the arrow by handle . Wind screen
Important safety notes G
WARNING
If you use the wind screen when it is dark or
in other conditions offering poor visibility,
your view to the rear is further impaired. As a
result of the poor visibility, you could cause
an accident and injure yourself or others.
For this reason, remove the wind screen as
soon as it is dark or if your vision is otherwise
restricted. G
WARNING
You could lose control of the vehicle and
injure yourself or others if you operate the
wind screen while driving. 88
RoofOpening/closing
Page 93 of 358

i
Discs 0003and 0004can also be used
independently of each other, e.g .when you
are driving without a passenger. MAGIC SKY CONTROL
General notes MAGIC SKY CONTROL is a glass roof, the
transparency of which can be changed by
applying electrical voltage.
MAGIC SKY CONTROL can be switched
between darkened and transparent states.
i MAGIC SKY CONTROL darkens
automatically when you turn the SmartKey
to position 0in the ignition lock or remove
the SmartKey.
Risk of electric shock G
DANGER
The MAGIC SKY CONTROL electrical system
works at high voltage.
If the cover behind the overhead control unit
is damaged or is removed, electrical
components of MAGIC SKY CONTROL are
exposed. These may be live. If you touch these
components, you may get an electric shock
and could be seriously or even fatally injured.
For this reason, never remove the cover
behind the overhead control unit. Never touch
parts of the electrical system (control unit,
cables or cable connections).
Have all work on MAGIC SKY CONTROL
carried out at a qualified specialist workshop.
The electrical components of MAGIC SKY
CONTROL are protected by a paneling behind
the overhead control panel.
The MAGIC SKY CONTROL control unit is
marked with a yellow warning sticker that
warns you of high voltage. The high-voltage
cables are orange in color. Operating MAGIC SKY CONTROL
X
Turn the SmartKey to position 1or 2in the
ignition lock.
MAGIC SKY CONTROL switches to the
status it was set to before the engine was
switched off.
X To change the degree of transparency:
press button 0003.
i At sub-zero temperatures, the change is
slower and uneven. The entire process may
take some time. Roof
91Opening/closing Z
Page 97 of 358

Seats
Important safety notes
G
WARNING
The seats can still be adjusted when there is
no key in the ignition lock. For this reason,
children should never be left unsupervised in
the vehicle. They could otherwise become
trapped when adjusting the seat. G
WARNING
Make sure that the back of your head is
supported at eye level by the central area of
the head restraint .Ifyour head is not
supported correctly by the head restraint, you
could suffer a severe neck injury in the event
of an accident. Never drive if the head
restraints are not engaged and set correctly. G
WARNING
In order to avoid possible loss of vehicle
control, all seat, head restraint, steering
wheel and rear view mirror adjustments, as
well as fastening of seat belts, must be done
before setting the vehicle in motion. G
WARNING
Do not adjust the driver's seat while driving.
Adjusting the seat while driving could cause
the driver to lose control of the vehicle.
Never travel in a moving vehicle with the seat
backrest in an excessively reclined position as
this can be dangerous. You could slide under
the seat belt in a collision. If you slide under
it, the seat belt would apply force at the
abdomen or neck.T his could cause serious or
fatal injuries. The seat backrest and seat belts
provide the best restraint when the wearer is
in a position that is as upright as possible and
seat belts are properly positioned on the
body. G
WARNING
Your seat belt must be adjusted so that you
can correctly fasten your seat belt. Observe the following points:
R
adjust the seat backrest until your arms are
slightly angled when holding the steering
wheel.
R adjust the seat to a comfortable seating
position that still allows you to reach the
accelerator/brake pedal safely. The
position should be as far back as possible
with the driver still able to operate the
controls properly.
R adjust the head restraint so that it is as
close to the head as possible and the center
of the head restraint supports the back of
the head at eye level.
R never place hands under the seat or near
any moving parts while a seat is being
adjusted.
Failure to do so could result in an accident
and/or serious personal injury. G
WARNING
Children 12 years old and under must be
seated and properly secured in an
appropriately sized infant restraint, child
restraint system, or booster seat
recommended for the size and weight of the
child. For additional information, see the
"Children in the vehicle" section.
Ac hild's risk of serious or fatal injuries is
significantly increased if the child restraints
are not properly secured in the vehicle and/
or the child is not properly secured in the child
restraint. G
WARNING
Children 12 years old and under must be
seated and properly secured in an appropriate
infant restraint, toddler restraint, or booster
seat recommended for the size and weight of
the child. Additional information can be found
under "Children in the vehicle".
Ac hild's risk of serious or fatal injuries is
significantly increased if the child restraints
are not properly secured in the vehicle and/
or the child is not properly secured in the child
restraint. Seats
95Seats, steering wheel and mirrors Z
Page 99 of 358

Adjusting the head restraints
Adjusting the head restraints manually X
To raise/lower: push the head restraint
upwards or pull it down into the desired
position. Adjusting the 4-way lumbar support
0003
To raise the backrest contour
0004 To soften the backrest contour
0024 To lower the backrest contour
0023 To harden the backrest contour
You can adjust the contour of the seat
backrests individually to provide optimum
support for your back. Switching the sea
theating on/off
Activating/deactivating Driver's and front-passenger seat
The three red indicator lamps in the button
indicate the heating level you have selected.
The system automatically switches down
from level
3to level 2after approximately five
minutes.
The system automatically switches down
from level 2to level 1after approximately ten
minutes.
The system automatically switches off
approximatel y20 minutes after it is set to
level 1.
X Make sure that the SmartKey is in position
1or 2in the ignition lock.
X To switch on: press button0003repeatedly
until the desired heating level is set.
X To switch off: press button0003repeatedly
until all the indicator lamps go out.
Problems with the seat heating The sea
theating has switched off
prematurely or cannot be switched on. The
vehicle's electrical system voltage is too low
because too many electrical consumers are
switched on.
X Switch off electrical consumers that you do
not need, such as the rear window
defroster or interior lighting.
X Once the battery is sufficiently charged,
switch on the seat heating again. Seats
97Seats, steering wheel and mirrors Z