2013 MERCEDES-BENZ SL-CLASS ROADSTER winter tires
[x] Cancel search: winter tiresPage 29 of 572

Selecting the location
....................394
Selecting the location in the
weather map .................................. 395
Switching off .................................. 393
Switching on .................................. 393
Weather map (COMAND)
Legend
........................................... 396
Showing/hiding the menu ............. 396
Switching to the weather
information display ........................ 396
Weather map (SIRIUS)
Calling up ....................................... 465
Legend ........................................... 470
Moving ........................................... 465
Showing/hiding layers ...................466
Showing/hiding the menu ............. 465
Time stamp .................................... 470
Weather memory (SIRIUS)
Selecting an area ........................... 465
Storing an area .............................. 464
Website
Add to favourites ........................... 407
Wheel bolt tightening torque ...........552
Wheel chock ...................................... 549
Wheels Changing a wheel .......................... 547
Checking ........................................ 527
Cleaning ......................................... 502
Cleaning (warning) .........................548
Important safety notes .................. 526
Interchanging/changing ................547
Mounting a new wheel ................... 551
Mounting a wheel .......................... 548
Overview ........................................ 526
Removing a wheel ..........................551
Storing ........................................... 548
Tightening torque ........................... 552
Wheel size/tire size ....................... 552
Windows
see Side windows
Wind screen
Electrical wind screen ...................... 92
Manual wind screen ......................... 90
Windshield
Defrosting ...................................... 128
Windshield washer fluid
see Windshield washer system Windshield washer system
Adding washer fluid ....................... 499
Notes
............................................. 564
Windshield wipers
Problem (malfunction) ...................120
Replacing the wiper blades ............ 119
Switching on/off ........................... 118
Winter driving
Important safety notes .................. 528
Slippery road surfaces ................... 161
Snow chains .................................. 529
Winter operation
Overview ........................................ 528
Winter tires
M+S tires ....................................... 528
Wiper blades
Cleaning ......................................... 503
Important safety notes .................. 119
Replacing ....................................... 119
Wooden trim (cleaning
instructions) ...................................... 505
Workshop see Qualified specialist workshop Z
ZAGAT ®
rating service ...................... 315 Index
27
Page 59 of 572

Activating the special seat belt retractor:
X
Pull the seat belt out fully and let the seat
belt retractor retract it again.
While the
seat belt is retracting, you should
hear a ratcheting sound. The special seat
belt retractor is activated.
X Push down on the child restraint system to
take up any slack.
Removing a child restraint system/
deactivating the special seat belt retractor:
X Always comply with the manufacturer's
installation instructions.
X Press the seat belt release button and
guide the belt tongue to the belt outlet.
The special seat belt retractor is
deactivated.
If necessary:
X Additionally move the seat backwards.
The special seat belt retractor is
deactivated.
If necessary:
X Additionally remove the seat belt from the
seat belt guide on the seat backrest and
guide the seat belt back to the belt sash
guide.
The special seat belt retractor is
deactivated. Driving safety systems
Driving safety systems overview
In this
section, you will find information about
the following driving safety systems:
R ABS ( Anti-lock Braking System)
(Y page 57)
R BAS ( Brake Assist System) ( Y page 58)
R BAS PLUS ( Brake Assist System PLUS)
(Y page 58)
R ESP ®
(Electronic Stability Program)
(Y page 59)
R EBD ( electronic brake force distribution)
(Y page 62)
R ADAPTIVE BRAKE (Y page 63) R
PRE-SAFE ®
Brake (Y page 63)
R STEER CONTROL ( Y page 65) Important safety notes
If you fail to adapt your driving style or
become distracted, the driving safety
systems can neither reduce the risk of
accident nor override the laws of physics.
Driving safety systems are merely aids
designed to assist driving. You are
responsible for the distance to the vehicle in
front, for vehicle speed and for braking in
good time.
Always adapt your driving style to
suit the prevailing road and weather
conditions and maintain a safe distance from
the vehicle in front. Drive carefully.
i The driving safety systems described only
work as effectively as possible when there
is adequate contact between the tires and
the road surface. Please pay special
attention to the notes on tires,
recommended minimum tire tread depths,
etc. (Y page 526).
In wintry driving conditions, always use
winter tires (M+S tires) and if necessary,
snow chains. Only in this way will the
driving safety systems described in this
section work as effectively as possible. ABS (Anti-lock Braking System)
Important safety notes G
WARNING
If ABS is faulty, the wheels could lock when
braking. The steerability and braking
characteristics may be severely impaired.
Additionally, further driving safety systems
are deactivated.
There is an increased danger
of skidding and accidents.
Drive on carefully. Have ABS checked
immediately at a qualified specialist
workshop. Driving safety systems
57
Safety Z
Page 163 of 572

X
Hold test gauge A vertically on brake
disc : and slide measuring pin ; onto
brake disc :.
X Check which color field ? the arrow on
measuring pin ; is pointing to.
Green: the brake pad/lining thickness is
sufficient.
Red: the brake pad/lining thickness is not
sufficient. Have the brake pads/lining
checked at
a qualified specialist workshop.
i To avoid an inaccurate measurement:
R make sure you position the wheels
suitably
R do not
put the measuring pin on a recess
in the brake disc Driving on wet roads
Hydroplaning If water has accumulated to a certain depth
on the road surface, there is a danger of
hydroplaning occurring, even if:
R
you drive at low speeds.
R the tires have adequate tread depth.
For this reason, in the event of heavy rain or
in conditions in which hydroplaning can
occur, you must drive in the following
manner:
R lower your speed.
R avoid ruts.
R brake carefully.
Driving on flooded roads !
Do not drive through flooded areas.
Check the
depth of any water before driving
through it. Drive slowly through standing
water. Otherwise, water may enter the
vehicle interior or the engine compartment.
This can damage the electronic
components in the engine or the automatic
transmission. Water can also be drawn in
by the engine's air suction nozzles and this
can cause engine damage. Winter driving
Important safety notes G
WARNING
If the vehicle becomes trapped in snow,
ensure that snow is kept away from the
exhaust pipe and from around the vehicle as
long as the engine is running. Otherwise,
poisonous carbon monoxide (CO) may enter
the vehicle,
resulting in loss of consciousness
and even death.
To assure sufficient fresh air ventilation, open
a window slightly on the side of the vehicle
not facing the wind.
Have your vehicle winterproofed at a qualified
specialist workshop at the onset of winter.
Observe the notes in the "Winter operation"
section ( Y page 528).
Driving with summer tires Observe the notes in the "Winter operation"
section (
Y page 528).
Slippery road surfaces G
WARNING
The outside temperature indicator is not
designed to serve as an ice-warning device
and is therefore unsuitable for that purpose.
Indicated temperatures just above the
freezing point
do not guarantee that the road
surface is free of ice. The road may still be icy,
especially in wooded areas or on bridges. G
WARNING
On slippery road surfaces, never downshift in
order to obtain braking action. This could
result in
drive wheel slip and reduced vehicle
control. Your vehicle's ABS will not prevent
this type of loss of control. G
WARNING
Make sure that you do not endanger other
road users when you apply the brakes. Driving tips
161
Driving and parking Z
Page 503 of 572

cleaning agents. These cleaning agents can
damage the paintwork or plastic parts.
! Make sure that the automatic
transmission is
in position N when washing
your vehicle in a tow-through car wash. The
vehicle could be damaged if the
transmission is in another position.
! Make sure that:
R the side windows are fully closed.
R the ventilation/heating is switched off
(the OFF button has been pressed).
R the windshield wiper switch is in position
0.
Otherwise, the vehicle might be damaged.
You can wash the vehicle in an automatic car
wash from the very start.
If the vehicle is very dirty, pre-wash it before
cleaning it in an automatic car wash.
After using an automatic car wash, wipe off
wax from the windshield and the wiper
blades. This will prevent smears and reduce
wiping noises caused by residue on the
windshield.
Washing by hand In some countries, washing by hand is only
allowed at specially equipped washing bays.
Observe the legal requirements in all
countries concerned.
X
Do not use hot water and do not wash the
vehicle in direct sunlight.
X Use a soft sponge to clean.
X Use a mild cleaning agent, such as a car
shampoo approved by Mercedes-Benz.
X Thoroughly hose down the vehicle with a
gentle jet of water.
X Do not point the water jet directly towards
the air inlets.
X Use plenty of water and rinse out the
sponge frequently. X
Rinse the vehicle with clean water and dry
thoroughly with a chamois.
X Do not let the cleaning agent dry on the
paintwork.
When using the vehicle in winter, remove all
traces of road salt deposits carefully and as
soon as possible.
Power washers G
WARNING
Do not use power washers with circular-jet
nozzles (dirt
grinders) to clean your vehicle, in
particular the tires. You could otherwise
damage the tires and cause an accident.
! Always maintain a distance of at least
11.8 in (30 cm) between the vehicle and the
power washer nozzle. Information about
the correct distance is available from the
equipment manufacturer.
Move the power washer nozzle around
when cleaning your vehicle.
Do not aim directly at any of the following:
R tires
R door gaps, roof gaps, joints, etc.
R electrical components
R battery
R connectors
R lights
R seals
R trim
R ventilation slots
Damaged seals or electrical components
can lead to leaks or failures.
Cleaning the paintwork !
Do not affix:
R stickers
R films
R magnetic plates or similar items
to painted surfaces. You could otherwise
damage the paintwork. Care
501
Maintenance and care Z
Page 511 of 572

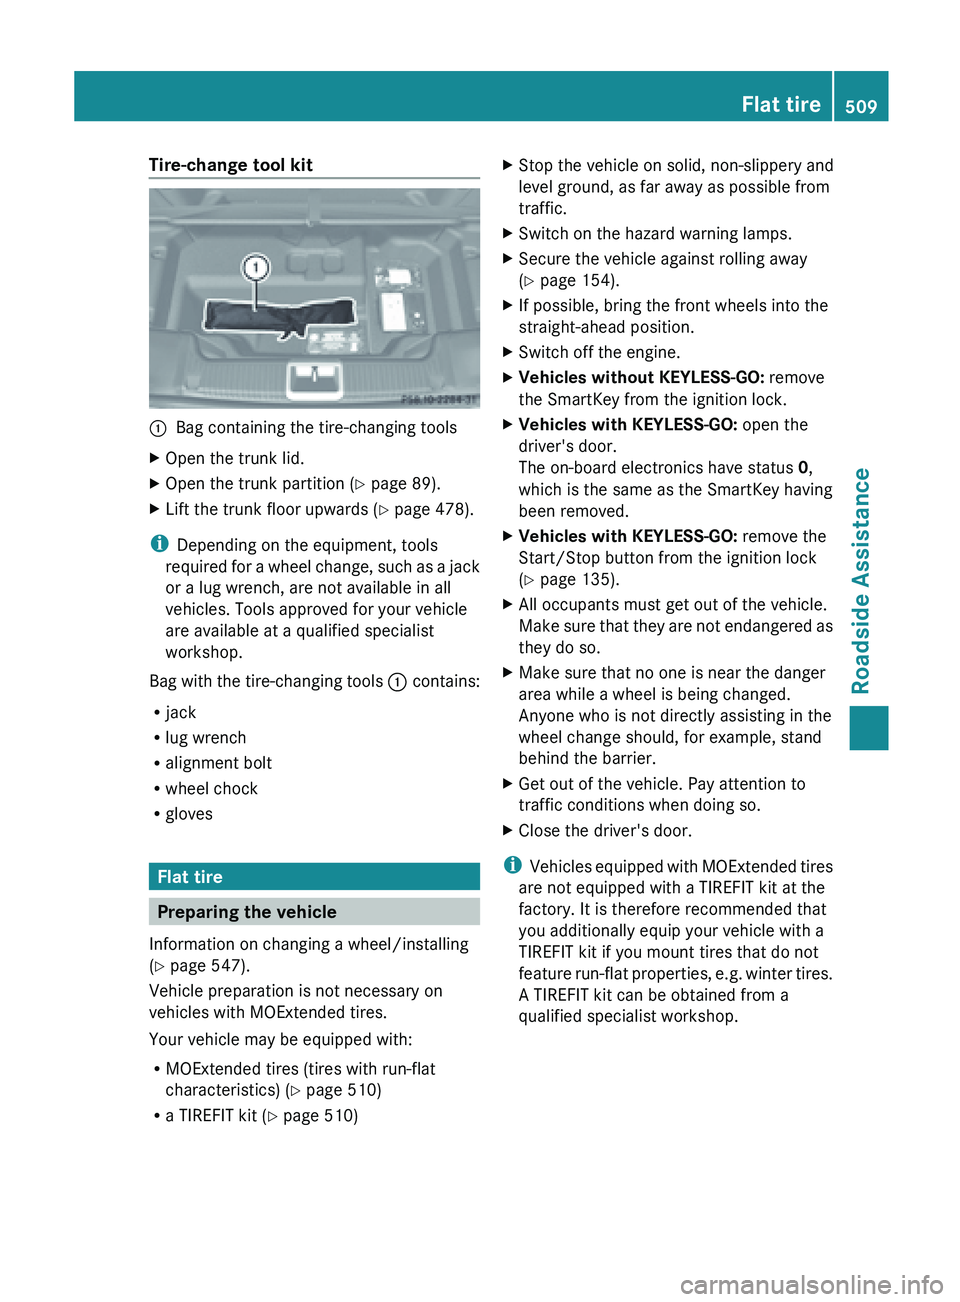
Tire-change tool kit
:
Bag containing the tire-changing tools
X Open the trunk lid.
X Open the trunk partition ( Y page 89).
X Lift the trunk floor upwards (Y page 478).
i Depending on the equipment, tools
required for
a wheel change, such as a jack
or a lug wrench, are not available in all
vehicles. Tools approved for your vehicle
are available at a qualified specialist
workshop.
Bag with the tire-changing tools : contains:
R jack
R lug wrench
R alignment bolt
R wheel chock
R gloves Flat tire
Preparing the vehicle
Information on changing a wheel/installing
(Y page 547).
Vehicle preparation is not necessary on
vehicles with MOExtended tires.
Your vehicle may be equipped with:
R MOExtended tires (tires with run-flat
characteristics) (Y page 510)
R a TIREFIT kit (Y page 510) X
Stop the vehicle on solid, non-slippery and
level ground, as far away as possible from
traffic.
X Switch on the hazard warning lamps.
X Secure the vehicle against rolling away
(Y page 154).
X If possible, bring the front wheels into the
straight-ahead position.
X Switch off the engine.
X Vehicles without KEYLESS-GO: remove
the SmartKey from the ignition lock.
X Vehicles with KEYLESS-GO: open the
driver's door.
The on-board electronics have status 0,
which is the same as the SmartKey having
been removed.
X Vehicles with KEYLESS-GO: remove the
Start/Stop button from the ignition lock
(Y page 135).
X All occupants must get out of the vehicle.
Make sure
that they are not endangered as
they do so.
X Make sure that no one is near the danger
area while a wheel is being changed.
Anyone who is not directly assisting in the
wheel change should, for example, stand
behind the barrier.
X Get out of the vehicle. Pay attention to
traffic conditions when doing so.
X Close the driver's door.
i Vehicles equipped
with MOExtended tires
are not equipped with a TIREFIT kit at the
factory. It is therefore recommended that
you additionally equip your vehicle with a
TIREFIT kit if you mount tires that do not
feature run-flat properties, e.g. winter tires.
A TIREFIT kit can be obtained from a
qualified specialist workshop. Flat tire
509
Roadside Assistance
Page 512 of 572

MOExtended tires (tires with run-flat
properties)
G
WARNING
When driving in emergency mode, the driving
characteristics deteriorate, e.g. when
cornering, accelerating quickly and when
braking. There is a risk of an accident.
Do not exceed the stated maximum speed.
Avoid abrupt
steering and driving maneuvers,
and driving over obstacles (curbs, potholes,
off-road). This applies in particular to a laden
vehicle.
Stop driving in emergency mode if:
R you hear banging noises.
R the vehicle starts to shake.
R you see smoke and smell rubber.
R ESP ®
is intervening constantly.
R there are tears in the sidewalls of the tire.
After driving in emergency mode, have the
wheel rims checked at a qualified specialist
workshop with regard to their further use. The
defective tire must be replaced in every case.
With MOExtended tires (tires with run flat
characteristics), you can continue to drive
your vehicle even if there is a total loss of
pressure in one or more tires.
MOExtended tires may only be used in
conjunction with the activated tire pressure
loss warning system or with the activated tire
pressure monitor.
The maximum driving distance is
approximately 50 miles (80 km) when the
vehicle is partially laden, and approximately
18 miles (30 km) when the vehicle is fully
laden.
In addition to the vehicle load, the driving
distance possible depends upon:
R speed
R road condition
R outside temperature
The driving distance possible in run-flat mode
may be reduced by extreme driving conditions/maneuvers, or it can be increased
through a moderate style of driving.
The maximum permissible distance which
can
be
driven in run-flat mode is counted from
the moment the tire pressure loss warning
appears in the multifunction display.
You must not exceed a maximum speed of
50 mph (80 km/h).
i When changing or replacing one or all of
the tires, note the label "MOExtended".
Take note also of the size specified for the
vehicle.
i Vehicles equipped with MOExtended tires
are not equipped with a TIREFIT kit at the
factory. It is therefore recommended that
you additionally equip your vehicle with a
TIREFIT kit if you mount tires that do not
feature run-flat properties, e.g. winter tires.
A TIREFIT kit is available, for example, from
a qualified specialist workshop. TIREFIT kit
Using the TIREFIT kit TIREFIT is a tire sealant.
You can use TIREFIT to seal punctures of up
to
0.16
in (4 mm), particularly those in the tire
tread. You can use TIREFIT at outside
temperatures down to Ò4 ‡ (Ò20 †). G
WARNING
In the following situations, the tire sealant is
unable to provide sufficient breakdown
assistance, as it is unable to seal the tire
properly:
R there are
cuts or punctures in the tire larger
than those mentioned above.
R the wheel rim is damaged.
R you have driven at very low tire pressures
or on a flat tire.
There is a risk of an accident.
Do not drive any further. Contact a qualified
specialist workshop. 510
Flat tire
Roadside Assistance
Page 527 of 572

Useful information ............................
526
Important safety notes ....................526
Operation ........................................... 526
Winter operation ............................... 528
Tire pressure ..................................... 529
Loading the vehicle ..........................537
All about wheels and tires ...............540
Changing a wheel ............................. 547
Wheel and tire combinations ...........552 525Wheels and tires
Page 530 of 572

Selecting, mounting and replacing
tires
R Only mount tires and wheels of the same
type and make.
R Only mount tires of the correct size onto
the wheels.
R Break in new tires at moderate speeds for
the first
60 miles (100 km). They only reach
their full performance after this distance.
R Do not drive with tires which have too little
tread depth. as this significantly reduces
the traction on wet roads (hydroplaning).
R Replace the tires after six years at the
latest, regardless of wear. MOExtended tires (tires with run-flat
properties)
With MOExtended tires (tires with run flat
characteristics), you can continue to drive
your vehicle even if there is a total loss of
pressure in one or more tires.
MOExtended tires may be used only in
conjunction with the activated tire pressure
loss warning system or the activated tire
pressure monitor and only on wheels
specifically tested by Mercedes-Benz.
Notes on driving with MOExtended tires with
a flat tire ( Y
page 510).
i Vehicles equipped
with MOExtended tires
are not equipped with a TIREFIT kit at the
factory. It is therefore recommended that
you additionally equip your vehicle with a
TIREFIT kit if you mount tires that do not
feature run-flat properties, e.g. winter tires.
A TIREFIT kit can be obtained from a
qualified specialist workshop. Winter operation
General notes
Have your
vehicle winterproofed at a qualified
specialist workshop at the onset of winter. Observe the notes in the "Changing a wheel"
section (
Y page 547). Driving with summer tires
At temperatures
below 45 ‡ (+7 †), summer
tires lose elasticity and therefore traction and
braking power. Change the tires on your
vehicle to M+S tires. Using summer tires at
very cold temperatures could cause tears to
form, thereby damaging the tires
permanently. Mercedes-Benz cannot accept
responsibility for this type of damage. M+S tires
G
WARNING
M+S tires with a tire tread depth of less than
ã
in
(4 mm) are not suitable for use in winter
and do not provide sufficient traction. There
is a risk of an accident.
M+S tires with a tread depth of less than ã
in (4 mm) must be replaced immediately.
At temperatures below 45 ‡ (+7 †), use
winter tires or all-season tires. Both types of
tire are identified by the M+S marking.
Only winter tires bearing the i snowflake
symbol in addition to the M+S marking
provide the best possible grip in wintry road
conditions.
Only these tires will allow driving safety
systems such as ABS and ESP ®
to function
optimally in winter. These tires have been
developed specifically for driving in snow.
Use M+S tires of the same make and tread on
all wheels to maintain safe handling
characteristics.
Always observe the maximum permissible
speed specified for the M+S tires you have
mounted. 528
Winter operation
Wheels and tires