2013 MERCEDES-BENZ SL-CLASS ROADSTER ECU
[x] Cancel search: ECUPage 460 of 572
X
Select the Back (to movie) menu item in
the menu and press W to confirm.
Setting the language and audio format This function is not available on all DVDs. If it
is available, you can set the DVD menu
language, the audio language or the audio
format.
The
number of settings is determined
by the DVD content. It is possible that the
settings may also be accessed in the DVD
menu (Y page 457).
X Show the DVD menu (Y page 457).
X In full-screen mode, press W the
COMAND
controller to show the menu.
X Select DVD-Video in the menu by turning
cVd the COMAND controller and press
W to confirm.
X Select DVD Functions and press W to
confirm.
X Select Menu Language or Audio
Language and press W to confirm.
In both cases, a menu appears after a few
seconds. The # dot in front of an entry
indicates the currently selected language.
X Select a setting by turning cVd the
COMAND controller and press W to
confirm.
Subtitles and camera angle These functions are not available on all DVDs.
The
number
of subtitle languages and camera
angles available depends on the content of
the DVD. It is possible that the settings may
also be accessed in the DVD menu
(Y page 457).
X Activate the DVD menu (Y page 457).
X Select DVD-Video in the menu by turning
cVd the COMAND controller and press
W to confirm.
X Select DVD Functions and press W to
confirm. X
Select Subtitles or Camera Angle and
press W to confirm.
In both
cases, a menu appears. The # dot
in front of an entry indicates the current
setting.
X Select a setting by turning cVd the
COMAND controller and press W to
confirm.
Interactive content DVDs can contain interactive content (e.g. a
video game). In a video game, for example,
you may be able to influence events by
selecting
and
triggering actions. The type and
number of actions depend on the DVD.
X Select an action by sliding ZVÆ or XVY
the
COMAND controller and press W to
execute it.
A menu appears and the first entry,
Select, is highlighted.
X Press W the COMAND controller. AUX video mode
Connecting external video sources G
WARNING
External video sources may have different
volumes, which can mean that system
messages such
as traffic announcements and
navigation system announcements are much
louder. If necessary, please deactivate the
system messages or adjust their volume
manually.
If your vehicle is equipped with Media
Interface, you can connect an external video
source (AUX video) ( Y page 445).
The 1/8 inch audio/video jacks are in the
center console stowage compartment.
i In vehicles with a rear view camera, the
AUX video jack cannot be used for external
video sources. 458
Video
COMAND
Page 481 of 572
X
To re-install the insert: place the insert in
stowage compartment ;.
X Slide catches : outwards in the direction
of the arrow until they engage.
You can remove the cup holder's rubber mat
for cleaning. Clean with clear, lukewarm
water only. Bottle holder
G
WARNING
Do not transport heavy, sharp-edged, or
fragile bottles in the bottle holder.
In the event of an accident, the bottle holder
cannot secure a bottle sufficiently. You and/
or vehicle occupants could be injured. X
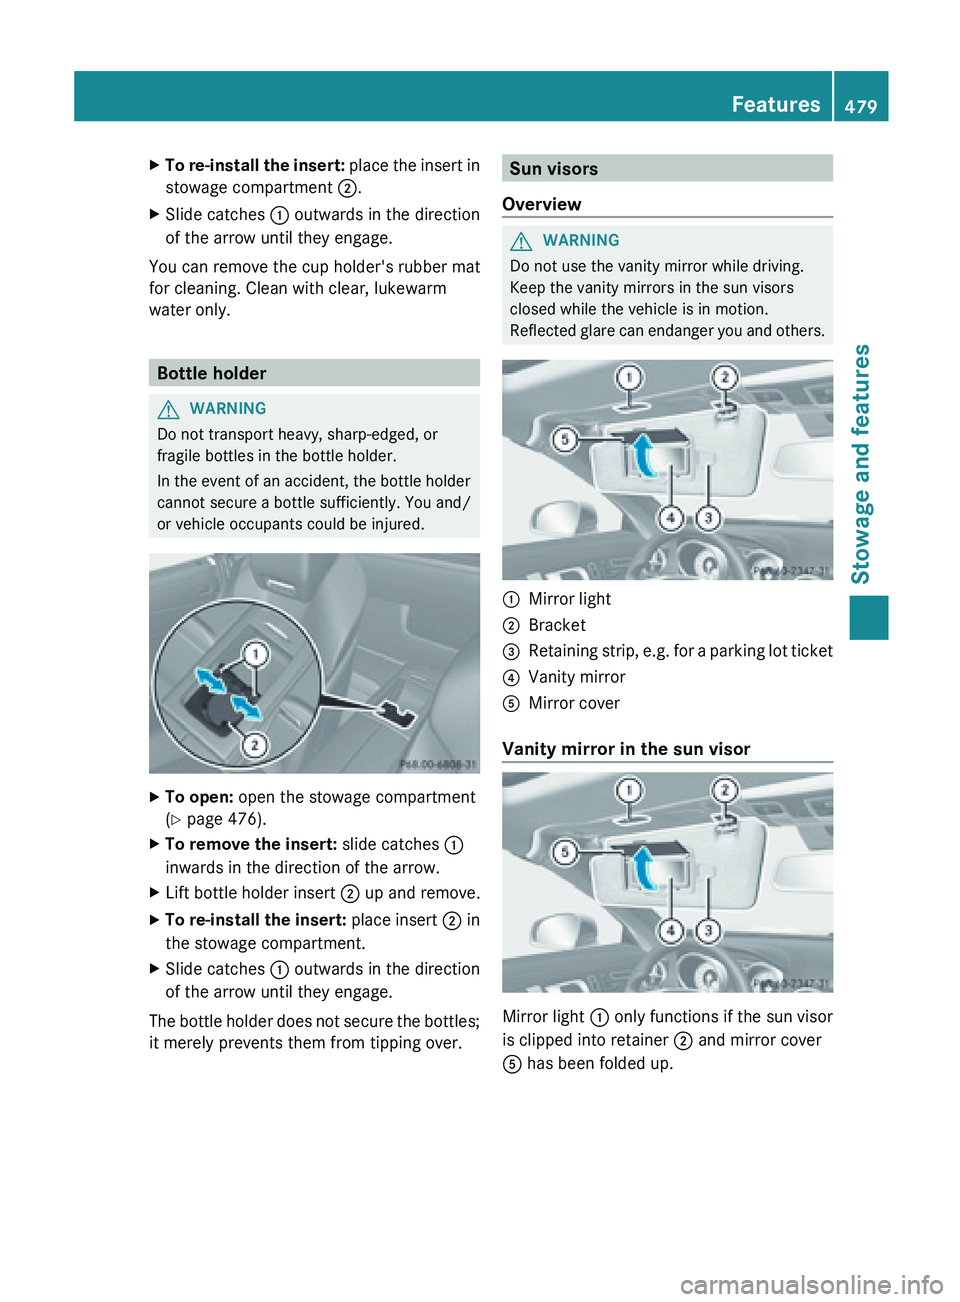
To open: open the stowage compartment
(Y page 476).
X To remove the insert: slide catches :
inwards in the direction of the arrow.
X Lift bottle holder insert ; up and remove.
X To re-install the insert: place
insert ; in
the stowage compartment.
X Slide catches : outwards in the direction
of the arrow until they engage.
The bottle holder does not secure the bottles;
it merely prevents them from tipping over. Sun visors
Overview G
WARNING
Do not use the vanity mirror while driving.
Keep the vanity mirrors in the sun visors
closed while the vehicle is in motion.
Reflected glare
can endanger you and others. :
Mirror light
; Bracket
= Retaining strip, e.g. for a parking lot ticket
? Vanity mirror
A Mirror cover
Vanity mirror in the sun visor Mirror light : only functions if the sun visor
is clipped into retainer
; and mirror cover
A has been folded up. Features
479
Stowage and features Z
Page 483 of 572
to the sockets is automatically cut. This
ensures that there is sufficient power to
start the engine.
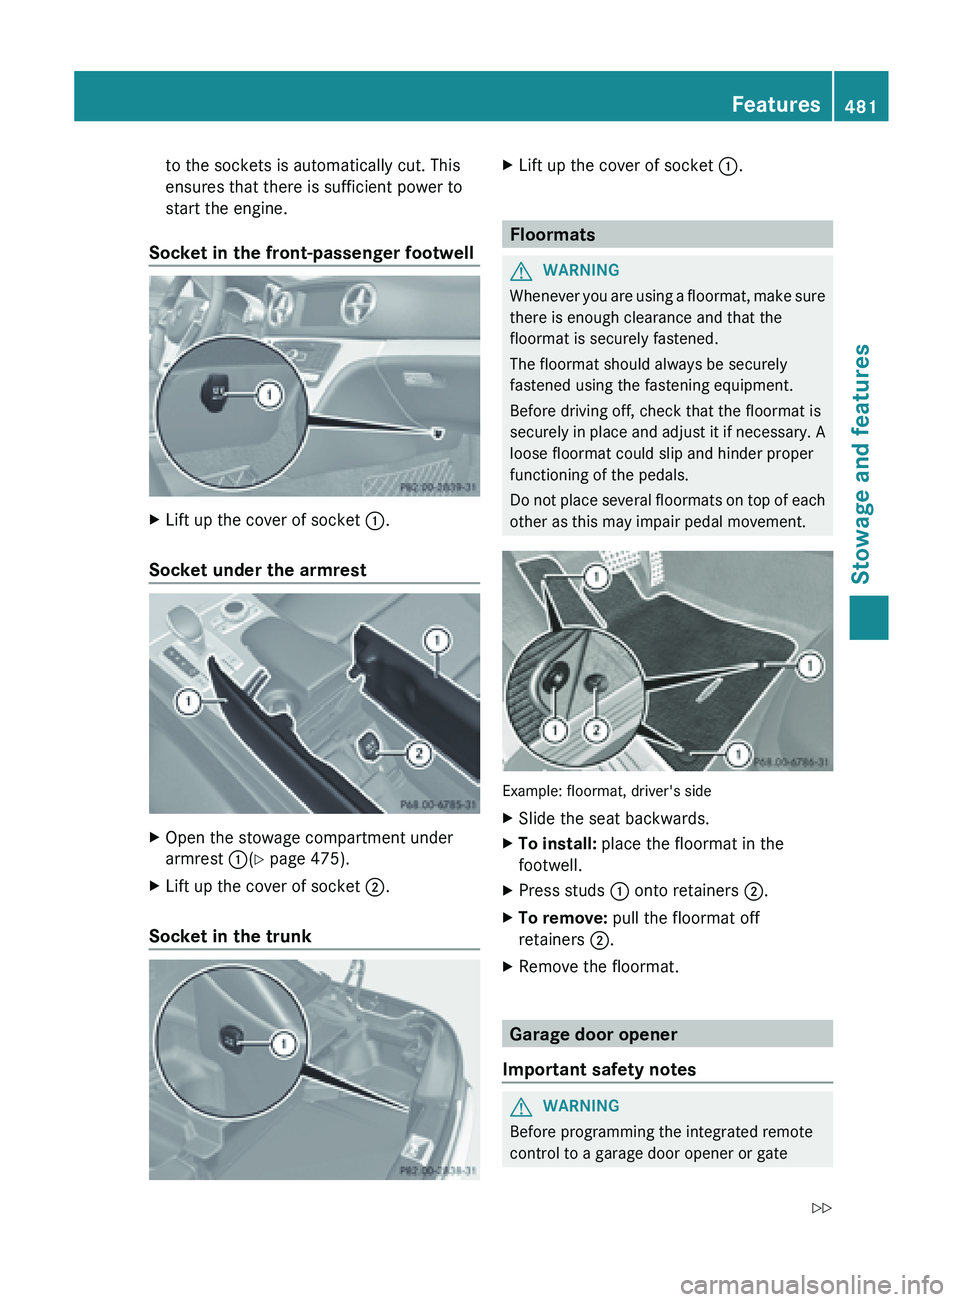
Socket in the front-passenger footwell X
Lift up the cover of socket :.
Socket under the armrest X
Open the stowage compartment under
armrest :(Y page 475).
X Lift up the cover of socket ;.
Socket in the trunk X
Lift up the cover of socket :. Floormats
G
WARNING
Whenever you are using a floormat, make sure
there is enough clearance and that the
floormat is securely fastened.
The floormat should always be securely
fastened using the fastening equipment.
Before driving off, check that the floormat is
securely in
place and adjust it if necessary. A
loose floormat could slip and hinder proper
functioning of the pedals.
Do not place several floormats on top of each
other as this may impair pedal movement. Example: floormat, driver's side
X
Slide the seat backwards.
X To install: place the floormat in the
footwell.
X Press studs : onto retainers ;.
X To remove: pull the floormat off
retainers ;.
X Remove the floormat. Garage door opener
Important safety notes G
WARNING
Before programming the integrated remote
control to a garage door opener or gate Features
481
Stowage and features
Z
Page 499 of 572
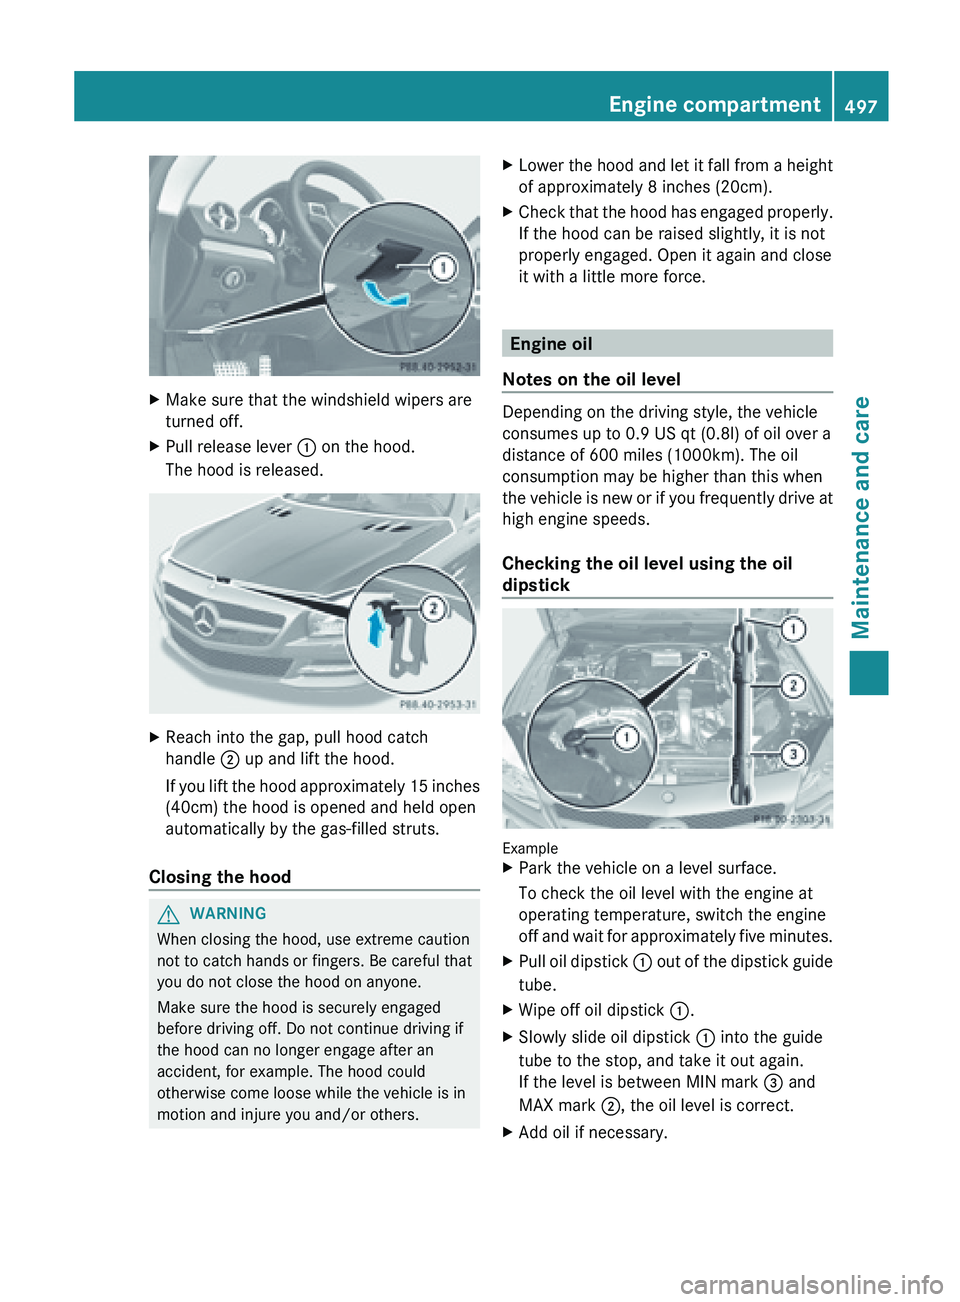
X
Make sure that the windshield wipers are
turned off.
X Pull release lever : on the hood.
The hood is released. X
Reach into the gap, pull hood catch
handle ; up and lift the hood.
If you
lift the hood approximately 15 inches
(40cm) the hood is opened and held open
automatically by the gas-filled struts.
Closing the hood G
WARNING
When closing the hood, use extreme caution
not to catch hands or fingers. Be careful that
you do not close the hood on anyone.
Make sure the hood is securely engaged
before driving off. Do not continue driving if
the hood can no longer engage after an
accident, for example. The hood could
otherwise come loose while the vehicle is in
motion and injure you and/or others. X
Lower the hood and let it fall from a height
of approximately 8 inches (20cm).
X Check
that the hood has engaged properly.
If the hood can be raised slightly, it is not
properly engaged. Open it again and close
it with a little more force. Engine oil
Notes on the oil level Depending on the driving style, the vehicle
consumes up to 0.9 US qt (
0.8l) of oil over a
distance of 600 miles (1000km). The oil
consumption may be higher than this when
the
vehicle is new or if you frequently drive at
high engine speeds.
Checking the oil level using the oil
dipstick Example
X
Park the vehicle on a level surface.
To check the oil level with the engine at
operating temperature, switch the engine
off and
wait for approximately five minutes.
X Pull oil dipstick : out
of the dipstick guide
tube.
X Wipe off oil dipstick :.
X Slowly slide oil dipstick : into the guide
tube to the stop, and take it out again.
If the level is between MIN mark = and
MAX mark ;, the oil level is correct.
X Add oil if necessary. Engine compartment
497
Maintenance and care Z
Page 500 of 572

Adding engine oil
G
WARNING
If engine oil comes into contact with hot
engine parts,
it may ignite and you could burn
yourself. Do not spill any engine oil on hot
engine parts. H
Environmental note
When adding oil, take care not to spill any. If
oil enters the soil or waterways, it is harmful
to the environment.
! Use only engine oils and oil filters that
have been approved for vehicles equipped
with a service system. A list of the engine
oils and oil filters tested and approved in
accordance with the Mercedes-Benz
Specifications for Service Products can be
called up by visiting http://
www.mbusa.com (USA only). More
information about tested and approved
engine oils and oil filters is available from
any authorized Mercedes-Benz Center.
Damage to
the engine or exhaust system is
caused by the following:
R using engine oils and oil filters which
have not been specifically approved for
the service system.
R replacing the engine oil or oil filter after
the replacement interval required by the
service system has elapsed
R using engine oil additives.
! Do not add too much oil. If the oil level is
above the "max" mark on the dipstick, too
much oil has been added. This can lead to
damage to the engine or the catalytic
converter. Have excess oil siphoned off. Example: engine oil cap
X
Turn cap : counter-clockwise and remove
it.
X Add the amount of oil required.
Fill carefully to the maximum mark on the
oil dipstick.
X Replace cap :
on the filler neck and
tighten clockwise.
Ensure that the cap locks into place
securely.
i The difference between the minimum
mark and the maximum mark on the oil
dipstick is approximately 1.4 US qt (
1.3l).
i Further information on engine oil
(Y page 562). Checking and adding other service
products
Checking the coolant level G
WARNING
In order to avoid potentially serious burns:
R use extreme caution when opening the
hood if there are any signs of vapor or
coolant leaking
from the cooling system, or
if the coolant temperature display indicates
that the coolant is overheated.
R do not remove the pressure cap on the
coolant tank if the coolant temperature is
above 158 ‡ (70 †). Allow the engine to
cool down before removing the cap. The
coolant tank contains hot fluid and is under
pressure.498
Engine compartment
Maintenance and care
Page 505 of 572
should drive for a few minutes after
cleaning.
Braking
heats the brake discs and
the brake pads/linings, thus drying them.
The vehicle can then be parked.
Cleaning the windows G
WARNING
Before cleaning the windshield or wiper
blades, switch off the windshield wipers and
remove the SmartKey from the ignition lock.
On vehicles with KEYLESS-GO, press the
Start/Stop button repeatedly until all
indicator lamps
in the instrument cluster have
gone out. The windshield wipers could
otherwise move and injure you. G
WARNING
Do not clean the rear window with the
reatractable hardtop
(vario-roof) in a position
other than the fully raised and closed position.
Otherwise, the retractable hardtop may move
unexpectedly which may result in personal
injury to you or others.
! Only fold the windshield wipers away from
the windshield when vertical. Otherwise,
you will damage the hood.
! Do not use dry cloths, abrasive products,
solvents or cleaning agents containing
solvents to clean the inside of the windows.
Do not touch the insides of the windows
with hard objects, e.g. an ice scraper or
ring. There is otherwise a risk of damaging
the windows.
! Clean the water drainage channels of the
windshield and the rear window at regular
intervals. Deposits such as leaves, petals
and pollen may under certain
circumstances prevent water from draining
away. This can lead to corrosion damage
and damage to electronic components.
X Clean the inside and outside of the
windows with a damp cloth and a cleaning
agent that is recommended and approved
by Mercedes-Benz. Cleaning the wiper blades G
WARNING
Before cleaning the windshield or wiper
blades, switch off the windshield wipers and
remove the SmartKey from the ignition lock.
On vehicles with KEYLESS-GO, press the
Start/Stop button repeatedly until all
indicator lamps
in the instrument cluster have
gone out. The windshield wipers could
otherwise move and injure you.
! Do not pull the wiper blade. Otherwise,
the wiper blade could be damaged.
! Do not clean wiper blades too often and
do not rub them too hard. Otherwise, the
graphite coating could be damaged. This
could cause wiper noise.
! Hold the wiper arm securely when folding
back. The windshield could be damaged if
the wiper arm smacks against it suddenly.
X Fold the windshield wiper arms away from
the windshield.
X Carefully clean the wiper blades with a
damp cloth.
X Fold the windshield wiper arms back again
before switching on the ignition.
Cleaning the exterior lighting !
Only use cleaning agents or cleaning
cloths which are suitable for plastic light
lenses. Unsuitable cleaning agents or
cleaning cloths could scratch or damage
the plastic light lenses.
X Clean the plastic lenses of the exterior
lighting using a wet sponge and a mild
cleaning agent, e.g. Mercedes-Benz car
shampoo or cleaning cloths.
Mirror turn signals !
Only use cleaning agents or cleaning
cloths that are suitable for plastic lenses.
Unsuitable cleaning agents or cleaning Care
503
Maintenance and care Z
Page 511 of 572
Tire-change tool kit
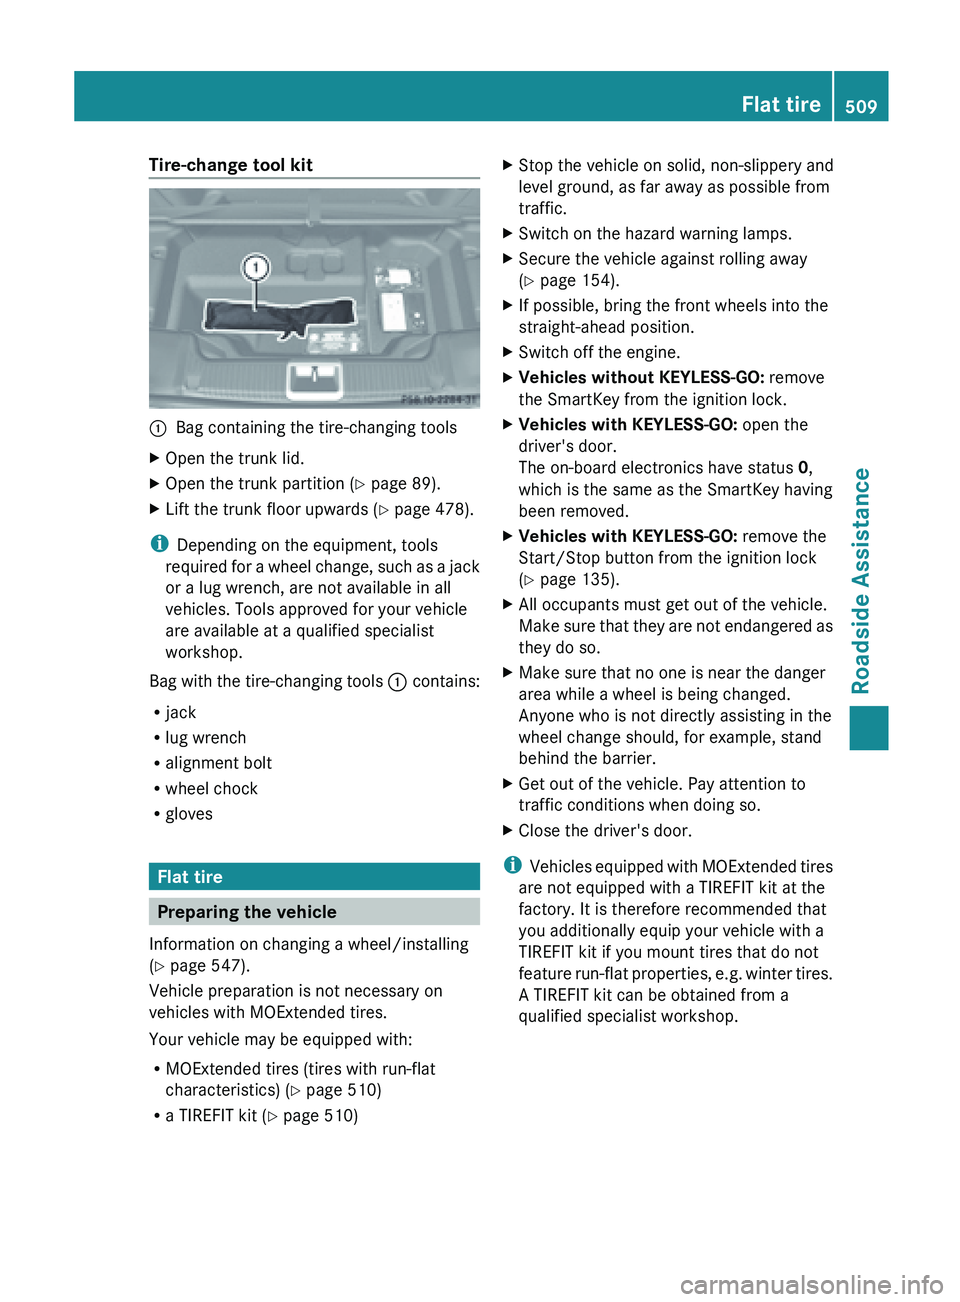
:
Bag containing the tire-changing tools
X Open the trunk lid.
X Open the trunk partition ( Y page 89).
X Lift the trunk floor upwards (Y page 478).
i Depending on the equipment, tools
required for
a wheel change, such as a jack
or a lug wrench, are not available in all
vehicles. Tools approved for your vehicle
are available at a qualified specialist
workshop.
Bag with the tire-changing tools : contains:
R jack
R lug wrench
R alignment bolt
R wheel chock
R gloves Flat tire
Preparing the vehicle
Information on changing a wheel/installing
(Y page 547).
Vehicle preparation is not necessary on
vehicles with MOExtended tires.
Your vehicle may be equipped with:
R MOExtended tires (tires with run-flat
characteristics) (Y page 510)
R a TIREFIT kit (Y page 510) X
Stop the vehicle on solid, non-slippery and
level ground, as far away as possible from
traffic.
X Switch on the hazard warning lamps.
X Secure the vehicle against rolling away
(Y page 154).
X If possible, bring the front wheels into the
straight-ahead position.
X Switch off the engine.
X Vehicles without KEYLESS-GO: remove
the SmartKey from the ignition lock.
X Vehicles with KEYLESS-GO: open the
driver's door.
The on-board electronics have status 0,
which is the same as the SmartKey having
been removed.
X Vehicles with KEYLESS-GO: remove the
Start/Stop button from the ignition lock
(Y page 135).
X All occupants must get out of the vehicle.
Make sure
that they are not endangered as
they do so.
X Make sure that no one is near the danger
area while a wheel is being changed.
Anyone who is not directly assisting in the
wheel change should, for example, stand
behind the barrier.
X Get out of the vehicle. Pay attention to
traffic conditions when doing so.
X Close the driver's door.
i Vehicles equipped
with MOExtended tires
are not equipped with a TIREFIT kit at the
factory. It is therefore recommended that
you additionally equip your vehicle with a
TIREFIT kit if you mount tires that do not
feature run-flat properties, e.g. winter tires.
A TIREFIT kit can be obtained from a
qualified specialist workshop. Flat tire
509
Roadside Assistance
Page 517 of 572

clamp. Never swap the terminal clamps.
Otherwise, the vehicle's electronic
system may be damaged.
R in vehicles with automatic transmission,
the transmission is locked in position P
after disconnecting the battery. The
vehicle is secured against rolling away.
You can
then no longer move the vehicle.
The battery and the cover of the positive
terminal clamp must be installed securely
during operation.
In order for the battery to achieve the
maximum possible service life, it must always
be sufficiently charged.
The vehicle battery, like other batteries, can
discharge over time if you do not use the
vehicle. In this case, have the battery
disconnected at a qualified specialist
workshop. You can also charge the battery
with a charger recommended by Mercedes-
Benz. Contact a qualified specialist workshop
for further information.
Have the battery charge level checked more
frequently if you use the vehicle mainly for
short trips or if you leave it standing idle for
a lengthy period. Consult a qualified specialist
workshop if you wish to leave your vehicle
parked up for a long period of time.
Only replace a battery with a battery that has
been recommended by Mercedes-Benz.
i Remove the SmartKey if you park the
vehicle and do not require any electrical
consumers. The vehicle will then use very
little energy, thus conserving battery
power.
i After an interruption to the power supply,
e.g. due to a discharged battery, you must
reset the clock (Y page 289). Charging the battery
G
WARNING
Never charge a battery still installed in the
vehicle unless
a battery charger unit approved by Mercedes-Benz is being used. Gases may
escape
during
charging and cause explosions
that may result in paint damage, corrosion or
personal injury.
A battery charger unit specially adapted for
Mercedes-Benz vehicles and tested and
approved by Mercedes-Benz is available as an
accessory. It permits the charging of the
battery in its installed position. Contact an
authorized Mercedes-Benz Center for further
information and availability.
Charge the battery in accordance with the
separate instructions for the battery charger. G
WARNING
There is a risk of acid burns during the
charging process due to the gases which
escape from
the battery. Do not lean over the
battery during the charging process. G
WARNING
Battery acid is caustic. Avoid contact with the
skin, eyes or clothing.
! Only use battery chargers with a
maximum charging voltage of 14.8 V.
! Only charge the battery using the jump-
starting connection point.
The jump-starting connection point is in the
engine compartment.
Read the battery charger's operating
instructions before charging the battery.
X Open the hood (Y page 496).
X Connect the battery charger to the positive
terminal and ground point in the same
order as when connecting the donor
battery in the jump-starting procedure
(Y page 516). Battery
515
Roadside Assistance Z