2013 MERCEDES-BENZ SL-CLASS ROADSTER trunk
[x] Cancel search: trunkPage 479 of 572
Loading aid in the trunk
Raising/lowering the roof G
WARNING
To prevent injuries, make sure that there is no
possibility of body parts getting caught in
moving parts.
If potential danger exists, press
the switch again. This will immediately stop
the movement of the hardtop.
! Only close the trunk once the roof is
lowered completely. Otherwise, you could
damage the roof.
If you close the trunk lid before the roof is
lowered completely, the loading aid switch
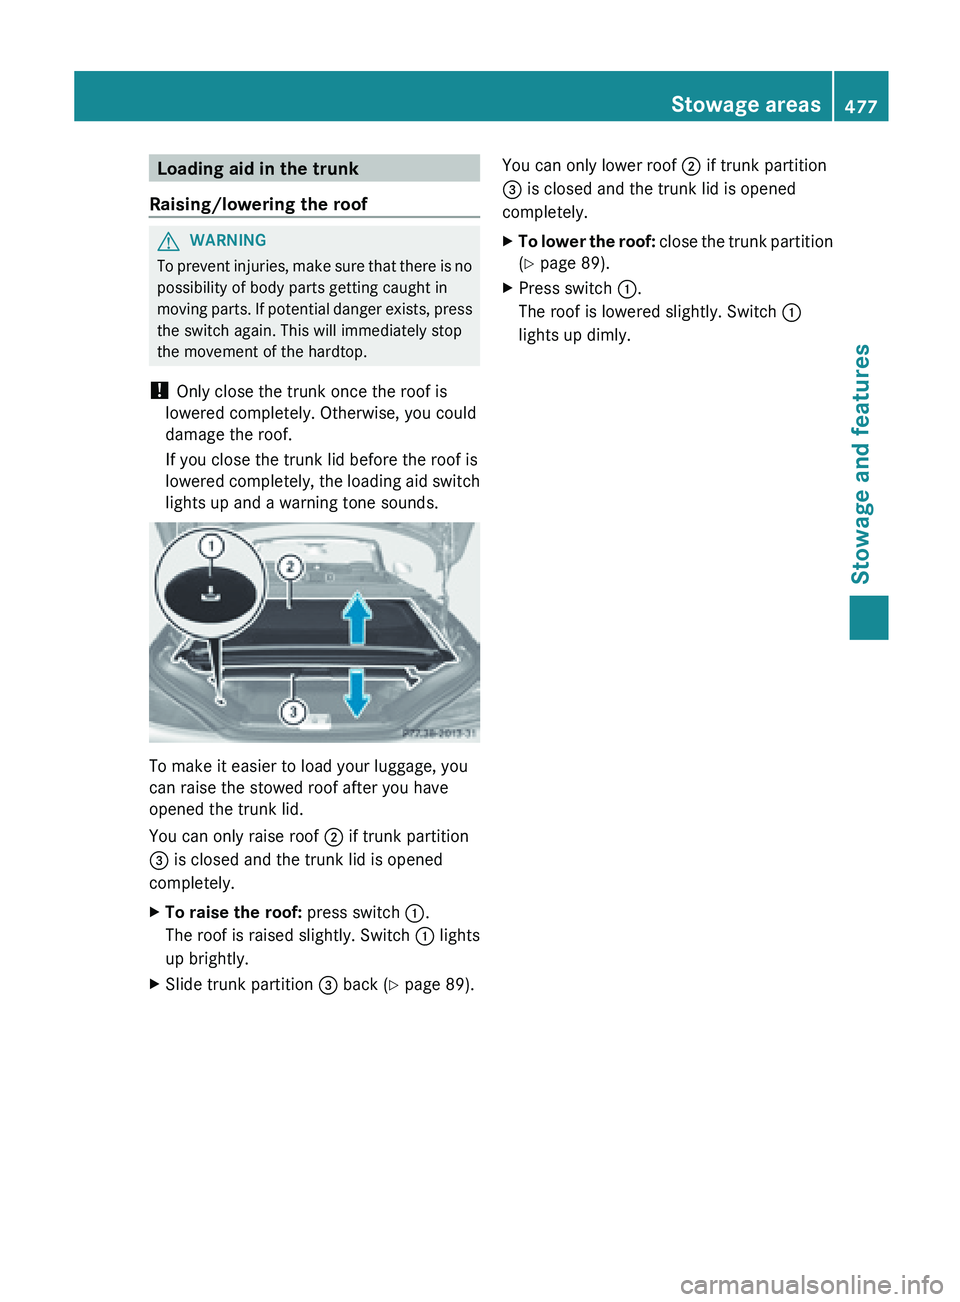
lights up and a warning tone sounds. To make it easier to load your luggage, you
can raise the stowed roof after you have
opened the trunk lid.
You can only raise roof
;
if trunk partition
= is closed and the trunk lid is opened
completely.
X To raise the roof: press switch :.
The roof is raised slightly. Switch : lights
up brightly.
X Slide trunk partition = back (Y page 89). You can only lower roof
; if trunk partition
= is closed and the trunk lid is opened
completely.
X To lower the roof: close
the trunk partition
(Y page 89).
X Press switch :.
The roof is lowered slightly. Switch :
lights up dimly. Stowage areas
477
Stowage and features Z
Page 480 of 572
Problems with the loading aid
Problem Possible causes/consequences and
M SolutionsIt is no longer possible
to lower the stowed
roof in the trunk using
the loading aid. You cannot close the trunk any more.
X
Call a qualified specialist workshop. Stowage well under the trunk floor
X
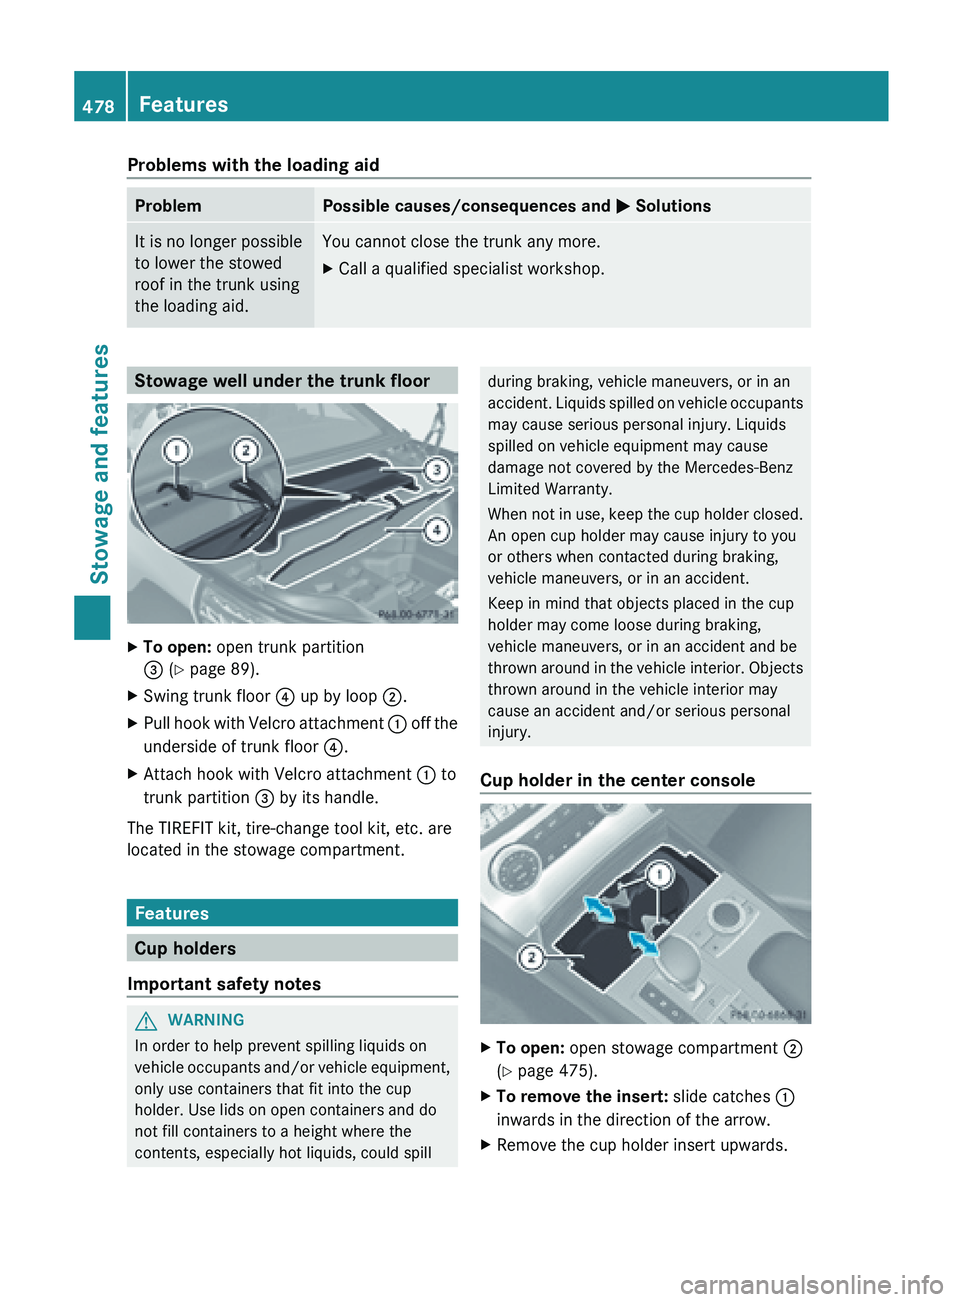
To open: open trunk partition
= (Y page 89).
X Swing trunk floor ? up by loop ;.
X Pull hook with Velcro attachment : off
the
underside of trunk floor ?.
X Attach hook with Velcro attachment : to
trunk partition = by its handle.
The TIREFIT kit, tire-change tool kit, etc. are
located in the stowage compartment. Features
Cup holders
Important safety notes G
WARNING
In order to help prevent spilling liquids on
vehicle occupants
and/or vehicle equipment,
only use containers that fit into the cup
holder. Use lids on open containers and do
not fill containers to a height where the
contents, especially hot liquids, could spill during braking, vehicle maneuvers, or in an
accident.
Liquids
spilled on vehicle occupants
may cause serious personal injury. Liquids
spilled on vehicle equipment may cause
damage not covered by the Mercedes-Benz
Limited Warranty.
When not in use, keep the cup holder closed.
An open cup holder may cause injury to you
or others when contacted during braking,
vehicle maneuvers, or in an accident.
Keep in mind that objects placed in the cup
holder may come loose during braking,
vehicle maneuvers, or in an accident and be
thrown around in the vehicle interior. Objects
thrown around in the vehicle interior may
cause an accident and/or serious personal
injury.
Cup holder in the center console X
To open: open stowage compartment ;
(Y page 475).
X To remove the insert: slide catches :
inwards in the direction of the arrow.
X Remove the cup holder insert upwards.478
Features
Stowage and features
Page 483 of 572
to the sockets is automatically cut. This
ensures that there is sufficient power to
start the engine.
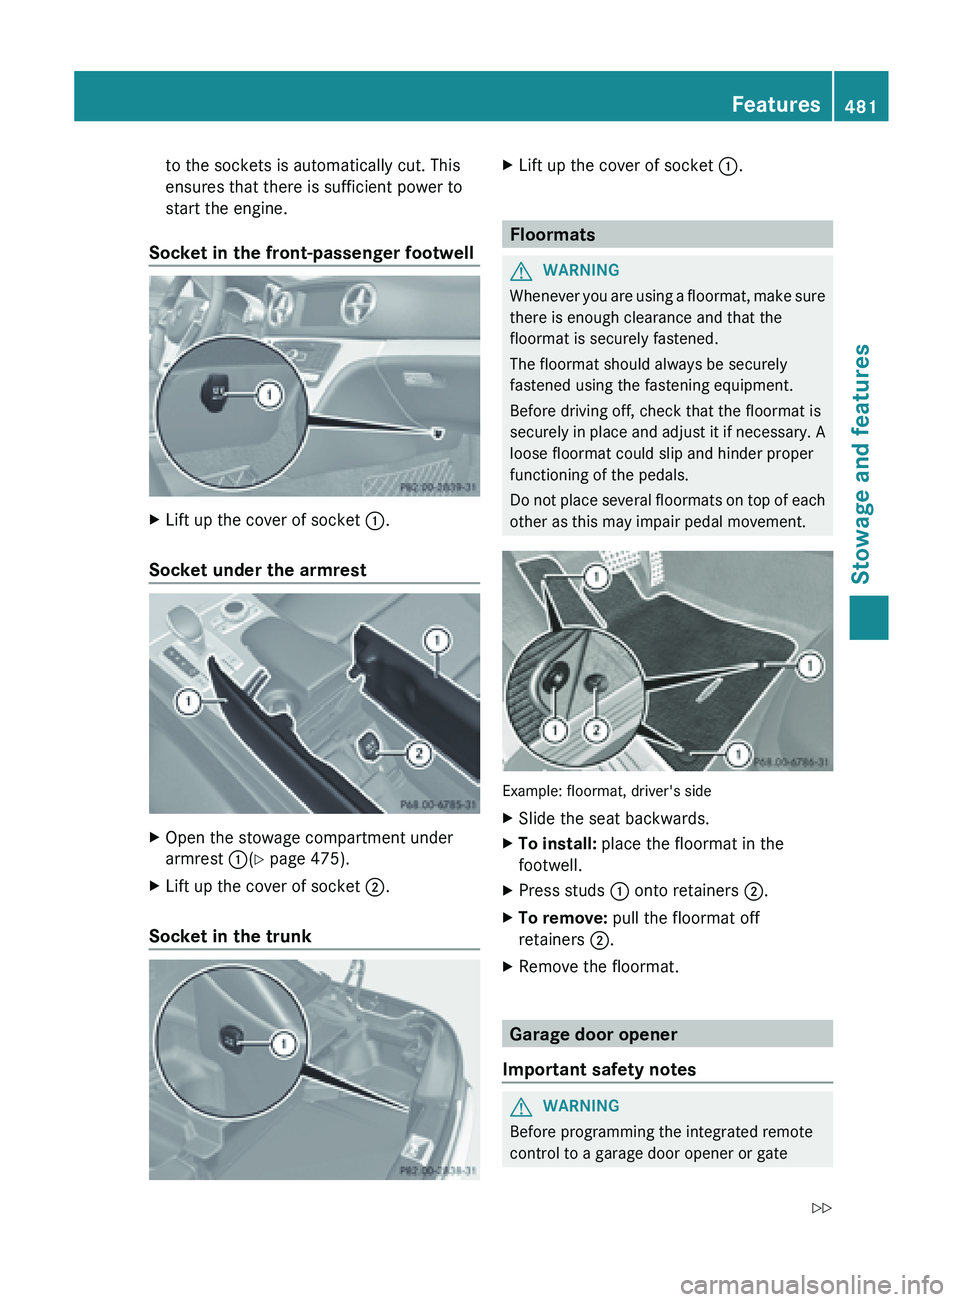
Socket in the front-passenger footwell X
Lift up the cover of socket :.
Socket under the armrest X
Open the stowage compartment under
armrest :(Y page 475).
X Lift up the cover of socket ;.
Socket in the trunk X
Lift up the cover of socket :. Floormats
G
WARNING
Whenever you are using a floormat, make sure
there is enough clearance and that the
floormat is securely fastened.
The floormat should always be securely
fastened using the fastening equipment.
Before driving off, check that the floormat is
securely in
place and adjust it if necessary. A
loose floormat could slip and hinder proper
functioning of the pedals.
Do not place several floormats on top of each
other as this may impair pedal movement. Example: floormat, driver's side
X
Slide the seat backwards.
X To install: place the floormat in the
footwell.
X Press studs : onto retainers ;.
X To remove: pull the floormat off
retainers ;.
X Remove the floormat. Garage door opener
Important safety notes G
WARNING
Before programming the integrated remote
control to a garage door opener or gate Features
481
Stowage and features
Z
Page 510 of 572
Useful information
i This Operator's Manual describes all
models and all standard and optional
equipment of your vehicle available at the
time of publication of the Operator's
Manual. Country-specific differences are
possible. Please
note that your vehicle may
not be equipped with all features
described. This also applies to safety-
related systems and functions.
i Read the information on qualified
specialist workshops: ( Y page 31).Where will I find...?
First-aid kit
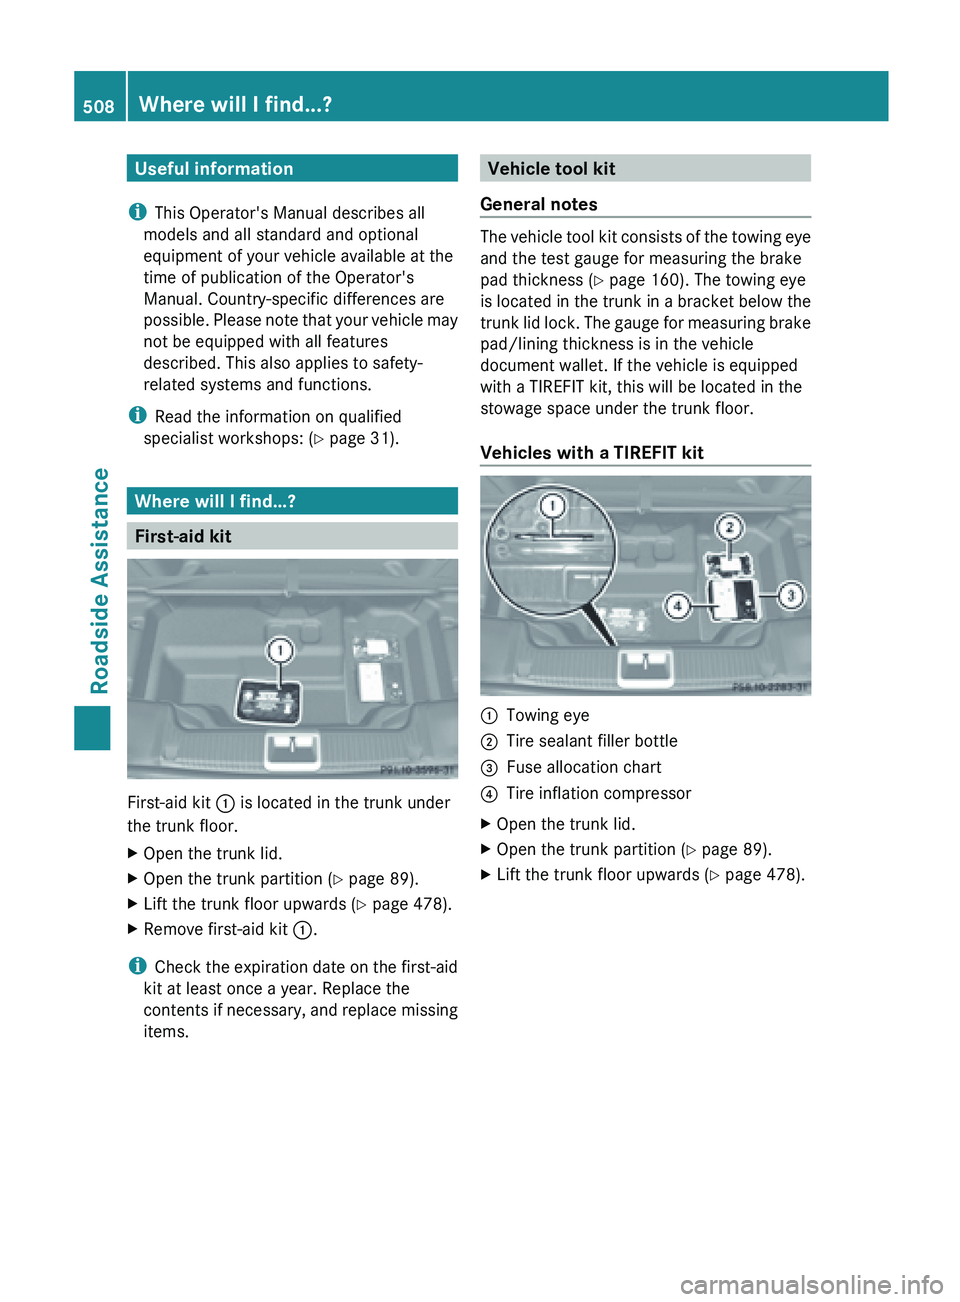
First-aid kit
:
is located in the trunk under
the trunk floor.
X Open the trunk lid.
X Open the trunk partition ( Y page 89).
X Lift the trunk floor upwards (Y page 478).
X Remove first-aid kit :.
i Check the
expiration date on the first-aid
kit at least once a year. Replace the
contents if necessary, and replace missing
items. Vehicle tool kit
General notes The
vehicle tool kit consists of the towing eye
and the test gauge for measuring the brake
pad thickness (Y page 160). The towing eye
is located
in the trunk in a bracket below the
trunk lid lock. The gauge for measuring brake
pad/lining thickness is in the vehicle
document wallet. If the vehicle is equipped
with a TIREFIT kit, this will be located in the
stowage space under the trunk floor.
Vehicles with a TIREFIT kit :
Towing eye
; Tire sealant filler bottle
= Fuse allocation chart
? Tire inflation compressor
X Open the trunk lid.
X Open the trunk partition
(
Y page 89).
X Lift the trunk floor upwards (Y page 478).508
Where will I find...?
Roadside Assistance
Page 511 of 572
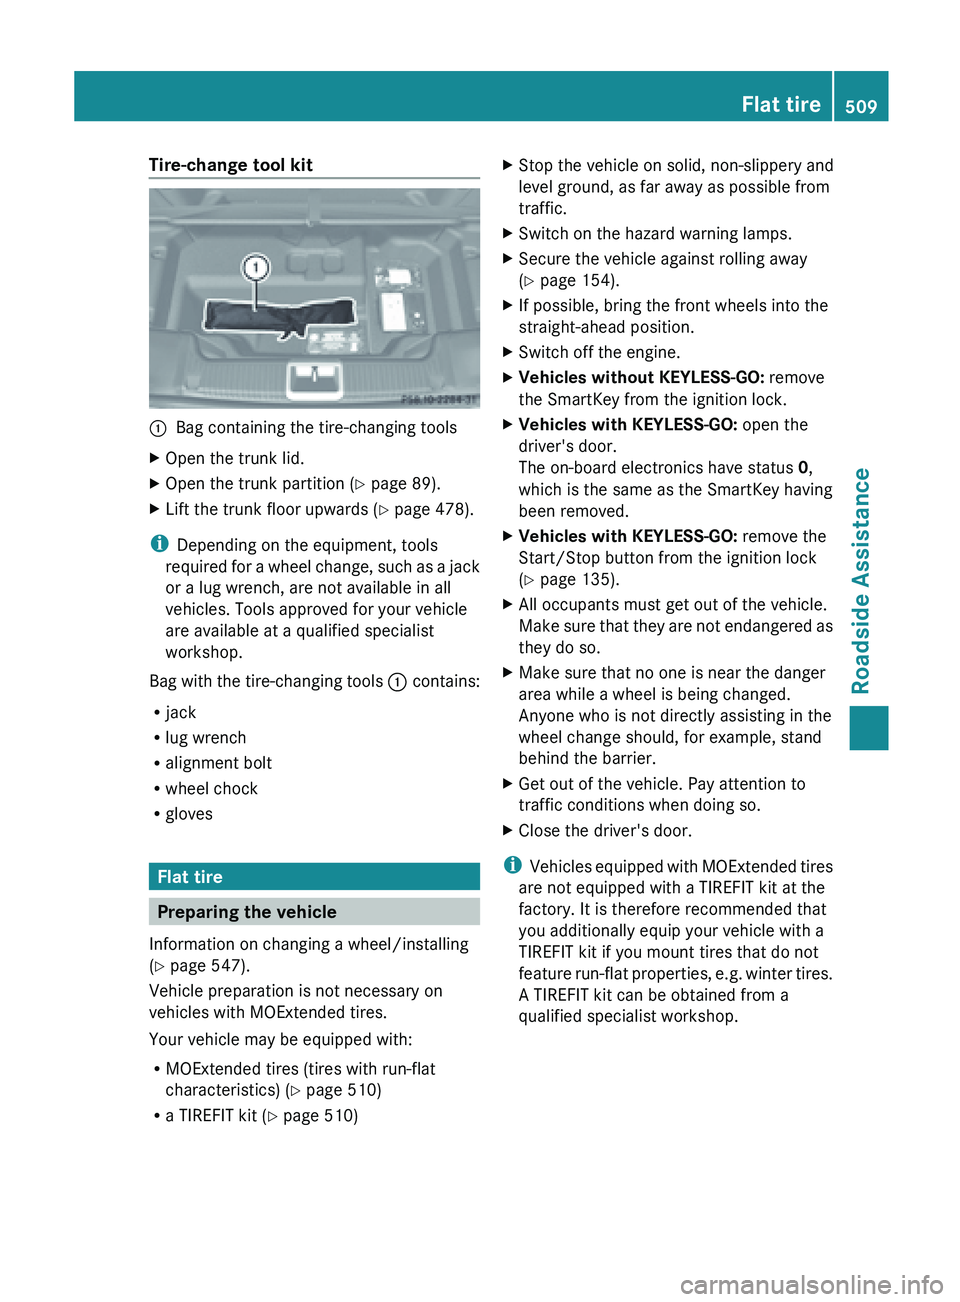
Tire-change tool kit
:
Bag containing the tire-changing tools
X Open the trunk lid.
X Open the trunk partition ( Y page 89).
X Lift the trunk floor upwards (Y page 478).
i Depending on the equipment, tools
required for
a wheel change, such as a jack
or a lug wrench, are not available in all
vehicles. Tools approved for your vehicle
are available at a qualified specialist
workshop.
Bag with the tire-changing tools : contains:
R jack
R lug wrench
R alignment bolt
R wheel chock
R gloves Flat tire
Preparing the vehicle
Information on changing a wheel/installing
(Y page 547).
Vehicle preparation is not necessary on
vehicles with MOExtended tires.
Your vehicle may be equipped with:
R MOExtended tires (tires with run-flat
characteristics) (Y page 510)
R a TIREFIT kit (Y page 510) X
Stop the vehicle on solid, non-slippery and
level ground, as far away as possible from
traffic.
X Switch on the hazard warning lamps.
X Secure the vehicle against rolling away
(Y page 154).
X If possible, bring the front wheels into the
straight-ahead position.
X Switch off the engine.
X Vehicles without KEYLESS-GO: remove
the SmartKey from the ignition lock.
X Vehicles with KEYLESS-GO: open the
driver's door.
The on-board electronics have status 0,
which is the same as the SmartKey having
been removed.
X Vehicles with KEYLESS-GO: remove the
Start/Stop button from the ignition lock
(Y page 135).
X All occupants must get out of the vehicle.
Make sure
that they are not endangered as
they do so.
X Make sure that no one is near the danger
area while a wheel is being changed.
Anyone who is not directly assisting in the
wheel change should, for example, stand
behind the barrier.
X Get out of the vehicle. Pay attention to
traffic conditions when doing so.
X Close the driver's door.
i Vehicles equipped
with MOExtended tires
are not equipped with a TIREFIT kit at the
factory. It is therefore recommended that
you additionally equip your vehicle with a
TIREFIT kit if you mount tires that do not
feature run-flat properties, e.g. winter tires.
A TIREFIT kit can be obtained from a
qualified specialist workshop. Flat tire
509
Roadside Assistance
Page 513 of 572
G
WARNING
The tire sealant is harmful and causes
irritation. It must not come into contact with
your skin, eyes or clothing or be swallowed.
Do not
inhale TIREFIT fumes. Keep tire sealant
away from children. There is a risk of injury.
If you come into contact with the tire sealant,
observe the following:
R Rinse off the tire sealant from your skin
immediately with water.
R If the tire sealant comes into contact with
your eyes, immediately rinse them
thoroughly with clean water.
R If tire sealant is swallowed, immediately
rinse your mouth out thoroughly and drink
plenty of water. Do not induce vomiting,
and seek medical attention immediately.
R Immediately change out of clothing which
has come into contact with tire sealant.
R If an allergic reaction occurs, seek medical
attention immediately.
! Do not operate the tire inflation
compressor for longer than eight minutes
at a time without a break. It may otherwise
overheat.
The tire inflation compressor can be
operated again once it has cooled down. X
Do not remove any foreign objects which
have penetrated the tire, e.g. screws or
nails.
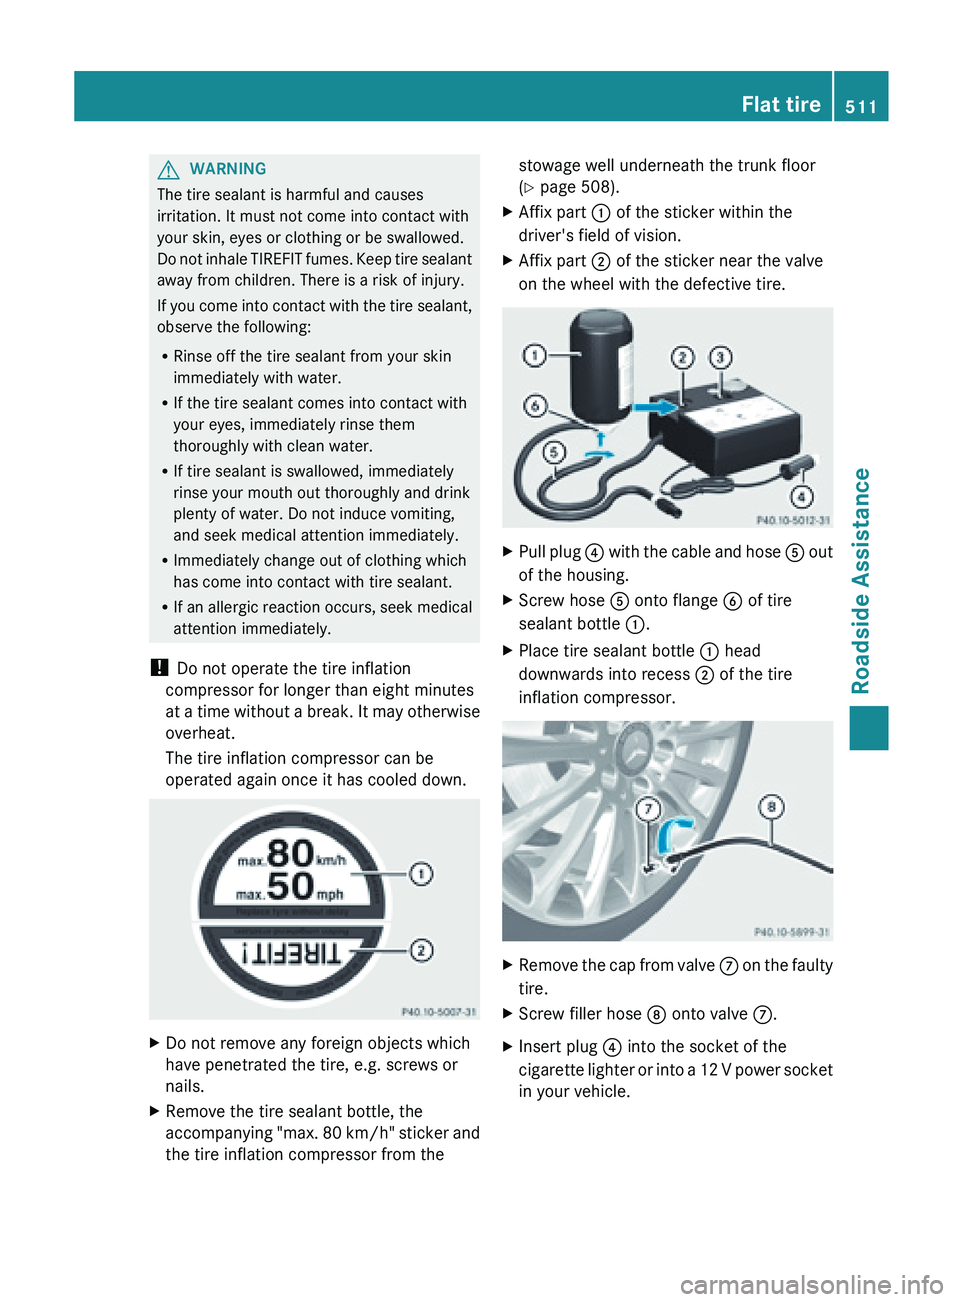
X Remove the tire sealant bottle, the
accompanying "max.
80 km/h" sticker and
the tire inflation compressor from the stowage well underneath the trunk floor
(Y page 508).
X Affix part : of the sticker within the
driver's field of vision.
X Affix part ; of the sticker near the valve
on the wheel with the defective tire. X
Pull
plug
? with the cable and hose A
out
of the housing.
X Screw hose A onto flange B of tire
sealant bottle :.
X Place tire sealant bottle : head
downwards into recess ; of the tire
inflation compressor. X
Remove
the cap from valve
C on
the faulty
tire.
X Screw filler hose D onto valve C.
X Insert plug ? into the socket of the
cigarette lighter
or into a 12 V power socket
in your vehicle. Flat tire
511
Roadside Assistance Z
Page 521 of 572
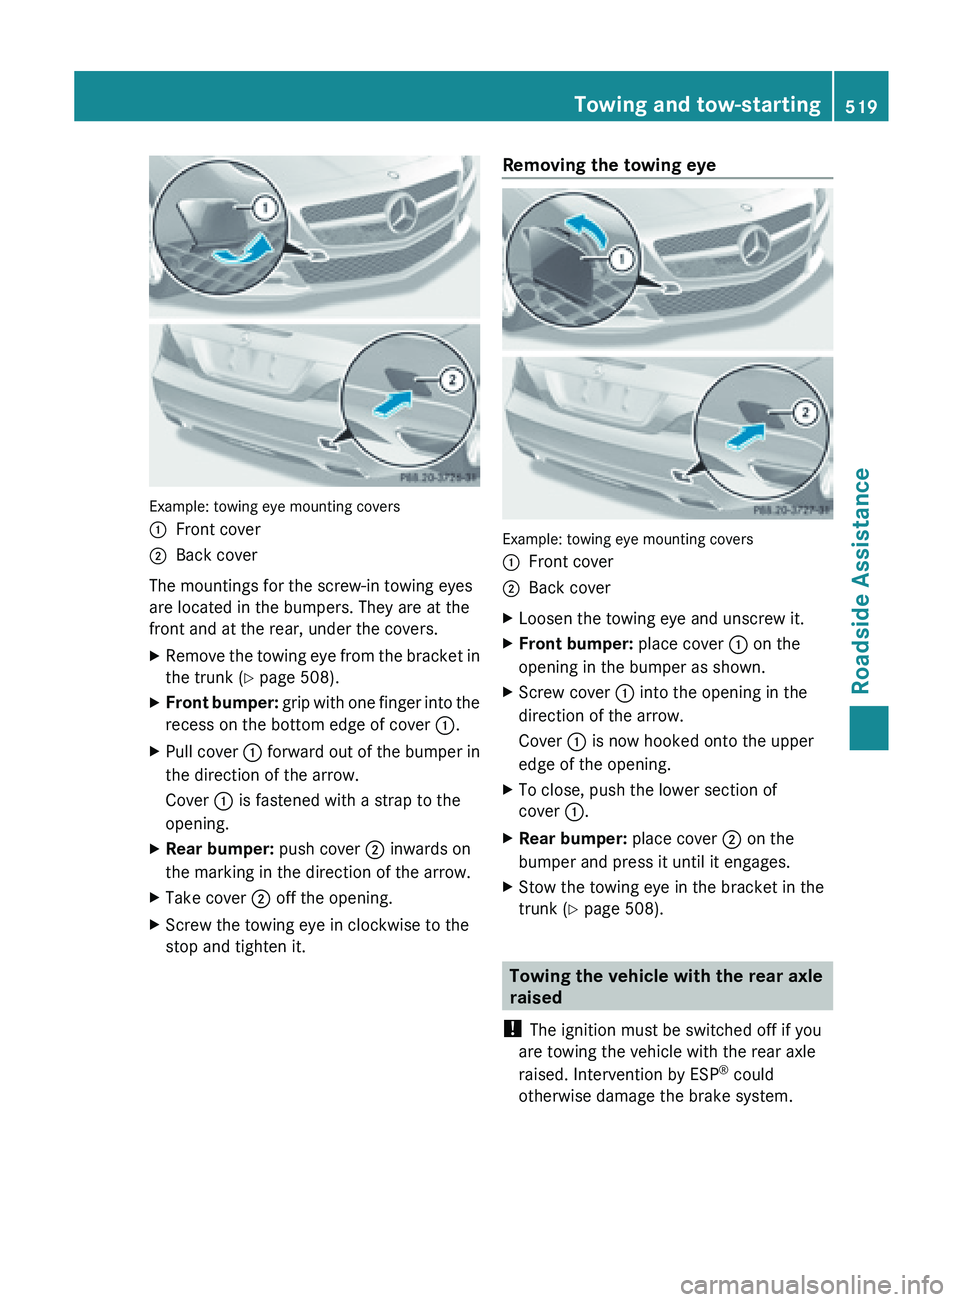
Example: towing eye mounting covers
:
Front cover
; Back cover
The mountings for the screw-in towing eyes
are located in the bumpers. They are at the
front and at the rear, under the covers.
X Remove the towing eye from the bracket in
the trunk (
Y page 508).
X Front bumper: grip
with one finger into the
recess on the bottom edge of cover :.
X Pull cover :
forward
out of the bumper in
the direction of the arrow.
Cover : is fastened with a strap to the
opening.
X Rear bumper: push cover ; inwards on
the marking in the direction of the arrow.
X Take cover ; off the opening.
X Screw the towing eye in clockwise to the
stop and tighten it. Removing the towing eye
Example: towing eye mounting covers
:
Front cover
; Back cover
X Loosen the towing eye and unscrew it.
X Front bumper: place cover : on the
opening in the bumper as shown.
X Screw cover : into the opening in the
direction of the arrow.
Cover : is now hooked onto the upper
edge of the opening.
X To close, push the lower section of
cover :.
X Rear bumper: place cover ; on the
bumper and press it until it engages.
X Stow the towing eye in the bracket in the
trunk (
Y page 508). Towing the vehicle with the rear axle
raised
! The ignition must be switched off if you
are towing the vehicle with the rear axle
raised. Intervention by ESP ®
could
otherwise damage the brake system. Towing and tow-starting
519
Roadside Assistance Z
Page 552 of 572
R
before raising the vehicle, secure it from
rolling away by applying the parking brake
and inserting wheel chocks. Never
disengage the parking brake while the
vehicle is raised.
R the jack must be placed on a firm, flat and
non-slip surface. On a loose surface, a
large, load-bearing
underlay must be used.
On a slippery surface, a non-slip underlay
must be used, e.g. rubber mats.
R do not use wooden blocks or similar
objects as a jack underlay. Otherwise, the
jack will not be able to achieve its load-
bearing capacity due to the restricted
height.
R make sure that the distance between the
underside of the tires and the ground does
not exceed 1.2 in (3 cm).
R never place your hands and feet under the
raised vehicle.
R never lie under the raised vehicle.
R never start the engine when the vehicle is
raised.
R never open or close a door or the trunk lid
when the vehicle is raised.
R make sure that no persons are present in
the vehicle when the vehicle is raised. X
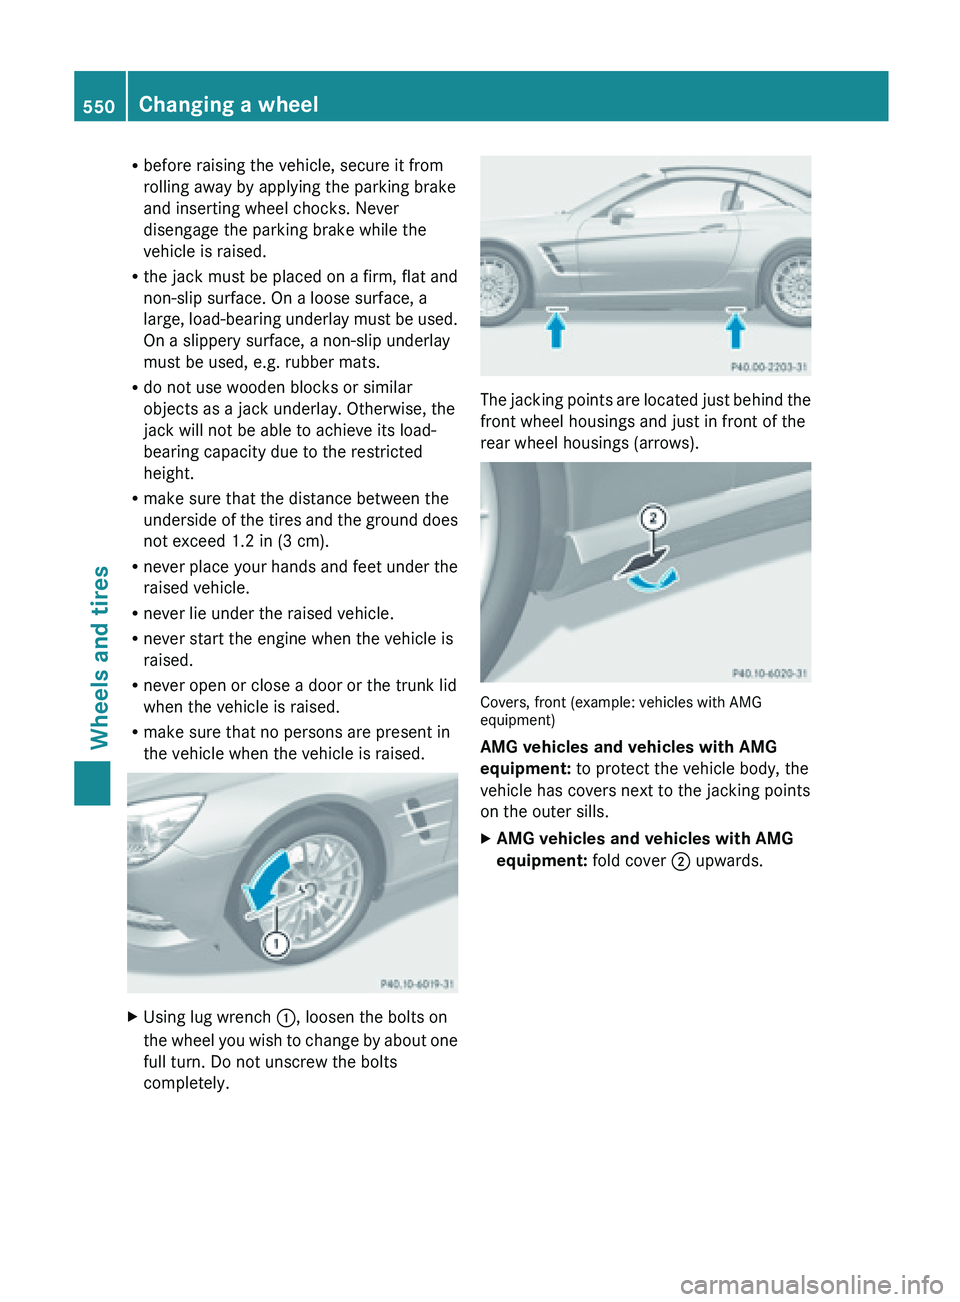
Using lug wrench :, loosen the bolts on
the wheel
you wish to change by about one
full turn. Do not unscrew the bolts
completely. The jacking points are located just behind the
front wheel housings and just in front of the
rear wheel housings (arrows).
Covers, front (example: vehicles with AMG
equipment)
AMG vehicles and vehicles with AMG
equipment:
to protect the vehicle body, the
vehicle has covers next to the jacking points
on the outer sills.
X AMG vehicles and vehicles with AMG
equipment: fold cover ; upwards.550
Changing a wheel
Wheels and tires