2013 MERCEDES-BENZ SL-CLASS ROADSTER trunk
[x] Cancel search: trunkPage 83 of 572

R
When making the kicking movement, make
sure that you are standing firmly on the
ground. You could otherwise lose your
balance e.g. on ice.
R Stand at least 4 in (10 cm) away from the
rear area while doing so.
R Do not come into contact with the bumper
while making the kicking movement.
Otherwise, the sensors may not function
correctly and you risk dirtying your clothes.
R HANDS-FREE ACCESS does not work with
a prosthetic leg.
Operation X
To open/close:
kick
into sensor detection
range : under the bumper with your leg.
You do not need to touch the bumper.
You will hear a warning tone while the trunk
lid is opening or closing.
X If the trunk lid does not open after
several attempts: wait at least ten
seconds then kick under the bumper once
again. i
If you
hold your leg under the bumper for
too long, the trunk lid does not open or
close. Repeat the leg movement more
quickly if this occurs. Opening/closing automatically from
inside
Important safety notes G
WARNING
Maintain sight of the area around the rear of
the vehicle while operating the trunk lid with
the door
mounted switch. Monitor the closing
procedure carefully to make sure no one is in
danger of being injured.
To interrupt the closing procedure, release
the door mounted remote trunk opening/
closing switch again.
Even with the SmartKey removed from the
starter switch or the SmartKey with KEYLESS-
GO removed from the vehicle, the remote
trunk opening/closing switch can be
operated. Therefore, do not leave children
unattended in the vehicle, or with access to
an unlocked vehicle. A child's unsupervised
access to a vehicle could result in an accident
and/or serious personal injury. G
WARNING
Make sure the trunk lid is closed when the
engine is running and while driving. Among
other dangers, deadly carbon monoxide (CO)
gases may
enter the vehicle interior resulting
in unconsciousness and death.
! The trunk lid swings upwards when
opened. Therefore, make sure that there is
sufficient clearance above the trunk lid.
i The opening dimensions of the trunk lid
can be found in the "Vehicle data" section
(Y page 565). Trunk
81
Opening/closing Z
Page 84 of 572

Opening/closing
X
To open: pull remote operating switch for
trunk lid : until the trunk lid opens.
X To close: press remote operating switch
for trunk
lid : until the trunk lid is closed.
You can open and close the trunk lid from the
driver's seat when the vehicle is stationary
and unlocked. Locking the trunk separately
You can
lock the trunk separately. If you then
unlock the vehicle centrally, the trunk
remains locked and cannot be opened.
X Close the trunk lid.
X Take the mechanical key out of the
SmartKey (Y page 70). 1
Basic position
2 Locking X
Insert the mechanical key into the trunk lid
lock as far as the stop.
X Turn the mechanical key clockwise from
position 1 to position 2.
X Remove the mechanical key.
X Insert the mechanical key into the
SmartKey. Unlocking the trunk (mechanical key)
! The trunk lid swings upwards when
opened. Therefore,
make sure that there is
sufficient clearance above the trunk lid.
If the trunk cannot be unlocked with the
SmartKey or KEYLESS-GO, use the
mechanical key.
If you use the mechanical key to unlock and
open the trunk lid, the anti-theft alarm system
will be triggered ( Y page 65).
X Take the mechanical key out of the
SmartKey (Y page 70).
X Insert the mechanical key into the trunk lid
lock as far as the stop. 1
Basic position
2 To unlock
X Turn the mechanical key counter-clockwise
from position 1 as far as it will go to
position 2.
X Pull the trunk lid handle.
The trunk is unlocked.82
Trunk
Opening/closing
Page 85 of 572

X
Turn the mechanical key back to position
1 and remove it.
X Insert the mechanical key into the
SmartKey. Trunk emergency release
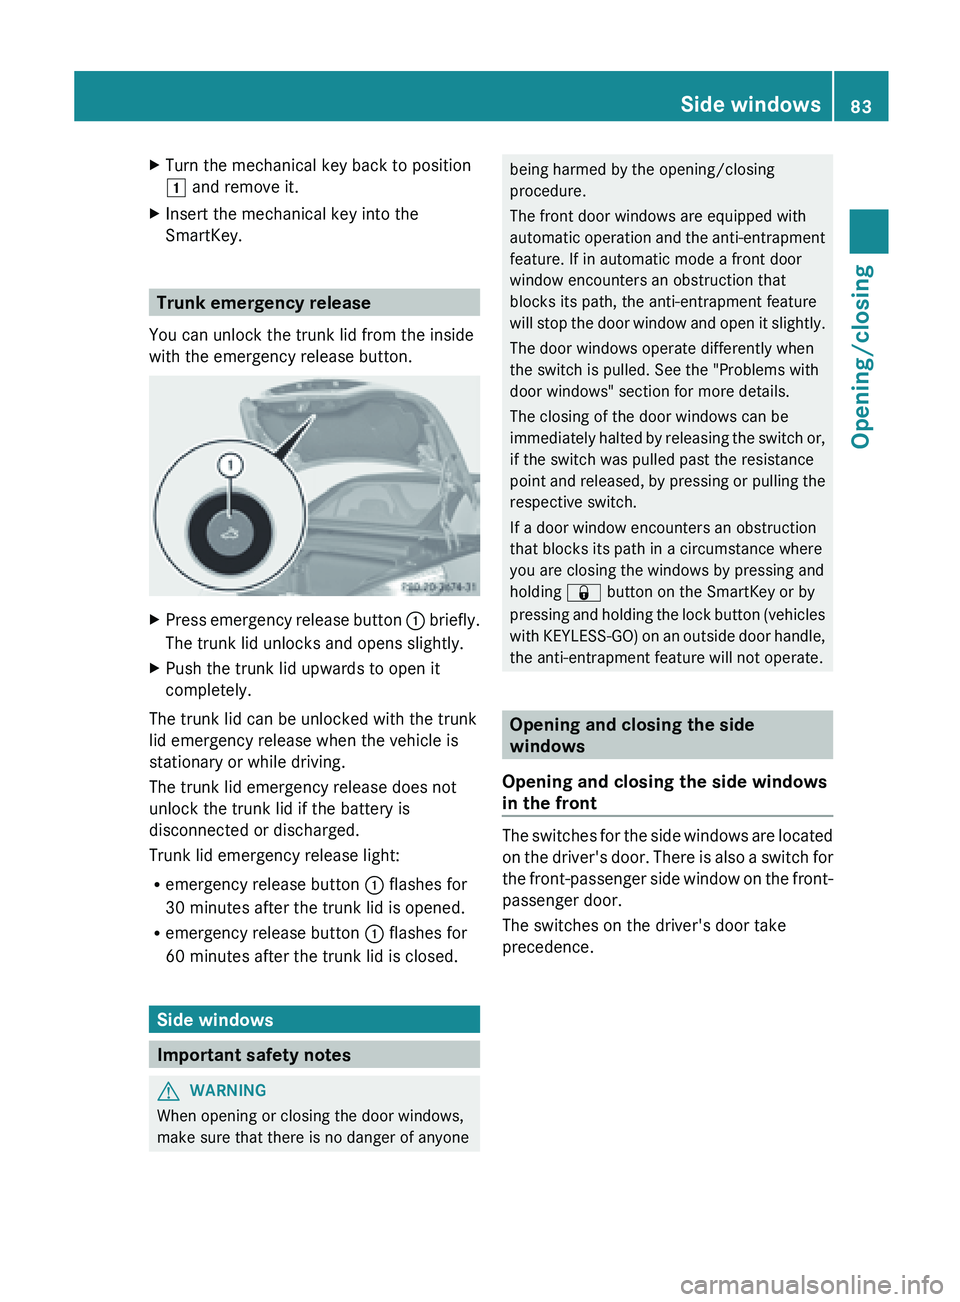
You can unlock the trunk lid from the inside
with the emergency release button. X
Press emergency release button : briefly.
The trunk lid unlocks and opens slightly.
X Push the trunk lid upwards to open it
completely.
The trunk lid can be unlocked with the trunk
lid emergency release when the vehicle is
stationary or while driving.
The trunk lid emergency release does not
unlock the trunk lid if the battery is
disconnected or discharged.
Trunk lid emergency release light:
R emergency release button
: flashes for
30 minutes after the trunk lid is opened.
R emergency release button : flashes for
60 minutes after the trunk lid is closed. Side windows
Important safety notes
G
WARNING
When opening or closing the door windows,
make sure that there is no danger of anyone being harmed by the opening/closing
procedure.
The front door windows are equipped with
automatic
operation
and the anti-entrapment
feature. If in automatic mode a front door
window encounters an obstruction that
blocks its path, the anti-entrapment feature
will stop the door window and open it slightly.
The door windows operate differently when
the switch is pulled. See the "Problems with
door windows" section for more details.
The closing of the door windows can be
immediately halted by releasing the switch or,
if the switch was pulled past the resistance
point and released, by pressing or pulling the
respective switch.
If a door window encounters an obstruction
that blocks its path in a circumstance where
you are closing the windows by pressing and
holding & button on the SmartKey or by
pressing and holding the lock button (vehicles
with KEYLESS-GO) on an outside door handle,
the anti-entrapment feature will not operate. Opening and closing the side
windows
Opening and closing the side windows
in the front The switches for the side windows are located
on
the
driver's door. There is also a switch for
the front-passenger side window on the front-
passenger door.
The switches on the driver's door take
precedence. Side windows
83
Opening/closing Z
Page 87 of 572

You can use the key to open or close all side
windows simultaneously.
X
Close the roof ( Y page 87).
X Open the trunk partition ( Y page 89).
X Vehicles without KEYLESS-GO: point the
tip of the SmartKey at the door handle on
the driver's door.
X Vehicles with KEYLESS-GO: the
SmartKey must be within 6 ft (2 m) of the
vehicle.
X To open all side windows: press
the % button on the key until the side
windows are fully opened.
X To interrupt the opening procedure:
release the % button.
X To close all side windows: press the
& button on the key until the side
windows are fully closed.
X To interrupt the closing procedure:
release the & button.
Convenience closing with KEYLESS-GO G
WARNING
When using the convenience closing feature,
make sure
that nobody can become trapped.
Proceed as follows if there is a risk of
entrapment:
R release the locking button on the door
handle.
R pull the door handle immediately and hold
it.
The side windows open.
With KEYLESS-GO you can close all side
windows simultaneously. The KEYLESS-GO
key must be outside the vehicle. All the doors
must be closed. X
Touch recessed sensor surface : on the
door handle
until the side windows are fully
closed.
i Make sure you only touch recessed
sensor surface :.
X Make sure that all the side windows are
closed.
X To interrupt convenience closing:
release recessed
sensor surface : on the
door handle. Resetting the side windows
If a
side window can no longer be closed fully,
you must reset it.
X Close all the doors.
X Turn the SmartKey to position 1 or 2
in the
ignition lock.
X Pull the corresponding switch on the door
control panel until the side window is
completely closed. ( Y page 83)
X Hold the switch for an additional second.
If the side window opens again slightly:
X Immediately pull the corresponding switch
on the door control panel until the side
window is completely closed (Y
page 83).
X Hold the switch for an additional second.
X If the corresponding side window remains
closed after the button has been released,
the side window has been reset correctly.
If this is not the case, repeat the steps
above again. Side windows
85
Opening/closing Z
Page 89 of 572

Attempting to manually close the roof may
cause damage to the roof and/or injury.
For this reason, the manual closing process
should only be carried out at a qualified
specialist workshop.
! Never sit
on the rear compartment trim or
stow heavy objects there. You will
otherwise damage the roof and rear
compartment trim of the vehicle.
! Do not forget that the weather can
change abruptly. Make certain that the roof
is closed when you leave the vehicle. The
vehicle electronics can be damaged if
water enters the vehicle interior.
! When opening and closing the roof, make
sure that:
R there is sufficient clearance, as the roof
swings upwards.
R there is sufficient clearance behind the
vehicle, as the trunk lid swings
backwards beyond the bumper.
R the trunk is only loaded to below the
trunk partition.
R the trunk partition is not pushed up by
the load.
R the trunk partition is closed.
R the trunk lid is closed.
R the outside temperature is above 5 ‡
(Ò15 †).
You could otherwise damage the roof,
trunk and other parts of the vehicle.
i Make sure that the roof and rear window
are clean and dry before opening the roof.
Otherwise, water or dirt could enter the
vehicle interior or trunk. Opening and closing using the roof
switch
Important safety notes G
WARNING
Before operating the retractable hardtop
(vario-roof), make sure there is no danger of
anyone being injured by the moving parts
(retractable hardtop, roof frame, and trunk
lid).
Hands must never be placed near the roof
frame, upper windshield area, hardtop, shelf
behind roll bars, or trunk lid while the
retractable hardtop is being raised or
lowered. Serious personal injury may occur.
If potential danger exists, release the
retractable hardtop switch or the
% or
& button on the SmartKey. This
immediately interrupts
the raising or lowering
procedure. You can then operate the
retractable hardtop switch or press the
% or & button on the SmartKey to raise
or lower the retractable hardtop away from
the danger zone.
Opening/closing X
Secure the vehicle against rolling away
(
Y page 154).
X Close the trunk partition (Y page 89).
X Close the trunk lid.
X Turn the SmartKey to position 2 in the
ignition lock.
X Open the cover in the lower center console.
Roof switch : is located under the cover. Roof
87
Opening/closing Z
Page 90 of 572

X
To open: pull roof switch : until the roof
has been fully retracted into the trunk and
the Vario-Roof in Operation message
disappears from the multifunction display.
All of the side windows open.
X To close: press roof
switch : until the roof
is fully closed and the Vario-Roof in
Operation message disappears from the
multifunction display.
All of the side windows open.
X To close all side windows, pull the switch
under the cover of the center console
(Y page 84). Opening and closing using the
SmartKey
Important safety notes G
WARNING
Before operating the retractable hardtop
(vario-roof), make sure there is no danger of
anyone being injured by the moving parts
(retractable hardtop, roof frame, and trunk
lid).
Hands must never be placed near the roof
frame, upper windshield area, hardtop, shelf
behind roll bars, or trunk lid while the
retractable hardtop is being raised or
lowered. Serious personal injury may occur.
If potential danger exists, release the
retractable hardtop switch or the % or
& button on the SmartKey. This
immediately interrupts
the raising or lowering
procedure. You can then operate the
retractable hardtop switch or press the
% or & button on the SmartKey to raise
or lower the retractable hardtop away from
the danger zone.
Opening/closing X
Close the trunk partition (Y page 89).
X Close the trunk lid ( Y page 77). X
Vehicles without KEYLESS-GO: point
the
tip of the SmartKey at the door handle on
the driver's door.
X Vehicles with KEYLESS-GO: the
SmartKey must be within 6 ft (2 m) of the
vehicle.
X To open: press and hold the % button
on the key until the roof is fully opened.
The roof and the rear side windows open.
The front side windows close.
X To interrupt the opening procedure:
release the % button.
X To open the front side windows: press
and hold
the % button on the key again.
X To close: press and hold the & button
on the key until the roof is fully closed.
The roof and the side windows close.
X To interrupt the closing procedure:
release the & button.
i When the roof is closed and the trunk
partition is open, the roof cannot be
opened using the SmartKey functions.
Instead, all of the side windows open or
close simultaneously (Y
page 84). Locking the roof again
Important safety notes G
WARNING
Stop the vehicle in a safe location or as soon
as it is safe to do so and lock the retractable
hardtop before
continuing to drive. You could
otherwise endanger yourself and others.
The roof is not locked if:
R the K symbol and Vario-Roof In
Operation message appear in the
multifunction display
R the K symbol and Open/Close Vario-
Roof Completely message appear and
you hear a warning tone
R you hear a warning tone for up to
10 seconds when pulling away or while
driving.88
Roof
Opening/closing
Page 91 of 572

Locking
You can lock the roof again if it is not locked
fully.
X
Pull over and stop the vehicle safely as soon
as possible, paying attention to road and
traffic conditions.
X Make sure that the SmartKey is in position
2 in the ignition lock.
X Press the roof switch (Y page 87). Trunk partition
General notes !
To avoid damaging the roof or luggage
when folding back the roof, you should:
R only load the trunk to below the trunk
partition
R not place
any objects on or in front of the
trunk partition
R not place any objects on the cover
behind the roll bars
R not allow the cargo to push the trunk
partition upwards
! Make sure the trunk separator is
completely closed. Otherwise, the roof can
be blocked when it is opened or closed.
The trunk partition can be used to cover
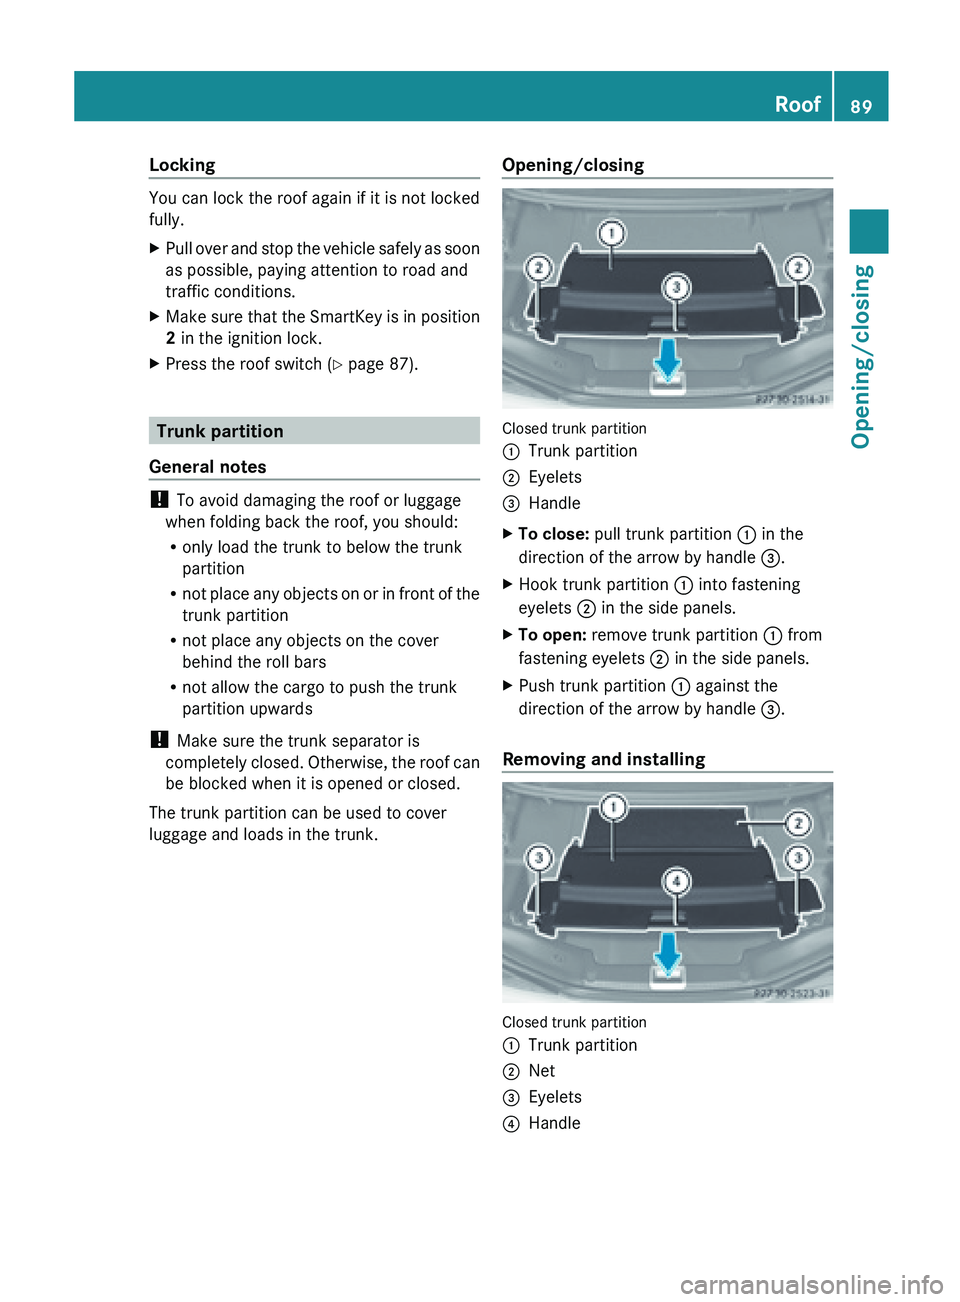
luggage and loads in the trunk. Opening/closing Closed trunk partition
:
Trunk partition
; Eyelets
= Handle
X To close: pull trunk partition : in the
direction of the arrow by handle =.
X Hook trunk partition : into fastening
eyelets ; in the side panels.
X To open: remove trunk partition : from
fastening eyelets ; in the side panels.
X Push trunk partition : against the
direction of the arrow by handle =.
Removing and installing Closed trunk partition
:
Trunk partition
; Net
= Eyelets
? Handle Roof
89
Opening/closing Z
Page 92 of 572

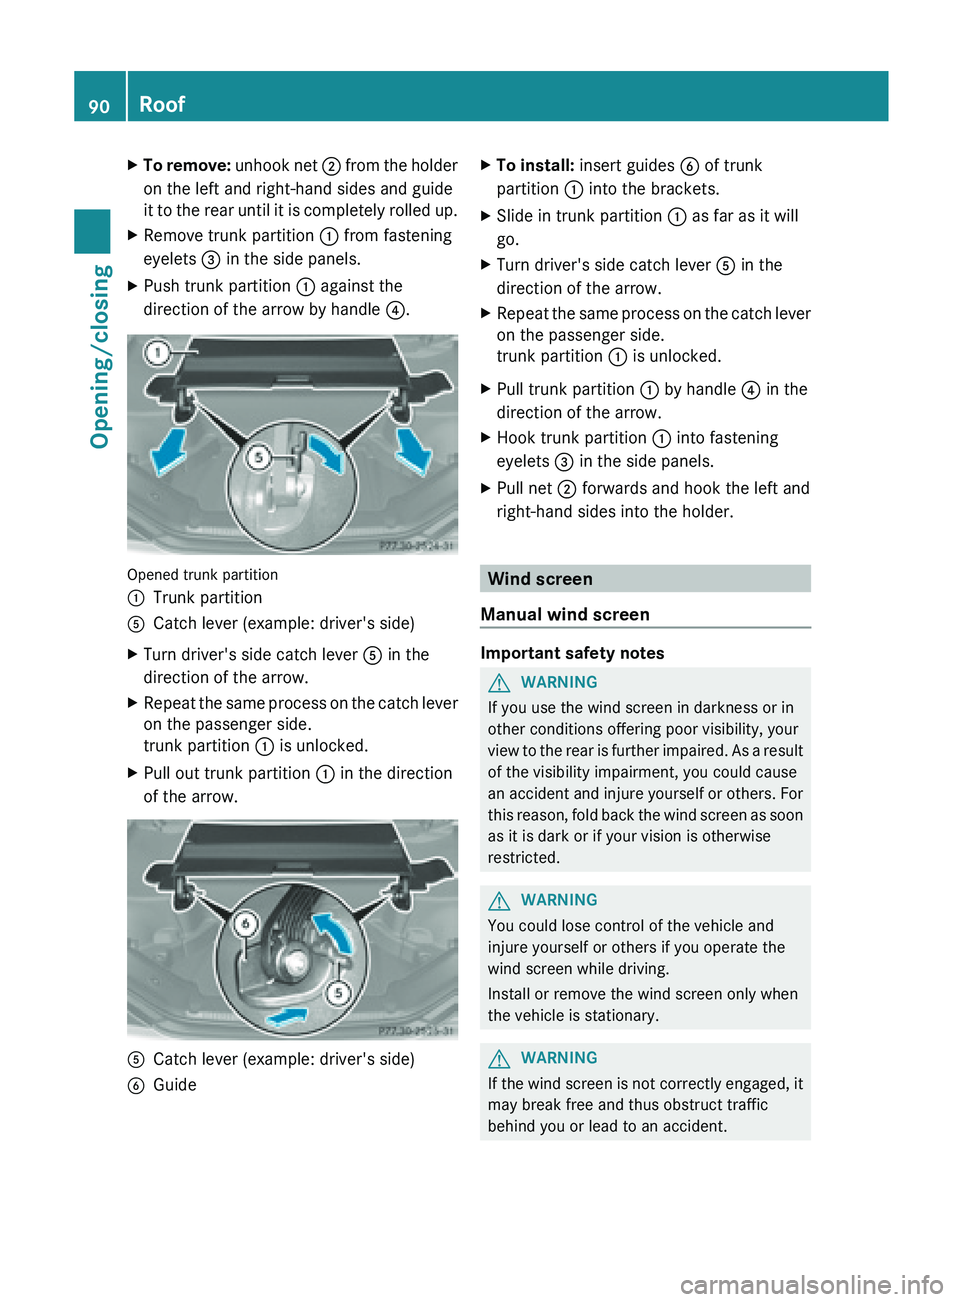
X
To remove: unhook net ; from the holder
on the left and right-hand sides and guide
it to the rear until it is completely rolled up.
X Remove trunk partition : from fastening
eyelets = in the side panels.
X Push trunk partition : against the
direction of the arrow by handle ?.Opened trunk partition
:
Trunk partition
A Catch lever (example: driver's side)
X Turn driver's side catch lever A in the
direction of the arrow.
X Repeat the same process on the catch lever
on the passenger side.
trunk partition : is unlocked.
X Pull out trunk partition : in the direction
of the arrow. A
Catch lever (example: driver's side)
B Guide X
To install: insert guides B of trunk
partition : into the brackets.
X Slide in trunk partition : as far as it will
go.
X Turn driver's side catch lever A in the
direction of the arrow.
X Repeat the same process on the catch lever
on the passenger side.
trunk partition : is unlocked.
X Pull trunk partition : by handle ? in the
direction of the arrow.
X Hook trunk partition : into fastening
eyelets = in the side panels.
X Pull net ; forwards and hook the left and
right-hand sides into the holder. Wind screen
Manual wind screen Important safety notes
G
WARNING
If you use the wind screen in darkness or in
other conditions offering poor visibility, your
view to
the rear is further impaired. As a result
of the visibility impairment, you could cause
an accident and injure yourself or others. For
this reason, fold back the wind screen as soon
as it is dark or if your vision is otherwise
restricted. G
WARNING
You could lose control of the vehicle and
injure yourself or others if you operate the
wind screen while driving.
Install or remove the wind screen only when
the vehicle is stationary. G
WARNING
If the wind screen is not correctly engaged, it
may break free and thus obstruct traffic
behind you or lead to an accident. 90
Roof
Opening/closing