2013 MERCEDES-BENZ SL-CLASS ROADSTER tow
[x] Cancel search: towPage 78 of 572

Automatic locking feature
:
To deactivate
; To activate
X To deactivate: press and hold button :
for about
five seconds until a tone sounds.
X To activate: press and hold button ; for
about five seconds until a tone sounds.
i If you press one of the two buttons and
do not
hear a tone, the relevant setting has
already been selected.
The vehicle is locked automatically when the
ignition is switched on and the wheels are
turning.
You could therefore lock yourself out if:
R the vehicle is being pushed.
R the vehicle is being towed.
R the vehicle is on a roller dynamometer.
You can also switch the automatic locking
function on and off using the on-board
computer (Y page 218). Power closing feature
G
WARNING
To prevent possible personal injury, always
keep hands
and fingers away from the door or
trunk opening when closing a door or the
trunk lid. Be especially careful when small
children are around.
If danger threatens, pull the inside or outside
door handle, or pull the trunk lid handle. To
prevent personal injury, never activate the
closing assist mechanism by tampering with
the door or trunk lid latch. G
WARNING
Only drive with the doors closed. Otherwise,
one or
more of the doors could open while the
vehicle is in motion, putting you and/or
others at risk. G
WARNING
Make sure the trunk lid is closed when the
engine is running and while driving. Among
other dangers, deadly carbon monoxide (CO)
gases may
enter the vehicle interior resulting
in unconsciousness and death.
The power closing feature pulls the doors and
trunk lid into their locks automatically even if
they are only partly closed.
X Power closing feature (doors): push the
door past the first detent position of the
lock.
The power
closing feature will pull the door
fully closed.
X Power closing feature (trunk lid): lightly
push the trunk lid closed.
The power
closing feature will pull the trunk
lid fully closed. Unlocking the driver's door
(mechanical key)
If the
vehicle can no longer be unlocked with
the SmartKey, use the mechanical key.
X Take the mechanical key out of the
SmartKey (Y page 70).
X Insert the mechanical key into the lock of
the driver's door as far as it will go.76
Doors
Opening/closing
Page 80 of 572

seat adjustment, steering wheel
adjustment or memory function.
If children open a door, they could cause
severe or
even fatal injury to other persons; if
they get out of the vehicle, they could injure
themselves when doing so or be seriously or
even fatally injured by any passing traffic.
Do not expose the child restraint system to
direct sunlight. The child restraint system's
metal parts, for example, could become very
hot, and a child could be burned on these
parts. G
WARNING
Do not carry heavy or hard objects in the
passenger compartment
or trunk unless they
are firmly secured in place.
Unsecured or improperly positioned cargo
increases a child's risk of injury in the event
of
R strong braking maneuvers
R sudden changes of direction
R an accident G
WARNING
Make sure the trunk lid is closed when the
engine is running and while driving. Among
other dangers, deadly carbon monoxide (CO)
gases may
enter the vehicle interior resulting
in unconsciousness and death.
! The trunk lid swings upwards when
opened. Therefore, make sure that there is
sufficient clearance above the trunk lid.
i The opening dimensions of the trunk lid
can be found in the "Vehicle data" section
(Y page 565).
i To make loading easier, the stowed roof
can be raised with the loading aid after the
trunk lid has been opened. The trunk
partition can also be detached. The trunk
partition must be put back in position after
loading. Otherwise, the roof cannot be
lowered. You can unlock the trunk lid if the vehicle is
stationary
and
the roof is completely open or
closed.
Do not leave the SmartKey in the trunk. You
could otherwise lock yourself out.
The trunk lid can be:
R opened and closed manually from outside
R opened automatically from outside
(vehicles without trunk lid remote closing
feature)
R opened and closed automatically from
outside (vehicles with trunk lid remote
closing feature)
R opened and closed from outside (vehicles
with KEYLESS-GO and HANDS-FREE
ACCESS)
R opened and closed automatically from
inside (vehicles with trunk lid remote
closing feature)
R locked separately
R unlocked with the mechanical key
R opened with the emergency release button Opening and closing manually from
outside
Opening X
Press the
% button on the SmartKey.
X Pull handle :.
X Raise the trunk lid.
i With the roof open, you can use the
loading aid (Y
page 477) to raise the
folded-up roof in the trunk, enabling you to 78
Trunk
Opening/closing
Page 89 of 572

Attempting to manually close the roof may
cause damage to the roof and/or injury.
For this reason, the manual closing process
should only be carried out at a qualified
specialist workshop.
! Never sit
on the rear compartment trim or
stow heavy objects there. You will
otherwise damage the roof and rear
compartment trim of the vehicle.
! Do not forget that the weather can
change abruptly. Make certain that the roof
is closed when you leave the vehicle. The
vehicle electronics can be damaged if
water enters the vehicle interior.
! When opening and closing the roof, make
sure that:
R there is sufficient clearance, as the roof
swings upwards.
R there is sufficient clearance behind the
vehicle, as the trunk lid swings
backwards beyond the bumper.
R the trunk is only loaded to below the
trunk partition.
R the trunk partition is not pushed up by
the load.
R the trunk partition is closed.
R the trunk lid is closed.
R the outside temperature is above 5 ‡
(Ò15 †).
You could otherwise damage the roof,
trunk and other parts of the vehicle.
i Make sure that the roof and rear window
are clean and dry before opening the roof.
Otherwise, water or dirt could enter the
vehicle interior or trunk. Opening and closing using the roof
switch
Important safety notes G
WARNING
Before operating the retractable hardtop
(vario-roof), make sure there is no danger of
anyone being injured by the moving parts
(retractable hardtop, roof frame, and trunk
lid).
Hands must never be placed near the roof
frame, upper windshield area, hardtop, shelf
behind roll bars, or trunk lid while the
retractable hardtop is being raised or
lowered. Serious personal injury may occur.
If potential danger exists, release the
retractable hardtop switch or the
% or
& button on the SmartKey. This
immediately interrupts
the raising or lowering
procedure. You can then operate the
retractable hardtop switch or press the
% or & button on the SmartKey to raise
or lower the retractable hardtop away from
the danger zone.
Opening/closing X
Secure the vehicle against rolling away
(
Y page 154).
X Close the trunk partition (Y page 89).
X Close the trunk lid.
X Turn the SmartKey to position 2 in the
ignition lock.
X Open the cover in the lower center console.
Roof switch : is located under the cover. Roof
87
Opening/closing Z
Page 101 of 572
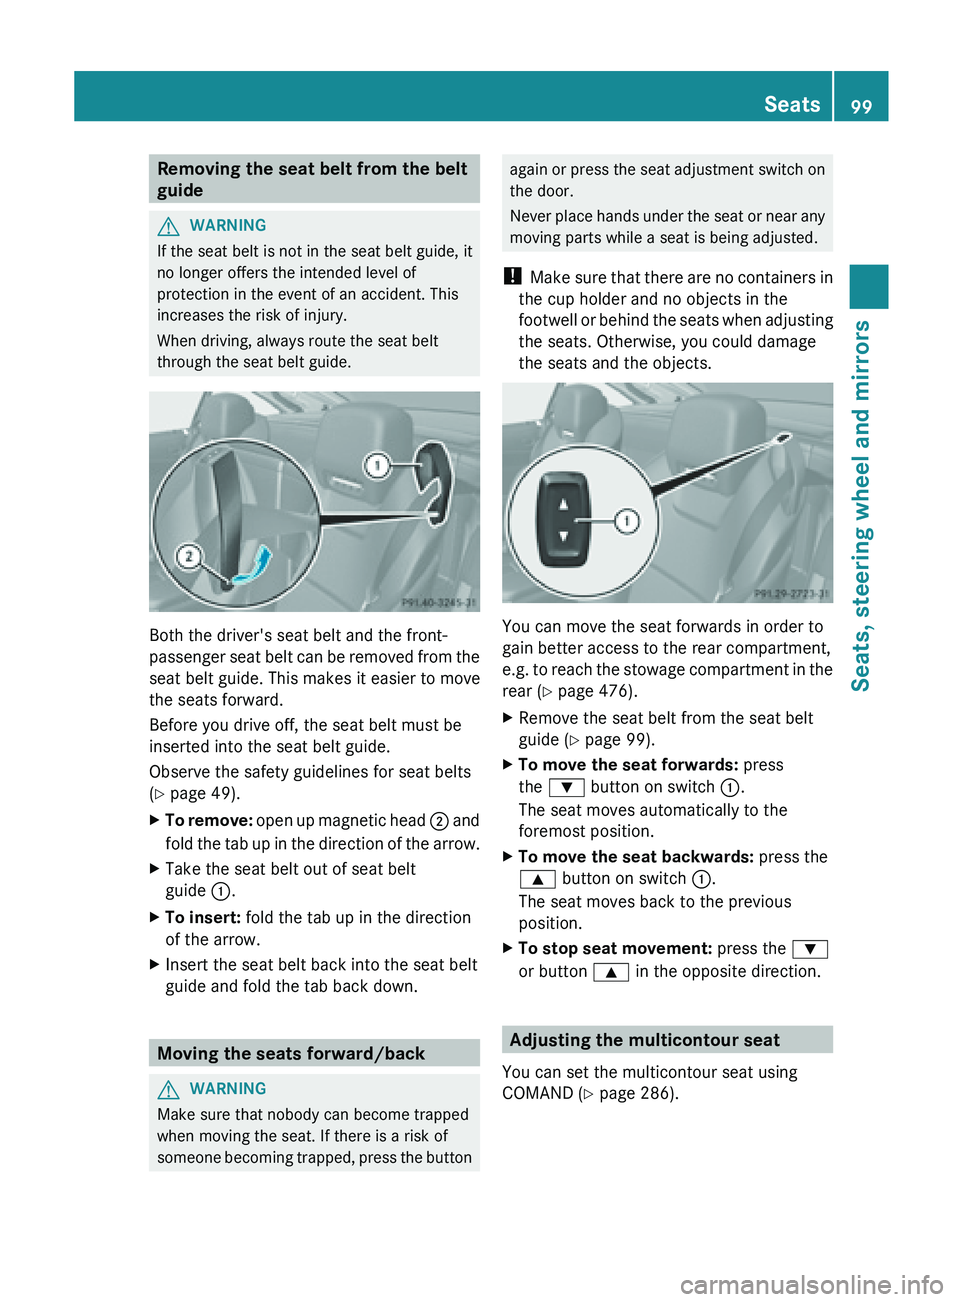
Removing the seat belt from the belt
guide
G
WARNING
If the seat belt is not in the seat belt guide, it
no longer offers the intended level of
protection in the event of an accident. This
increases the risk of injury.
When driving, always route the seat belt
through the seat belt guide. Both the driver's seat belt and the front-
passenger
seat
belt can be removed from the
seat belt guide. This makes it easier to move
the seats forward.
Before you drive off, the seat belt must be
inserted into the seat belt guide.
Observe the safety guidelines for seat belts
(Y page 49).
X To remove: open up magnetic head ;
and
fold the tab up in the direction of the arrow.
X Take the seat belt out of seat belt
guide :.
X To insert: fold the tab up in the direction
of the arrow.
X Insert the seat belt back into the seat belt
guide and fold the tab back down. Moving the seats forward/back
G
WARNING
Make sure that nobody can become trapped
when moving the seat. If there is a risk of
someone becoming
trapped, press the button again
or press the seat adjustment switch on
the door.
Never place
hands under the seat or near any
moving parts while a seat is being adjusted.
! Make sure that there are no containers in
the cup holder and no objects in the
footwell or behind the seats when adjusting
the seats. Otherwise, you could damage
the seats and the objects. You can move the seat forwards in order to
gain better access to the rear compartment,
e.g.
to
reach the stowage compartment in the
rear ( Y page 476).
X Remove the seat belt from the seat belt
guide ( Y
page 99).
X To move the seat forwards: press
the : button on switch :.
The seat moves automatically to the
foremost position.
X To move the seat backwards: press the
9 button on switch :.
The seat moves back to the previous
position.
X To stop seat movement: press the :
or button 9 in the opposite direction. Adjusting the multicontour seat
You can set the multicontour seat using
COMAND (
Y page 286). Seats
99
Seats, steering wheel and mirrors Z
Page 148 of 572
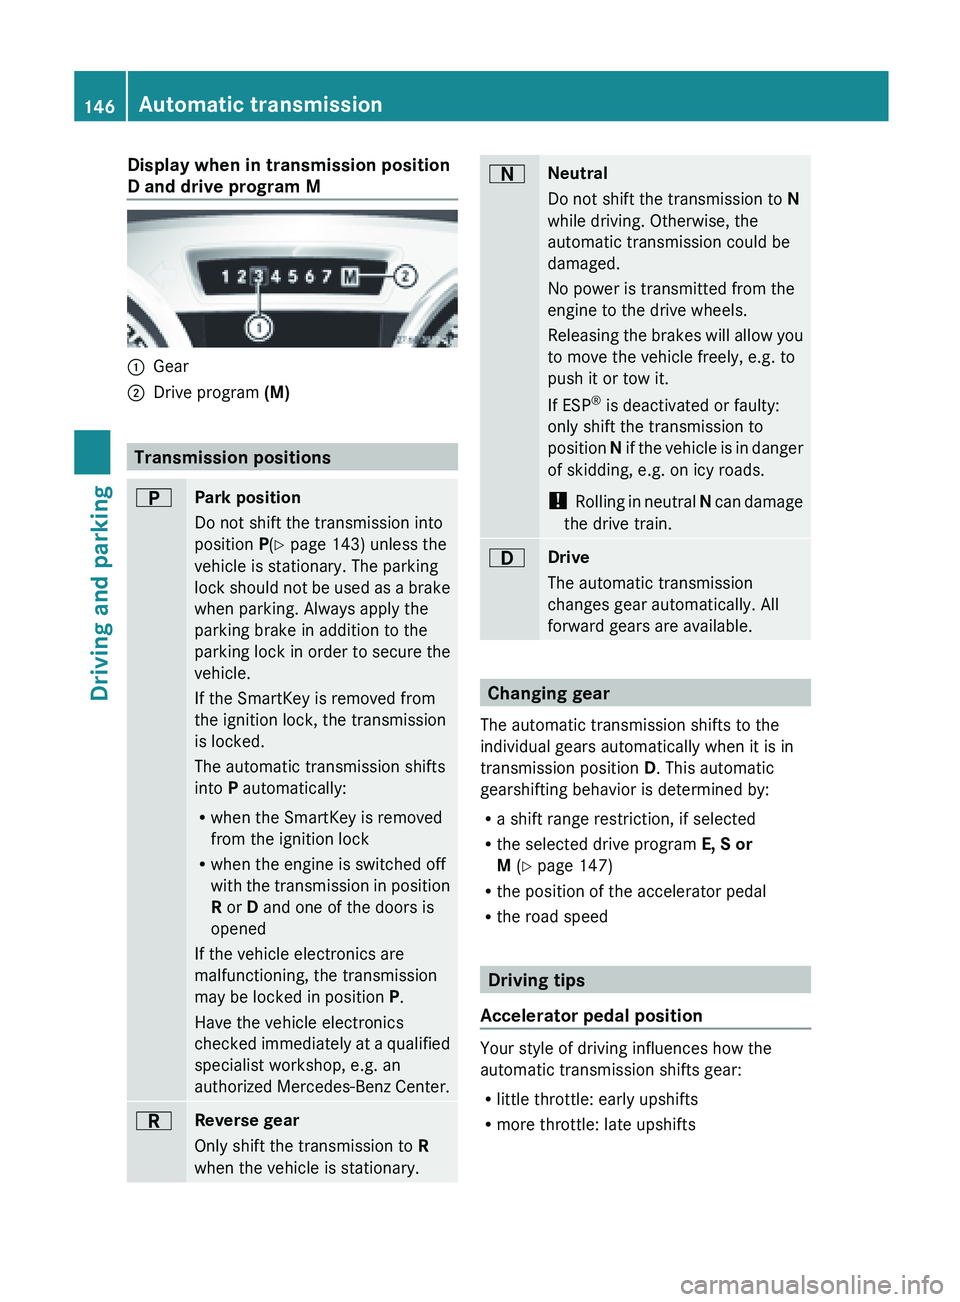
Display when in transmission position
D and drive program M
:
Gear
; Drive program (M) Transmission positions
B
Park position
Do not shift the transmission into
position P(Y page 143) unless the
vehicle is stationary. The parking
lock
should
not be used as a brake
when parking. Always apply the
parking brake in addition to the
parking lock in order to secure the
vehicle.
If the SmartKey is removed from
the ignition lock, the transmission
is locked.
The automatic transmission shifts
into P automatically:
R when the SmartKey is removed
from the ignition lock
R when the engine is switched off
with the transmission in position
R or D and one of the doors is
opened
If the vehicle electronics are
malfunctioning, the transmission
may be locked in position P.
Have the vehicle electronics
checked immediately at a qualified
specialist workshop, e.g. an
authorized Mercedes-Benz Center. C
Reverse gear
Only shift the transmission to
R
when the vehicle is stationary. A
Neutral
Do not shift the transmission to
N
while driving. Otherwise, the
automatic transmission could be
damaged.
No power is transmitted from the
engine to the drive wheels.
Releasing the
brakes will allow you
to move the vehicle freely, e.g. to
push it or tow it.
If ESP ®
is deactivated or faulty:
only shift the transmission to
position N if the vehicle is in danger
of skidding, e.g. on icy roads.
! Rolling in neutral N can damage
the drive train. 7
Drive
The automatic transmission
changes gear automatically. All
forward gears are available.
Changing gear
The automatic transmission shifts to the
individual gears automatically when it is in
transmission position D. This automatic
gearshifting behavior is determined by:
R a shift range restriction, if selected
R the selected drive program E, S or
M (Y page 147)
R the position of the accelerator pedal
R the road speed Driving tips
Accelerator pedal position Your style of driving influences how the
automatic transmission shifts gear:
R
little throttle: early upshifts
R more throttle: late upshifts146
Automatic transmission
Driving and parking
Page 156 of 572
Problems with fuel and the fuel tank
Problem Possible causes/consequences and
M Solutions
Fuel is leaking from the
vehicle. G
Risk of explosion or fire
The fuel line or the fuel tank is faulty.
X Turn the SmartKey to position
0
in
the ignition lock immediately
and remove it (Y page 135).
X Do not restart the engine under any circumstances.
X Consult a qualified specialist workshop. The fuel filler flap
cannot be opened. The fuel filler flap is not unlocked.
or
The SmartKey battery is discharged.
X
Unlock the vehicle (
Y page 68).
or
X Unlock the vehicle using the mechanical key ( Y page 70).The fuel filler flap is unlocked, but the opening mechanism is
jammed.
X
Consult a qualified specialist workshop. Parking
Important safety notes
G
WARNING
Do not park this vehicle in areas where
combustible materials
can come into contact
with the hot exhaust system. Do not park the
vehicle on dry grassland or harvested grain
fields. Combustible materials, such as grass,
hay or leaves could be ignited by the hot
exhaust system and cause a vehicle fire.
Unintended vehicle movement can cause
serious personal injury or damage to the
vehicle or the vehicle drivetrain. To reduce
such risks, always do the following before
turning off the engine and leaving the vehicle:
R keep your right foot on the brake pedal.
R engage the parking brake.
R shift the automatic transmission to park
position P.
R slowly release the brake pedal. R
when parked
on an incline, always turn the
front wheels towards the road curb.
R turn the SmartKey in the ignition lock to
position 0 and remove the SmartKey from
the ignition lock, or press the KEYLESS-GO
Start/Stop button.
R take the SmartKey with you and lock the
vehicle when leaving. Switching off the engine
Important safety notes G
WARNING
Do not turn off the engine before the vehicle
has come
to a complete stop. With the engine
not running, there is no power assistance for
the brake and steering systems. In this case,
it is important to keep in mind that a
considerably higher degree of effort is
necessary to brake and steer the vehicle. 154
Parking
Driving and parking
Page 162 of 572
!
As the ESP ®
system operates
automatically, the engine and the ignition
system must be switched off (SmartKey in
position 0
or 1
in the ignition lock or Start/
Stop button in position 0 or 1) when:
R testing the parking brake on a brake
dynamometer.
R you intend to have the vehicle towed with
the front axle raised.
Braking maneuvers triggered automatically
by ESP ®
may seriously damage the brake
system.
All checks and maintenance work on the
brake system must be carried out at a
qualified specialist workshop. Have this work
carried out at an authorized Mercedes-Benz
Center.
Have the brake pads and brake fluid installed
or replaced at a qualified specialist workshop,
e.g. an authorized Mercedes-Benz Center.
If the brake system has only been subject to
moderate loads, you should test the
functionality of your brakes at regular
intervals. To do so, press firmly on the brake
pedal when driving at a high speed. This
improves the grip of the brake pads.
A description of Brake Assist (BAS):
(Y page 58)
Checking brake lining thickness You can measure the break pad/lining
thickness using a test gauge. Color-coding
(green
or
red) on the test gauge allows you to
determine whether the brake pad/lining
thickness is still sufficient. The test gauge is
in the vehicle document wallet in the glove
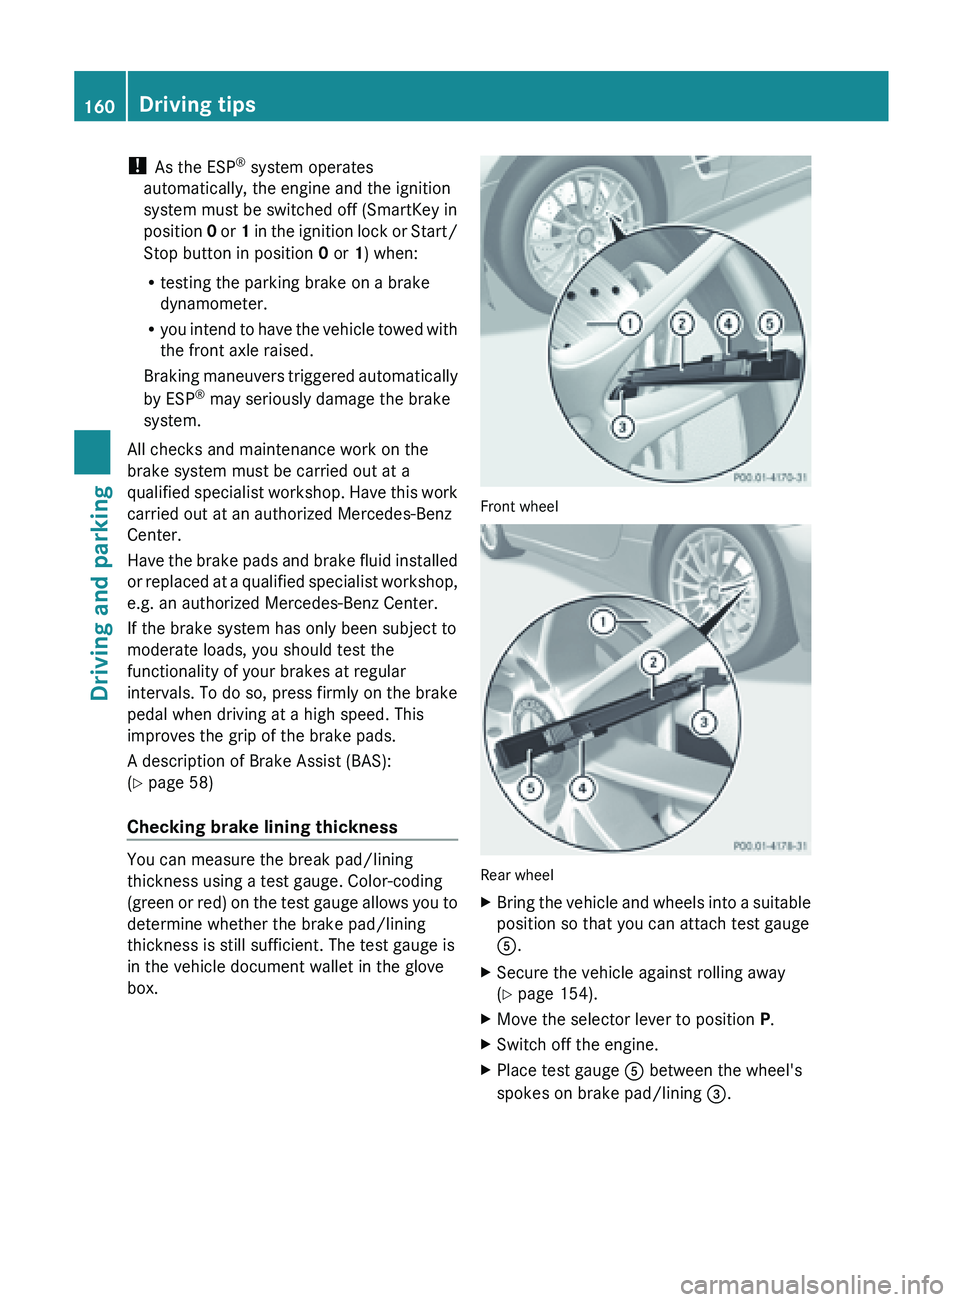
box. Front wheel
Rear wheel
X
Bring the vehicle and wheels into a suitable
position so that you can attach test gauge
A.
X Secure the vehicle against rolling away
(Y page 154).
X Move the selector lever to position P.
X Switch off the engine.
X Place test gauge A between the wheel's
spokes on brake pad/lining =. 160
Driving tips
Driving and parking
Page 165 of 572
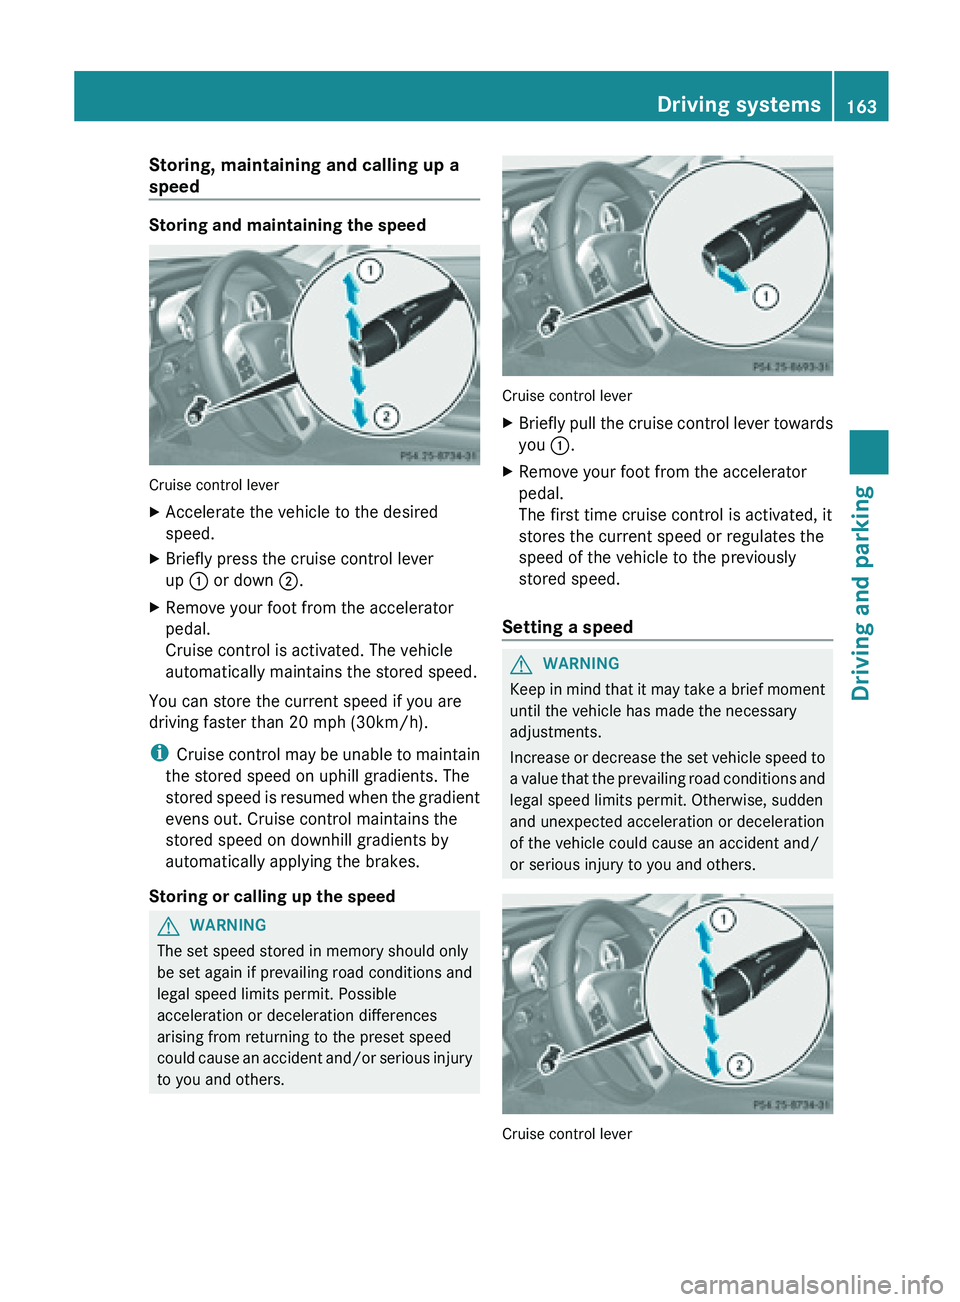
Storing, maintaining and calling up a
speed
Storing and maintaining the speed
Cruise control lever
X
Accelerate the vehicle to the desired
speed.
X Briefly press the cruise control lever
up : or down ;.
X Remove your foot from the accelerator
pedal.
Cruise control is activated. The vehicle
automatically maintains the stored speed.
You can store the current speed if you are
driving faster than 20 mph (30km/h).
i Cruise control
may be unable to maintain
the stored speed on uphill gradients. The
stored speed is resumed when the gradient
evens out. Cruise control maintains the
stored speed on downhill gradients by
automatically applying the brakes.
Storing or calling up the speed G
WARNING
The set speed stored in memory should only
be set again if prevailing road conditions and
legal speed limits permit. Possible
acceleration or deceleration differences
arising from returning to the preset speed
could cause
an accident and/or serious injury
to you and others. Cruise control lever
X
Briefly pull the cruise control lever towards
you :.
X Remove your foot from the accelerator
pedal.
The first time cruise control is activated, it
stores the current speed or regulates the
speed of the vehicle to the previously
stored speed.
Setting a speed G
WARNING
Keep in mind that it may take a brief moment
until the vehicle has made the necessary
adjustments.
Increase or
decrease the set vehicle speed to
a value that the prevailing road conditions and
legal speed limits permit. Otherwise, sudden
and unexpected acceleration or deceleration
of the vehicle could cause an accident and/
or serious injury to you and others. Cruise control lever Driving systems
163Driving and parking Z