2013 MERCEDES-BENZ SL-CLASS ROADSTER headlamp
[x] Cancel search: headlampPage 218 of 572

You can determine whether the multifunction
display shows some messages in miles or
kilometers.
X
Press the = or ; button on the
steering wheel to select the Settings
menu.
X Press the : or 9 button to select the
Inst. Cluster submenu.
X Press the a button to confirm.
X Press the : or 9
button to select the
Display Unit Speed-/Odometer:
function.
You will see the selected setting: km or
miles.
X Press the a button to save the setting.
The selected unit of measurement for
distance applies to:
R the digital speedometer in the Trip menu
R odometer and the trip odometer
R trip computer
R current consumption and the range
R the navigation instructions in the Navi
menu
R cruise control
R DISTRONIC PLUS
R ASSYST PLUS service interval display
Selecting the
permanent display function
You can determine whether the multifunction
display permanently shows your speed or the
outside temperature.
X Press the = or ; button on the
steering wheel to select the Sett. menu.
X Press the : or 9
button to select the
Instr. Cluster submenu.
X Press the a button to confirm.
X Press the :
or 9
button to select the
Permanent Display function.
You will see the selected setting: Outside
Temperature or Speedometer.
X Press the a button to save the setting.
i Speed is displayed in mph. Light submenu Setting the daytime running lamps
i
This function is not available in Canada.
X Press the = or ; button on the
steering wheel to select the Sett. menu.
X Press the : or 9
button to select the
Lights submenu.
X Press the a button to confirm.
X Press the :
or 9
button to select the
Daytime Running Lights function.
If the Daytime Running Lights have
been switched on, the cone of light and the
W symbol in the multifunction display
are shown in red.
X Press the a button to save the setting.
If you have activated the Daytime Running
Lights
function and the light switch is in the
à position, the daytime running lamps or
parking lamps and low-beam headlamps are
switched on depending on the brightness of
the ambient light.
When the low-beam headlamps are switched
on, the L indicator lamp in the instrument
cluster lights up.
Further information on daytime running
lamps ( Y page 109).
Setting the brightness of the ambient
lighting
X Press the = or ; button on the
steering wheel to select the Sett. menu.
X Press the : or 9
button to select the
Lights submenu.
X Press the a button to confirm.
X Press the : or 9
button to select the
Amb. Light +/-. function.
You will see the selected setting.
X Press the a button to confirm.
X Press the :
or 9
button to adjust the
brightness to any level from Off to Level
5 (bright).
X Press the a or % button
to save the
setting. 216
Menus and submenus
On-board computer and displays
Page 219 of 572

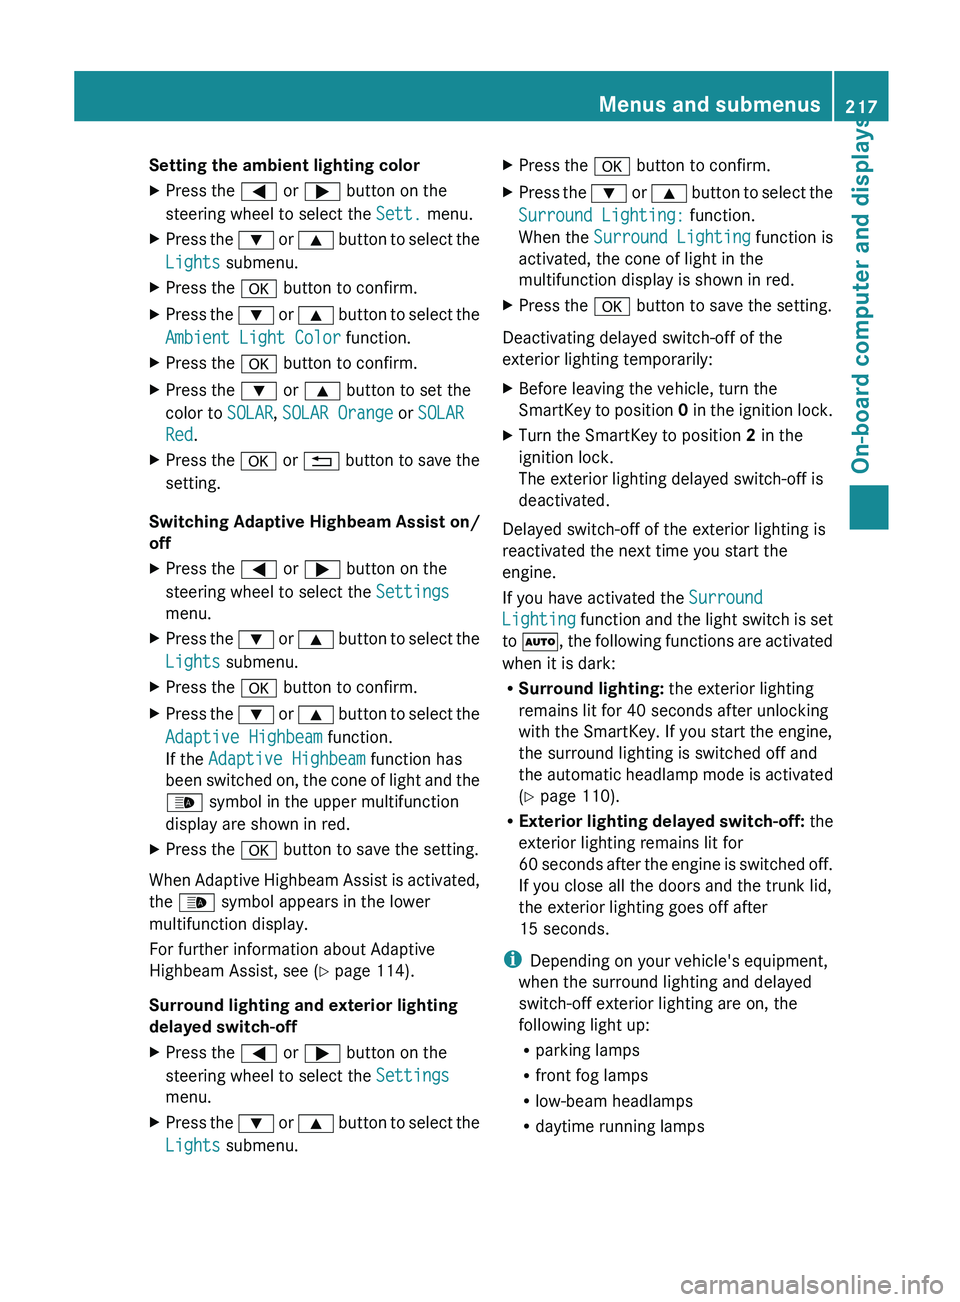
Setting the ambient lighting color
X
Press the = or ; button on the
steering wheel to select the Sett. menu.
X Press the : or 9 button to select the
Lights submenu.
X Press the a button to confirm.
X Press the : or 9
button to select the
Ambient Light Color function.
X Press the a button to confirm.
X Press the : or 9 button to set the
color to SOLAR, SOLAR Orange or SOLAR
Red.
X Press the a or % button
to save the
setting.
Switching Adaptive Highbeam Assist on/
off
X Press the = or ; button on the
steering wheel to select the Settings
menu.
X Press the : or 9
button to select the
Lights submenu.
X Press the a button to confirm.
X Press the :
or 9
button to select the
Adaptive Highbeam function.
If the Adaptive Highbeam function has
been switched on, the cone of light and the
_ symbol in the upper multifunction
display are shown in red.
X Press the a button to save the setting.
When Adaptive Highbeam Assist is activated,
the _ symbol appears in the lower
multifunction display.
For further information about Adaptive
Highbeam Assist, see ( Y page 114).
Surround lighting and exterior lighting
delayed switch-off
X Press the = or ; button on the
steering wheel to select the Settings
menu.
X Press the :
or 9
button to select the
Lights submenu. X
Press the a button to confirm.
X Press the :
or 9
button to select the
Surround Lighting: function.
When the Surround Lighting function is
activated, the cone of light in the
multifunction display is shown in red.
X Press the a button to save the setting.
Deactivating delayed switch-off of the
exterior lighting temporarily:
X Before leaving the vehicle, turn the
SmartKey to
position 0 in the ignition lock.
X Turn the SmartKey to position 2 in the
ignition lock.
The exterior lighting delayed switch-off is
deactivated.
Delayed switch-off of the exterior lighting is
reactivated the next time you start the
engine.
If you have activated the Surround
Lighting function
and the light switch is set
to Ã, the following functions are activated
when it is dark:
R Surround lighting: the exterior lighting
remains lit for 40 seconds after unlocking
with the SmartKey. If you start the engine,
the surround lighting is switched off and
the automatic headlamp mode is activated
(Y page 110).
R Exterior lighting delayed switch-off: the
exterior lighting remains lit for
60 seconds after the engine is switched off.
If you close all the doors and the trunk lid,
the exterior lighting goes off after
15 seconds.
i Depending on your vehicle's equipment,
when the surround lighting and delayed
switch-off exterior lighting are on, the
following light up:
R parking lamps
R front fog lamps
R low-beam headlamps
R daytime running lamps Menus and submenus
217
On-board computer and displays Z
Page 237 of 572

Display messages Possible causes/consequences and
M SolutionsOperator's Manual display messages must not be shown in
the multifunction display.
X Wait for a period of at least 60 seconds until the necessary
system checks have been completed.
X Make sure that the display messages do not appear in the
multifunction display.
If these conditions are fulfilled, the front-passenger seat can be
occupied again.
Whether the ^a indicator lamp remains lit
or goes out depends on how OCS classifies the occupant.
If the conditions are not fulfilled, the system is not operating
correctly.
X Visit a qualified specialist workshop immediately.
For further information about the Occupant Classification System,
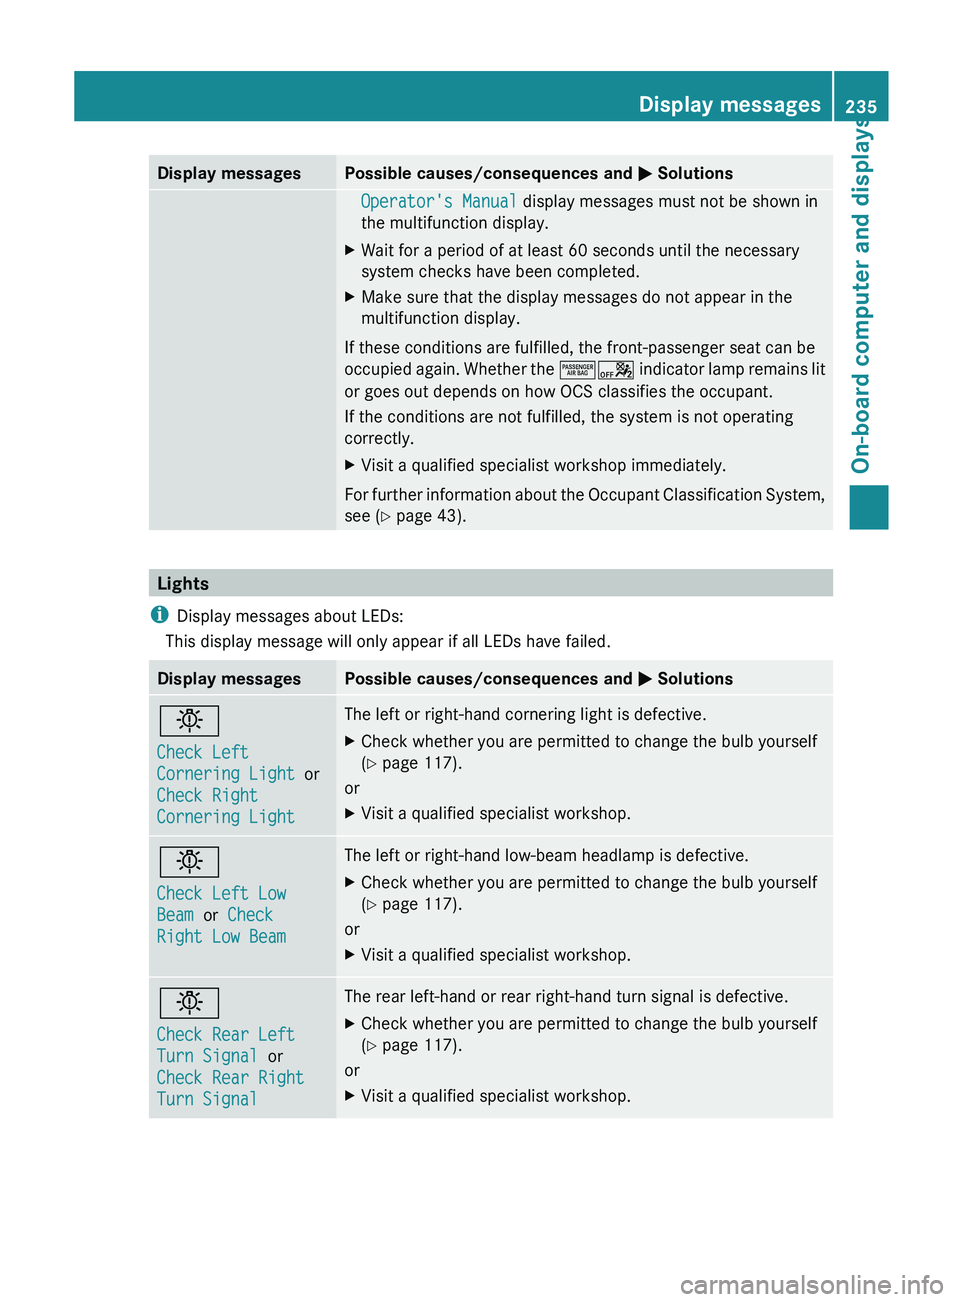
see ( Y page 43). Lights
i Display messages about LEDs:
This display message will only appear if all LEDs have failed. Display messages Possible causes/consequences and
M Solutionsb
Check Left
Cornering Light
or
Check Right
Cornering Light The left or right-hand cornering light is defective.
X
Check whether you are permitted to change the bulb yourself
(Y page 117).
or
X Visit a qualified specialist workshop. b
Check Left Low
Beam or Check
Right Low Beam The left or right-hand low-beam headlamp is defective.
X
Check whether you are permitted to change the bulb yourself
(Y page 117).
or
X Visit a qualified specialist workshop. b
Check Rear Left
Turn Signal or
Check Rear Right
Turn Signal The rear left-hand or rear right-hand turn signal is defective.
X
Check whether you are permitted to change the bulb yourself
(Y page 117).
or
X Visit a qualified specialist workshop. Display messages
235
On-board computer and displays Z
Page 239 of 572

Display messages Possible causes/consequences and
M Solutionsb
License Plate Lamp The left or right-hand license plate lamp is defective.
X
Check whether you are permitted to change the bulb yourself
(Y page 117).
or
X Visit a qualified specialist workshop. b
Check Left Fog
LamporCheck Right
Fog Lamp The left-hand or right-hand front fog lamp is defective.
X
Check whether you are permitted to change the bulb yourself
(Y page 117).
or
X Visit a qualified specialist workshop. b
Check Front Left
Parking Lamp or
Check Front Right
Parking Lamp The front left or front right parking or standing lamp is defective.
X
Check whether you are permitted to change the bulb yourself
(Y page 117).
or
X Visit a qualified specialist workshop. b
Backup Light The backup lamp is defective.
X
Check whether you are permitted to change the bulb yourself
(Y page 117).
or
X Visit a qualified specialist workshop. b
Check
Left
Daytime
Running Light
or
Check Right
Daytime Running
Light The left or right-hand daytime running lamp is defective.
X
Check whether you are permitted to change the bulb yourself
(Y page 117).
or
X Visit a qualified specialist workshop. b
Active Headlamps
Inoperative The active light function is defective.
X
Visit a qualified specialist workshop. b
Malfunction See
Operator's Manual The exterior lighting is defective.
X
Visit a qualified specialist workshop. Display messages
237
On-board computer and displays Z
Page 257 of 572

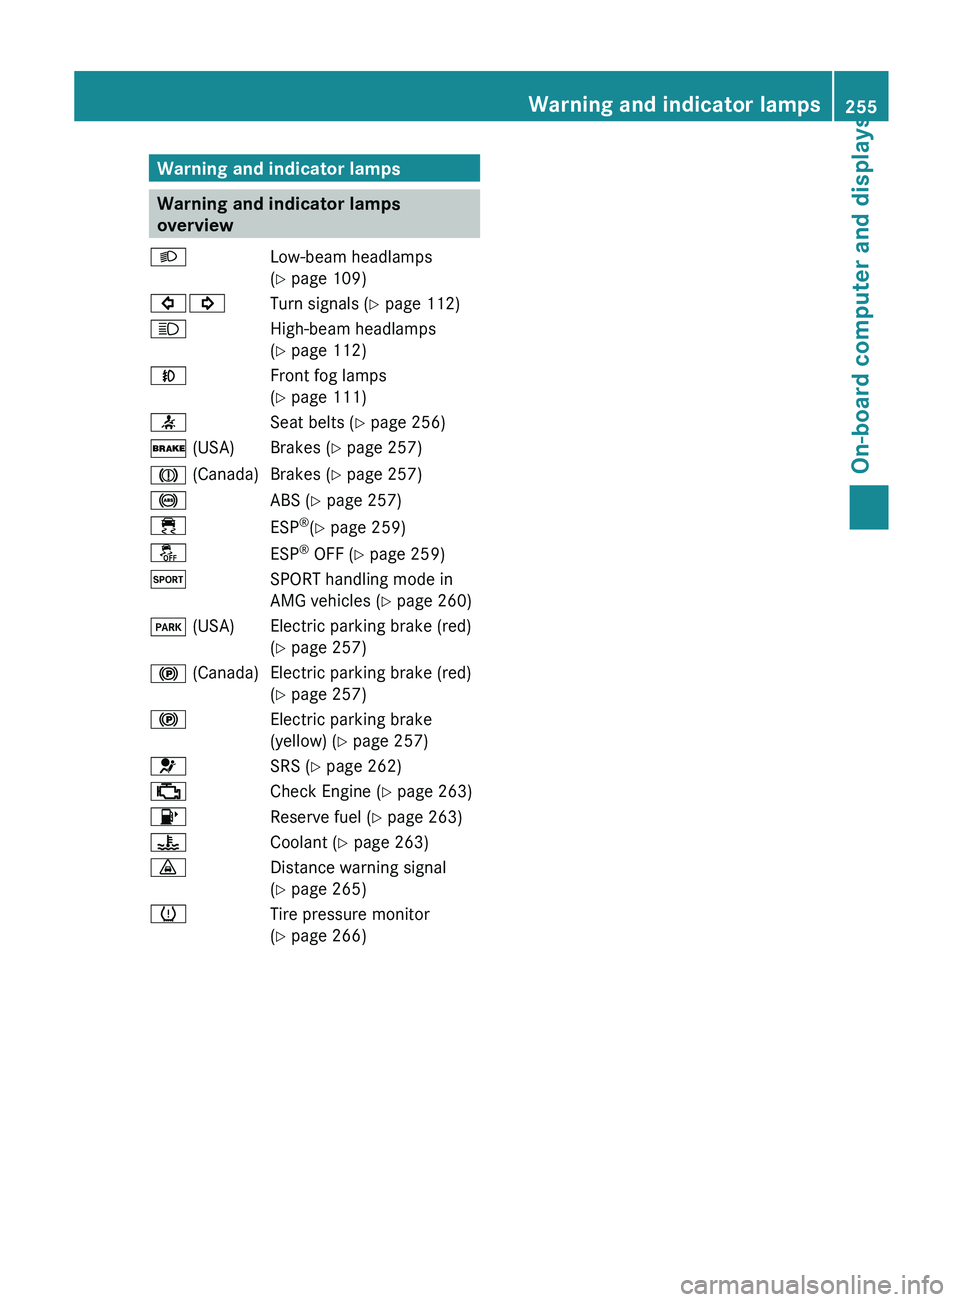
Warning and indicator lamps
Warning and indicator lamps
overview
L Low-beam headlamps
( Y page 109)
#! Turn signals (Y page 112)
K High-beam headlamps
(Y page 112)
N Front fog lamps
(Y page 111)
7 Seat belts (Y page 256)
$ (USA) Brakes (Y page 257)
J (Canada) Brakes (Y page 257)
! ABS (Y page 257)
÷ ESP®
(Y page 259)
å ESP®
OFF (Y page 259)
M SPORT handling mode in
AMG vehicles (Y page 260)
F (USA) Electric parking brake (red) (Y page 257)
! (Canada) Electric parking brake (red) (Y page 257)
! Electric parking brake
(yellow) (Y
page 257)
6 SRS (Y page 262)
; Check Engine (Y page 263)
8 Reserve fuel (Y page 263)
? Coolant (Y page 263)
· Distance warning signal
(Y page 265)
h Tire pressure monitor
(Y page 266) Warning and indicator lamps
255
On-board computer and displays Z
Page 501 of 572

R
using a cloth, slowly turn the cap
approximately Ö turn to relieve excess
pressure. If
you open the cap immediately,
pressurized scalding hot fluid and vapor will
be blown out.
R do not spill antifreeze on hot engine parts.
Antifreeze contains ethylene glycol which
may burn if it comes into contact with hot
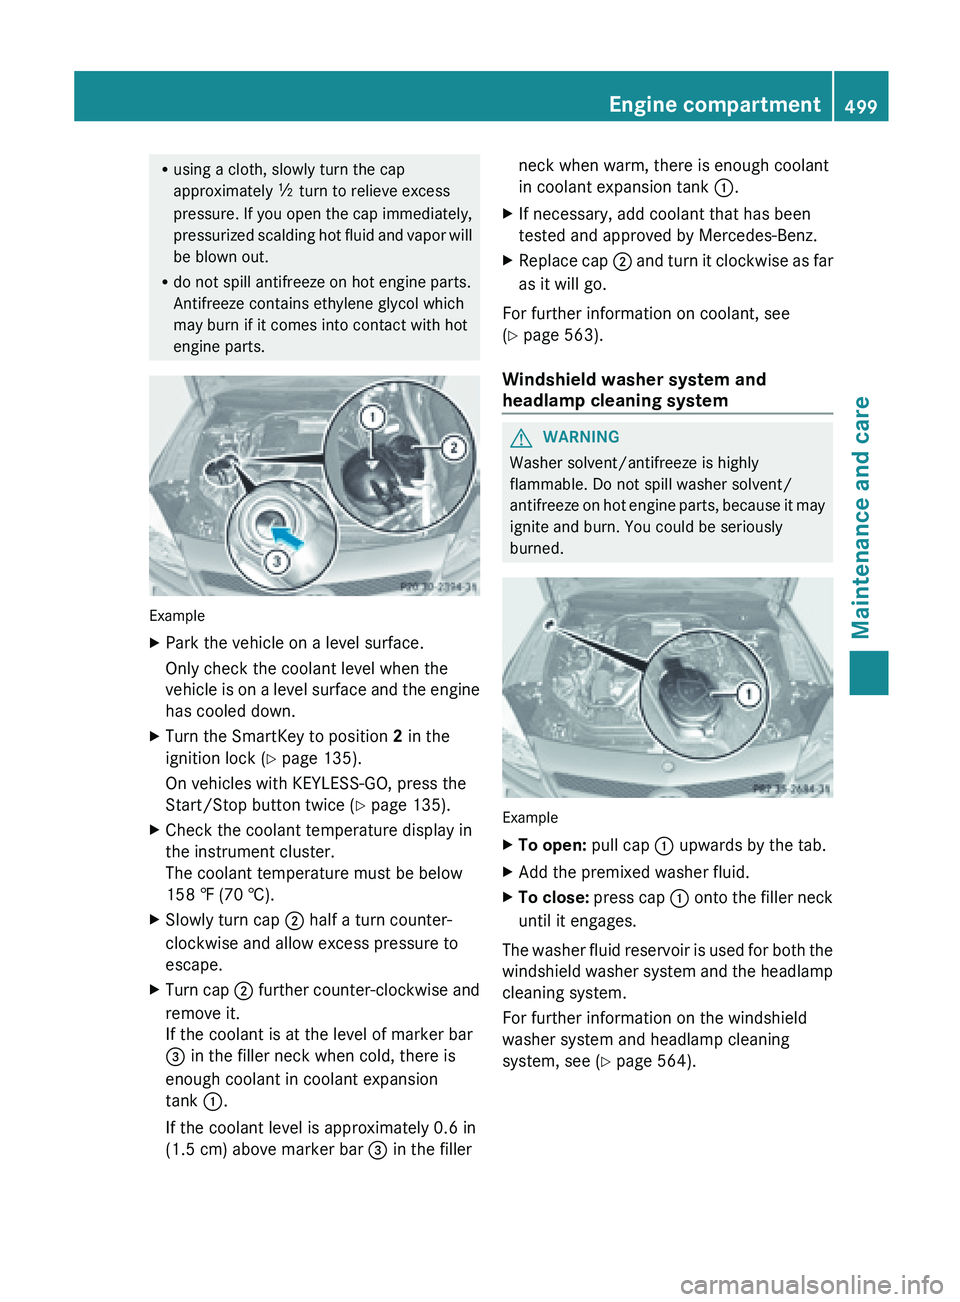
engine parts. Example
X
Park the vehicle on a level surface.
Only check the coolant level when the
vehicle is
on a level surface and the engine
has cooled down.
X Turn the SmartKey to position 2 in the
ignition lock (Y page 135).
On vehicles with KEYLESS-GO, press the
Start/Stop button twice (
Y page 135).
X Check the coolant temperature display in
the instrument cluster.
The coolant temperature must be below
158 ‡ (70 †).
X Slowly turn cap ;
half a turn counter-
clockwise and allow excess pressure to
escape.
X Turn cap ; further
counter-clockwise and
remove it.
If the coolant is at the level of marker bar
= in the filler neck when cold, there is
enough coolant in coolant expansion
tank :.
If the coolant level is approximately 0.6 in
(1.5 cm) above marker bar = in the fillerneck when warm, there is enough coolant
in coolant expansion tank
:.
X If necessary, add coolant that has been
tested and approved by Mercedes-Benz.
X Replace cap ; and
turn it clockwise as far
as it will go.
For further information on coolant, see
(Y page 563).
Windshield washer system and
headlamp cleaning system G
WARNING
Washer solvent/antifreeze is highly
flammable. Do not spill washer solvent/
antifreeze on
hot engine parts, because it may
ignite and burn. You could be seriously
burned. Example
X
To open:
pull cap
: upwards by the tab.
X Add the premixed washer fluid.
X To close:
press cap :
onto the filler neck
until it engages.
The washer fluid reservoir is used for both the
windshield washer
system and the headlamp
cleaning system.
For further information on the windshield
washer system and headlamp cleaning
system, see ( Y page 564). Engine compartment
499
Maintenance and care Z
Page 566 of 572

If antifreeze comes into contact with hot
engine
parts,
it may ignite and you could burn
yourself. Do not spill any antifreeze on hot
engine parts.
! Only add coolant that has been premixed
with the desired antifreeze protection. You
could otherwise damage the engine.
Further information on coolants can be
found in the Mercedes-Benz Specifications
for Service Products, MB Specifications for
Service Products 310.1, e.g. on the
Internet at
http://bevo.mercedes-benz.com. Or
contact a qualified specialist workshop.
! Always use a suitable coolant mixture,
even in countries where high temperatures
prevail.
Otherwise, the engine cooling system is not
sufficiently protected from corrosion and
overheating.
The coolant is a mixture of water and
antifreeze/corrosion inhibitor. It performs
the following tasks:
R corrosion protection
R antifreeze protection
R raising the boiling point
If the coolant has antifreeze protection down
to -35 ‡ (-37 †), the boiling point of the
coolant during operation is approximately
266 ‡ (130 †).
The antifreeze/corrosion inhibitor
concentration in the engine cooling system
should:
R be at least 50 %. This will protect the engine
cooling system against freezing down to
approximately -35 ‡ (-37 †).
R not exceed 55 % (antifreeze protection
down to -49 ‡ [-45 †]). Otherwise, heat
will not be dissipated as effectively.
If the vehicle has lost coolant, add equal
amounts of water and antifreeze/corrosion
inhibitor. Mercedes-Benz recommends an
antifreeze/corrosion inhibitor concentrate in accordance with MB Specifications for
Service Products 310.1.
The coolant is checked with every
maintenance interval at a qualified specialist
workshop.
i
When the vehicle is first delivered, it is
filled with a coolant mixture that ensures
adequate antifreeze and corrosion
protection.
Capacity Model Capacity
SL 550
BlueEFFICIENCY
Approximately
15.3 US qt (14.5 l) SL 63 AMG
Approximately
15.2 US qt (14.4 l) SL 65 AMG
Approximately
13.5 US qt (12.8 l)
Low-temperature circuit:
approximately
3.7 US qt
(3.5 l) i
Use antifreeze/corrosion inhibitor
according to MB approval 325.0 or 326.0. Windshield/headlamp cleaning
system
G
WARNING
Washer solvent/antifreeze is highly
flammable. Do not spill washer solvent/
antifreeze on
hot engine parts, because it may
ignite and burn. You could be seriously
burned.
! Only use washer fluid that is suitable for
plastic lamp lenses, e.g. MB SummerFit or
MB WinterFit. Unsuitable washer fluid
could damage the plastic lenses of the
headlamps. 564
Service products and filling capacities
Technical data