2013 MERCEDES-BENZ SL-CLASS ROADSTER lock
[x] Cancel search: lockPage 501 of 572
R
using a cloth, slowly turn the cap
approximately Ö turn to relieve excess
pressure. If
you open the cap immediately,
pressurized scalding hot fluid and vapor will
be blown out.
R do not spill antifreeze on hot engine parts.
Antifreeze contains ethylene glycol which
may burn if it comes into contact with hot
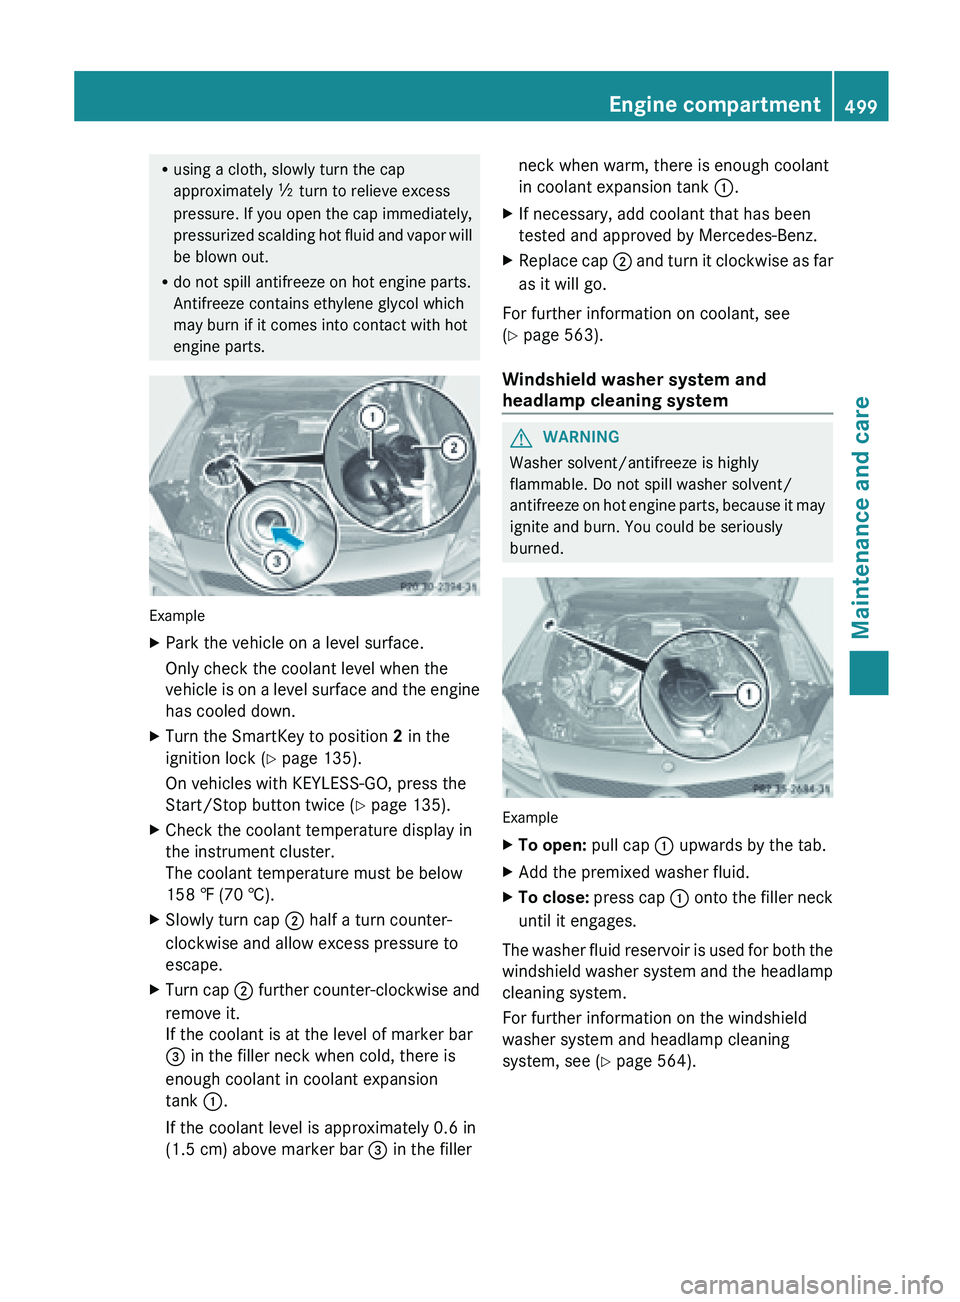
engine parts. Example
X
Park the vehicle on a level surface.
Only check the coolant level when the
vehicle is
on a level surface and the engine
has cooled down.
X Turn the SmartKey to position 2 in the
ignition lock (Y page 135).
On vehicles with KEYLESS-GO, press the
Start/Stop button twice (
Y page 135).
X Check the coolant temperature display in
the instrument cluster.
The coolant temperature must be below
158 ‡ (70 †).
X Slowly turn cap ;
half a turn counter-
clockwise and allow excess pressure to
escape.
X Turn cap ; further
counter-clockwise and
remove it.
If the coolant is at the level of marker bar
= in the filler neck when cold, there is
enough coolant in coolant expansion
tank :.
If the coolant level is approximately 0.6 in
(1.5 cm) above marker bar = in the fillerneck when warm, there is enough coolant
in coolant expansion tank
:.
X If necessary, add coolant that has been
tested and approved by Mercedes-Benz.
X Replace cap ; and
turn it clockwise as far
as it will go.
For further information on coolant, see
(Y page 563).
Windshield washer system and
headlamp cleaning system G
WARNING
Washer solvent/antifreeze is highly
flammable. Do not spill washer solvent/
antifreeze on
hot engine parts, because it may
ignite and burn. You could be seriously
burned. Example
X
To open:
pull cap
: upwards by the tab.
X Add the premixed washer fluid.
X To close:
press cap :
onto the filler neck
until it engages.
The washer fluid reservoir is used for both the
windshield washer
system and the headlamp
cleaning system.
For further information on the windshield
washer system and headlamp cleaning
system, see ( Y page 564). Engine compartment
499
Maintenance and care Z
Page 502 of 572

ASSYST PLUS
The ASSYST PLUS service interval display
informs you of the next service due date.
Information on
the type of service and service
intervals (see separate Maintenance
Booklet).
You can obtain further information from an
authorized Mercedes-Benz Center or at
http://www.mbusa.com (USA only).
i The ASSYST PLUS service interval display
does not show any information on the
engine oil level. Observe the notes on the
engine oil level ( Y page 497).Care
Notes on care
G
WARNING
Many cleaning products can be hazardous.
Some are poisonous, others are flammable.
Always follow the instructions on the
particular container. Always open your
vehicle's doors
or windows when cleaning the
inside.
Never use fluids or solvents that are not
designed for cleaning your vehicle.
Always lock away cleaning products and keep
them out of reach of children. H
Environmental note
Dispose of empty packaging and cleaning
cloths in an environmentally responsible
manner.
! For cleaning your vehicle, do not use any
of the following:
R dry, rough or hard cloths
R abrasive cleaning agents
R solvents
R cleaning agents containing solvents
Do not scrub.
Do not touch the surfaces or protective
films with hard objects, e.g. a ring or ice scraper. You could otherwise scratch or
damage the surfaces and protective film.
! Do not park the vehicle for an extended
period straight
after cleaning it, particularly
after having cleaned the wheels with wheel
cleaner. Wheel cleaners could cause
increased corrosion of the brake discs and
brake pads/linings. For this reason, you
should drive for a few minutes after
cleaning. Braking heats the brake discs and
the brake pads/linings, thus drying them.
The vehicle can then be parked.
Regular care of your vehicle is a condition for
retaining the quality in the long term.
Use care products and cleaning agents
recommended and approved by Mercedes-
Benz. Washing
the vehicle and cleaning the
paintwork
Automatic car wash G
WARNING
Braking efficiency is reduced after washing
the vehicle.
This could cause an accident. For
this reason, you must drive particularly
carefully after washing the vehicle until the
brakes have dried. G
WARNING
The
vehicle is braked when the HOLD function
or DISTRONIC PLUS is activated. Therefore,
deactivate the
HOLD function and DISTRONIC
PLUS before the vehicle is washed in an
automatic car wash.
! It is preferable to use car washes with
adjustable high-pressure pre-cleaning that
corresponds to the specification for the
Cabriolet program. In car washes that use
high water pressures, there is a risk that a
small amount of water may leak into the
vehicle.
! Never clean your vehicle in a Touchless
Automatic Car Wash as these use special 500
Care
Maintenance and care
Page 505 of 572
should drive for a few minutes after
cleaning.
Braking
heats the brake discs and
the brake pads/linings, thus drying them.
The vehicle can then be parked.
Cleaning the windows G
WARNING
Before cleaning the windshield or wiper
blades, switch off the windshield wipers and
remove the SmartKey from the ignition lock.
On vehicles with KEYLESS-GO, press the
Start/Stop button repeatedly until all
indicator lamps
in the instrument cluster have
gone out. The windshield wipers could
otherwise move and injure you. G
WARNING
Do not clean the rear window with the
reatractable hardtop
(vario-roof) in a position
other than the fully raised and closed position.
Otherwise, the retractable hardtop may move
unexpectedly which may result in personal
injury to you or others.
! Only fold the windshield wipers away from
the windshield when vertical. Otherwise,
you will damage the hood.
! Do not use dry cloths, abrasive products,
solvents or cleaning agents containing
solvents to clean the inside of the windows.
Do not touch the insides of the windows
with hard objects, e.g. an ice scraper or
ring. There is otherwise a risk of damaging
the windows.
! Clean the water drainage channels of the
windshield and the rear window at regular
intervals. Deposits such as leaves, petals
and pollen may under certain
circumstances prevent water from draining
away. This can lead to corrosion damage
and damage to electronic components.
X Clean the inside and outside of the
windows with a damp cloth and a cleaning
agent that is recommended and approved
by Mercedes-Benz. Cleaning the wiper blades G
WARNING
Before cleaning the windshield or wiper
blades, switch off the windshield wipers and
remove the SmartKey from the ignition lock.
On vehicles with KEYLESS-GO, press the
Start/Stop button repeatedly until all
indicator lamps
in the instrument cluster have
gone out. The windshield wipers could
otherwise move and injure you.
! Do not pull the wiper blade. Otherwise,
the wiper blade could be damaged.
! Do not clean wiper blades too often and
do not rub them too hard. Otherwise, the
graphite coating could be damaged. This
could cause wiper noise.
! Hold the wiper arm securely when folding
back. The windshield could be damaged if
the wiper arm smacks against it suddenly.
X Fold the windshield wiper arms away from
the windshield.
X Carefully clean the wiper blades with a
damp cloth.
X Fold the windshield wiper arms back again
before switching on the ignition.
Cleaning the exterior lighting !
Only use cleaning agents or cleaning
cloths which are suitable for plastic light
lenses. Unsuitable cleaning agents or
cleaning cloths could scratch or damage
the plastic light lenses.
X Clean the plastic lenses of the exterior
lighting using a wet sponge and a mild
cleaning agent, e.g. Mercedes-Benz car
shampoo or cleaning cloths.
Mirror turn signals !
Only use cleaning agents or cleaning
cloths that are suitable for plastic lenses.
Unsuitable cleaning agents or cleaning Care
503
Maintenance and care Z
Page 510 of 572
Useful information
i This Operator's Manual describes all
models and all standard and optional
equipment of your vehicle available at the
time of publication of the Operator's
Manual. Country-specific differences are
possible. Please
note that your vehicle may
not be equipped with all features
described. This also applies to safety-
related systems and functions.
i Read the information on qualified
specialist workshops: ( Y page 31).Where will I find...?
First-aid kit
First-aid kit
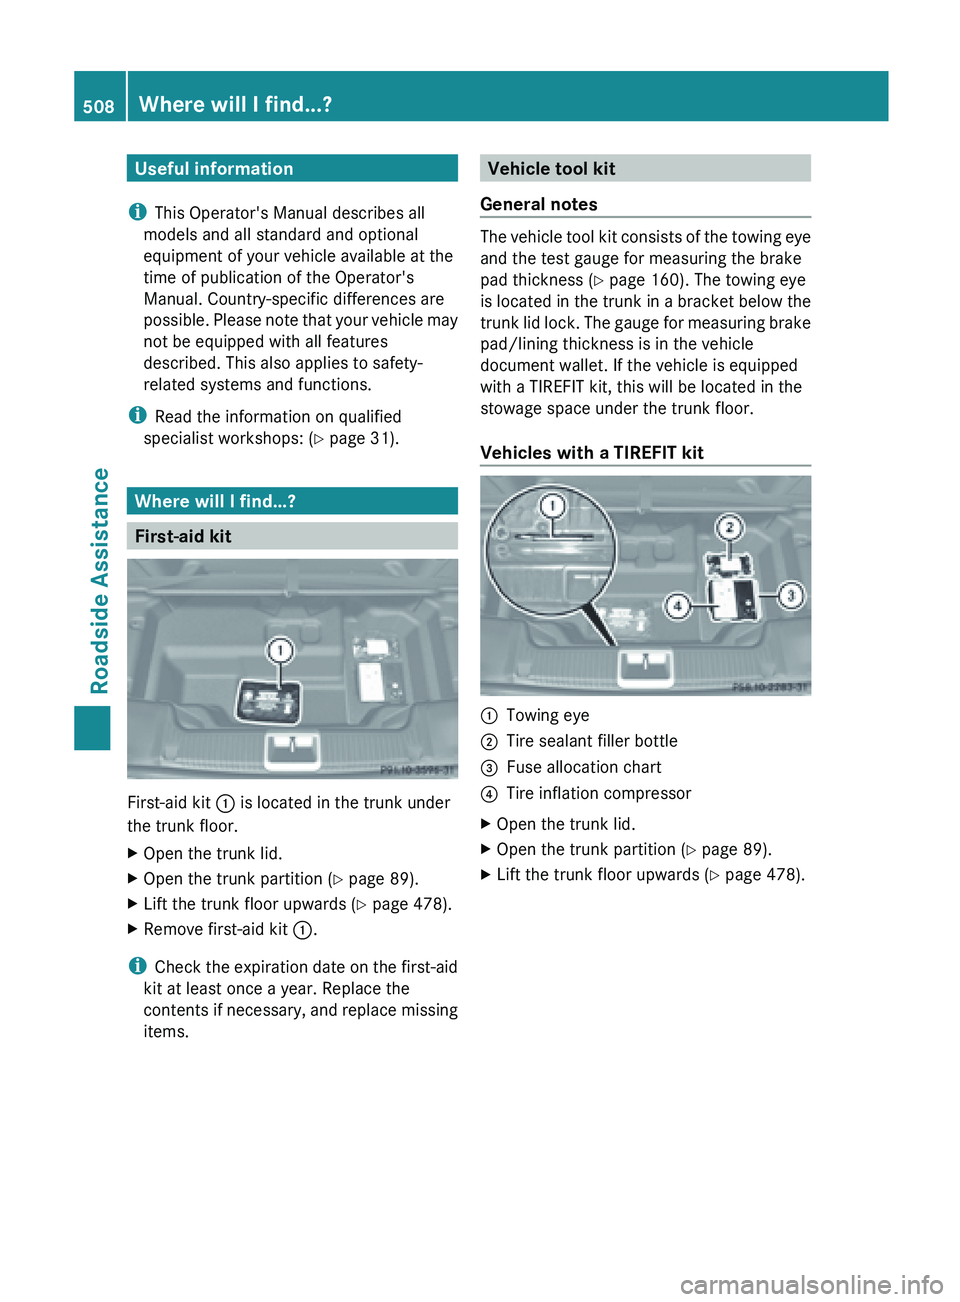
:
is located in the trunk under
the trunk floor.
X Open the trunk lid.
X Open the trunk partition ( Y page 89).
X Lift the trunk floor upwards (Y page 478).
X Remove first-aid kit :.
i Check the
expiration date on the first-aid
kit at least once a year. Replace the
contents if necessary, and replace missing
items. Vehicle tool kit
General notes The
vehicle tool kit consists of the towing eye
and the test gauge for measuring the brake
pad thickness (Y page 160). The towing eye
is located
in the trunk in a bracket below the
trunk lid lock. The gauge for measuring brake
pad/lining thickness is in the vehicle
document wallet. If the vehicle is equipped
with a TIREFIT kit, this will be located in the
stowage space under the trunk floor.
Vehicles with a TIREFIT kit :
Towing eye
; Tire sealant filler bottle
= Fuse allocation chart
? Tire inflation compressor
X Open the trunk lid.
X Open the trunk partition
(
Y page 89).
X Lift the trunk floor upwards (Y page 478).508
Where will I find...?
Roadside Assistance
Page 511 of 572
Tire-change tool kit
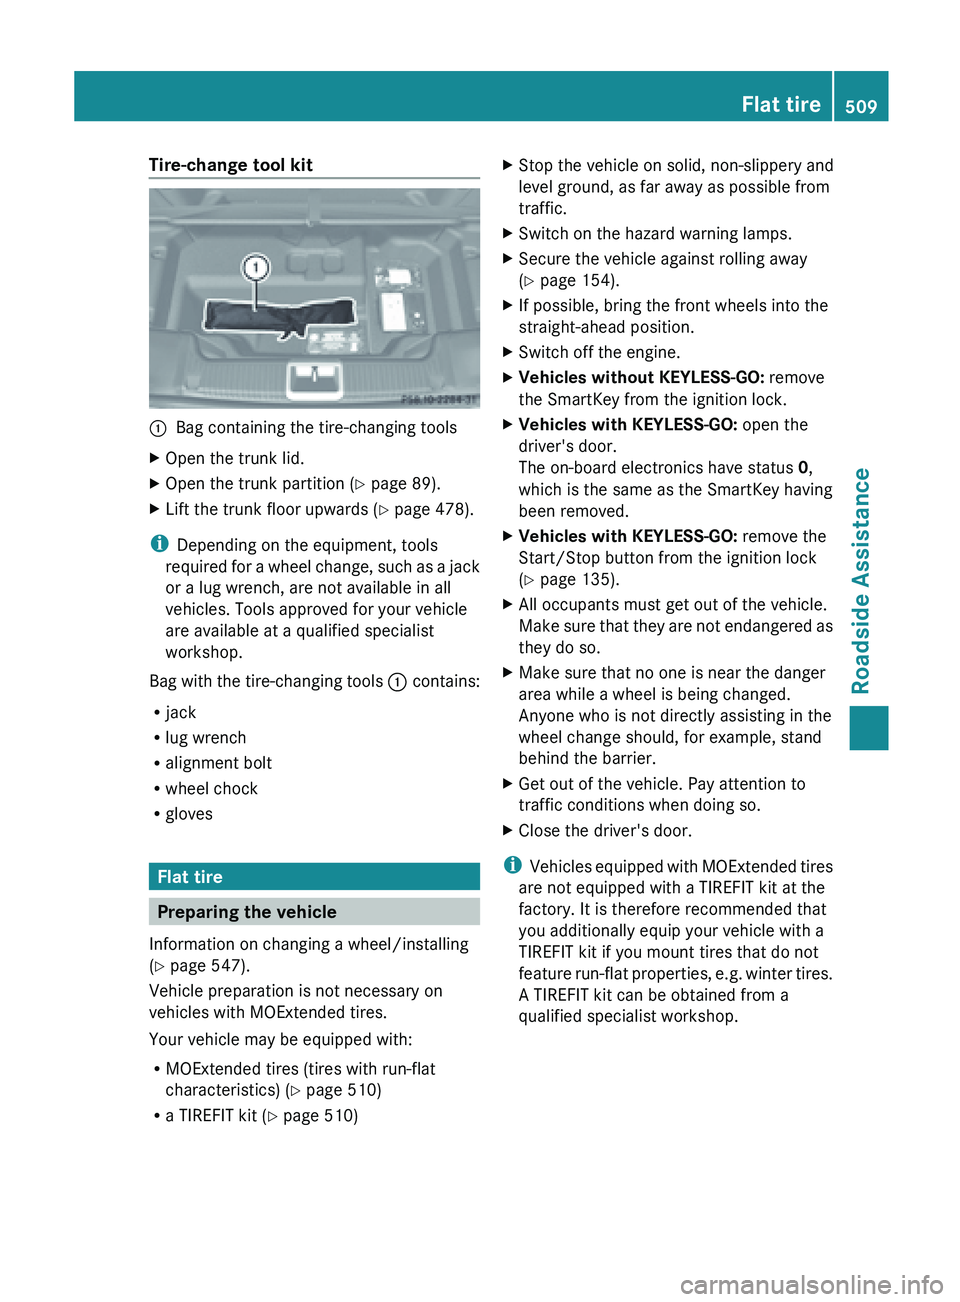
:
Bag containing the tire-changing tools
X Open the trunk lid.
X Open the trunk partition ( Y page 89).
X Lift the trunk floor upwards (Y page 478).
i Depending on the equipment, tools
required for
a wheel change, such as a jack
or a lug wrench, are not available in all
vehicles. Tools approved for your vehicle
are available at a qualified specialist
workshop.
Bag with the tire-changing tools : contains:
R jack
R lug wrench
R alignment bolt
R wheel chock
R gloves Flat tire
Preparing the vehicle
Information on changing a wheel/installing
(Y page 547).
Vehicle preparation is not necessary on
vehicles with MOExtended tires.
Your vehicle may be equipped with:
R MOExtended tires (tires with run-flat
characteristics) (Y page 510)
R a TIREFIT kit (Y page 510) X
Stop the vehicle on solid, non-slippery and
level ground, as far away as possible from
traffic.
X Switch on the hazard warning lamps.
X Secure the vehicle against rolling away
(Y page 154).
X If possible, bring the front wheels into the
straight-ahead position.
X Switch off the engine.
X Vehicles without KEYLESS-GO: remove
the SmartKey from the ignition lock.
X Vehicles with KEYLESS-GO: open the
driver's door.
The on-board electronics have status 0,
which is the same as the SmartKey having
been removed.
X Vehicles with KEYLESS-GO: remove the
Start/Stop button from the ignition lock
(Y page 135).
X All occupants must get out of the vehicle.
Make sure
that they are not endangered as
they do so.
X Make sure that no one is near the danger
area while a wheel is being changed.
Anyone who is not directly assisting in the
wheel change should, for example, stand
behind the barrier.
X Get out of the vehicle. Pay attention to
traffic conditions when doing so.
X Close the driver's door.
i Vehicles equipped
with MOExtended tires
are not equipped with a TIREFIT kit at the
factory. It is therefore recommended that
you additionally equip your vehicle with a
TIREFIT kit if you mount tires that do not
feature run-flat properties, e.g. winter tires.
A TIREFIT kit can be obtained from a
qualified specialist workshop. Flat tire
509
Roadside Assistance
Page 514 of 572

Observe the notes on the cigarette lighter
(Y page 480). Observe the notes on
sockets (
Y page 480).
X Turn the SmartKey to position 1 in the
ignition lock (Y page 135).
X Press on/off switch = on the tire inflation
compressor to I.
The tire inflation compressor is switched
on. The tire is inflated.
i First, tire sealant is pumped into the tire.
The pressure can briefly rise to
approximately 500 kPa (5.0 bar/73 psi).
Do not switch off the tire inflation
compressor during this phase.
X Allow the tire inflation compressor to run
for five minutes. The tire should then have
attained a pressure of at least 180 kPa
(1.8 bar/26 psi).
If
a tire pressure of 180 kPa (
1.8 bar/26 psi)
has been attained after five minutes:
(Y page 512).
If a tire pressure of 180 kPa (1.8 bar/26 psi)
has not been attained after five minutes:
(Y page 512).
i If tire sealant leaks out, allow it to dry. It
can then be removed like a layer of film.
If your clothes are soiled with tire sealant,
have them cleaned with perchloroethylene
at a dry cleaner as soon as possible.
Tire pressure of at least 180 kPa
(1.8 bar/26 psi) is not reached If a pressure of 180 kPa
(
1.8 bar/26 psi) has
not been achieved after five minutes:
X Switch off the tire inflation compressor.
X Unscrew the filler hose from the valve of
the faulty tire.
X Very slowly drive forwards or reverse
approximately 30 ft
(10 m).
X Pump up the tire again.
After a maximum of five minutes the tire
pressure must
be at least 180 kPa (1.8 bar/
26 psi). G
WARNING
If the required tire pressure is not reached
after the specified time, the tire is too badly
damaged. The tire sealant cannot repair the
tire in
this instance. Damaged tires and a tire
pressure that is too low can significantly
impair the vehicle's braking and driving
characteristics. There is a risk of accident.
Do not continue driving. Contact a qualified
specialist workshop.
Tire pressure of 180 kPa (1.8 bar/
26 psi) is reached G
WARNING
A tire temporarily sealed with tire sealant
impairs the driving characteristics and is not
suitable for higher speeds. There is a risk of
accident.
You should therefore adapt your driving style
accordingly and
drive carefully. Do not exceed
the specified maximum speed with a tire that
has been repaired using tire sealant.
! Residue from the tire sealant may come
out of the filler hose after use. This could
cause stains.
Therefore, place the filler hose in the plastic
bag which contained the TIREFIT kit. H
Environmental note
Have the used tire sealant bottle disposed of
professionally, e.g. at a qualified specialist
workshop.
X Switch off the tire inflation compressor.
X Unscrew the filler hose from the valve of
the faulty tire.
X Stow the tire sealant bottle and the tire
inflation compressor.
X Pull away immediately.
The maximum speed for a tire sealed with
tire sealant
is 50 mph (80 km/h). The "max.
80 km/h" sticker must be affixed to the 512
Flat tire
Roadside Assistance
Page 515 of 572
instrument cluster within the driver's field
of vision.
X Stop after driving for approximately ten
minutes and check the tire pressure with
the tire inflation compressor.
The tire pressure must now be at least
130 kPa (1.3 bar/19 psi). G
WARNING
If the required tire pressure is not reached
after driving for a short period, the tire is too
badly damaged.
The tire sealant cannot repair
the tire in this instance. Damaged tires and a
tire pressure that is too low can significantly
impair the vehicle's braking and driving
characteristics. There is a risk of accident.
Do not continue driving. Contact a qualified
specialist workshop.
X Correct the tire pressure if it is still at least
130 kPa (1.3 bar/19 psi) (for the values,
see the Tire and Loading Information
placard on the driver's side B-pillar or tire
pressure table on the fuel filler flap).
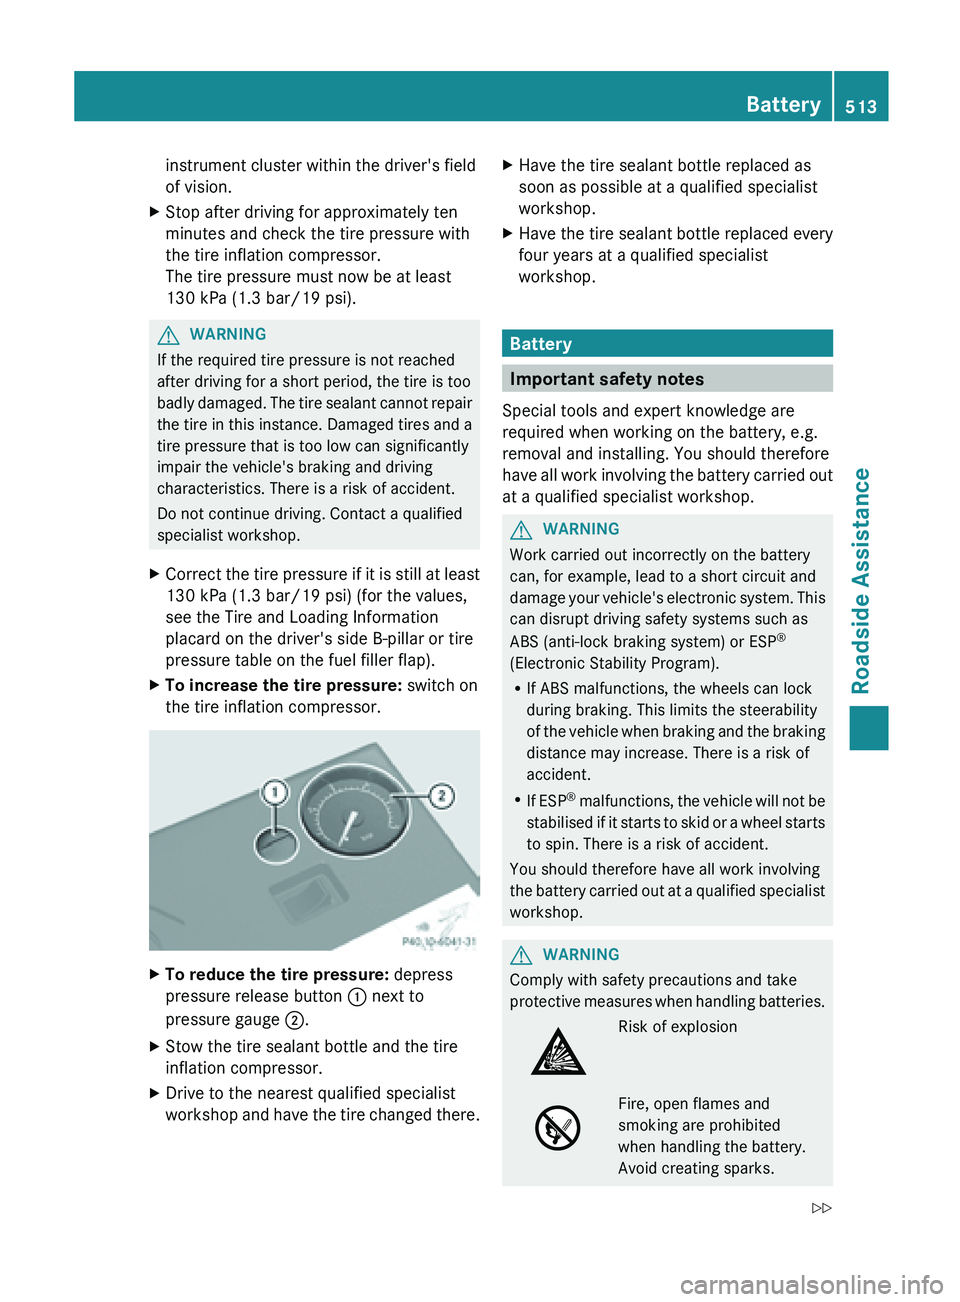
X To increase the tire pressure: switch on
the tire inflation compressor. X
To reduce the tire pressure: depress
pressure release button : next to
pressure gauge ;.
X Stow the tire sealant bottle and the tire
inflation compressor.
X Drive to the nearest qualified specialist
workshop and
have the tire changed there. X
Have the tire sealant bottle replaced as
soon as possible at a qualified specialist
workshop.
X Have the tire sealant bottle replaced every
four years at a qualified specialist
workshop. Battery
Important safety notes
Special tools and expert knowledge are
required when working on the battery, e.g.
removal and installing. You should therefore
have all
work involving the battery carried out
at a qualified specialist workshop. G
WARNING
Work carried out incorrectly on the battery
can, for example, lead to a short circuit and
damage your
vehicle's electronic system. This
can disrupt driving safety systems such as
ABS (anti-lock braking system) or ESP ®
(Electronic Stability Program).
R If ABS malfunctions, the wheels can lock
during braking. This limits the steerability
of the vehicle when braking and the braking
distance may increase. There is a risk of
accident.
R If ESP ®
malfunctions, the vehicle will not be
stabilised if it starts to skid or a wheel starts
to spin. There is a risk of accident.
You should therefore have all work involving
the battery carried out at a qualified specialist
workshop. G
WARNING
Comply with safety precautions and take
protective measures
when handling batteries. Risk of explosion
Fire, open flames and
smoking are prohibited
when handling the battery.
Avoid creating sparks. Battery
513
Roadside Assistance
Z
Page 517 of 572

clamp. Never swap the terminal clamps.
Otherwise, the vehicle's electronic
system may be damaged.
R in vehicles with automatic transmission,
the transmission is locked in position P
after disconnecting the battery. The
vehicle is secured against rolling away.
You can
then no longer move the vehicle.
The battery and the cover of the positive
terminal clamp must be installed securely
during operation.
In order for the battery to achieve the
maximum possible service life, it must always
be sufficiently charged.
The vehicle battery, like other batteries, can
discharge over time if you do not use the
vehicle. In this case, have the battery
disconnected at a qualified specialist
workshop. You can also charge the battery
with a charger recommended by Mercedes-
Benz. Contact a qualified specialist workshop
for further information.
Have the battery charge level checked more
frequently if you use the vehicle mainly for
short trips or if you leave it standing idle for
a lengthy period. Consult a qualified specialist
workshop if you wish to leave your vehicle
parked up for a long period of time.
Only replace a battery with a battery that has
been recommended by Mercedes-Benz.
i Remove the SmartKey if you park the
vehicle and do not require any electrical
consumers. The vehicle will then use very
little energy, thus conserving battery
power.
i After an interruption to the power supply,
e.g. due to a discharged battery, you must
reset the clock (Y page 289). Charging the battery
G
WARNING
Never charge a battery still installed in the
vehicle unless
a battery charger unit approved by Mercedes-Benz is being used. Gases may
escape
during
charging and cause explosions
that may result in paint damage, corrosion or
personal injury.
A battery charger unit specially adapted for
Mercedes-Benz vehicles and tested and
approved by Mercedes-Benz is available as an
accessory. It permits the charging of the
battery in its installed position. Contact an
authorized Mercedes-Benz Center for further
information and availability.
Charge the battery in accordance with the
separate instructions for the battery charger. G
WARNING
There is a risk of acid burns during the
charging process due to the gases which
escape from
the battery. Do not lean over the
battery during the charging process. G
WARNING
Battery acid is caustic. Avoid contact with the
skin, eyes or clothing.
! Only use battery chargers with a
maximum charging voltage of 14.8 V.
! Only charge the battery using the jump-
starting connection point.
The jump-starting connection point is in the
engine compartment.
Read the battery charger's operating
instructions before charging the battery.
X Open the hood (Y page 496).
X Connect the battery charger to the positive
terminal and ground point in the same
order as when connecting the donor
battery in the jump-starting procedure
(Y page 516). Battery
515
Roadside Assistance Z