2013 MERCEDES-BENZ SL-CLASS ROADSTER lock
[x] Cancel search: lockPage 207 of 572

Displays and operation
Instrument cluster
Instrument cluster: miles
:
Speedometer with segments ( Y page 206)
; Fuel gauge
= Tachometer (Y page 206)
? Coolant temperature ( Y page 205)
A Multifunction display ( Y page 208)
B Instrument cluster lighting (Y page 205) Instrument lighting
The lighting in the instrument cluster, in the
displays and the controls in the vehicle
interior can
be adjusted using the brightness
control knob.
The brightness control knob is on the bottom
left of the instrument cluster ( Y page 205).
X Turn the brightness control knob counter-
clockwise or clockwise.
If the light switch is set to Ã, T or
L, the brightness is dependent upon
the brightness of the ambient light.
i The light
sensor in the instrument cluster
automatically controls the brightness of
the multifunction display. In daylight, the displays in the instrument
cluster are not lit. Coolant temperature display
G
WARNING
Driving when your engine is overheated can
cause some
fluids which may have leaked into
the engine compartment to catch fire. You
could be seriously burned.
Steam from an overheated engine can cause
serious burns which can occur just by opening
the engine hood. Stay away from the engine
if you see or hear steam coming from it.
Stop the vehicle in a safe location away from
other traffic. Turn off the engine, get out of the Displays and operation
205
On-board computer and displays
Z
Page 208 of 572

vehicle and do not stand near the vehicle until
the engine has cooled down.
! A display
message is shown if the coolant
temperature is too high.
If the coolant temperature is over
248 ‡(120 †), do not continue driving. The
engine will otherwise be damaged.
The coolant temperature gauge is in the
instrument cluster on the right-hand side
(Y page 205).
Under normal operating conditions and with
the specified coolant level, the coolant
temperature may rise to 248 ‡ (120 †). Tachometer
! Do not drive in the overrevving range, as
this could damage the engine.
The red
band in the tachometer indicates the
engine's overrevving range.
The fuel supply is interrupted to protect the
engine when the red band is reached. Outside temperature display
G
WARNING
The outside temperature indicator is not
designed to serve as an ice-warning device
and is therefore unsuitable for that purpose.
Indicated temperatures just above the
freezing point
do not guarantee that the road
surface is free of ice. The road may still be icy,
especially in wooded areas or on bridges.
The outside temperature display is in the
multifunction display ( Y page 208).
Changes in the outside temperature are
displayed after a short delay. Speedometer with segments
The segments in the speedometer indicate
which speed range is available.
R Cruise control activated ( Y
page 162):
The segments light up from the stored
speed to the maximum speed.
R DISTRONIC PLUS activated (Y page 164):
One or two segments in the set speed
range light up.
R DISTRONIC PLUS
detects a vehicle in front:
The segments between the speed of the
vehicle in front and the stored speed light
up. Operating the on-board computer
Overview :
Multifunction display
; To switch on the Voice Control System;
see the separate operating instructions
= Right control panel
? Left control panel
A Back button
X To
activate the on-board computer:
turn
the SmartKey to position 1
in the ignition
lock. 206
Displays and operation
On-board computer and displays
Page 219 of 572
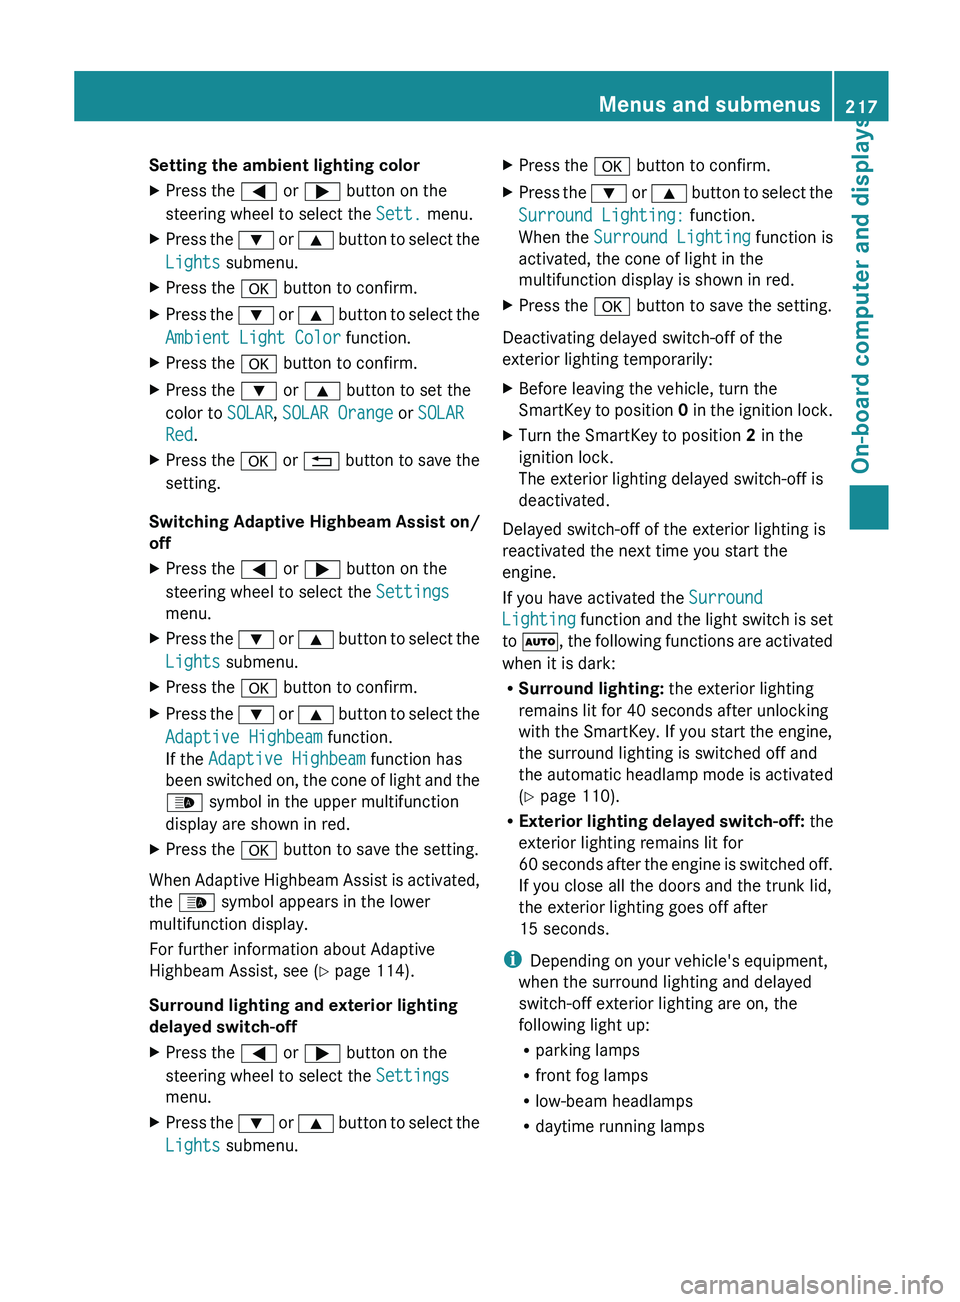
Setting the ambient lighting color
X
Press the = or ; button on the
steering wheel to select the Sett. menu.
X Press the : or 9 button to select the
Lights submenu.
X Press the a button to confirm.
X Press the : or 9
button to select the
Ambient Light Color function.
X Press the a button to confirm.
X Press the : or 9 button to set the
color to SOLAR, SOLAR Orange or SOLAR
Red.
X Press the a or % button
to save the
setting.
Switching Adaptive Highbeam Assist on/
off
X Press the = or ; button on the
steering wheel to select the Settings
menu.
X Press the : or 9
button to select the
Lights submenu.
X Press the a button to confirm.
X Press the :
or 9
button to select the
Adaptive Highbeam function.
If the Adaptive Highbeam function has
been switched on, the cone of light and the
_ symbol in the upper multifunction
display are shown in red.
X Press the a button to save the setting.
When Adaptive Highbeam Assist is activated,
the _ symbol appears in the lower
multifunction display.
For further information about Adaptive
Highbeam Assist, see ( Y page 114).
Surround lighting and exterior lighting
delayed switch-off
X Press the = or ; button on the
steering wheel to select the Settings
menu.
X Press the :
or 9
button to select the
Lights submenu. X
Press the a button to confirm.
X Press the :
or 9
button to select the
Surround Lighting: function.
When the Surround Lighting function is
activated, the cone of light in the
multifunction display is shown in red.
X Press the a button to save the setting.
Deactivating delayed switch-off of the
exterior lighting temporarily:
X Before leaving the vehicle, turn the
SmartKey to
position 0 in the ignition lock.
X Turn the SmartKey to position 2 in the
ignition lock.
The exterior lighting delayed switch-off is
deactivated.
Delayed switch-off of the exterior lighting is
reactivated the next time you start the
engine.
If you have activated the Surround
Lighting function
and the light switch is set
to Ã, the following functions are activated
when it is dark:
R Surround lighting: the exterior lighting
remains lit for 40 seconds after unlocking
with the SmartKey. If you start the engine,
the surround lighting is switched off and
the automatic headlamp mode is activated
(Y page 110).
R Exterior lighting delayed switch-off: the
exterior lighting remains lit for
60 seconds after the engine is switched off.
If you close all the doors and the trunk lid,
the exterior lighting goes off after
15 seconds.
i Depending on your vehicle's equipment,
when the surround lighting and delayed
switch-off exterior lighting are on, the
following light up:
R parking lamps
R front fog lamps
R low-beam headlamps
R daytime running lamps Menus and submenus
217
On-board computer and displays Z
Page 220 of 572

R
side marker lamps
R surround lighting in the exterior mirrors
Activating/deactivating the interior
lighting delayed switch-off
If you activate the Interior Lighting
Delay function, the interior lighting remains
on for 20seconds after you remove the
SmartKey from the ignition lock.
X Press the = or ; button on the
steering wheel to select the Settings
menu.
X Press the : or 9 button to select the
Lights submenu.
X Press the a button to confirm.
X Press : or 9 to select the
Interior Lighting Delay function.
When the Interior Lighting Delay
function is
activated, the vehicle interior is
displayed in red in the multifunction
display.
X Press the a button to save the setting.
Vehicle submenu Activating/deactivating the automatic
door locking mechanism
X
Press the = or ; button on the
steering wheel to select the Settings
menu.
X Press the : or 9
button to select the
Vehicle submenu.
X Press the a button to confirm.
X Press : or 9 to select the
Automatic Door Lock function.
When the Automatic
Door Lock function
is activated, the vehicle doors are displayed
in red in the multifunction display.
X Press the a button to save the setting.
If you activate the Automatic Door Lock
function, the
vehicle is centrally locked above
a speed of around 9 mph (15 km/h).
For further information on the automatic
locking feature, see ( Y page 76). Activating/deactivating the acoustic
locking verification signal
If
you
switch on the Acoustic Lock function,
an acoustic signal sounds when you lock the
vehicle.
X Press the = or ; button on the
steering wheel to select the Settings
menu.
X Press the : or 9
button to select the
Vehicle submenu.
X Press the a button to confirm.
X Press the :
or 9
button to select the
Acoustic Lock function.
If the Acoustic Lock function is activated,
the & symbol in the multifunction
display lights up red.
X Press the a button to save the setting.
Activating/deactivating the radar sensor
system
X Press the = or ; button on the
steering wheel to select the Sett. menu.
X Press the : or 9
button to select the
Vehicle submenu.
X Press the a button to confirm.
X Press the 9 or : button to select
Radar Sensor (See Oper. Manual).
You will see the selected setting: On or
Off.
X Press the a button to save the setting.
The following systems are switched off when
the radar sensor system is deactivated:
R DISTRONIC PLUS (Y page 164)
R BAS PLUS (
Y page 58)
R PRE-SAFE ®
Brake (Y page 63)
R Active Blind Spot Assist (Y page 195)
i USA only: This device has been approved
by the FCC as a "Vehicular Radar System".
The radar sensor is intended for use in an
automotive radar system only. Removal,
tampering, or altering of the device will void
any warranties, and is not permitted by the 218
Menus and submenus
On-board computer and displays
Page 221 of 572
FCC. Do not tamper with, alter, or use in
any non-approved way.
Any unauthorized modification to this
device could void the user’s authority to
operate the equipment.
i Canada only:
This device complies with the RSS-210
Rules of Industry Canada. Operation is
subject to the following two conditions:
1. This device may not cause harmful
interference, and
2. this
device must accept any interference
received, including interference that may
cause undesired operation of the device.
Any unauthorized modification to this
device could void the user’s authority to
operate the equipment.
Convenience submenu Activating/deactivating the EASY-
ENTRY/EXIT feature
G
WARNING
You must make sure no one can become
trapped or injured by the moving steering
wheel when the easy-entry/exit feature is
activated.
To stop steering wheel movement, move
steering wheel
adjustment lever or press one
of the memory position buttons.
Do not leave children unattended in the
vehicle, or with access to an unlocked vehicle.
Children could open the driver's door and
unintentionally activate the easy-entry/exit
feature, which could result in an accident
and/or serious personal injury.
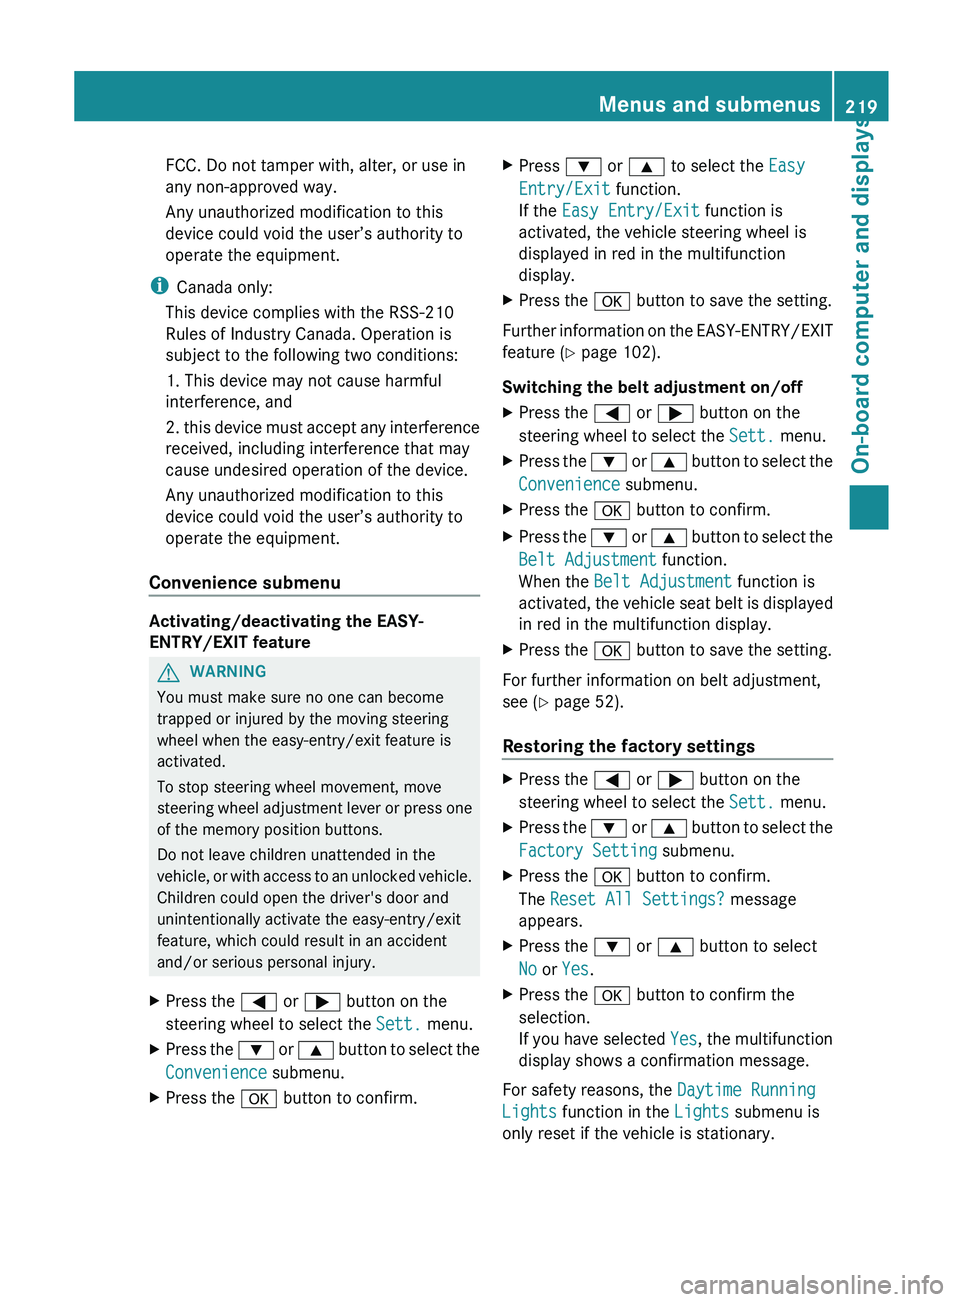
X Press the = or ; button on the
steering wheel to select the Sett. menu.
X Press the :
or 9
button to select the
Convenience submenu.
X Press the a button to confirm. X
Press : or 9 to select the Easy
Entry/Exit function.
If the Easy Entry/Exit function is
activated, the vehicle steering wheel is
displayed in red in the multifunction
display.
X Press the a button to save the setting.
Further information on the EASY-ENTRY/EXIT
feature ( Y page 102).
Switching the belt adjustment on/off
X Press the = or ; button on the
steering wheel to select the Sett. menu.
X Press the : or 9
button to select the
Convenience submenu.
X Press the a button to confirm.
X Press the :
or 9
button to select the
Belt Adjustment function.
When the Belt Adjustment function is
activated, the vehicle seat belt is displayed
in red in the multifunction display.
X Press the a button to save the setting.
For further information on belt adjustment,
see ( Y page 52).
Restoring the factory settings X
Press the = or ; button on the
steering wheel to select the Sett. menu.
X Press the : or 9
button to select the
Factory Setting submenu.
X Press the a button to confirm.
The Reset All Settings? message
appears.
X Press the : or 9 button to select
No or Yes.
X Press the a button to confirm the
selection.
If you
have selected Yes, the multifunction
display shows a confirmation message.
For safety reasons, the Daytime Running
Lights function in the Lights submenu is
only reset if the vehicle is stationary. Menus and submenus
219
On-board computer and displays Z
Page 222 of 572
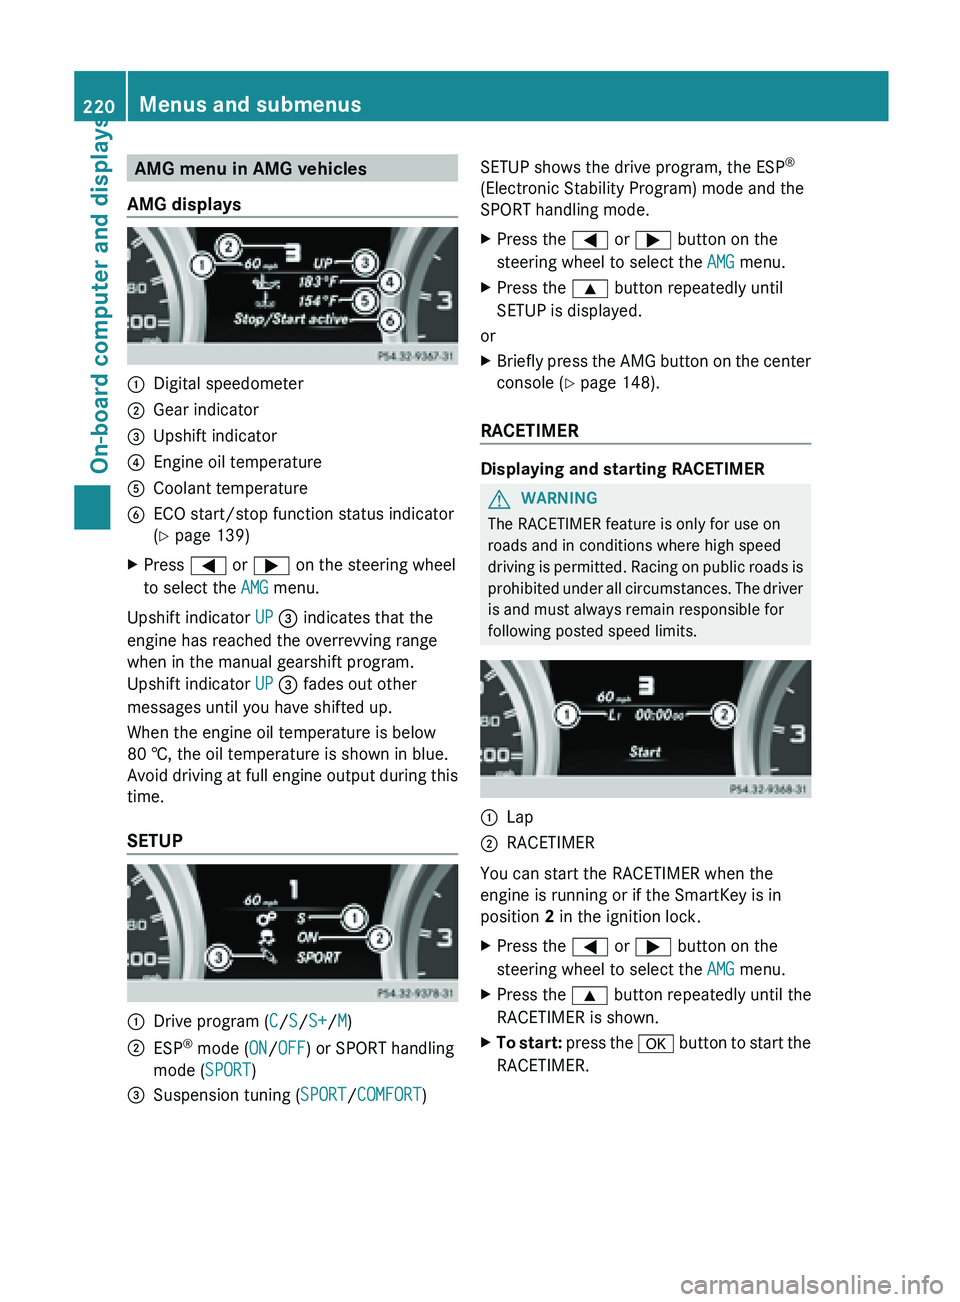
AMG menu in AMG vehicles
AMG displays :
Digital speedometer
; Gear indicator
= Upshift indicator
? Engine oil temperature
A Coolant temperature
B ECO start/stop function status indicator
( Y page 139)
X Press = or ; on the steering wheel
to select the AMG menu.
Upshift indicator UP = indicates that the
engine has reached the overrevving range
when in the manual gearshift program.
Upshift indicator UP = fades out other
messages until you have shifted up.
When the engine oil temperature is below
80 †, the oil temperature is shown in blue.
Avoid driving
at full engine output during this
time.
SETUP :
Drive program (
C/S/S+/M)
; ESP ®
mode ( ON/OFF) or SPORT handling
mode ( SPORT)
= Suspension tuning (SPORT/COMFORT) SETUP shows the drive program, the ESP
®
(Electronic Stability Program) mode and the
SPORT handling mode.
X Press the = or ; button on the
steering wheel to select the AMG menu.
X Press the 9 button repeatedly until
SETUP is displayed.
or
X Briefly press the AMG button on the center
console (Y page 148).
RACETIMER Displaying and starting RACETIMER
G
WARNING
The RACETIMER feature is only for use on
roads and in conditions where high speed
driving is
permitted. Racing on public roads is
prohibited under all circumstances. The driver
is and must always remain responsible for
following posted speed limits. :
Lap
; RACETIMER
You can start the RACETIMER when the
engine is running or if the SmartKey is in
position
2 in the ignition lock.
X Press the = or ; button on the
steering wheel to select the AMG menu.
X Press the 9 button repeatedly until the
RACETIMER is shown.
X To start: press the a
button to start the
RACETIMER. 220
Menus and submenus
On-board computer and displays
Page 223 of 572
Displaying the intermediate time
X
Press = or ; to select Interm.
Time.
X Press the a button to confirm.
The intermediate time is displayed for five
seconds.
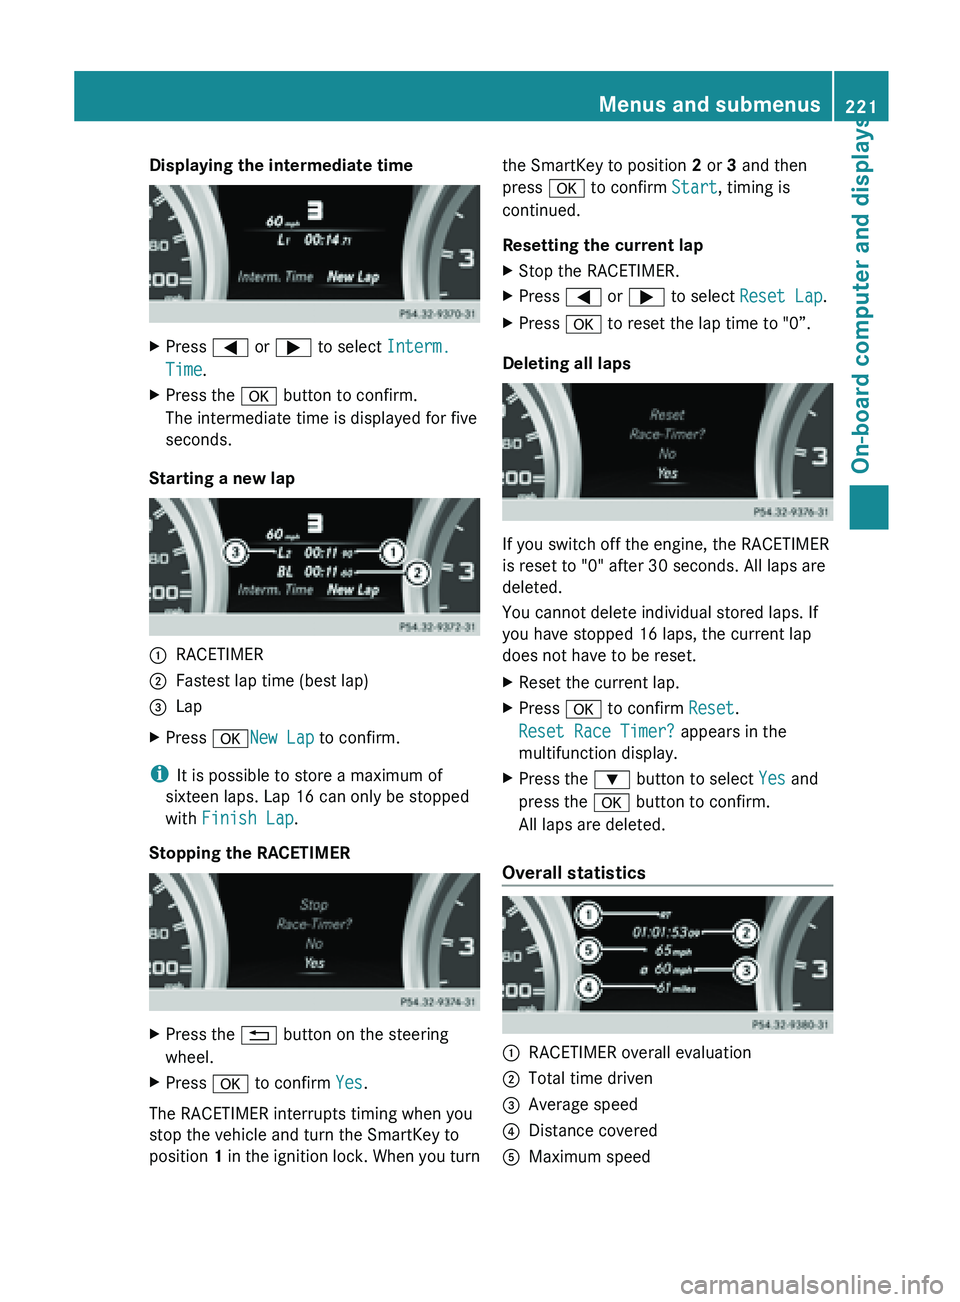
Starting a new lap :
RACETIMER
; Fastest lap time (best lap)
= Lap
X Press aNew Lap to confirm.
i It is possible to store a maximum of
sixteen laps. Lap 16 can only be stopped
with Finish Lap.
Stopping the RACETIMER X
Press the % button on the steering
wheel.
X Press a to confirm Yes.
The RACETIMER interrupts timing when you
stop the vehicle and turn the SmartKey to
position 1 in
the ignition lock. When you turn the SmartKey to position
2 or 3 and then
press a to confirm Start, timing is
continued.
Resetting the current lap
X Stop the RACETIMER.
X Press = or ; to select Reset Lap.
X Press a to reset the lap time to "0”.
Deleting all laps If you switch off the engine, the RACETIMER
is reset to "0" after 30 seconds. All laps are
deleted.
You cannot delete individual stored laps. If
you have stopped 16 laps, the current lap
does not have to be reset.
X
Reset the current lap.
X Press a to confirm Reset.
Reset Race Timer? appears in the
multifunction display.
X Press the : button to select Yes and
press the a button to confirm.
All laps are deleted.
Overall statistics :
RACETIMER overall evaluation
; Total time driven
= Average speed
? Distance covered
A Maximum speed Menus and submenus
221
On-board computer and displays Z
Page 226 of 572
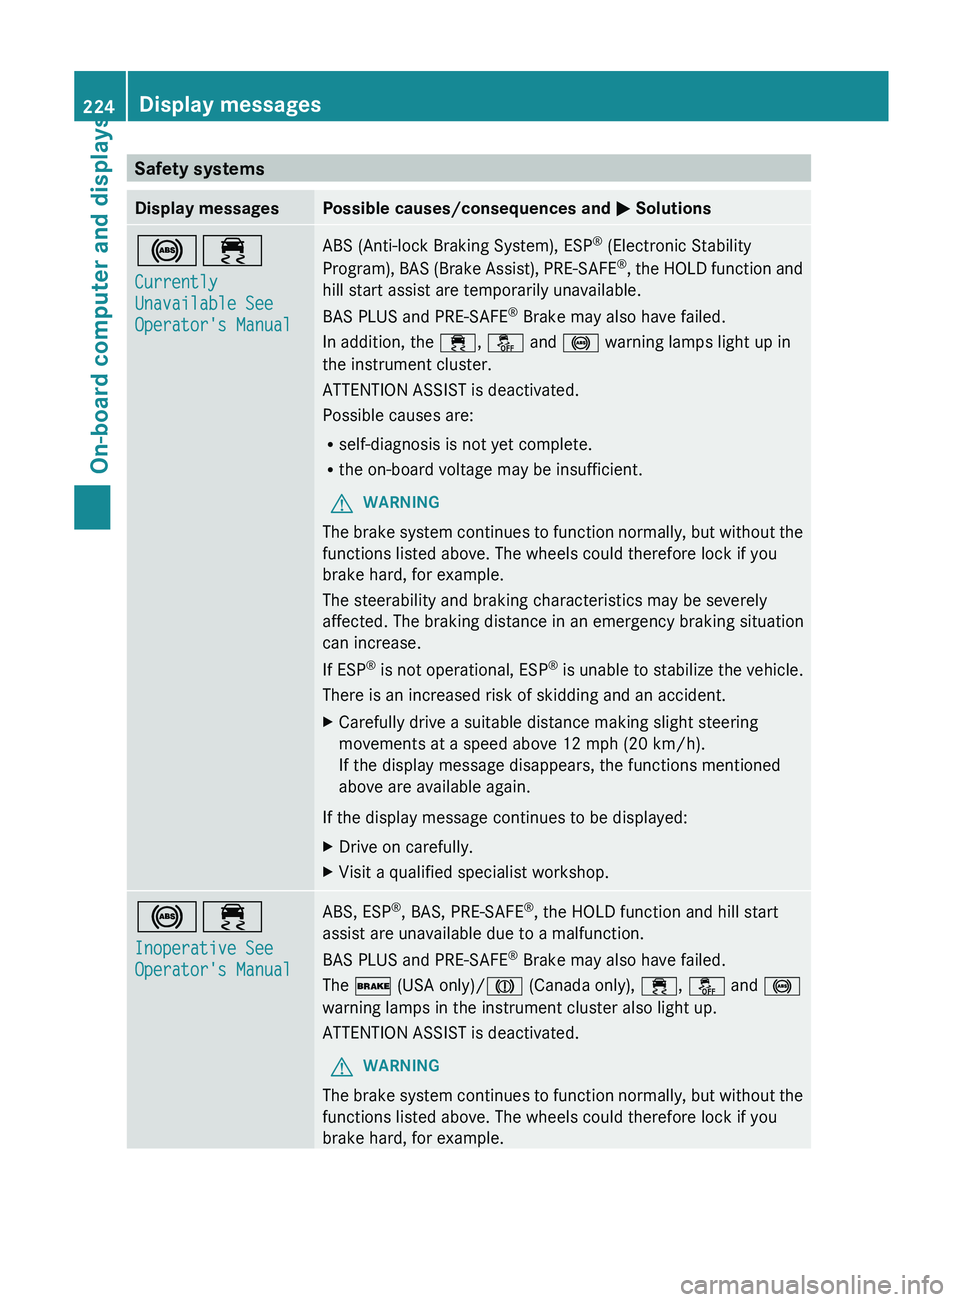
Safety systems
Display messages Possible causes/consequences and
M Solutions
!÷
Currently
Unavailable See
Operator's Manual ABS (Anti-lock Braking System), ESP
®
(Electronic Stability
Program), BAS
(Brake Assist), PRE-SAFE ®
, the HOLD function and
hill start assist are temporarily unavailable.
BAS PLUS and PRE-SAFE ®
Brake may also have failed.
In addition, the ÷, å and ! warning lamps light up in
the instrument cluster.
ATTENTION ASSIST is deactivated.
Possible causes are:
R self-diagnosis is not yet complete.
R the on-board voltage may be insufficient.
G WARNING
The brake system continues to function normally, but without the
functions listed above. The wheels could therefore lock if you
brake hard, for example.
The steerability and braking characteristics may be severely
affected. The braking distance in an emergency braking situation
can increase.
If ESP ®
is
not operational, ESP ®
is unable to stabilize the vehicle.
There is an increased risk of skidding and an accident.
X Carefully drive a suitable distance making slight steering
movements at a speed above 12 mph (20 km/h).
If the display message disappears, the functions mentioned
above are available again.
If the display message continues to be displayed:
X Drive on carefully.
X Visit a qualified specialist workshop. !÷
Inoperative See
Operator's Manual ABS, ESP
®
, BAS, PRE-SAFE ®
, the HOLD function and hill start
assist are unavailable due to a malfunction.
BAS PLUS and PRE-SAFE ®
Brake may also have failed.
The
$ (USA only)/J (Canada only),
÷, å and !
warning lamps in the instrument cluster also light up.
ATTENTION ASSIST is deactivated.
G WARNING
The brake system continues to function normally, but without the
functions listed above. The wheels could therefore lock if you
brake hard, for example. 224
Display messages
On-board computer and displays