2013 MERCEDES-BENZ SL-CLASS ROADSTER audio
[x] Cancel search: audioPage 460 of 572
X
Select the Back (to movie) menu item in
the menu and press W to confirm.
Setting the language and audio format This function is not available on all DVDs. If it
is available, you can set the DVD menu
language, the audio language or the audio
format.
The
number of settings is determined
by the DVD content. It is possible that the
settings may also be accessed in the DVD
menu (Y page 457).
X Show the DVD menu (Y page 457).
X In full-screen mode, press W the
COMAND
controller to show the menu.
X Select DVD-Video in the menu by turning
cVd the COMAND controller and press
W to confirm.
X Select DVD Functions and press W to
confirm.
X Select Menu Language or Audio
Language and press W to confirm.
In both cases, a menu appears after a few
seconds. The # dot in front of an entry
indicates the currently selected language.
X Select a setting by turning cVd the
COMAND controller and press W to
confirm.
Subtitles and camera angle These functions are not available on all DVDs.
The
number
of subtitle languages and camera
angles available depends on the content of
the DVD. It is possible that the settings may
also be accessed in the DVD menu
(Y page 457).
X Activate the DVD menu (Y page 457).
X Select DVD-Video in the menu by turning
cVd the COMAND controller and press
W to confirm.
X Select DVD Functions and press W to
confirm. X
Select Subtitles or Camera Angle and
press W to confirm.
In both
cases, a menu appears. The # dot
in front of an entry indicates the current
setting.
X Select a setting by turning cVd the
COMAND controller and press W to
confirm.
Interactive content DVDs can contain interactive content (e.g. a
video game). In a video game, for example,
you may be able to influence events by
selecting
and
triggering actions. The type and
number of actions depend on the DVD.
X Select an action by sliding ZVÆ or XVY
the
COMAND controller and press W to
execute it.
A menu appears and the first entry,
Select, is highlighted.
X Press W the COMAND controller. AUX video mode
Connecting external video sources G
WARNING
External video sources may have different
volumes, which can mean that system
messages such
as traffic announcements and
navigation system announcements are much
louder. If necessary, please deactivate the
system messages or adjust their volume
manually.
If your vehicle is equipped with Media
Interface, you can connect an external video
source (AUX video) ( Y page 445).
The 1/8 inch audio/video jacks are in the
center console stowage compartment.
i In vehicles with a rear view camera, the
AUX video jack cannot be used for external
video sources. 458
Video
COMAND
Page 462 of 572
Data medium Supported picture
formats
CD/DVD with
picture files jpeg, jpg
USB devices (sticks,
hard drives)
SD memory card jpeg, jpg
Calling up a category list
X
Select a data medium with pictures (e.g. a
memory card):
R
In the Audio menu (Y page 411)
R In the media list ( Y page 426)
X Select Search in the basic display by
sliding VÆ and
turning cVd the COMAND
controller and press W to confirm.
The category list appears ( Y page 433).
Displaying pictures X
Select (Y page 433)Photos in the category
list
by turning cVd the COMAND controller
and press W to confirm.
A folder directory appears.
X Select a folder with photos and press W to
confirm.
The
folder displays the existing picture files
(example). X
Select a photo and press W to confirm.
The photo is displayed and the music is
stopped. Changing the picture view
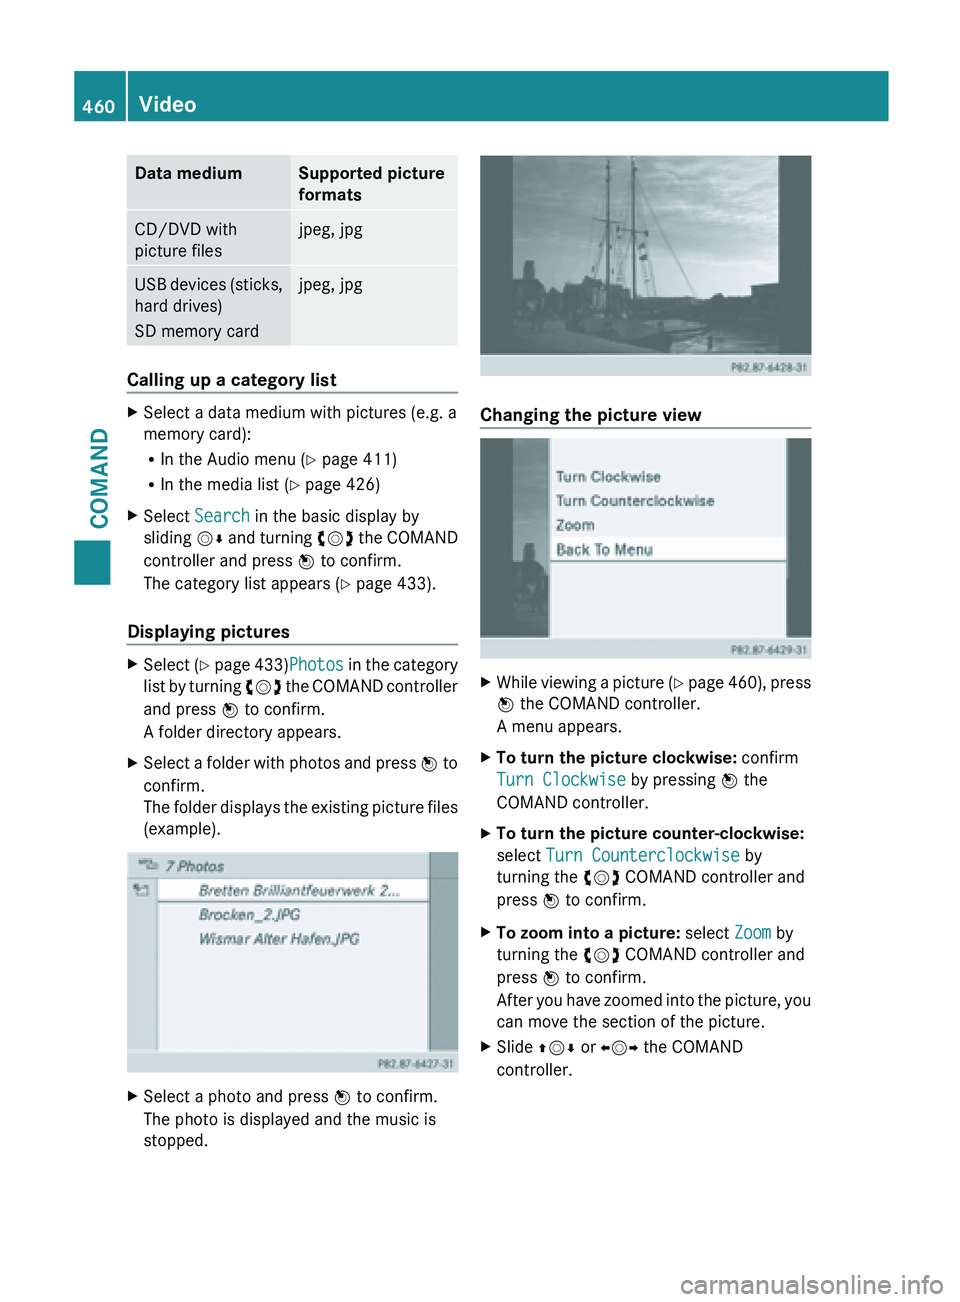
X
While viewing a picture (Y page
460), press
W the COMAND controller.
A menu appears.
X To turn the picture clockwise: confirm
Turn Clockwise by pressing W the
COMAND controller.
X To turn the picture counter-clockwise:
select Turn Counterclockwise by
turning the cVd COMAND controller and
press W to confirm.
X To zoom into a picture: select Zoom by
turning the cVd COMAND controller and
press W to confirm.
After you
have zoomed into the picture, you
can move the section of the picture.
X Slide ZVÆ or XVY the COMAND
controller. 460
Video
COMAND
Page 477 of 572
Stowage compartment/telephone
compartment under the armrest
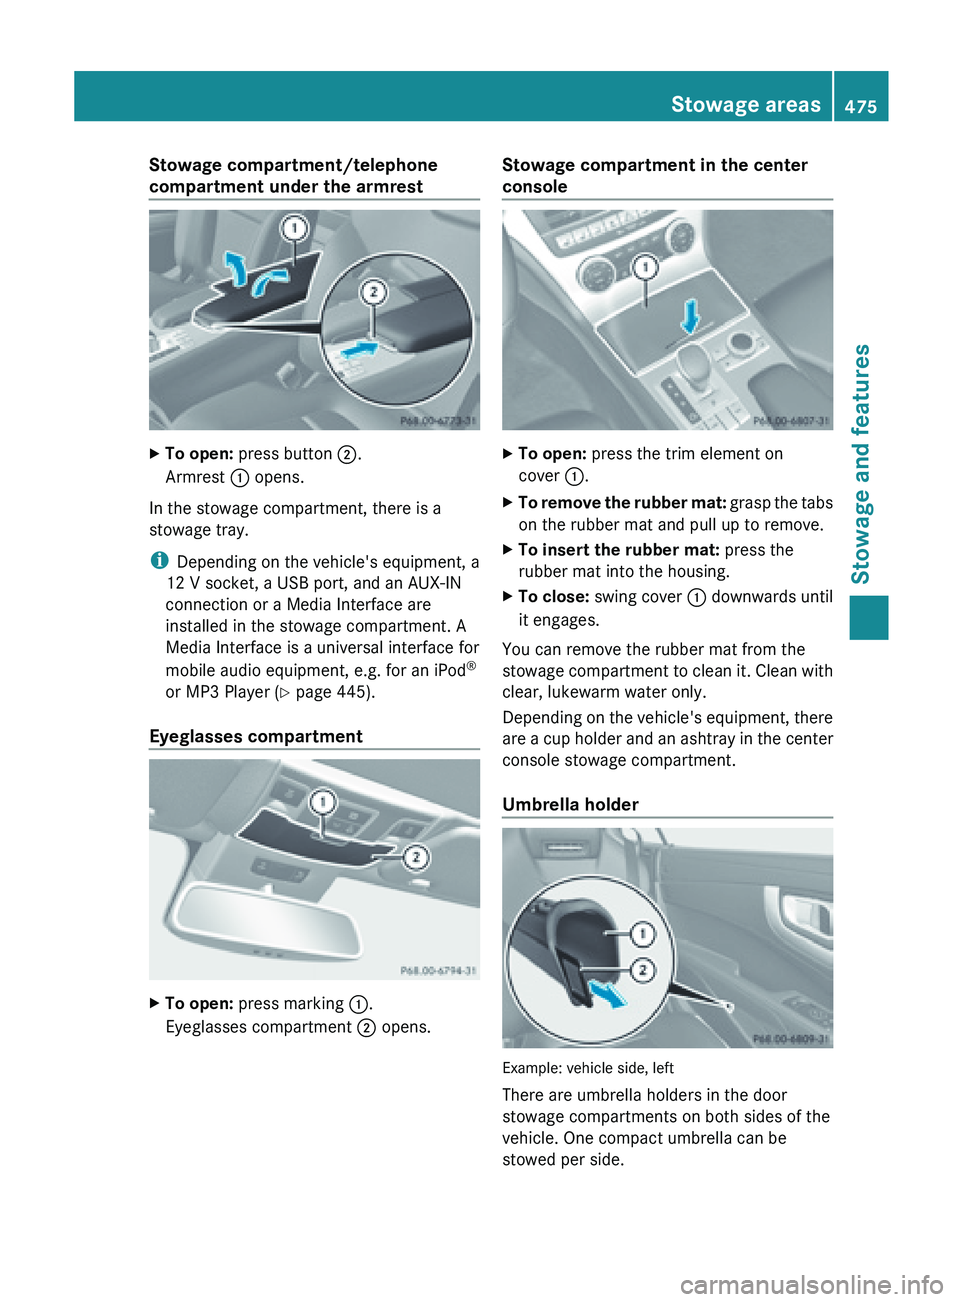
X
To open: press button ;.
Armrest : opens.
In the stowage compartment, there is a
stowage tray.
i Depending on the vehicle's equipment, a
12 V socket, a USB port, and an AUX-IN
connection or a Media Interface are
installed in the stowage compartment. A
Media Interface is a universal interface for
mobile audio equipment, e.g. for an iPod ®
or MP3 Player (
Y
page 445).
Eyeglasses compartment X
To open: press marking :.
Eyeglasses compartment ; opens. Stowage compartment in the center
console
X
To open: press the trim element on
cover :.
X To remove the rubber mat:
grasp the tabs
on the rubber mat and pull up to remove.
X To insert the rubber mat: press the
rubber mat into the housing.
X To close: swing cover : downwards until
it engages.
You can remove the rubber mat from the
stowage compartment
to clean it. Clean with
clear, lukewarm water only.
Depending on the vehicle's equipment, there
are a cup holder and an ashtray in the center
console stowage compartment.
Umbrella holder Example: vehicle side, left
There are umbrella holders in the door
stowage compartments on both sides of the
vehicle. One compact umbrella can be
stowed per side. Stowage areas
475
Stowage and features Z
Page 489 of 572
Emergency call
Important safety notes
G
WARNING
If the indicator lamp in the SOS button is
flashing continuously and no voice
connection with the Response center has
been established, then the mbrace system
has not
been able to initiate an emergency call
(e.g. the relevant mobile phone network is not
available).
The Call Failed message is displayed in the
multifunction display and must be confirmed.
Should this occur, assistance must be
summoned by other means.
An emergency call is dialed automatically if
an air bag or Emergency Tensioning Device is
triggered.
i You cannot end an automatically
triggered emergency call yourself.
An emergency call can also be initiated
manually.
As soon as the emergency call has been
initiated, the indicator lamp in the SOS button
flashes. The Connecting Call message
appears on the multifunction display.
The audio output is muted.
Once the connection has been made, the
Call Connected message appears in the
multifunction display.
All important information on the emergency
is transmitted, for example:
R current location of the vehicle (as
determined by the GPS system)
R vehicle identification number
R information on serious accidents
Shortly after the emergency call has been
initiated, a voice connection is automatically
established between the Mercedes-Benz
Customer Assistance Center and the vehicle
occupants. If the vehicle occupants respond,
the Mercedes-Benz Customer Assistance
Center attempts to get more information on
the emergency. i
If there is no response from the vehicle
occupants, an ambulance is immediately
sent to the vehicle.
Making an emergency call G
WARNING
If you feel at any way in jeopardy when in the
vehicle (e.g. smoke or fire in the vehicle,
vehicle in a dangerous road location), please
do not wait for voice contact after you have
pressed the SOS button. Carefully leave the
vehicle and move to a safe location. The
Response Center will automatically contact
local emergency officials with the vehicle's
approximate location if they receive an
automatic SOS
signal and cannot make voice
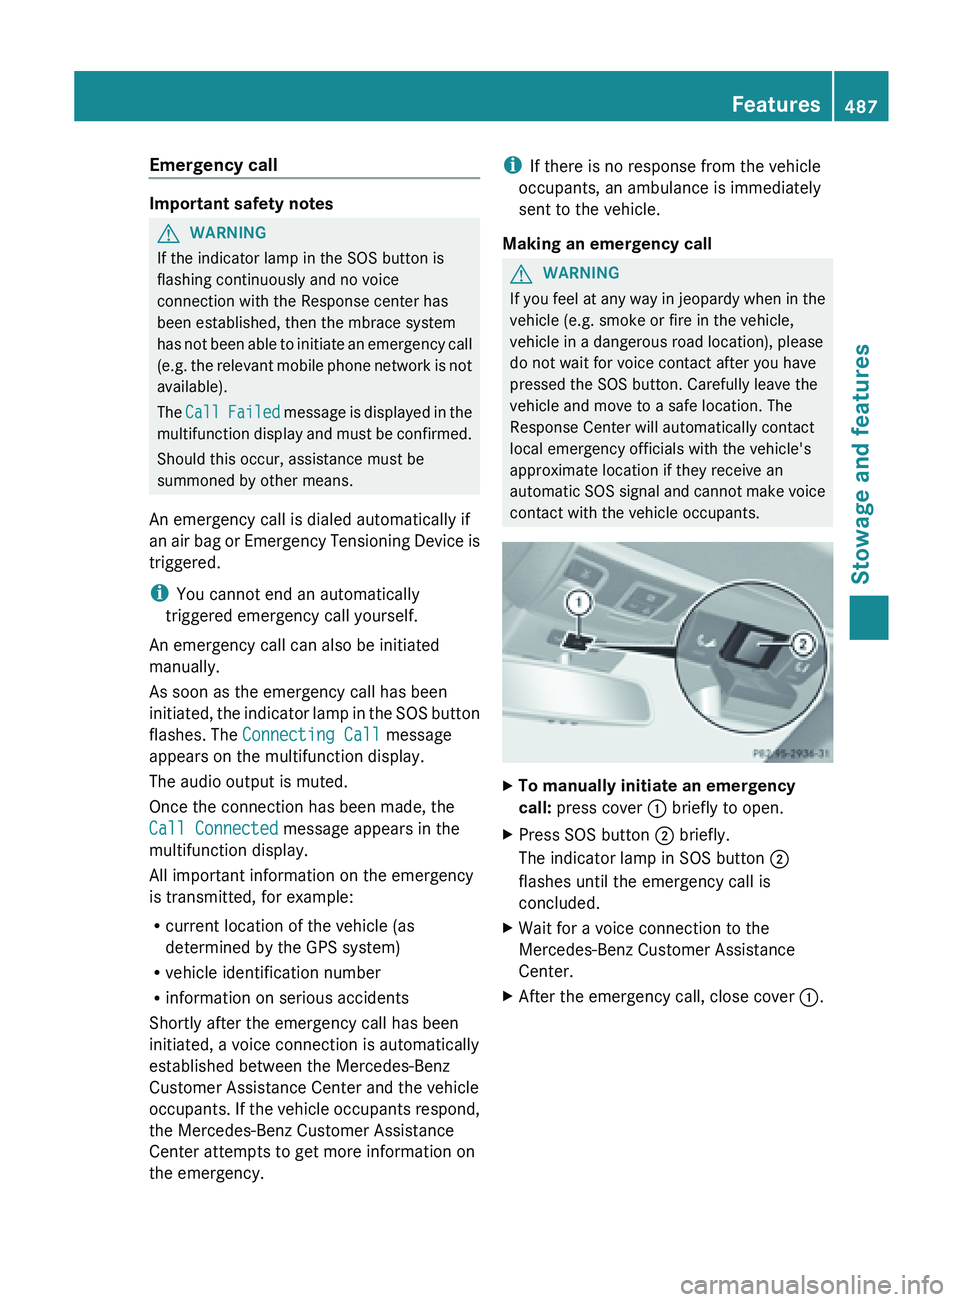
contact with the vehicle occupants. X
To manually initiate an emergency
call: press cover : briefly to open.
X Press SOS button ; briefly.
The indicator lamp in SOS button ;
flashes until the emergency call is
concluded.
X Wait for a voice connection to the
Mercedes-Benz Customer Assistance
Center.
X After the emergency call, close cover :. Features
487
Stowage and features Z
Page 490 of 572
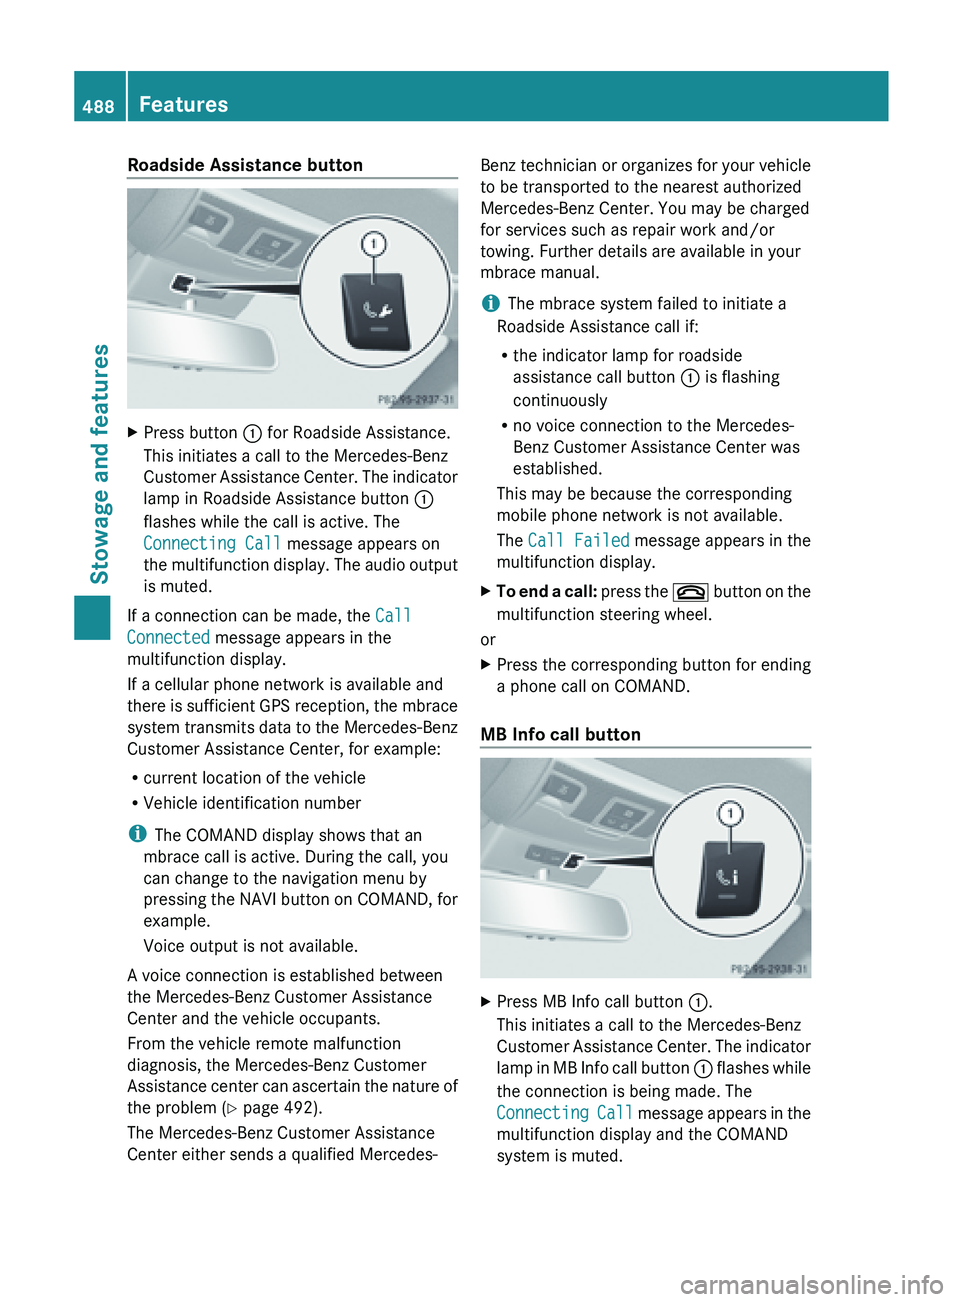
Roadside Assistance button
X
Press button : for Roadside Assistance.
This initiates a call to the Mercedes-Benz
Customer Assistance
Center. The indicator
lamp in Roadside Assistance button :
flashes while the call is active. The
Connecting Call message appears on
the multifunction display. The audio output
is muted.
If a connection can be made, the Call
Connected message appears in the
multifunction display.
If a cellular phone network is available and
there is
sufficient GPS reception, the mbrace
system transmits data to the Mercedes-Benz
Customer Assistance Center, for example:
R current location of the vehicle
R Vehicle identification number
i The COMAND display shows that an
mbrace call is active. During the call, you
can change to the navigation menu by
pressing the NAVI button on COMAND, for
example.
Voice output is not available.
A voice connection is established between
the Mercedes-Benz Customer Assistance
Center and the vehicle occupants.
From the vehicle remote malfunction
diagnosis, the Mercedes-Benz Customer
Assistance center can ascertain the nature of
the problem ( Y page 492).
The Mercedes-Benz Customer Assistance
Center either sends a qualified Mercedes- Benz technician or organizes for your vehicle
to be transported to the nearest authorized
Mercedes-Benz Center. You may be charged
for services such as repair work and/or
towing. Further details are available in your
mbrace manual.
i
The mbrace system failed to initiate a
Roadside Assistance call if:
R the indicator lamp for roadside
assistance call button : is flashing
continuously
R no voice connection to the Mercedes-
Benz Customer Assistance Center was
established.
This may be because the corresponding
mobile phone network is not available.
The Call Failed message appears in the
multifunction display.
X To end a call: press
the ~ button on the
multifunction steering wheel.
or
X Press the corresponding button for ending
a phone call on COMAND.
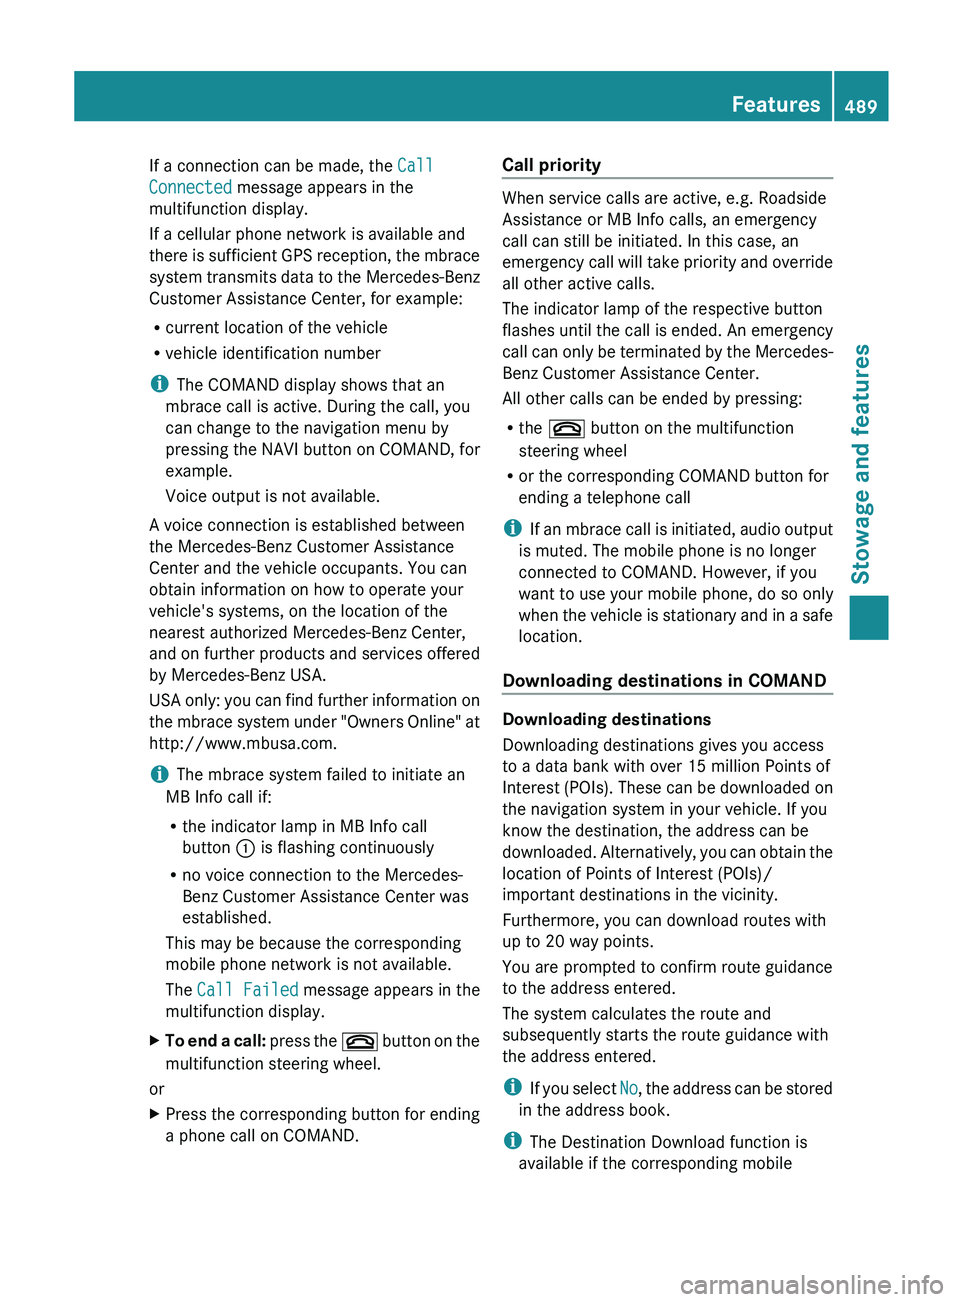
MB Info call button X
Press MB Info call button :.
This initiates a call to the Mercedes-Benz
Customer Assistance
Center. The indicator
lamp in MB Info call button : flashes while
the connection is being made. The
Connecting Call message appears in the
multifunction display and the COMAND
system is muted. 488
Features
Stowage and features
Page 491 of 572
If a connection can be made, the
Call
Connected message appears in the
multifunction display.
If a cellular phone network is available and
there is
sufficient GPS reception, the mbrace
system transmits data to the Mercedes-Benz
Customer Assistance Center, for example:
R current location of the vehicle
R vehicle identification number
i The COMAND display shows that an
mbrace call is active. During the call, you
can change to the navigation menu by
pressing the NAVI button on COMAND, for
example.
Voice output is not available.
A voice connection is established between
the Mercedes-Benz Customer Assistance
Center and the vehicle occupants. You can
obtain information on how to operate your
vehicle's systems, on the location of the
nearest authorized Mercedes-Benz Center,
and on further products and services offered
by Mercedes-Benz USA.
USA only: you can find further information on
the mbrace system under "Owners Online" at
http://www.mbusa.com.
i The mbrace system failed to initiate an
MB Info call if:
R the indicator lamp in MB Info call
button : is flashing continuously
R no voice connection to the Mercedes-
Benz Customer Assistance Center was
established.
This may be because the corresponding
mobile phone network is not available.
The Call Failed message appears in the
multifunction display.
X To end a call: press
the ~ button on the
multifunction steering wheel.
or
X Press the corresponding button for ending
a phone call on COMAND. Call priority When service calls are active, e.g. Roadside
Assistance or MB Info calls, an emergency
call can still be initiated. In this case, an
emergency
call
will take priority and override
all other active calls.
The indicator lamp of the respective button
flashes until the call is ended. An emergency
call can only be terminated by the Mercedes-
Benz Customer Assistance Center.
All other calls can be ended by pressing:
R the ~ button on the multifunction
steering wheel
R or the corresponding COMAND button for
ending a telephone call
i If an mbrace call is initiated, audio output
is muted. The mobile phone is no longer
connected to COMAND. However, if you
want to use your mobile phone, do so only
when the vehicle is stationary and in a safe
location.
Downloading destinations in COMAND Downloading destinations
Downloading destinations gives you access
to a data bank with over 15 million Points of
Interest
(POIs).
These can be downloaded on
the navigation system in your vehicle. If you
know the destination, the address can be
downloaded. Alternatively, you can obtain the
location of Points of Interest (POIs)/
important destinations in the vicinity.
Furthermore, you can download routes with
up to 20 way points.
You are prompted to confirm route guidance
to the address entered.
The system calculates the route and
subsequently starts the route guidance with
the address entered.
i If you select No, the address can be stored
in the address book.
i The Destination Download function is
available if the corresponding mobile Features
489
Stowage and features Z
Page 560 of 572

Useful information
i This Operator's Manual describes all
models and all standard and optional
equipment of your vehicle available at the
time of publication of the Operator's
Manual. Country-specific differences are
possible. Please
note that your vehicle may
not be equipped with all features
described. This also applies to safety-
related systems and functions.
i Read the information on qualified
specialist workshops: ( Y page 31).Information regarding technical data
i The data
stated here specifically refers to
a vehicle with standard equipment. Consult
a Mercedes-Benz Center for the data for all
vehicle variants and trim levels. Genuine Mercedes-Benz parts
G
WARNING
Driving safety may be impaired if non-
approved parts, tires and wheels or safety-
relevant accessories are used.
This could lead to malfunctions in safety-
relevant systems,
e.g. the brake system. This
could cause you to lose control of your vehicle
and cause an accident.
For this reason, Mercedes-Benz recommends
that you use genuine Mercedes-Benz parts or
parts of equal quality. Only use tires, wheels
and accessories that have been specifically
approved for your vehicle. H
Environmental note
Daimler
AG also supplies reconditioned major
assemblies and parts which are of the same
quality as
new parts. They are covered by the
same Limited Warranty entitlements as new
parts. !
Air bags and Emergency Tensioning
Devices, as well as control units and
sensors for
these restraint systems, may be
installed in the following areas of your
vehicle:
R doors
R door pillars
R door sills
R seats
R cockpit
R instrument cluster
R center console
Do not install accessories such as audio
systems in these areas. Do not carry out
repairs or welding. You could impair the
operating efficiency of the restraint
systems.
Have aftermarket accessories installed at
a qualified specialist workshop.
Genuine Mercedes-Benz parts are subject to
strict quality control. Each part has been
specially developed, manufactured or
selected for Mercedes-Benz vehicles and
fine-tuned for them. Only genuine Mercedes-
Benz parts should therefore be used.
More than 300,000 different genuine
Mercedes-Benz parts are available for
Mercedes-Benz models.
All Mercedes-Benz Centers maintain a supply
of genuine Mercedes-Benz parts for
necessary service and repair work. In
addition, strategically located parts delivery
centers provide quick and reliable parts
service.
Always specify the vehicle identification
number (VIN) ( Y page 559) and the engine
number (Y page 560) when ordering
genuine Mercedes-Benz parts. Warranty
Your vehicle
is covered under the terms of the
warranties printed in the Service and
Warranty Information booklet. 558
Warranty
Technical data