2013 MERCEDES-BENZ GLA SUV engine
[x] Cancel search: enginePage 83 of 401

If you deactivate ESP
®
:
R ESP ®
no longer improves driving stability.
R engine torque is no longer limited and the
drive wheels are able to spin.
The spinning of the wheels results in a cut-
ting action for better traction on loose sur-faces.
R traction control is still activated.
R PRE-SAFE ®
is no longer available; nor is it
activated if you brake firmly with assis-
tance from ESP ®
.
R COLLISION PREVENTION ASSIST is no lon-
ger available; nor is it activated if you brake
firmly with assistance from ESP ®
.
R ESP ®
still provides support when you
brake.
Off-road ESP ® An ESP
®
system specifically suited to off-road
terrain is activated automatically once the off-
road program is activated (Y page 205).
The off-road ESP ®
intervenes with a delay if
there is oversteering or understeering, thus
improving traction.
ESP ®
trailer stabilisation General notes
If your vehicle/trailer combination begins to
lurch, ESP
®
assists you in this situation. ESP ®
slows the vehicle down by braking and limit-
ing the engine output until the vehicle/trailer
combination has stabilised.
Important safety notes G
WARNING
If road and weather conditions are poor,
trailer stabilisation will not be able to prevent the vehicle/trailer combination from swerv-
ing. Trailers with a high centre of gravity can
tip over before ESP ®
can detect this. There is
a risk of an accident.
Always adapt your driving style to the prevail-
ing road and weather conditions. If your vehicle/trailer combination begins to
lurch, you can only stabilise the vehicle/
trailer combination by depressing the brake
firmly.
ESP
®
trailer stabilisation is active above
speeds of about 65 km/h.
ESP ®
trailer stabilisation does not work if
ESP ®
is deactivated or disabled because of a
malfunction. EBD (electronic brake force distribu-
tion)
General notes EBD monitors and controls the brake pres-
sure on the rear wheels to improve driving
stability while braking.
Important safety notes i
Observe the "Important safety notes" sec-
tion for driving safety systems (Y page 72). G
WARNING
If EBD has malfunctioned, the rear wheels can still lock, e.g. under full braking. This increa-
ses the risk of skidding and an accident.
You should therefore adapt your driving style
to the different handling characteristics. Havethe brake system checked at a qualified spe-
cialist workshop.
Observe information regarding indicator and
warning lamps (Y page 289) as well as dis-
play messages (Y page 257). ADAPTIVE BRAKE
ADAPTIVE BRAKE enhances braking safety
and offers increased braking comfort. In addi-
tion to the braking function, ADAPTIVE BRAKE
also has the HOLD function (Y page 201) and
hill start assist (Y page 161). For further
information, see Driving tips (Y page 183).80
Driving safety systemsSafety
Page 84 of 401
STEER CONTROL
General notes STEER CONTROL helps you by transmitting a
noticeable steering force to the steering
wheel in the direction required for vehicle
stabilisation.
This steering support is provided in particular
if:
R both right wheels or both left wheels are on
a wet or slippery road surface when you
brake.
R the vehicle starts to skid.
Important safety notes No steering support is provided from STEER
CONTROL, if
R ESP ®
is malfunctioning.
R the steering is faulty.
Power steering will, however, continue to
function. Anti-theft systems
Immobiliser
The immobiliser prevents your vehicle from
being started without the correct key.
X To activate: remove the key from the igni-
tion lock.
X To deactivate: switch on the ignition.
When leaving the vehicle, always take the key
with you and lock the vehicle. The engine can
be started by anyone with a valid key that is
left inside the vehicle.
i The immobiliser is always deactivated
when you start the engine. ATA (Anti-Theft Alarm system)
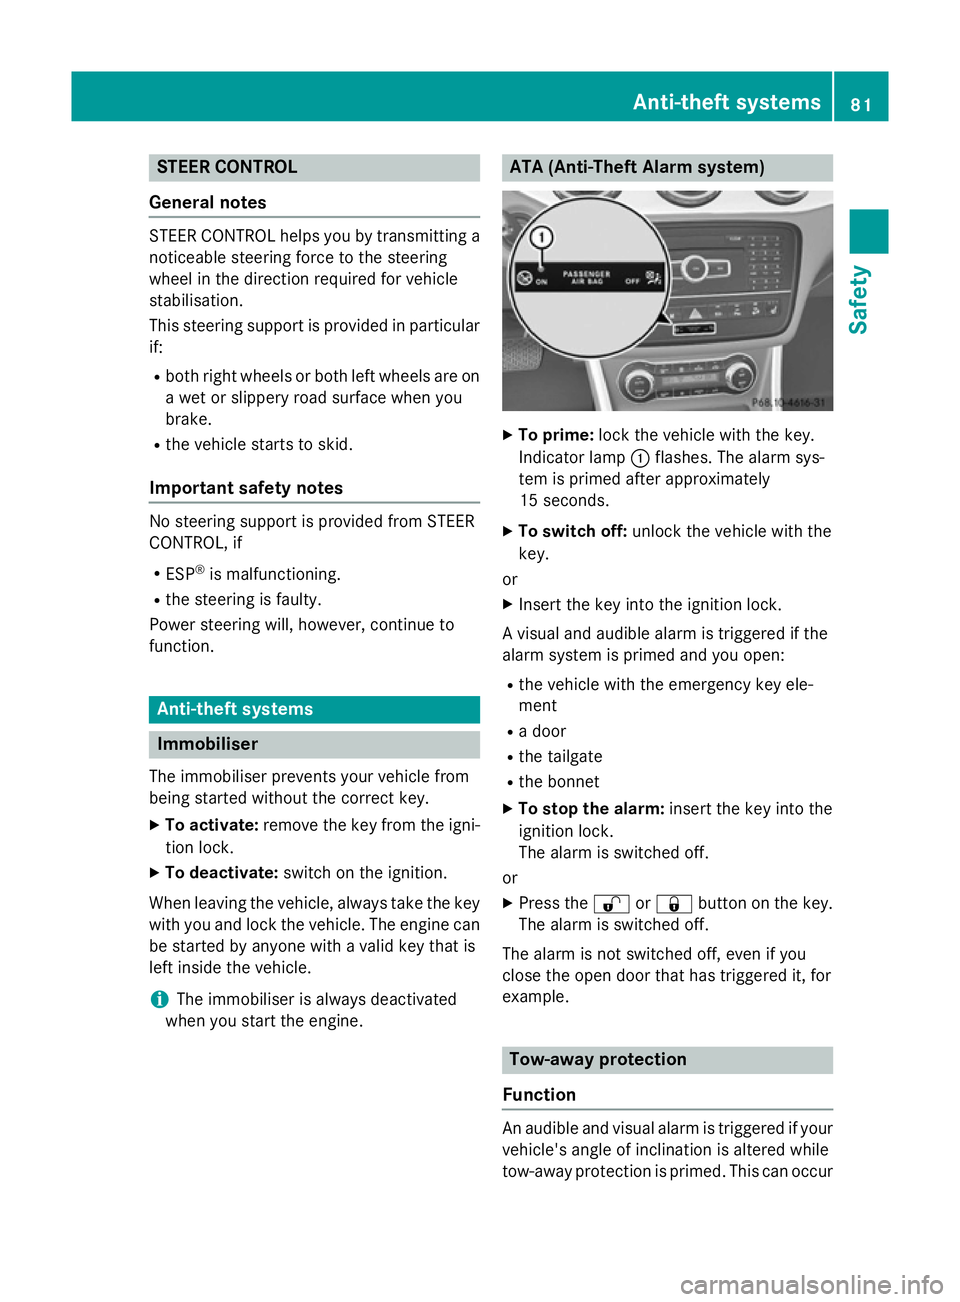
X
To prime: lock the vehicle with the key.
Indicator lamp :flashes. The alarm sys-
tem is primed after approximately
15 seconds.
X To switch off: unlock the vehicle with the
key.
or
X Insert the key into the ignition lock.
A visual and audible alarm is triggered if the
alarm system is primed and you open:
R the vehicle with the emergency key ele-
ment
R a door
R the tailgate
R the bonnet
X To stop the alarm: insert the key into the
ignition lock.
The alarm is switched off.
or
X Press the %or& button on the key.
The alarm is switched off.
The alarm is not switched off, even if you
close the open door that has triggered it, for
example. Tow-away protection
Function An audible and visual alarm is triggered if your
vehicle's angle of inclination is altered while
tow-away protection is primed. This can occur Anti-theft systems
81Safety Z
Page 89 of 401
Useful information
i This Owner's Manual describes all mod-
els, series and optional equipment for your
vehicle that were available at the time of
going to press. National variations are pos- sible. Note that your vehicle may not be
equipped with all of the functions descri-
bed. This is also the case for systems and
functions relevant to safety.
i Read the information on qualified special-
ist workshops: (Y page 25). Key
Important safety notes
G
WARNING
If children are left unsupervised in the vehicle, they could:
R open doors, thereby endangering other per-
sons or road users
R get out and be struck by oncoming traffic
R operate vehicle equipment and become
trapped, for example
In addition, the children could also set the
vehicle in motion, for example, if they:
R release the parking brake
R shift the automatic transmission out of park
position P or shift manual transmission into
neutral
R start the engine
There is a risk of an accident and injury.
When leaving the vehicle, always take the key with you and lock the vehicle. Never leave
children and animals unattended in the vehi-
cle. Keep the keys out of the reach of children. G
WARNING
If persons (particularly children) are exposed
to heat or cold for a prolonged period, there is a risk of serious or even fatal injuries. Never
leave persons (particularly children) unatten-
ded in the vehicle. G
WARNING
If you attach heavy or large objects to the key, the key could be unintentionally turned in the
ignition lock. This could cause the engine to
be switched off. There is a risk of an accident.
Do not attach any heavy or large objects to the
key. Remove any bulky keyrings before insert-
ing the key into the ignition lock.
! Keep the key away from strong magnetic
fields. Otherwise, the remote control func-
tion could be affected.
Strong magnetic fields can occur in the
vicinity of powerful electrical installations.
Do not keep the key: R with electronic devices, e.g. a mobile
phone or another key
R with metallic objects, e.g. coins or metal
film
R inside metallic objects, e.g. a metal case
United Kingdom only: G
WARNING
When the double locks are activated, the
doors can no longer be opened from the
inside. People in the vehicle can no longer get out, e.g. in hazardous situations. There is a
risk of injury.
Therefore, do not leave any people unsuper-
vised in the vehicle, particularly children, eld-
erly people or people in need of special assis-
tance. Do not activate the double lock when
people are in the vehicle.
If the vehicle has been locked with the key,
the double lock function is activated as stand-
ard. It is then not possible to open the doors
from inside the vehicle. You can deactivate
the double lock function by deactivating the
interior motion sensor (Y page 82). The doors
can then be opened from the inside after the vehicle has been locked from the outside. You
can open the rear doors from inside the vehi-
cle if they are not secured by the child-proof
locks (Y page 71). The anti-theft alarm system 86
KeyOpening and closing
Page 94 of 401

Problem
Possible causes/consequences and
M
MSolutions The engine cannot be
started using the key. The on-board voltage is too low.
X Switch off non-essential consumers, e.g. seat heating or interior
lighting, and try to start the engine again.
If this does not work:
X Check the starter battery and charge it if necessary
(Y page 338).
or
X Jump-start the vehicle (Y page 342).
or
X Consult a qualified specialist workshop. The engine cannot be
started using the key. The steering lock is mechanically blocked.
X Remove the key and reinsert it into the ignition lock. While doing
this, turn the steering wheel in both directions. Doors
Important safety notes
G
WARNING
If children are left unsupervised in the vehicle, they could:
R open doors, thereby endangering other per-
sons or road users
R get out and be struck by oncoming traffic
R operate vehicle equipment and become
trapped, for example
In addition, the children could also set the
vehicle in motion, for example, if they:
R release the parking brake
R shift the automatic transmission out of park
position P or shift manual transmission into
neutral
R start the engine
There is a risk of an accident and injury.
When leaving the vehicle, always take the key with you and lock the vehicle. Never leave
children and animals unattended in the vehi-
cle. Keep the keys out of the reach of children. G
WARNING
If persons (particularly children) are exposed
to heat or cold for a prolonged period, there is a risk of serious or even fatal injuries. Never
leave persons (particularly children) unatten-
ded in the vehicle.
Stow luggage or loads preferably in the lug-
gage compartment. Observe the loading
guidelines (Y page 300).
United Kingdom only: G
WARNING
When the double locks are activated, the
doors can no longer be opened from the
inside. People in the vehicle can no longer get out, e.g. in hazardous situations. There is a
risk of injury.
Therefore, do not leave any people unsuper-
vised in the vehicle, particularly children, eld-
erly people or people in need of special assis-
tance. Do not activate the double lock when
people are in the vehicle.
If the vehicle has been locked with the key,
the double lock function is activated as stand-
ard. It is then not possible to open the doors
from inside the vehicle. You can deactivate Doors
91Opening and closing Z
Page 97 of 401
X
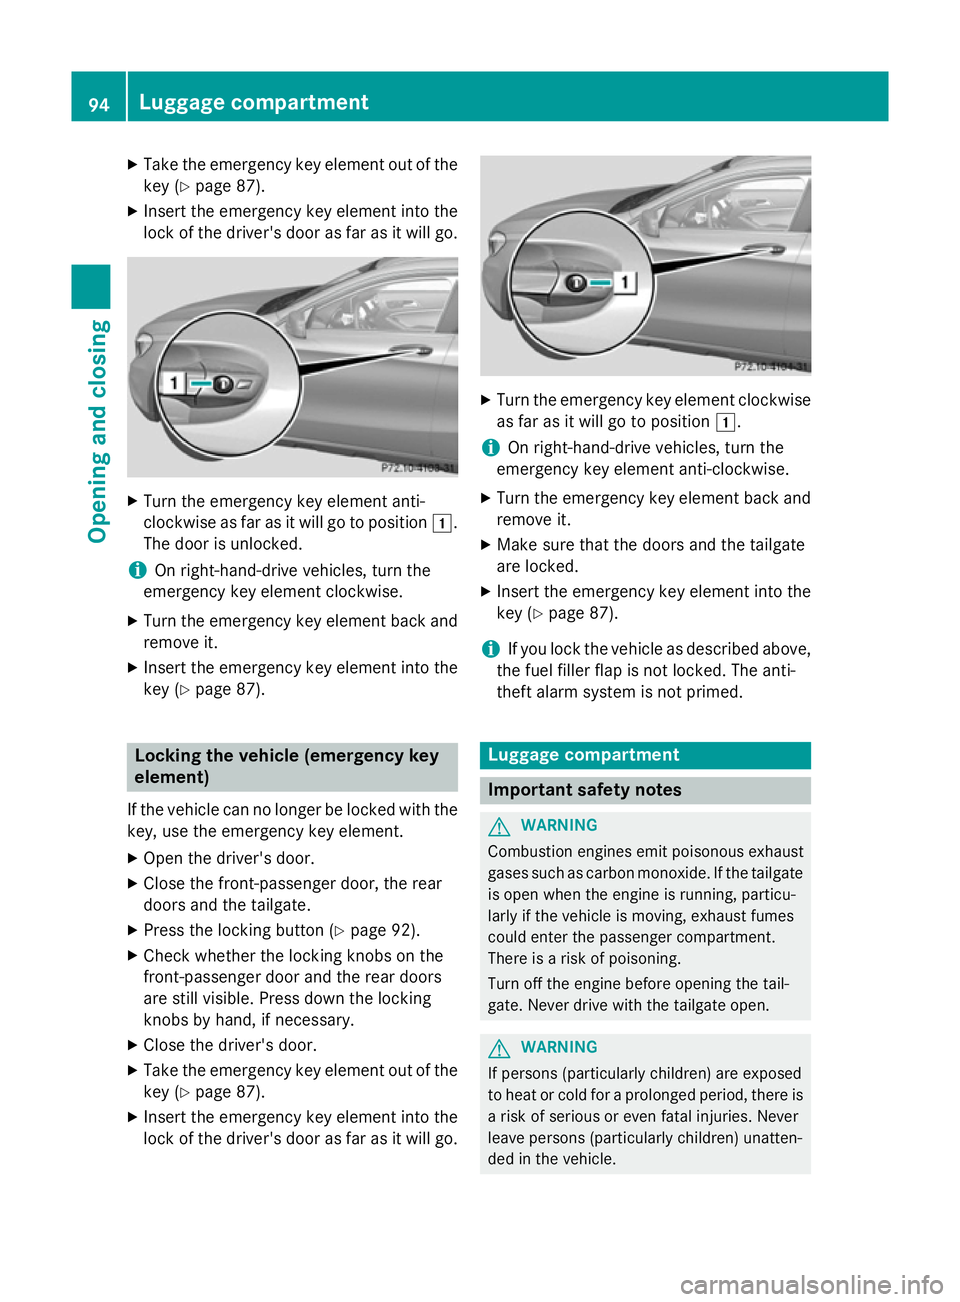
Take the emergency key element out of the
key (Y page 87).
X Insert the emergency key element into the
lock of the driver's door as far as it will go. X
Turn the emergency key element anti-
clockwise as far as it will go to position 1.
The door is unlocked.
i On right-hand-drive vehicles, turn the
emergency key element clockwise.
X Turn the emergency key element back and
remove it.
X Insert the emergency key element into the
key (Y page 87). Locking the vehicle (emergency key
element)
If the vehicle can no longer be locked with the key, use the emergency key element.
X Open the driver's door.
X Close the front-passenger door, the rear
doors and the tailgate.
X Press the locking button (Y page 92).
X Check whether the locking knobs on the
front-passenger door and the rear doors
are still visible. Press down the locking
knobs by hand, if necessary.
X Close the driver's door.
X Take the emergency key element out of the
key (Y page 87).
X Insert the emergency key element into the
lock of the driver's door as far as it will go. X
Turn the emergency key element clockwise
as far as it will go to position 1.
i On right-hand-drive vehicles, turn the
emergency key element anti-clockwise.
X Turn the emergency key element back and
remove it.
X Make sure that the doors and the tailgate
are locked.
X Insert the emergency key element into the
key (Y page 87).
i If you lock the vehicle as described above,
the fuel filler flap is not locked. The anti-
theft alarm system is not primed. Luggage compartment
Important safety notes
G
WARNING
Combustion engines emit poisonous exhaust
gases such as carbon monoxide. If the tailgate is open when the engine is running, particu-
larly if the vehicle is moving, exhaust fumes
could enter the passenger compartment.
There is a risk of poisoning.
Turn off the engine before opening the tail-
gate. Never drive with the tailgate open. G
WARNING
If persons (particularly children) are exposed
to heat or cold for a prolonged period, there is a risk of serious or even fatal injuries. Never
leave persons (particularly children) unatten-
ded in the vehicle. 94
Luggage compartmentOpening and closing
Page 102 of 401
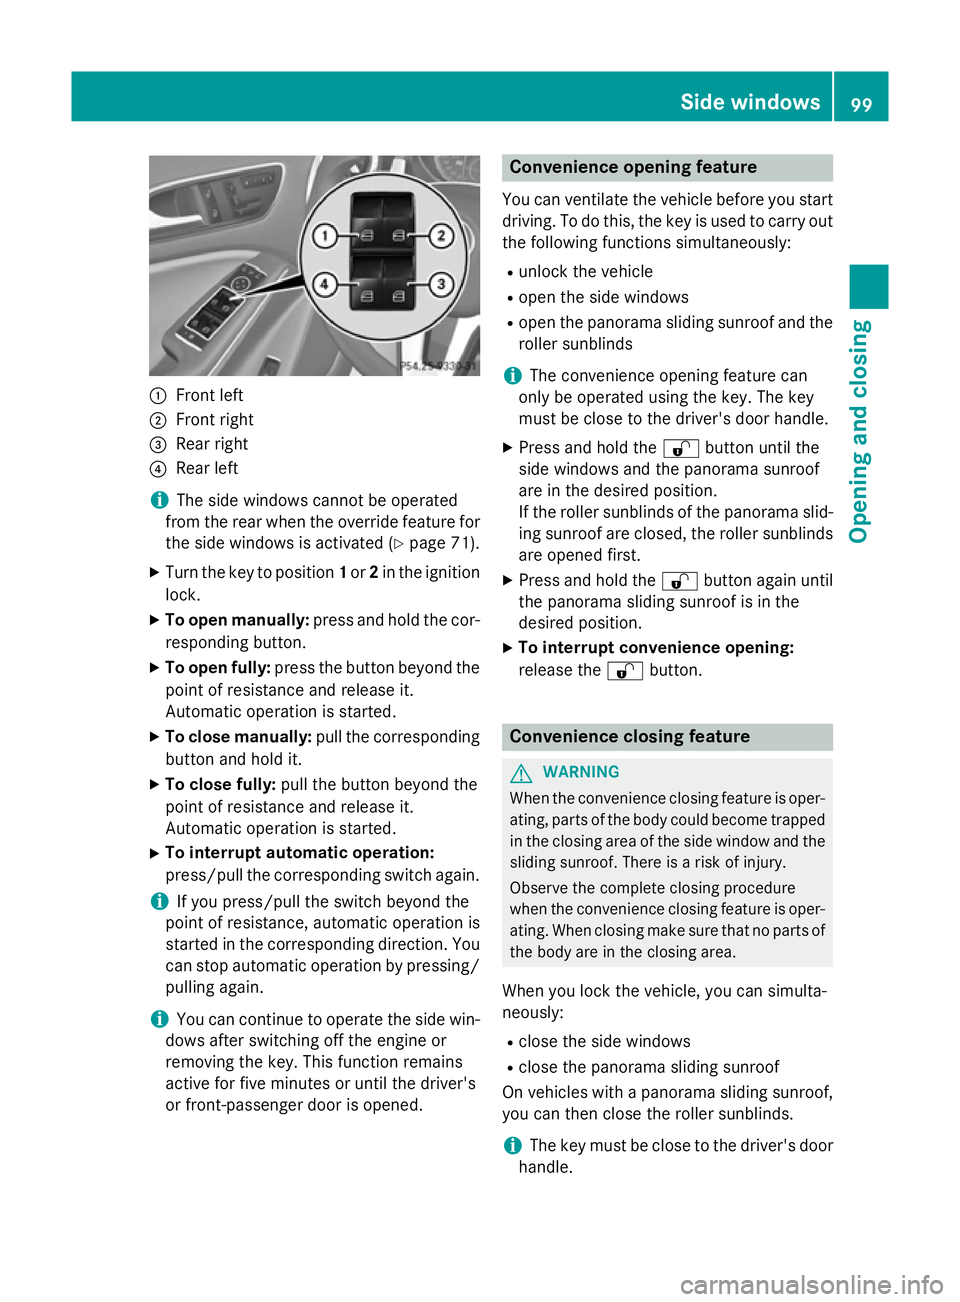
:
Front left
; Front right
= Rear right
? Rear left
i The side windows cannot be operated
from the rear when the override feature for
the side windows is activated (Y page 71).
X Turn the key to position 1or 2in the ignition
lock.
X To open manually: press and hold the cor-
responding button.
X To open fully: press the button beyond the
point of resistance and release it.
Automatic operation is started.
X To close manually: pull the corresponding
button and hold it.
X To close fully: pull the button beyond the
point of resistance and release it.
Automatic operation is started.
X To interrupt automatic operation:
press/pull the corresponding switch again.
i If you press/pull the switch beyond the
point of resistance, automatic operation is
started in the corresponding direction. You
can stop automatic operation by pressing/ pulling again.
i You can continue to operate the side win-
dows after switching off the engine or
removing the key. This function remains
active for five minutes or until the driver's
or front-passenger door is opened. Convenience opening feature
You can ventilate the vehicle before you start driving. To do this, the key is used to carry out
the following functions simultaneously:
R unlock the vehicle
R open the side windows
R open the panorama sliding sunroof and the
roller sunblinds
i The convenience opening feature can
only be operated using the key. The key
must be close to the driver's door handle.
X Press and hold the %button until the
side windows and the panorama sunroof
are in the desired position.
If the roller sunblinds of the panorama slid-
ing sunroof are closed, the roller sunblinds are opened first.
X Press and hold the %button again until
the panorama sliding sunroof is in the
desired position.
X To interrupt convenience opening:
release the %button. Convenience closing feature
G
WARNING
When the convenience closing feature is oper- ating, parts of the body could become trapped
in the closing area of the side window and the
sliding sunroof. There is a risk of injury.
Observe the complete closing procedure
when the convenience closing feature is oper-
ating. When closing make sure that no parts of the body are in the closing area.
When you lock the vehicle, you can simulta-
neously:
R close the side windows
R close the panorama sliding sunroof
On vehicles with a panorama sliding sunroof, you can then close the roller sunblinds.
i The key must be close to the driver's door
handle. Side windows
99Opening and closing Z
Page 106 of 401

speeds. The noise level in the vehicle inte-
rior is reduced as a result.
At low speeds it raises again automatically.
i You can continue to operate the sliding
sunroof after switching off the engine or
removing the key. This function remains
active for five minutes or until you open a
front door.
i The sliding sunroof cannot be opened if a
roof carrier is fitted. In order to allow ven-
tilation of the vehicle interior, you can raise the sliding sunroof.
If contact is made with a roof carrier
approved by Mercedes-Benz, the sliding
sunroof lowers slightly but remains raised
at the rear .
Rain-closing feature when the engine is
switched off The rain-closing feature is only available for
vehicles with a rain sensor.
When the key is in position 0in the ignition
lock or is removed, the sliding sunroof closes
automatically:
R if it starts to rain.
R at extreme outside temperatures.
R after six hours.
R if there is a malfunction in the power sup-
ply.
The sliding sunroof remains raised at the rear
in order to allow ventilation of the vehicle
interior.
i If the sliding sunroof is obstructed when
being closed by the rain-closing feature, it
opens again slightly. The rain-closing fea-
ture is then deactivated.
The sliding sunroof does not close if: R it is raised at the rear.
R it is blocked.
R no rain is falling on the area of the wind-
screen being monitored by the rain sensor, e.g. because the vehicle is under a bridge. Rain-closing feature when driving The raised sliding sunroof automatically low-
ers at the rear when driving if it starts to rain.
The sliding sunroof is lowered depending on:
R the road speed and
R the intensity of the rain
You can manually cancel the automatic clos-
ing procedure. Press or pull the 3switch
in any direction.
To raise the sliding sunroof again, press the
3 switch in direction :. The rain-closing
feature remains activated. Operating the roller sunblinds for the
sliding sunroof
Important safety notes G
WARNING
When opening or closing the roller sunblind
parts of the body could be trapped between
the roller sunblind and the frame or sliding
sunroof. There is a risk of injury.
When opening or closing make sure that no
parts of the body are in the sweep of the roller sunblind.
If someone is trapped:
R release the switch immediately or
R during automatic operation, press the
switch briefly in any direction
The opening/closing process is stopped.
The roller sunblinds shield the vehicle interior from sunlight. The two roller sunblinds can
only be opened and closed together when the sliding sunroof is closed.
Roller sunblinds reversing feature The roller sunblinds are equipped with an
automatic reversing feature. If a solid object
blocks or restricts a roller sunblind during the
automatic closing process, the roller sunblind
opens again automatically. However, the
automatic reversing feature is only an aid, not Panorama sliding sunroof
103Opening and closing Z
Page 111 of 401
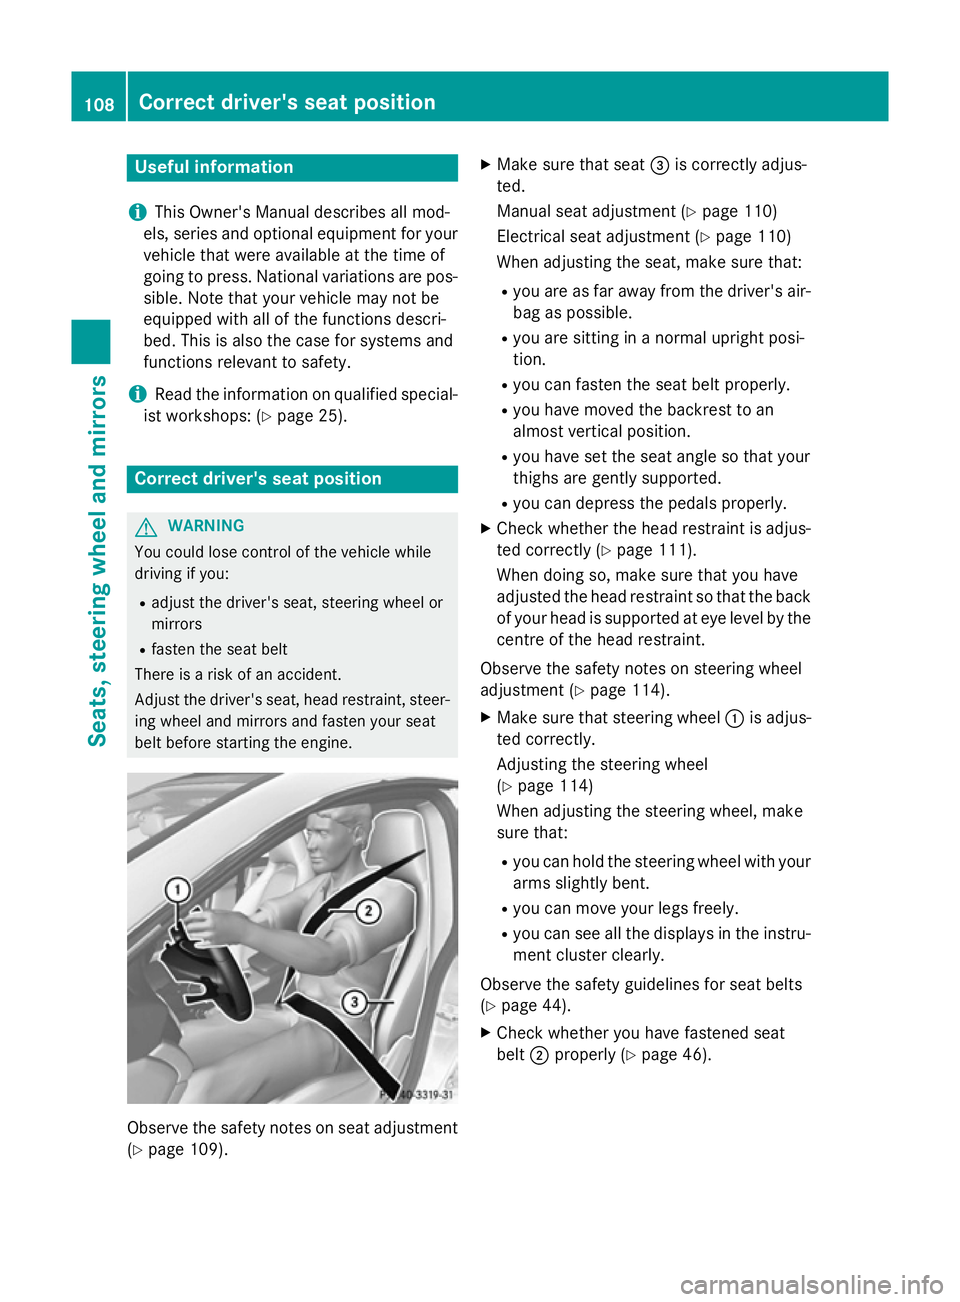
Useful information
i This Owner's Manual describes all mod-
els, series and optional equipment for your
vehicle that were available at the time of
going to press. National variations are pos- sible. Note that your vehicle may not be
equipped with all of the functions descri-
bed. This is also the case for systems and
functions relevant to safety.
i Read the information on qualified special-
ist workshops: (Y page 25). Correct driver's seat position
G
WARNING
You could lose control of the vehicle while
driving if you:
R adjust the driver's seat, steering wheel or
mirrors
R fasten the seat belt
There is a risk of an accident.
Adjust the driver's seat, head restraint, steer-
ing wheel and mirrors and fasten your seat
belt before starting the engine. Observe the safety notes on seat adjustment
(Y page 109). X
Make sure that seat =is correctly adjus-
ted.
Manual seat adjustment (Y page 110)
Electrical seat adjustment (Y page 110)
When adjusting the seat, make sure that:
R you are as far away from the driver's air-
bag as possible.
R you are sitting in a normal upright posi-
tion.
R you can fasten the seat belt properly.
R you have moved the backrest to an
almost vertical position.
R you have set the seat angle so that your
thighs are gently supported.
R you can depress the pedals properly.
X Check whether the head restraint is adjus-
ted correctly (Y page 111).
When doing so, make sure that you have
adjusted the head restraint so that the back of your head is supported at eye level by the centre of the head restraint.
Observe the safety notes on steering wheel
adjustment (Y page 114).
X Make sure that steering wheel :is adjus-
ted correctly.
Adjusting the steering wheel
(Y page 114)
When adjusting the steering wheel, make
sure that:
R you can hold the steering wheel with your
arms slightly bent.
R you can move your legs freely.
R you can see all the displays in the instru-
ment cluster clearly.
Observe the safety guidelines for seat belts
(Y page 44).
X Check whether you have fastened seat
belt ;properly (Y page 46).108
Correct driver's seat positionSeats, steering wheel and mirrors