2013 MERCEDES-BENZ GLA SUV trailer
[x] Cancel search: trailerPage 191 of 401
R
Use the left-hand steering wheel gearshift
paddle to shift to a lower gear appropriate
to the gradient.
R Use the left-hand gearshift paddle to shift
to a lower gear on long and steep downhill
gradients.
i Hill start assist will aid you when pulling
away on a hill.
For further information about hill start
assist, see (Y page 161).
Do not shift into transmission position N
when driving off-road. You could lose control
of the vehicle if you attempt to brake the
vehicle using the service brake. If the gradient
is too steep for your vehicle, back up in
reverse gear.
Always observe the approach/departure
angle values (Y page 393).
Maximum gradient-climbing capability Always observe the maximum gradient climb-
ing ability values (Y page 393).
Hilltops When driving up an uphill gradient, slightly
reduce pressure on the accelerator immedi-
ately before reaching the brow of the hill.
Make use of the vehicle's own impetus to
travel over the brow.
This style of driving prevents:
R the vehicle from lifting off the ground on the
brow of a hill
R the vehicle from travelling too quickly down
the other side.
Driving downhill R
Drive slowly.
R Do not drive at an angle down steep
inclines. Steer into the line of fall and drive
with the front wheels aligned straight. Oth- erwise, the vehicle could slip sideways, tip
and overturn. R
Before tackling steep downhill gradients,
use the left-hand steering wheel gearshift
paddle to shift to a lower gear.
R Activate DSR. If this is not sufficient, brake
gently. When doing so, make sure that the
vehicle is facing in the direction of the line
of fall.
R Check that the brakes are working normally
after a long downhill stretch.
i Off-road ABS is activated when the off-
road program is selected.
At speeds below 30 km/h the front wheels
lock cyclically during braking. The digging-
in effect achieved in the process reduces
the stopping distance when driving off-
road. The steerability of the vehicle is con-
siderably reduced if the wheels lock. Driving systems
Cruise control
General notes Cruise control maintains a constant road
speed for you. It brakes automatically in order
to avoid exceeding the set speed. You must
select a lower gear in good time on long and
steep downhill gradients, especially if the
vehicle is laden or towing a trailer. For vehi-
cles with automatic transmission, you need to have selected manual drive program M
(Y page 172). By doing so, you will make use
of the braking effect of the engine. This
relieves the load on the brake system and
prevents the brakes from overheating and
wearing too quickly.
Use cruise control only if road and traffic con- ditions are appropriate for maintaining a
steady speed for a prolonged period. You canstore any road speed above 30 km/h.
Important safety notes If you fail to adapt your driving style, cruise
control can neither reduce the risk of an acci-
dent nor override the laws of physics. Cruise 188
Driving systemsDriving and parking
Page 194 of 401
R
on vehicles with manual transmission, you
shift to a gear that is too high, and as a
result the engine speed is too low
R on vehicles with automatic transmission,
you shift into position Nwhile driving
If cruise control is deactivated, you will hear a warning tone. You will see the Cruise con‐
Cruise con‐
trol off
trol off message in the multifunction dis-
play for approximately five seconds.
i The last speed stored is cleared when you
switch off the engine. SPEEDTRONIC
General notes SPEEDTRONIC brakes automatically so that
you do not exceed the set speed. You must
select a lower gear in good time on long and
steep downhill gradients, especially if the
vehicle is laden or towing a trailer. For vehi-
cles with automatic transmission, you need to have selected manual drive program M
(Y page 172). By doing so, you will make use
of the braking effect of the engine. This
relieves the load on the brake system and
prevents the brakes from overheating and
wearing too quickly. If you need additional
braking, depress the brake pedal repeatedly
rather than continuously.
You can set a variable or permanent limit
speed:
R variable for speed limits, e.g. in built-up
areas
R permanent for long-term speed restric-
tions, e.g. when driving with winter tyres
fitted (Y page 193)
i The speed indicated in the speedometer
may differ slightly from the limit speed
stored.
Important safety notes If you fail to adapt your driving style, SPEED-
TRONIC can neither reduce the risk of an
accident nor override the laws of physics. SPEEDTRONIC cannot take into account
road, weather or traffic conditions. SPEED-
TRONIC is only an aid. You are responsible for
the distance to the vehicle in front, for vehicle speed, for braking in good time, and for stay-ing in lane.
If there is a change of drivers, advise the new
driver of the speed stored.
Variable SPEEDTRONIC General notes
With the cruise control lever, you can operate
cruise control or DISTRONIC PLUS and vari-
able SPEEDTRONIC.
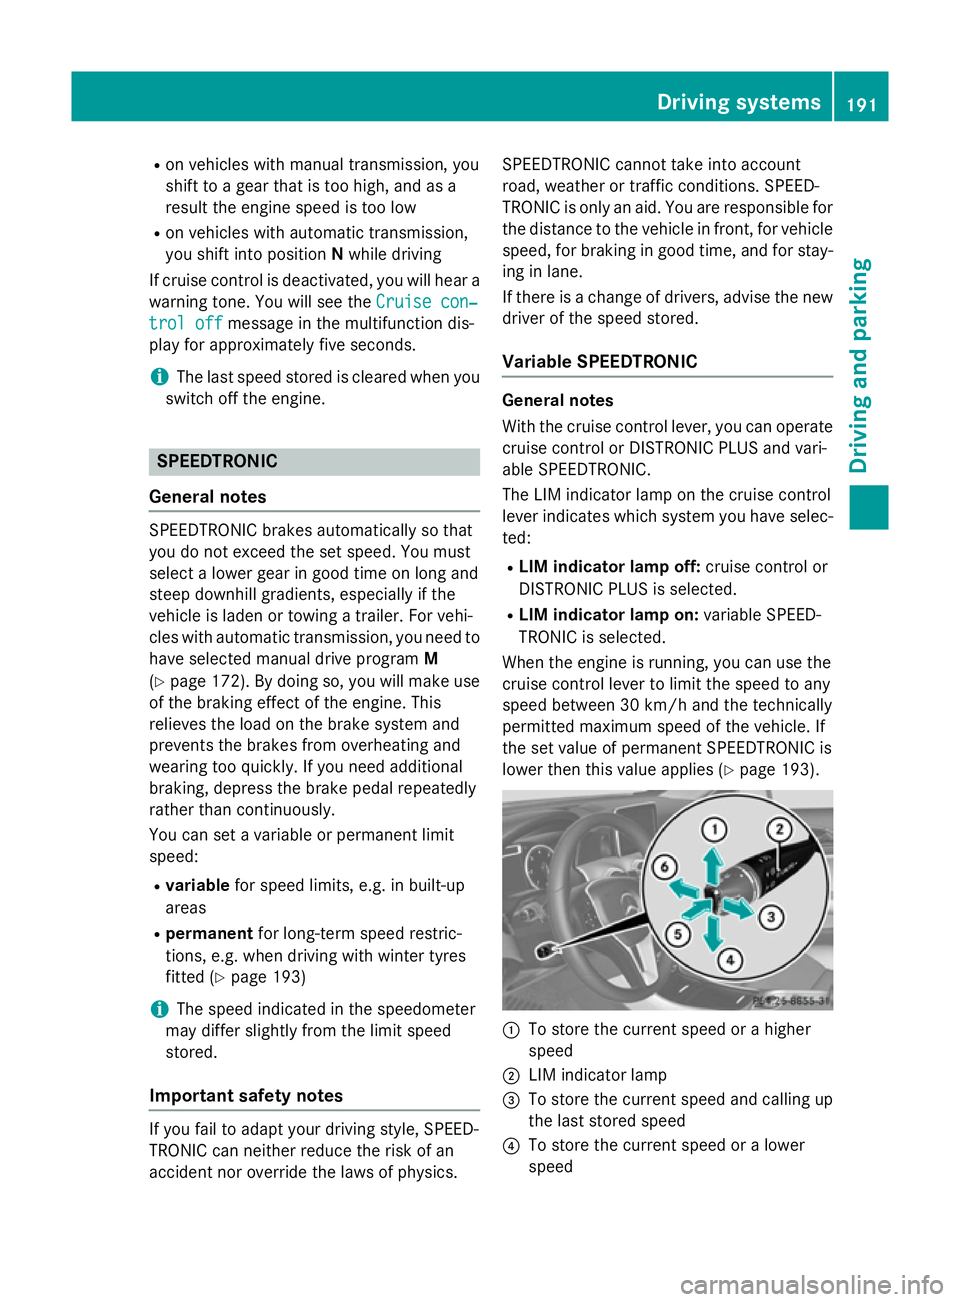
The LIM indicator lamp on the cruise control
lever indicates which system you have selec- ted:
R LIM indicator lamp off: cruise control or
DISTRONIC PLUS is selected.
R LIM indicator lamp on: variable SPEED-
TRONIC is selected.
When the engine is running, you can use the
cruise control lever to limit the speed to any
speed between 30 km/h and the technically
permitted maximum speed of the vehicle. If
the set value of permanent SPEEDTRONIC is
lower then this value applies (Y page 193). :
To store the current speed or a higher
speed
; LIM indicator lamp
= To store the current speed and calling up
the last stored speed
? To store the current speed or a lower
speed Driving systems
191Driving and parking Z
Page 209 of 401
teristics and the gearshifting characteristics
of the automatic transmission are adapted for
this purpose. ABS, ESP ®
and ETS programs
especially adapted to off-road driving are also
activated.
Do not use the off-road program on roads that are snow-covered or icy or if you have fitted
your vehicle with snow chains.
For information about "Driving off-road", see
(Y page 185).
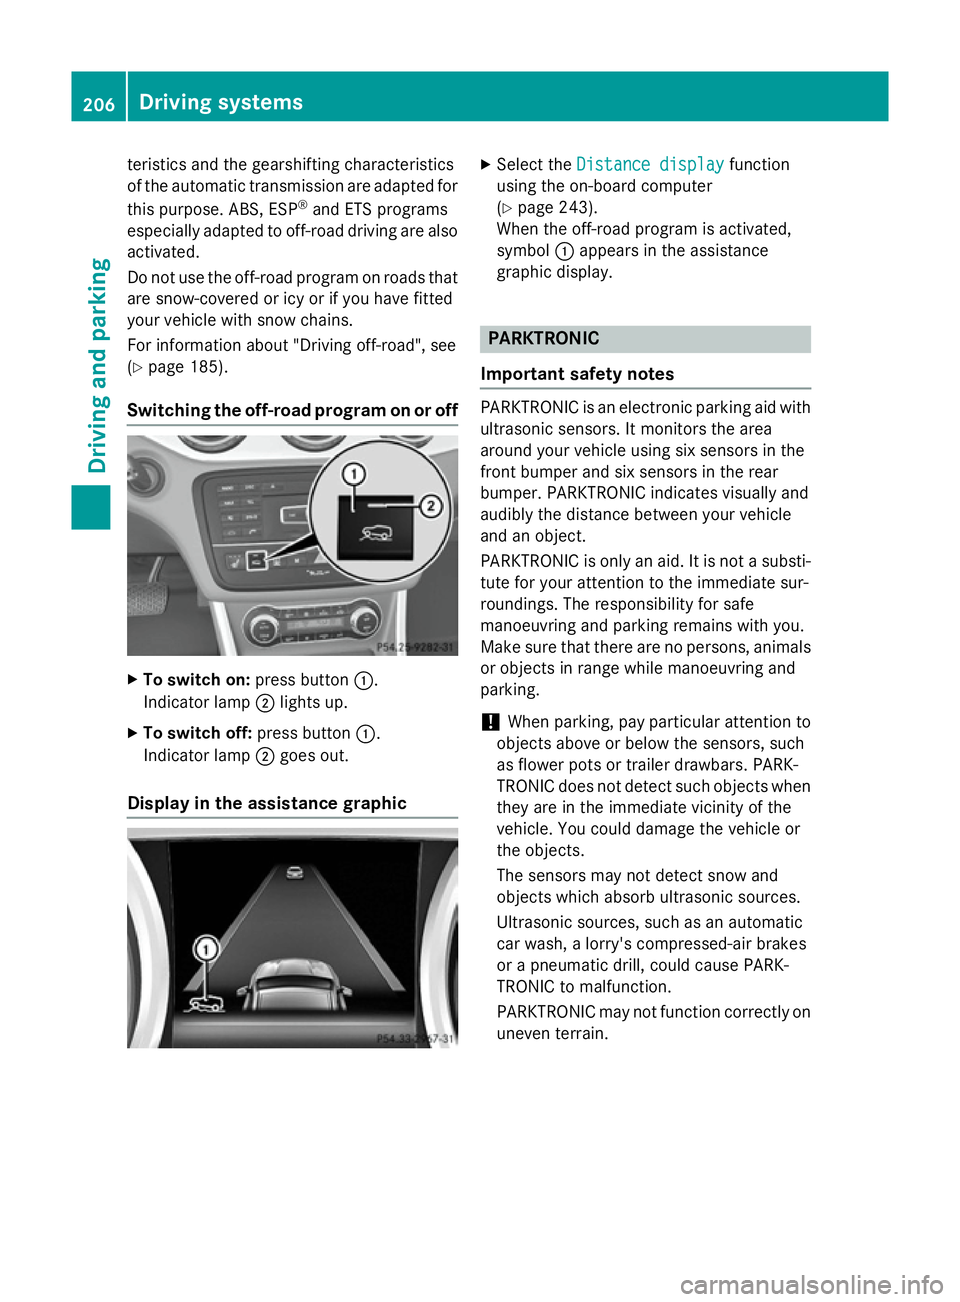
Switching the off-road program on or off X
To switch on: press button:.
Indicator lamp ;lights up.
X To switch off: press button:.
Indicator lamp ;goes out.
Display in the assistance graphic X
Select the Distance display Distance display function
using the on-board computer
(Y page 243).
When the off-road program is activated,
symbol :appears in the assistance
graphic display. PARKTRONIC
Important safety notes PARKTRONIC is an electronic parking aid with
ultrasonic sensors. It monitors the area
around your vehicle using six sensors in the
front bumper and six sensors in the rear
bumper. PARKTRONIC indicates visually and
audibly the distance between your vehicle
and an object.
PARKTRONIC is only an aid. It is not a substi- tute for your attention to the immediate sur-
roundings. The responsibility for safe
manoeuvring and parking remains with you.
Make sure that there are no persons, animals
or objects in range while manoeuvring and
parking.
! When parking, pay particular attention to
objects above or below the sensors, such
as flower pots or trailer drawbars. PARK-
TRONIC does not detect such objects when they are in the immediate vicinity of the
vehicle. You could damage the vehicle or
the objects.
The sensors may not detect snow and
objects which absorb ultrasonic sources.
Ultrasonic sources, such as an automatic
car wash, a lorry's compressed-air brakes
or a pneumatic drill, could cause PARK-
TRONIC to malfunction.
PARKTRONIC may not function correctly on uneven terrain. 206
Driving systemsDriving an
d parking
Page 212 of 401
Towing a trailer
!
Fold in the ball coupling if the trailer tow
hitch is not required. PARKTRONIC meas-
ures the minimum detection range to an
obstacle from the bumper, not the ball cou- pling.
PARKTRONIC is deactivated for the rear area
when you establish an electrical connection
between your vehicle and a trailer. Driving systems
209Driving and parking Z
Page 214 of 401

Active Parking Assist may also display spaces
not suitable for parking, e.g.:
R parking or stopping prohibitions
R in front of driveways or entrances and exits
R unsuitable surfaces
Parking tips:
R on narrow roads, drive as closely as possi-
ble past the parking space.
R parking spaces that are littered or over-
grown might be identified or measured
incorrectly.
R parking spaces that are partially occupied
by trailer drawbars might not be identified
as such or be measured incorrectly.
R snowfall or heavy rain may lead to a parking
space being measured inaccurately.
R pay attention to the PARKTRONIC
(Y page 207 )warning messages during the
parking procedure.
R you can intervene in the steering procedure
to correct it at any time. Active Parking
Assist will then be cancelled.
R when transporting a load which protrudes
from your vehicle, you should not use
Active Parking Assist.
R never use Active Parking Assist when snow
chains are fitted.
R make sure that the tyre pressures are
always correct. This has a direct influence
on the parking characteristics of the vehi-
cle.
Use Active Parking Assist for parking spaces
that are:
R parallel or at right angles to the direction of
travel
R on straight roads, not bends
R on the same level as the road, e.g. not on
the pavement
Detecting parking spaces Objects located above the height range of
Active Parking Assist will not be detected
when the parking space is measured. These are not taken into account when the parking
procedure is calculated, e.g. overhanging
loads, tail sections or loading ramps of goods
vehicles. G
WARNING
If objects are located above the detection
range, Active Parking Assist may start to steer into the parking space too soon. As a result,
you could cause a collision. There is a risk of
an accident.
If objects are located above the detection
range, stop the vehicle and switch Active
Parking Assist off.
For further information on the detection
range (Y page 207).
Active Parking Assist does not support you
parking in spaces at right angles to the direc-
tion of travel if:
R two parking spaces are located directly
next to one another
R the parking space is directly next to a low
obstacle such as a low kerb stone
R you forward park
Active Parking Assist does not support you
parking in spaces that are parallel or at right
angles to the direction of travel if:
R the parking space is on a kerb stone
R the parking space appears to be blocked,
for example by foliage or grass paving
blocks
R the range of movement is too small
R the parking space is bordered by an obsta-
cle which is not clearly defined such as a
tree or a trailer Driving systems
211Driving and parking Z
Page 218 of 401

X
Drive forwards and reverse as prompted by
the PARKTRONIC warning displays, several
times if necessary.
X Vehicles with manual transmission:
stop, at the latest when PARKTRONIC
sounds the continuous warning tone.
Once you have exited the parking space com- pletely, the steering wheel is moved to the
straight-ahead position. You hear a tone and
the Park Assist switched off Park Assist switched off message
appears in the multifunction display. You will
then have to steer and merge into traffic on
your own. PARKTRONIC is still available. You
can take over the steering before the vehicle has exited the parking space completely. This
is useful, for example when you recognise
that it is already possible to pull out of the
parking space.
Cancelling Active Parking Assist You can cancel Active Parking Assist at any
time.
X Stop the movement of the multifunction
steering wheel or steer yourself.
Active Parking Assist will be cancelled at
once. The Park Assist cancelled Park Assist cancelled mes-
sage appears in the multifunction display.
or
X Press the PARKTRONIC button on the
centre console (Y page 208).
PARKTRONIC is switched off and Active
Parking Assist is immediately cancelled.
The Park Assist cancelled
Park Assist cancelled message
appears in the multifunction display.
Active Parking Assist is cancelled automati-
cally if:
R the electric parking brake is applied
R transmission position Pis selected
R parking using Active Parking Assist is no
longer possible
R you are driving faster than 10 km/h
R a wheel spins and ESP ®
intervenes or fails.
The ÷ warning lamp lights up in the
instrument cluster. A warning tone sounds. The parking symbol
disappears and the multifunction display
shows the Park Assist cancelled
Park Assist cancelled mes-
sage.
When Active Parking Assist is cancelled, you
must steer again yourself.
Vehicles with automatic transmission: if a
system malfunction occurs, the vehicle is
braked to a standstill. To drive on, depress the
accelerator again.
Towing a trailer For vehicles with a trailer tow hitch, the min-
imum required length for parking spaces is
slightly increased.
If you have attached a trailer to your vehicle,
you should not use Active Parking Assist.
Once the electrical connection is established between your vehicle and the trailer, Active
Parking Assist is no longer available. PARK-
TRONIC is deactivated for the rear area. Reversing camera
General notes Reversing camera
:is in the handle on the
tailgate.
The reversing camera is an optical parking
and manoeuvring aid. It uses guide lines to
show the area behind your vehicle in the
Audio/COMAND display.
The area behind the vehicle is displayed as a
mirror image, as in the rear-view mirror. Driving systems
215Driving and parking Z
Page 219 of 401
The reversing camera is protected from rain-
drops and dust by means of a flap. When the
reversing camera is activated, this flap opens. Only once the manoeuvring process has been completed and the reversing camera has
switched off does the flap close again. For
technical reasons, the flap may remain open
briefly after the reversing camera has been
deactivated. If you switch off the engine, the
flap will also close.
i The text of messages shown in the
COMAND display depends on the language
setting. The following are examples of
reversing camera messages in the
COMAND display.
Observe the notes on cleaning (Y page 327).
Important safety notes The reversing camera is only an aid. It is not a
substitute for your attention to the immediate
surroundings. The responsibility for safe
manoeuvring and parking remains with you.
Make sure that there are no persons, animals
or objects in range while manoeuvring and
parking.
Under the following circumstances, the
reversing camera will not function, or will
function in a limited manner:
R if the tailgate is open
R in heavy rain, snow or fog
R at night or in very dark places
R if the camera is exposed to very bright light
R if the area is lit by fluorescent light or LED
lighting (the display may flicker)
R if there is a sudden change in temperature,
e.g. when driving into a heated garage in
winter
R if the camera lens is dirty or obstructed
R if the rear of your vehicle is damaged. In this
case, have the camera position and setting checked at a qualified specialist workshop.
The field of vision and other functions of the
reversing camera may be restricted due to additional accessories on the rear of the vehi-
cle (e.g. licence plate holder, bicycle rack).
Activating/deactivating the reversing
camera X
To activate: make sure that the key is in
position 2in the ignition lock.
X Make sure that the "Activation by R gear"
function is selected in the Audio system/
COMAND Online; see the separate operat-
ing instructions.
X Engage reverse gear.
Guide lines are used to show the area
behind the vehicle in the Audio/COMAND
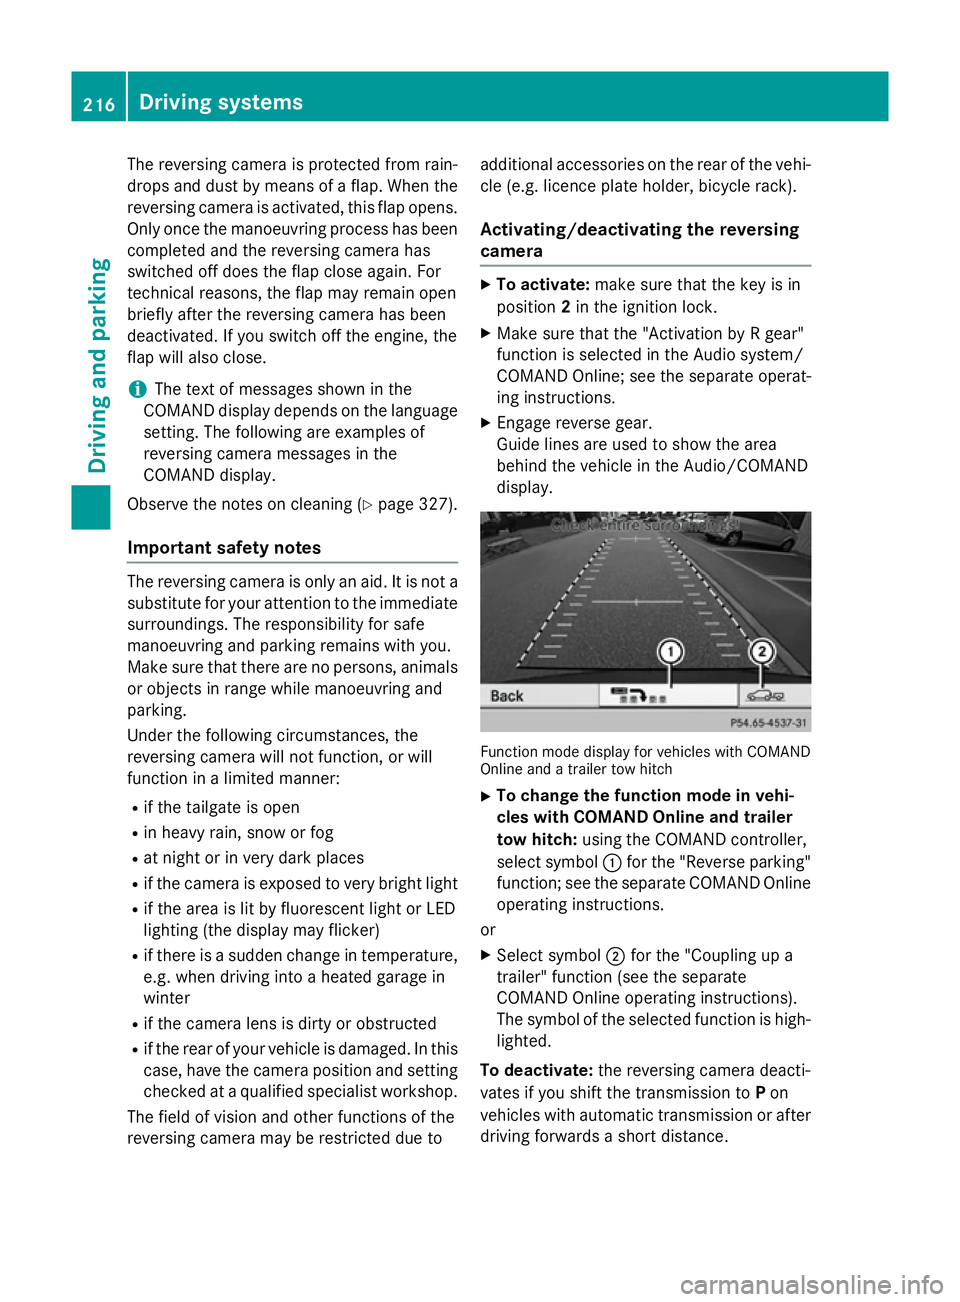
display. Function mode display for vehicles with COMAND
Online and a trailer tow hitch
X To change the function mode in vehi-
cles with COMAND Online and trailer
tow hitch: using the COMAND controller,
select symbol :for the "Reverse parking"
function; see the separate COMAND Online
operating instructions.
or
X Select symbol ;for the "Coupling up a
trailer" function (see the separate
COMAND Online operating instructions).
The symbol of the selected function is high-
lighted.
To deactivate: the reversing camera deacti-
vates if you shift the transmission to Pon
vehicles with automatic transmission or after driving forwards a short distance. 216
Driving systemsDriving and parking
Page 220 of 401
Displays in the Audio/COMAND display
The reversing camera may show a distorted
view of obstacles or show them incorrectly or not at all. Obstacles are not shown by the
reversing camera in the following locations:
R very close to the rear bumper
R under the rear bumper
R in the area immediately above the tailgate
handle
! Objects not at ground level may appear to
be further away than they actually are, e.g.:
R the bumper of a parked vehicle
R the drawbar of a trailer
R the ball coupling of a trailer tow hitch
R the rear section of an HGV
R a slanted post
Use the guidelines only for orientation.
Approach objects no further than the bot-
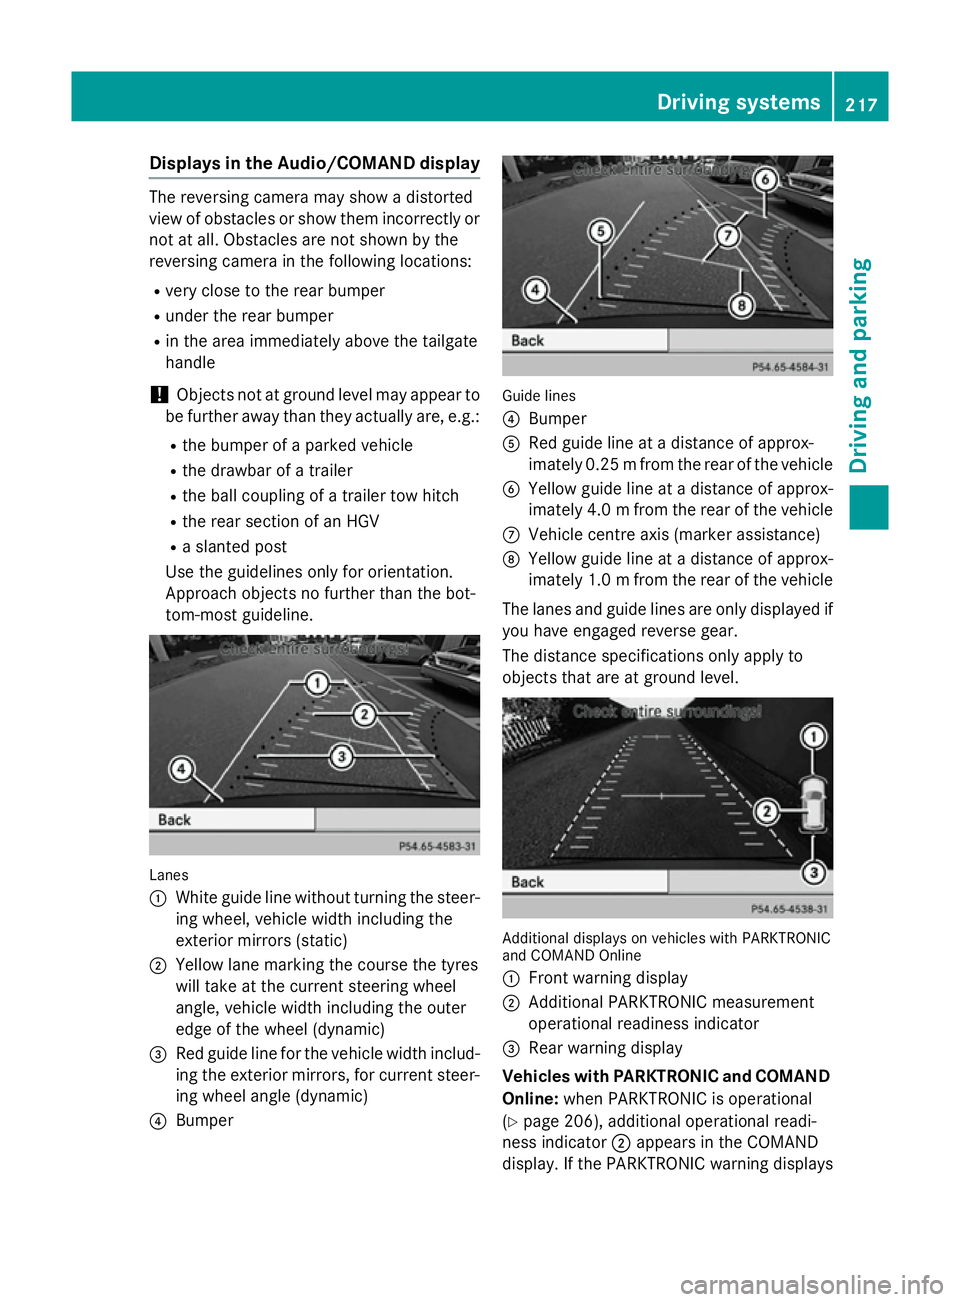
tom-most guideline. Lanes
:
White guide line without turning the steer-
ing wheel, vehicle width including the
exterior mirrors (static)
; Yellow lane marking the course the tyres
will take at the current steering wheel
angle, vehicle width including the outer
edge of the wheel (dynamic)
= Red guide line for the vehicle width includ-
ing the exterior mirrors, for current steer-
ing wheel angle (dynamic)
? Bumper Guide lines
?
Bumper
A Red guide line at a distance of approx-
imately 0.25 mfrom the rear of the vehicle
B Yellow guide line at a distance of approx-
imately 4.0 mfrom the rear of the vehicle
C Vehicle centre axis (marker assistance)
D Yellow guide line at a distance of approx-
imately 1.0 mfrom the rear of the vehicle
The lanes and guide lines are only displayed if
you have engaged reverse gear.
The distance specifications only apply to
objects that are at ground level. Additional displays on vehicles with PARKTRONIC
and COMAND Online
:
Front warning display
; Additional PARKTRONIC measurement
operational readiness indicator
= Rear warning display
Vehicles with PARKTRONIC and COMAND
Online: when PARKTRONIC is operational
(Y page 206), additional operational readi-
ness indicator ;appears in the COMAND
display. If the PARKTRONIC warning displays Driving systems
217Driving and parking Z