2013 MERCEDES-BENZ GLA SUV windscreen
[x] Cancel search: windscreenPage 6 of 401

Index
....................................................... 4Introduction
......................................... 22 At a glance
........................................... 29 Safety
................................................... 41 Opening and closing
...........................85 Seats, steering wheel and mirrors
..107 Lights and windscreen wipers
.........119 Climate control
................................. 137 Driving and parking
..........................157 On-board computer and displays
....233 Stowing and features
.......................299 Maintenance and care
......................315 Breakdown assistance
.....................331 Wheels and tyres
.............................. 351 Technical data
................................... 381 Contents
3
Page 10 of 401
Changing bulbs
Brake lamps .................................. .131
Cornering light function ................. 130
Dipped-beam headlamps .............. .130
Main-beam headlamps ................... 130
Rear foglamp ................................. 131
Reversing lamps ............................ 131
Turn signals (front) ......................... 130
Turn signals (rear) .......................... 131
Charging
see Charging the high-voltage battery
Child seat
Forward-facing restraint system ...... 64
ISOFIX .............................................. 61
On the front-passenger sea t............ 63
Rearward-facing restraint system .... 64
Recommendations ........................... 68
Suitable positions ............................ 64
Top Tether ....................................... 62
Child-proof locks
Important safety notes .................... 70
Rear doors ....................................... 71
Children
Restraint systems ............................ 60
Cigarette lighter ................................ 310
Cleaning
Trailer tow hitch ............................. 327
Climate control
Air conditioning ............................. 139
Auxiliary heating/ventilation .......... 150
Controlling automaticall y............... 144
Convenience opening/closing
(air-recirculation mode) ................. 148
Cooling with air dehumidification .. 142
Demisting the windows .................. 146
Demisting the windscreen ............. 146
Important safety notes .................. 138
Indicator lamp ................................ 144
Information on using
THERMOTRONIC automatic cli-
mate control .................................. 141
Notes on using the air-condition-
ing system ..................................... 139
Overview of systems ...................... 138
Problem with the rear window
heating .......................................... 148
Problems with cooling with air
dehumidification ............................ 144 Setting the air distribution ............. 145
Setting the air vents ...................... 155
Setting the airflow ......................... 145
Setting the temperature ................ 144
Switching air-recirculation mode
on/of
f............................................ 148
Switching on/of f........................... 142
Switching residual heat on/off ...... 149
Switching the rear window heat-
ing on/of f...................................... 147
Switching the ZONE function on/
off .................................................. 145
THERMOTRONIC (2-zone) auto-
matic climate control ..................... 141
Cockpit
Overview .......................................... 30
see Instrument cluster
COLLISION PREVENTION ASSIST
Activating/deactivating the dis-
tance warning function .................. 244
Display message ............................ 255
Operation/note s.............................. 73
COLLISION PREVENTION ASSIST
PLUS
Activating/deactivating ................. 244
Display message ............................ 262
Operation/note s.............................. 76
COMAND Online
see separate operating instructions
Combination switch .......................... 123
Consumption statistics (on-board
computer) .......................................... 237
Convenience closing feature .............. 99
Convenience opening feature ............ 99
Convenience opening/closing (air-
recirculation mode) ........................... 148
Coolant (engine)
Checking the level ......................... 320
Display message ............................ 272
Important safety notes .................. 390
Temperature (on-board com-
puter) ............................................. 251
Temperature gaug e........................ 234
Warning lamp ................................. 295
Cooling
see Climate control
Copyright ............................................. 27 Index
7
Page 24 of 401
LIM (DISTRONIC PLUS) .................. 194
LIM (variable SPEEDTRONIC) .........1
91
Overview .......................................... 34
PASSENGER AIR BAG ..................... .43
Reserve fuel .................................. .295
Seat belt ........................................ 288
Tyre pressure monitor ................... 298
Warning triangle ................................ 332
Washer fluid
Display message ............................ 287
Wheel and tyre combinations
see Tyres
Wheel bolt tightening torque ........... 365
Wheel chock ...................................... 363
Wheels
Changing a wheel .......................... 361
Changing/replacing ....................... 361
Checking ........................................ 353
Cleaning ......................................... 324
Cleaning (warning) ......................... 362
Emergency spare wheel ................. 377
Fitting a new wheel ........................ 365
Fitting a wheel ............................... 362
Important safety notes .................. 352
Removing a wheel .......................... 365
Storing .......................................... .362
Tightening torque ........................... 365
Wheel size/tyre size ..................... .366
Windowbag
Display message ............................ 265
Operation ......................................... 51
Windows
Cleaning ......................................... 325
see Side windows
Windscreen
Demisting ...................................... 146
Windscreen washer fluid
see Windscreen washer system
Windscreen washer system
Notes ............................................. 391
Topping up ..................................... 321
Windscreen wipers
Display message ............................ 287
Problem (malfunction) ................... 135
Rear window wiper ........................ 133
Replacing the wiper blades ............ 133
Switching on/off ........................... 132 Winter driving
General notes ................................ 354
Winter operation
Slippery road surfaces ................... 184
Snow chains .................................. 355
Winter tyres
Limiting the speed (on-board com-
puter) ............................................. 248
M+S tyres ...................................... 354
Wiper blades
Cleaning ......................................... 326
Important safety notes .................. 133
Replacing (on the rear window) ..... 134
Replacing (windscreen) .................. 133
Wooden trim (cleaning instruc-
tions) ................................................. .328
Workshop
see Qualified specialist workshop Z
ZONE function Switching on/off ........................... 145 Index
21
Page 122 of 401
Useful information
............................120
Exterior lighting ................................ 120
Interior lighting ................................. 127
Replacing bulbs ................................. 128
Windscreen wipers ...........................132 119Lights and windscreen wipers
Page 123 of 401
Useful information
i This Owner's Manual describes all mod-
els, series and optional equipment for your
vehicle that were available at the time of
going to press. National variations are pos- sible. Note that your vehicle may not be
equipped with all of the functions descri-
bed. This is also the case for systems and
functions relevant to safety.
i Read the information on qualified special-
ist workshops: (Y page 25). Exterior lighting
General notes
For reasons of safety, Mercedes-Benz recom- mends that you drive with the lights switched
on even during the daytime. In some coun-
tries, operation of the headlamps varies due
to legal requirements and self-imposed obli-
gations. Driving abroad
General notes If your journey takes you to countries where
vehicles are driven on the opposite side of the
road to the country in which the vehicle is
registered, your headlamps must be switched to symmetrical dipped beam as soon as pos-
sible after crossing the border (only vehicles
with Intelligent Light System). This prevents
oncoming traffic from being dazzled. Sym-
metrical lights do not illuminate as large an
area of the edge of the carriageway.
Vehicles with bi-xenon and halogen
headlamps It is not necessary to switch your headlamps
to symmetrical dipped beam when driving in
countries where vehicles are driven on the
opposite side of the road to the country in
which the vehicle is registered. Legal require- ments are fulfilled without switching the
headlamps to symmetrical dipped beam.
Vehicles with Intelligent Light System X
Before crossing the border, set the head-
lamps to symmetrical dipped beam and
after returning back to asymmetrical
dipped beam via the "Dipped-beam head-
lamps for driving on the right/left" function in the on-board computer (Y page 247).
If the headlamps are converted to symmetri-
cal dipped beam, the "motorway mode" and
"extended range foglamps" functions are not
available. Setting the exterior lighting
Setting options Exterior lighting can be set by:
R using the light switch
R headlamp range control (vehicles with hal-
ogen headlamps only) (Y page 122)
R using the combination switch
(Y page 123)
R using the on-board computer
(Y page 246)
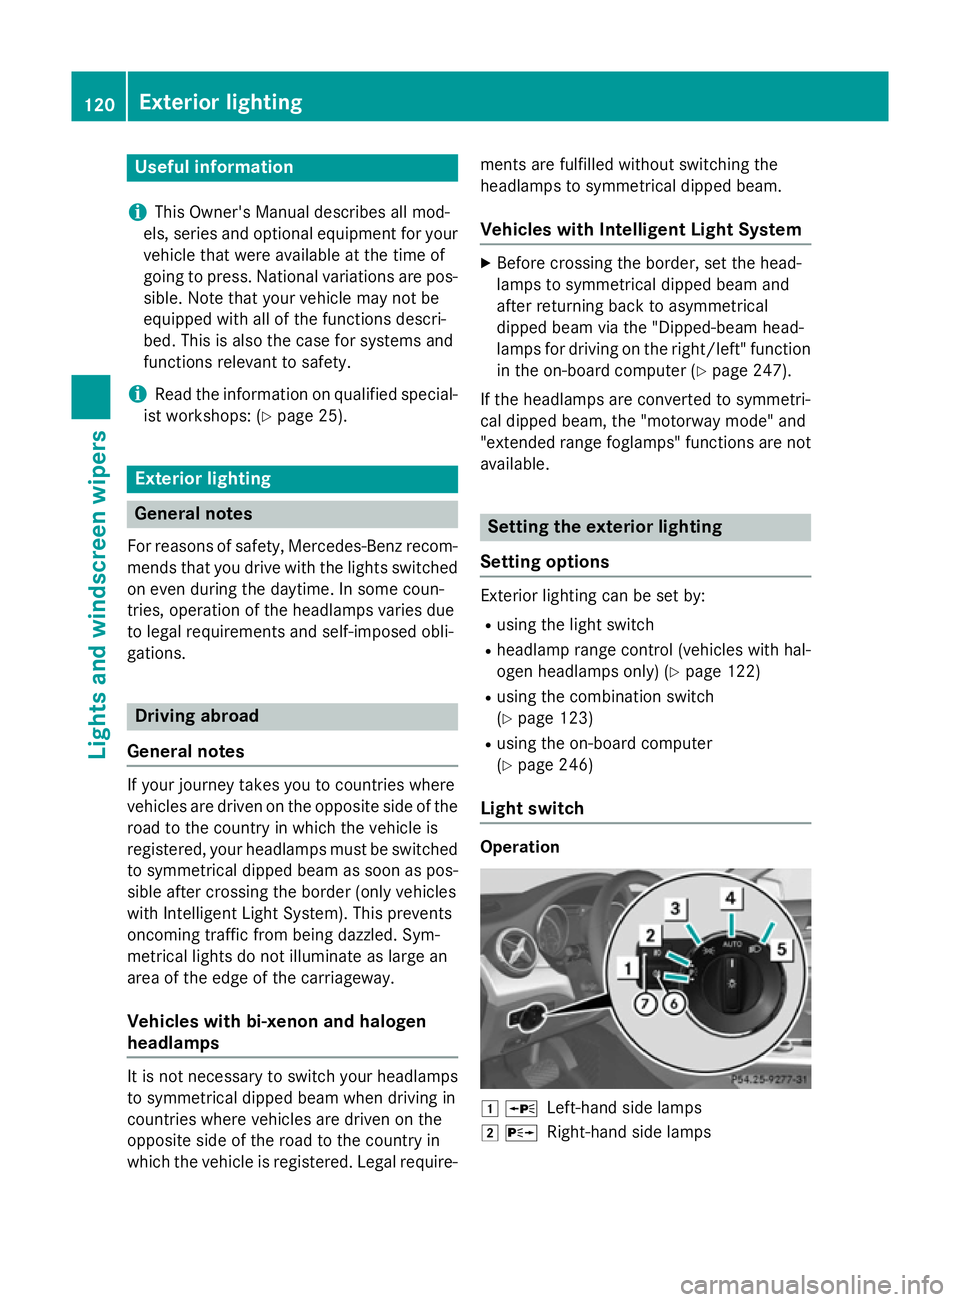
Light switch Operation
1
W
Left-hand side lamps
2 X
Right-hand side lamps 120
Exterior lightingLights and windscreen wipers
Page 124 of 401
3
T
Side lamps, licence plate and instru-
ment cluster lighting
4 Ã
Automatic headlamp mode, control-
led by the light sensor
5L Dipped-beam/main-beam head-
lamps
B R
Rear foglamp
C N
Foglamp (vehicles with front fog-
lamps only)
If you hear a warning tone when you leave the
vehicle, the lights may still be switched on.
X Turn the light switch to Ã.
The exterior lighting (except the side lamps/
standing lamps) switches off automatically if
you:
R remove the key from the ignition lock
R open the driver's door with the key in posi-
tion 0
Automatic headlamp mode G
WARNING
When the light switch is set to Ã, the
dipped-beam headlamps may not be switched on automatically if there is fog, snow or othercauses of poor visibility due to the weather
conditions such as spray. There is a risk of an
accident.
In such situations, turn the light switch to
L.
The automatic headlamp feature is only an
aid. The driver is responsible for the vehicle
lighting at all times.
à is the preferred light switch setting. The
light setting is automatically selected accord- ing to the brightness of the ambient light
(exception: poor visibility due to weather con-
ditions such as fog, snow or spray):
R key in position 1in the ignition lock: the
side lamps are switched on or off automat- ically depending on the brightness of the
ambient light.
R with the engine running: if you have
switched on the daytime driving lights func-
tion in the on-board computer, the daytime driving lights or the side lamps and dipped-
beam headlamps are switched on or off
automatically depending on the brightness of the ambient light.
X To switch on automatic headlamp
mode: turn the light switch to Ã.
The daytime driving lights improve the detect-
ability of your vehicle during the day. Here,
the daytime driving lights function must be
switched on via the on-board computer
(Y page 246).
When the dipped-beam headlamps are
switched on, the Lindicator lamp in the
instrument cluster lights up and the daytime
driving lights switch off.
Dipped-beam headlamps
When the ignition is switched on and the light
switch is in position L, the side lamps and
dipped-beam headlamps are switched on
even if the light sensor does not sense dark
ambient light conditions. This is advanta-
geous when there is fog or rain.
X To switch on the dipped-beam head-
lamps: turn the key in the ignition lock to
position 2or start the engine.
X Turn the light switch to L.
The green Lindicator lamp in the instru-
ment cluster lights up.
Foglamps
In conditions where visibility is poor due to
fog, snow or rain, the foglamps improve visi-
bility as well as making it easier for other road
users to see you. They can be operated
together with the side lamps or together with the side lamps and dipped-beam headlamps.
X To switch on the foglamps: turn the key
in the ignition lock to position 2or start the
engine.
X Turn the light switch to LorÃ. Exterior lighting
121Lights and windscreen wipers Z
Page 125 of 401
X
Press the Nbutton.
The green Nindicator lamp in the instru-
ment cluster lights up.
X To switch off the front foglamps: press
the N button.
The green Nindicator lamp in the instru-
ment cluster goes out.
Only vehicles with front foglamps are equip-
ped with the "Foglamps" function; for how to operate the foglamps on vehicles with the
Intelligent Light System (Y page 125).
Rear foglamp
The rear foglamp improves the visibility of
your vehicle in heavy fog for the following
traffic. Please observe the country-specific
laws on the use of rear foglamps.
X To switch on the rear foglamp: turn the
key in the ignition lock to position 2or start
the engine.
X Turn the light switch to LorÃ.
X Press the Rbutton.
The yellow Rindicator lamp in the
instrument cluster lights up.
X To switch off the rear foglamp: press the
R button.
The yellow Rindicator lamp in the
instrument cluster goes out.
Side lamps ! If the battery has been excessively dis-
charged, the side lamps or parking lamps
are automatically switched off to enable
the next engine start. Always park your
vehicle safely and sufficiently lit according
to legal standards. Avoid the continuous
use of the Tside lamps for several
hours. If possible, switch on the Xright
or the Wleft parking lamp.
X To switch on: turn the light switch to T.
The green Tindicator lamp in the instru-
ment cluster lights up. Side lamps
Switching on the side lamps ensures that the
corresponding side of the vehicle is illumina-
ted.
X To switch on the side lamps: the key is
not in the ignition lock or it is in position 0.
X Turn the light switch to W(left-hand side
of the vehicle) or X(right-hand side of
the vehicle).
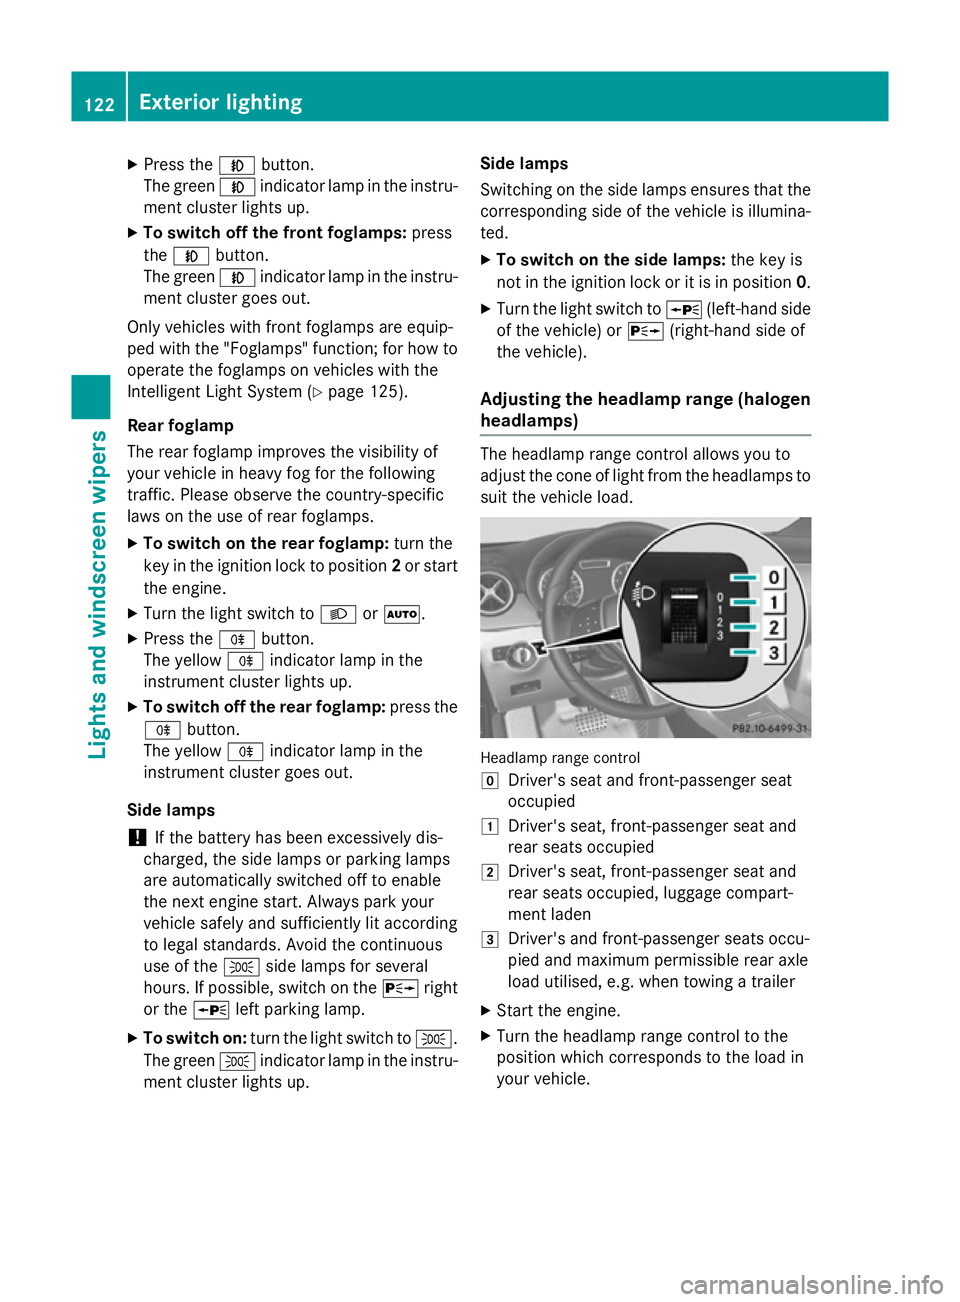
Adjusting the headlamp range (halogen headlamps) The headlamp range control allows you to
adjust the cone of light from the headlamps to suit the vehicle load. Headlamp range control
g
Driver's seat and front-passenger seat
occupied
1 Driver's seat, front-passenger seat and
rear seats occupied
2 Driver's seat, front-passenger seat and
rear seats occupied, luggage compart-
ment laden
3 Driver's and front-passenger seats occu-
pied and maximum permissible rear axle
load utilised, e.g. when towing a trailer
X Start the engine.
X Turn the headlamp range control to the
position which corresponds to the load in
your vehicle. 122
Exterior lightingLights and windscreen wipers
Page 126 of 401
Combination switch
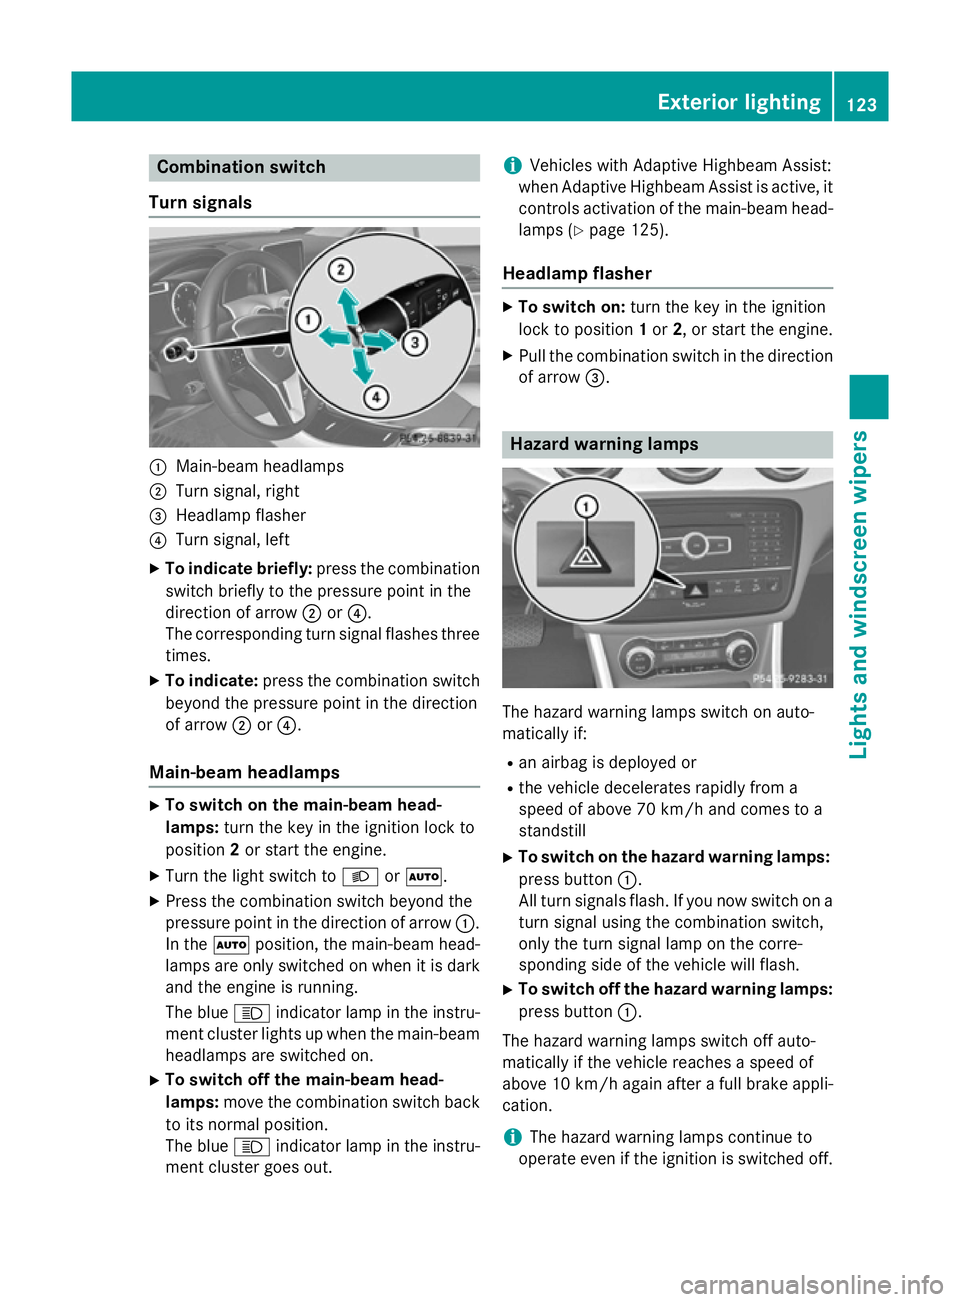
Turn signals :
Main-beam headlamps
; Turn signal, right
= Headlamp flasher
? Turn signal, left
X To indicate briefly: press the combination
switch briefly to the pressure point in the
direction of arrow ;or?.
The corresponding turn signal flashes three
times.
X To indicate: press the combination switch
beyond the pressure point in the direction
of arrow ;or?.
Main-beam headlamps X
To switch on the main-beam head-
lamps: turn the key in the ignition lock to
position 2or start the engine.
X Turn the light switch to LorÃ.
X Press the combination switch beyond the
pressure point in the direction of arrow :.
In the Ãposition, the main-beam head-
lamps are only switched on when it is dark
and the engine is running.
The blue Kindicator lamp in the instru-
ment cluster lights up when the main-beam headlamps are switched on.
X To switch off the main-beam head-
lamps: move the combination switch back
to its normal position.
The blue Kindicator lamp in the instru-
ment cluster goes out. i
Vehicles with Adaptive Highbeam Assist:
when Adaptive Highbeam Assist is active, it controls activation of the main-beam head-lamps (Y page 125).
Headlamp flasher X
To switch on: turn the key in the ignition
lock to position 1or 2, or start the engine.
X Pull the combination switch in the direction
of arrow =. Hazard warning lamps
The hazard warning lamps switch on auto-
matically if:
R
an airbag is deployed or
R the vehicle decelerates rapidly from a
speed of above 70 km/h and comes to a
standstill
X To switch on the hazard warning lamps:
press button :.
All turn signals flash. If you now switch on a turn signal using the combination switch,
only the turn signal lamp on the corre-
sponding side of the vehicle will flash.
X To switch off the hazard warning lamps:
press button :.
The hazard warning lamps switch off auto-
matically if the vehicle reaches a speed of
above 10 km/h again after a full brake appli- cation.
i The hazard warning lamps continue to
operate even if the ignition is switched off. Exterior lighting
123Lights and windscreen wipers Z