2013 MERCEDES-BENZ CLA COUPE fold seats
[x] Cancel search: fold seatsPage 19 of 373
Removing/replacing the cover
(front wheel arch) .......................... 119
Replacing the battery (auxiliary
heating remote control) .................... 140
Reserve (fuel tank)
see Fuel
Reserve fuel
Display message ............................ 250
Warning lamp ................................ .271
Residual heat (climate control) ........137
Restraint system
see SRS (Supplemental Restraint
System)
Rev counter ........................................ 215
Reverse gear
Engaging (manual transmission) .... 155
Reverse gear (selector lever) ........... 157
Reversing camera
Cleaning instructions ..................... 300
Function/notes ............................ .197
Switching on/off ........................... 198
Reversing feature
Panorama sliding sunroo f................ 92
Roller sunblind s............................... 93
Side windows ................................... 89
Reversing lamp
Changing bulb s.............................. 120
Reversing lamps
Display message ............................ 247
Roller sunblind
Opening/closing .............................. 94
Panorama sliding sunroo f................ 93
Roof carrier ........................................ 281
Roof lining and carpets (cleaning
instructions) ...................................... 303
Roof load (maximum) ........................ 362
Route (navigation)
see Route guidance (navigation)
Route guidance (navigation) ............ 219S
Safety Child restraint systems .................... 51
Children in the vehicle ..................... 51
Safety system
see Driving safety systems Seat
Adjusting (Performance Seat) ........ 103
Folding the backrest (rear com-
partment) forwards/back .............. 280
Seat belt
Switching belt adjustment on/off
(on-board computer) ...................... 230
Seat belts
Adjusting the driver's and front-
passenger seat belt ......................... 48
Adjusting the height ......................... 48
Belt force limite r.............................. 50
Belt tensioner .................................. 50
Cleaning ......................................... 303
Display message ............................ 243
Fastening ......................................... 48
Important safety guidelines ............. 46
Rear seat belt status indicator ......... 49
Releasing ......................................... 49
Warning lamp ................................. 263
Warning lamp (function) ................... 49
Seats
Adjusting (electrically) ................... 100
Adjusting (manually) ...................... 100
Adjusting the 4-way lumbar sup-
port ................................................ 102
Adjusting the head restraint .......... 101
Cleaning the cover ......................... 302
Correct driver's seat position ........... 98
Important safety notes .................... 99
Seat heating problem .................... 104
Storing settings (memory func-
tion) ............................................... 107
Switching seat heating on/of f....... 103
Sensors (cleaning instructions) ....... 300
Service
see ASSYST PLUS
Service Centre
see Qualified specialist workshop
Service menu (on-board com-
puter) .................................................. 225
Service products
Brake fluid ..................................... 360
Coolant (engine) ............................ 360
Engine oil ....................................... 359
Fuel ................................................ 355
Important safety notes .................. 354
Washer fluid ................................... 361 16
Index
Page 40 of 373
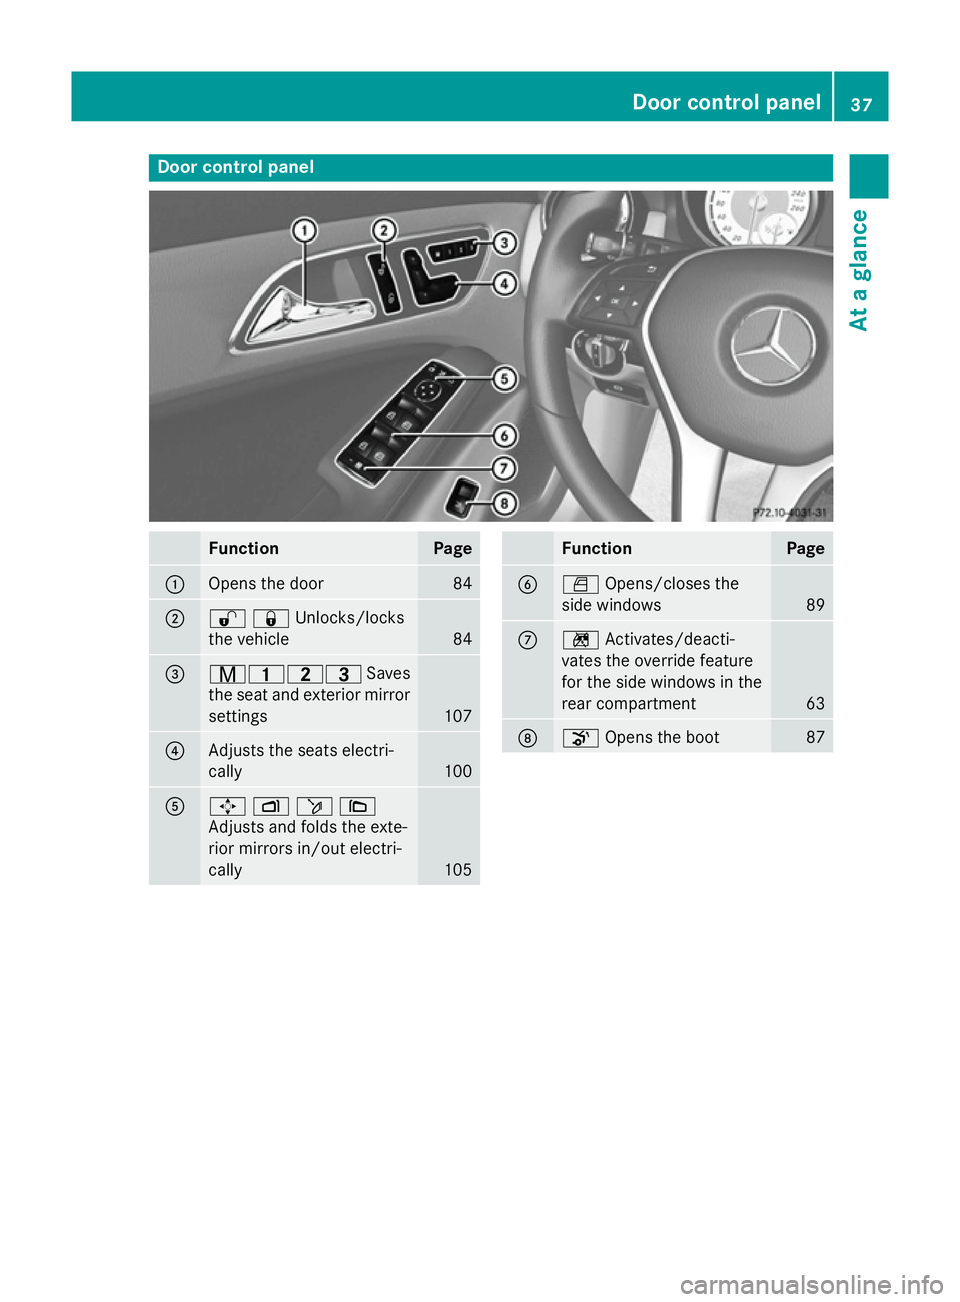
Door control panel
Function Page
:
Opens the door 84
;
%&Unlocks/locks
the vehicle
84
=
r45=
Saves
the seat and exterior mirror settings 107
?
Adjusts the seats electri-
cally
100
A
7
Zö\
Adjusts and folds the exte-
rior mirrors in/out electri-
cally 105 Function Page
B
W
Opens/closes the
side windows 89
C
n
Activates/deacti-
vates the override feature
for the side windows in the
rear compartment 63
D
o
Opens the boot 87Door control panel
37At a glance
Page 58 of 373
When installing a child restraint system, be
sure to observe the manufacturer's installa-
tion instructions and the instructions for cor- rect use of the child restraint system. G
WARNING
The child restraint system cannot perform its protective function if it is not correctly fitted
to a suitable vehicle seat. The child cannot berestrained in the event of an accident, heavy
braking or sudden changes of direction. The
child could be seriously or even fatally injured.
For this reason, when securing a child
restraint system, always observe the manu-
facturer's installation instructions and the
correct use of the child restraint system.
For safety reasons, on the rear seats use only child restraint systems with an ISOFIX child
seat securing system which have been tested
and approved for Mercedes-Benz vehicles.
An incorrectly fitted child restraint system
could come loose and seriously or even fatally injure the child or other vehicle occupants.
When fitting the child restraint system, always
make sure that it is engaged correctly in the
ISOFIX securing rings on both sides.
! When fitting the ISOFIX child restraint
system, make sure that the seat belt for the
centre seat does not get trapped. Other-
wise, the seat belt could be damaged. X
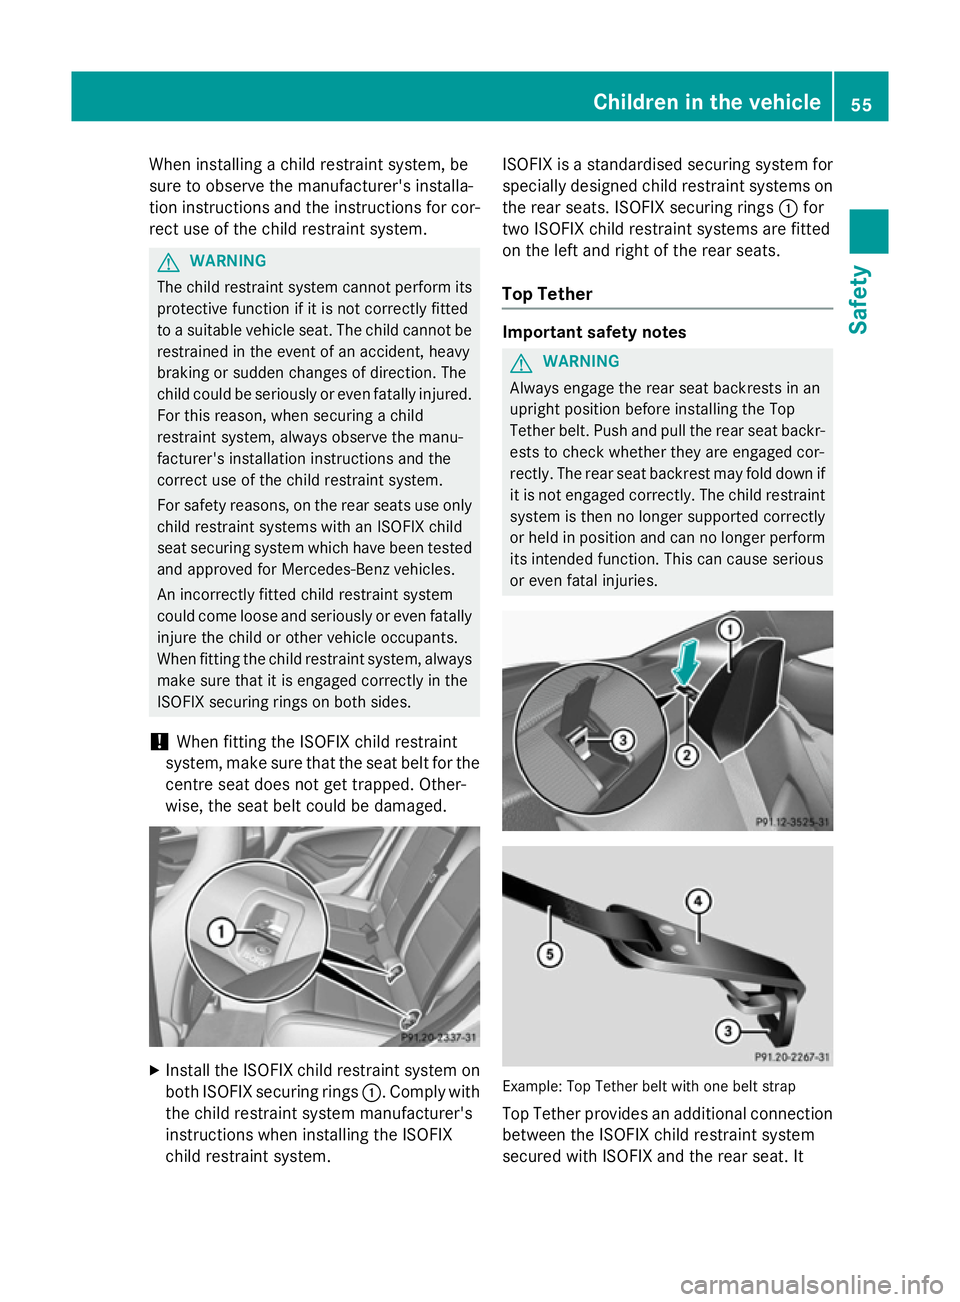
Install the ISOFIX child restraint system on
both ISOFIX securing rings :. Comply with
the child restraint system manufacturer's
instructions when installing the ISOFIX
child restraint system. ISOFIX is a standardised securing system for
specially designed child restraint systems on
the rear seats. ISOFIX securing rings :for
two ISOFIX child restraint systems are fitted
on the left and right of the rear seats.
Top Tether Important safety notes
G
WARNING
Always engage the rear seat backrests in an
upright position before installing the Top
Tether belt. Push and pull the rear seat backr- ests to check whether they are engaged cor-
rectly. The rear seat backrest may fold down if
it is not engaged correctly. The child restraint
system is then no longer supported correctly
or held in position and can no longer perform
its intended function. This can cause serious
or even fatal injuries. Example: Top Tether belt with one belt strap
Top Tether provides an additional connection
between the ISOFIX child restraint system
secured with ISOFIX and the rear seat. It Children in the vehicle
55Safety Z
Page 103 of 373
!
To avoid damage to the seats and the seat
heating, observe the following information:
R do not spill any liquids on the seats. If
liquid is spilled on the seats, dry them as soon as possible.
R if the seat covers are damp or wet, do not
switch on the seat heating. The seat
heating should also not be used to dry
the seats.
R clean the seat covers as recommended;
see the "Interior care" section.
R do not transport heavy loads on the
seats. Do not place sharp objects on the seat cushions, e.g. knives, nails or tools.
The seats should only be occupied by
passengers, if possible.
R when the seat heating is in operation, do
not cover the seats with insulating mate- rials, e.g. blankets, coats, bags, seat cov-
ers, child seats or booster seats.
! Make sure that there are no objects in the
footwell under or behind the seats when
moving the seats back. There is a risk that
the seats and/or the objects could be dam-
aged.
i Further related subjects:
R Luggage compartment enlargement
(folding down the rear seats)
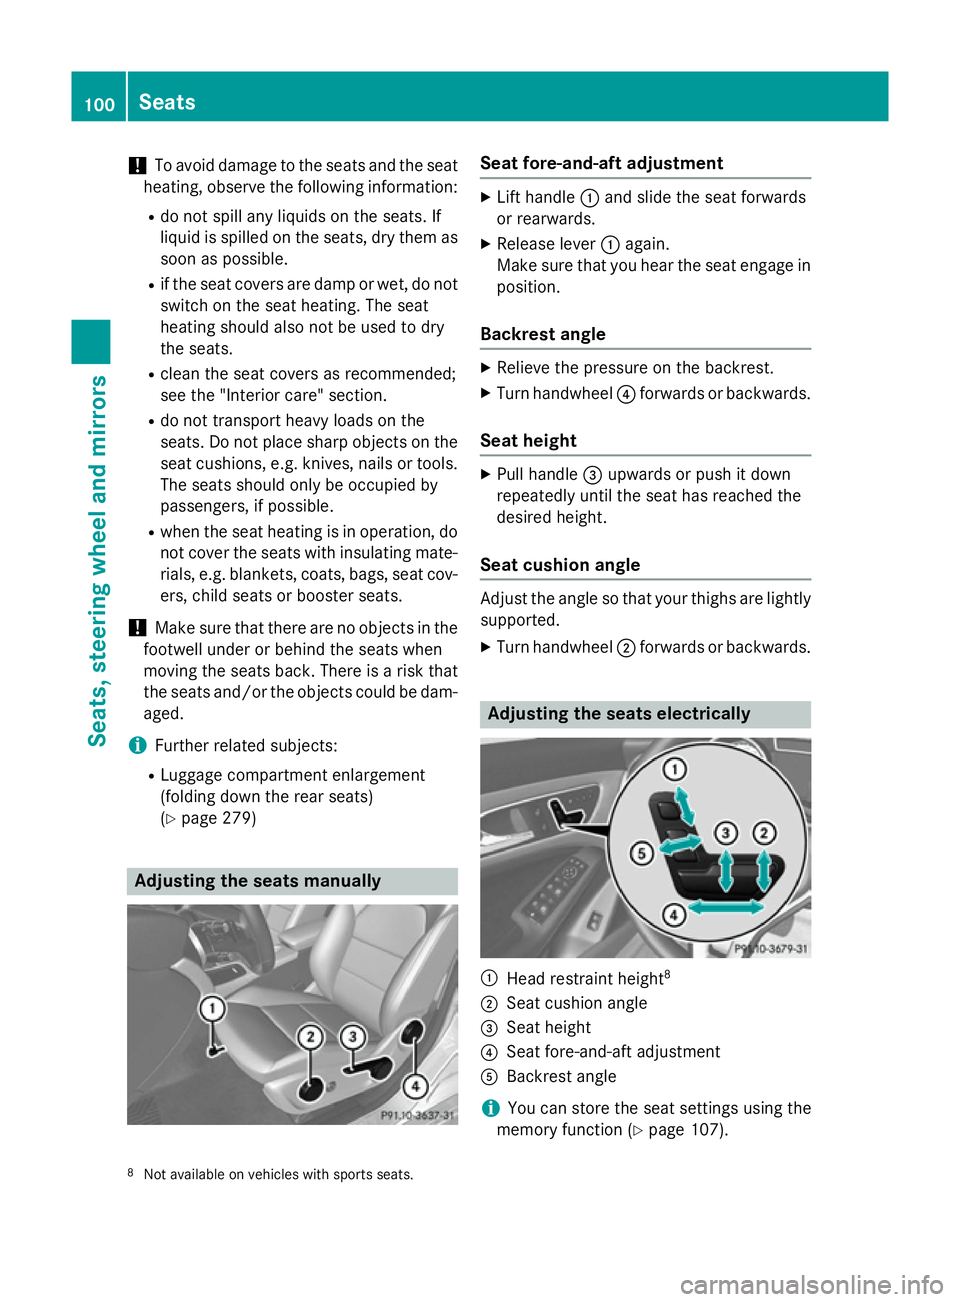
(Y page 279) Adjusting the seats manually Seat fore-and-aft adjustment
X
Lift handle :and slide the seat forwards
or rearwards.
X Release lever :again.
Make sure that you hear the seat engage in
position.
Backrest angle X
Relieve the pressure on the backrest.
X Turn handwheel ?forwards or backwards.
Seat height X
Pull handle =upwards or push it down
repeatedly until the seat has reached the
desired height.
Seat cushion angle Adjust the angle so that your thighs are lightly
supported.
X Turn handwheel ;forwards or backwards. Adjusting the seats electrically
:
Head restraint height 8
; Seat cushion angle
= Seat height
? Seat fore-and-aft adjustment
A Backrest angle
i You can store the seat settings using the
memory function (Y page 107).
8 Not available on vehicles with sports seats. 100
SeatsSeats, steering wheel and mirrors
Page 105 of 373
Rear seat head restraints
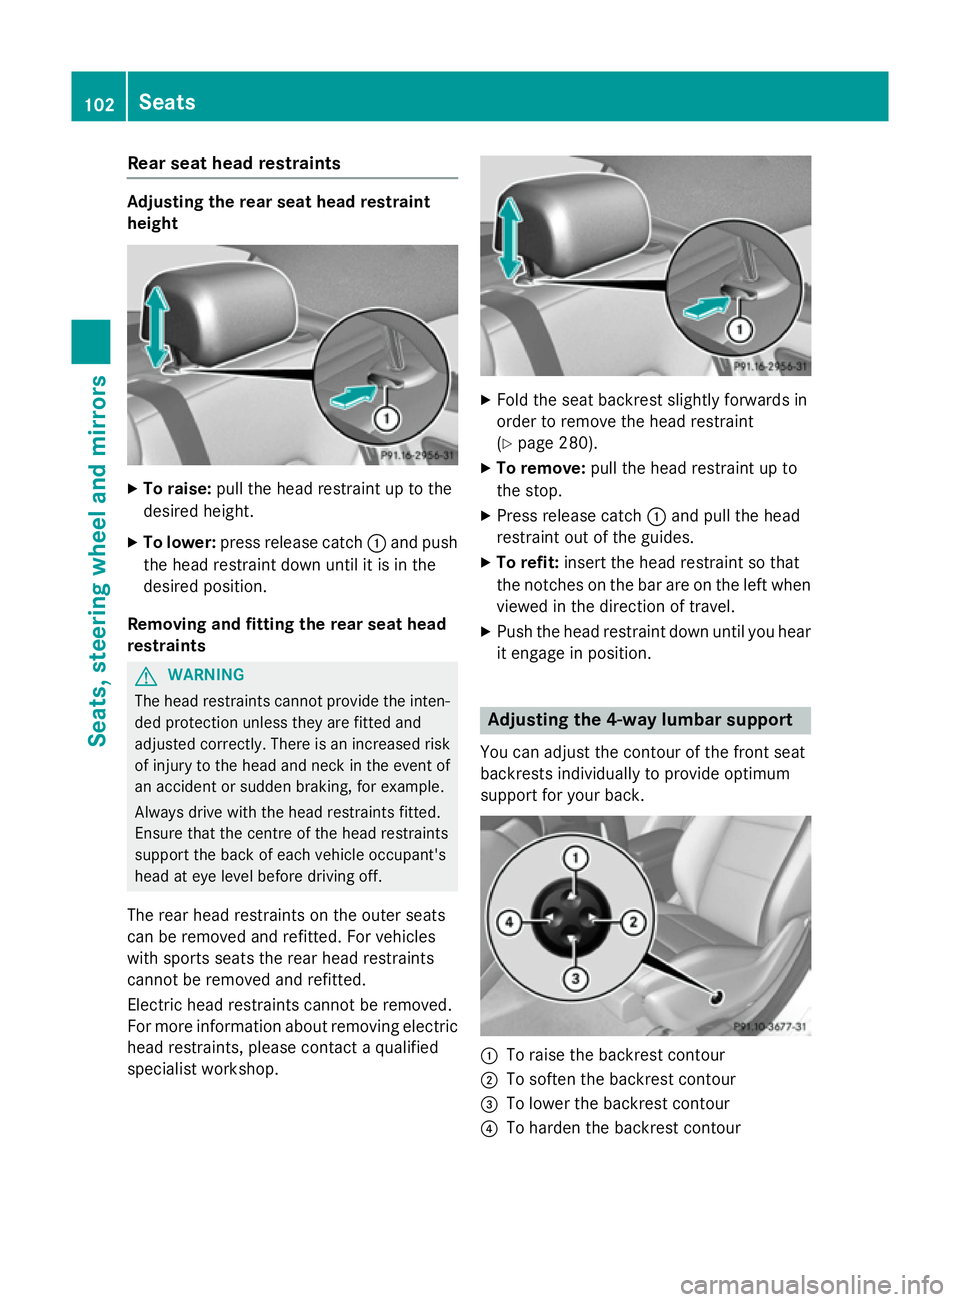
Adjusting the rear seat head restraint
height
X
To raise: pull the head restraint up to the
desired height.
X To lower: press release catch :and push
the head restraint down until it is in the
desired position.
Removing and fitting the rear seat head
restraints G
WARNING
The head restraints cannot provide the inten-
ded protection unless they are fitted and
adjusted correctly. There is an increased risk of injury to the head and neck in the event of
an accident or sudden braking, for example.
Always drive with the head restraints fitted.
Ensure that the centre of the head restraints
support the back of each vehicle occupant's
head at eye level before driving off.
The rear head restraints on the outer seats
can be removed and refitted. For vehicles
with sports seats the rear head restraints
cannot be removed and refitted.
Electric head restraints cannot be removed.
For more information about removing electric head restraints, please contact a qualified
specialist workshop. X
Fold the seat backrest slightly forwards in
order to remove the head restraint
(Y page 280).
X To remove: pull the head restraint up to
the stop.
X Press release catch :and pull the head
restraint out of the guides.
X To refit: insert the head restraint so that
the notches on the bar are on the left when viewed in the direction of travel.
X Push the head restraint down until you hear
it engage in position. Adjusting the 4-way lumbar support
You can adjust the contour of the front seat
backrests individually to provide optimum
support for your back. :
To raise the backrest contour
; To soften the backrest contour
= To lower the backrest contour
? To harden the backrest contour 102
SeatsSeats, steering wheel and mirrors
Page 108 of 373
Mirrors
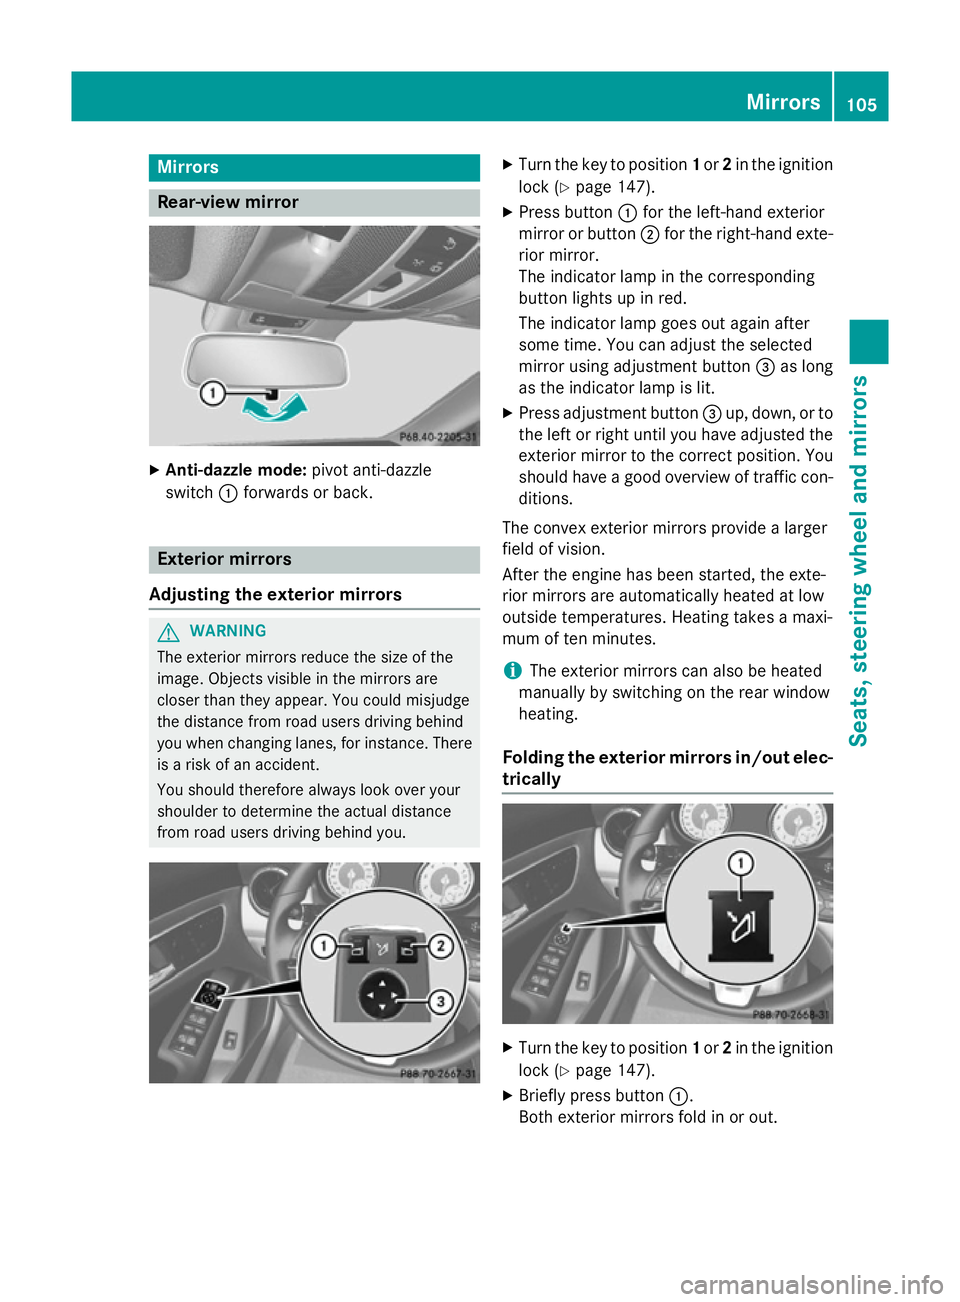
Rear-view mirror
X
Anti-dazzle mode: pivot anti-dazzle
switch :forwards or back. Exterior mirrors
Adjusting the exterior mirrors G
WARNING
The exterior mirrors reduce the size of the
image. Objects visible in the mirrors are
closer than they appear. You could misjudge
the distance from road users driving behind
you when changing lanes, for instance. There is a risk of an accident.
You should therefore always look over your
shoulder to determine the actual distance
from road users driving behind you. X
Turn the key to position 1or 2in the ignition
lock (Y page 147).
X Press button :for the left-hand exterior
mirror or button ;for the right-hand exte-
rior mirror.
The indicator lamp in the corresponding
button lights up in red.
The indicator lamp goes out again after
some time. You can adjust the selected
mirror using adjustment button =as long
as the indicator lamp is lit.
X Press adjustment button =up, down, or to
the left or right until you have adjusted the
exterior mirror to the correct position. You
should have a good overview of traffic con- ditions.
The convex exterior mirrors provide a larger
field of vision.
After the engine has been started, the exte-
rior mirrors are automatically heated at low
outside temperatures. Heating takes a maxi-
mum of ten minutes.
i The exterior mirrors can also be heated
manually by switching on the rear window
heating.
Folding the exterior mirrors in/out elec-
trically X
Turn the key to position 1or 2in the ignition
lock (Y page 147).
X Briefly press button :.
Both exterior mirrors fold in or out. Mirrors
105Seats, steering wheel and mirrors Z
Page 109 of 373

i
Make sure that the exterior mirrors are
always folded out fully while driving. They
could otherwise vibrate.
i If you are driving faster than 47 km/h, you
can no longer fold in the exterior mirrors.
Resetting the exterior mirrors If the battery has been disconnected or com-
pletely discharged, the exterior mirrors must
be reset. The exterior mirrors will otherwise
not fold in when you select the "Fold in mir-
rors when locking" function in the on-board
computer (Y page 230).
X Turn the key to position 1in the ignition
lock (Y page 147).
X Briefly press button :.
Folding the exterior mirrors in/out
automatically If the "Fold in mirrors when locking" function
is activated in the on-board computer
(Y page 230):
R the exterior mirrors fold in automatically as
soon as you lock the vehicle from the out-
side
R the exterior mirrors fold out again automat-
ically as soon as you unlock the vehicle and
then open the driver's or front-passenger
door.
i If the exterior mirrors have been folded in
manually, they do not fold out.
Exterior mirror pushed out of position If an exterior mirror has been pushed out of
position (forwards or backwards), proceed as
follows:
X Vehicles without electrically folding
exterior mirrors: move the exterior mirror
into the correct position manually.
X Vehicles with electrically folding exte-
rior mirrors: press and hold mirror-folding button (Y
page 105) until you hear a click
and then the mirror engage in position.
The mirror housing is engaged again and
you can adjust the exterior mirrors as usual
(Y page 105). Automatic anti-dazzle mirrors
The "Automatic anti-dazzle mirrors" function
is only available if the vehicle is equipped with
the "Mirror package".
The rear-view mirror and the exterior mirror
on the driver's side automatically go into anti- dazzle mode if:
R the ignition is switched on and
R incident light from headlamps strikes the
sensor in the rear-view mirror
The mirrors do not go into anti-dazzle mode if reverse gear is engaged or if the interior light-
ing is switched on. Parking position of the exterior mirror
on the front-passenger side
General notes The "Parking position for the exterior mirror
on the front-passenger side" function is only
available if the vehicle is equipped with the
"Memory package".
Setting and storing the parking position Using reverse gear
You can set the front-passenger side exterior
mirror so that you can see the rear wheel on
that side as soon as you engage reverse gear. You can store this position. 106
MirrorsSeats, steering wheel and mirrors