2013 MERCEDES-BENZ CLA COUPE spare tire
[x] Cancel search: spare tirePage 14 of 373

Fitting a wheel
Fitting a wheel .............................. .339
Lowering the vehicle ..................... .339
Preparing the vehicle ..................... 336
Raising the vehicle ......................... 337
Removing a wheel .......................... 339
Securing the vehicle against roll-
ing away ........................................ 336
Flat tyre
MOExtended tyres ......................... 308
Preparing the vehicle ..................... 308
TIREFIT kit ...................................... 309
see Emergency spare wheel
Floormat ............................................. 287
Foglamps
Extended range .............................. 115
Switching on/off ........................... 111
Frequencies
Mobile phone ................................. 352
Two-way radio ................................ 352
Front foglamps
Display message ............................ 247
Fuel
Additives ........................................ 357
Consumption information .............. 358
Consumption statistics .................. 217
Displaying the current consump-
tion ................................................ 218
Displaying the range ..................... .218
E10 ................................................ 356
Fuel gauge ....................................... 30
Grade (petrol) ................................ 356
Important safety notes .................. 355
Low outside temperatures ............. 358
Notes for AMG vehicles ................. 357
Problem (malfunction) ................... 166
Quality (diesel )............................... 357
Refuelling ....................................... 163
Tank content/reserve fue l............. 355
Fuel filler flap
Opening ......................................... 164
Fuel filter (white display message) .. 251
Fuel level
Calling up the range (on-board
computer) ...................................... 218
Gaug e.............................................. 30
Fuel reserve
see Fuel Fuel tank
Capacity ........................................ 355
Problem (malfunction) ................... 166
Fuses
Allocation chart ............................. 323
Before changing ............................. 323
Fuse box in the engine compart-
ment .............................................. 323
Fuse box in the front-passenger
footwell .......................................... 323
Important safety notes .................. 322 G
Gear indicator (on-board com-
puter) .................................................. 231
Gear or selector lever (cleaning
instructions) ...................................... 302
Gearshift program
SETUP (on-board computer) .......... 231
Genuine Mercedes-Benz parts ........... 21
Glove compartment .......................... 277 H
Handbrake see Parking brake
Hazard warning lamps ...................... 113
Display message ............................ 262
Head restraints
Adjusting ....................................... 101
Adjusting (electrically) ................... 101
Adjusting (manually) ...................... 101
Adjusting (rear) .............................. 102
Fitting/removing (rear) .................. 102
Headlamp
Cleaning system (function) ............ 114
Cleaning system (notes) ................ 361
Headlamps
Misting up ...................................... 116
Topping up the cleaning system .... 295
see Automatic headlamp mode
Heating
see Climate control
High-pressure cleaners .................... 298
Hill start assist .................................. 149
HOLD function
Activating ....................................... 186 Index
11
Page 21 of 373
Stowage well beneath the boot
floor
....................................................2 81
Summer tyres ................................... .328
Sun visor ............................................ 283
Supplemental restraint system
see SRS (Supplemental Restraint
System)
Surround lighting (on-board com-
puter) ................................................. .228 T
Tail lamps Display message ............................ 246
see Lights
Tank
see Fuel tank
Technical data
Emergency spare wheel ................. 350
Information ................................... .352
Trailer loads ................................... 364
Tyres/wheels ................................. 340
Vehicle data ................................... 362
Telephone
Accepting a call ............................ .222
Display message ............................ 262
Menu (on-board computer) ............ 221
Number from the phone book ....... .222
Redialling ....................................... 222
Rejecting/ending a call ................. 222
Telephone compartment ................ 278
Temperature
Coolant .......................................... 214
Coolant (on-board computer) ......... 231
Engine oil (on-board computer) ...... 231
Outside temperature ..................... .215
Setting (climate control) ................ 132
TEMPOMAT
Function/notes ............................ .173
Theft-deterrent system
ATA (Anti-Theft Alarm system) ......... 73
Immobiliser ...................................... 72
Through-loading ................................ 279
Through-loading feature ................... 279
Time
see Separate Owner's manual
Timing (RACETIMER) ......................... 232
TIREFIT kit .......................................... 309 Top Tether
............................................ 55
Tow-away protection
Activating ......................................... 73
Deactivating ..................................... 73
Function .......................................... .73
Tow-starting
Emergency engine starting ............ 322
Fitting the towing ey e.................... 320
Important safety notes .................. 318
Removing the towing eye ............... 320
Towing
Important safety notes .................. 318
Notes for 4MATIC vehicles ............ 321
Towing a trailer
Active Parking Assist ..................... 197
Axle load, permissibl e.................... 364
Bulb failure indicator for LED
lamps ............................................. 212
ESP® (Electronic Stability Pro-
gram) ............................................... 71
Pulling away with a traile r.............. 149
Trailer tow hitch display message .. 261
Towing away
Fitting the towing ey e.................... 320
Removing the towing eye ............... 320
With both axles on the ground ....... 321
With front axle raised ..................... 320
Trailer coupling
see Towing a trailer
Trailer towing
7-pin connecto r............................. 212
Blind Spot Assist ............................ 205
Cleaning the trailer tow hitch ......... 301
Coupling up a traile r...................... 210
Decoupling a trailer ....................... 210
Driving tip s.................................... 207
Folding in the ball coupling ............ 211
Folding out the ball coupling .......... 209
Important safety notes .................. 207
Lights display message .................. 245
Mounting dimensions .................... 363
Parktroni c...................................... 191
Power supply ................................. 211
Trailer load s................................... 364
Transmission
see Automatic transmission
see Manual transmission 18
Index
Page 310 of 373
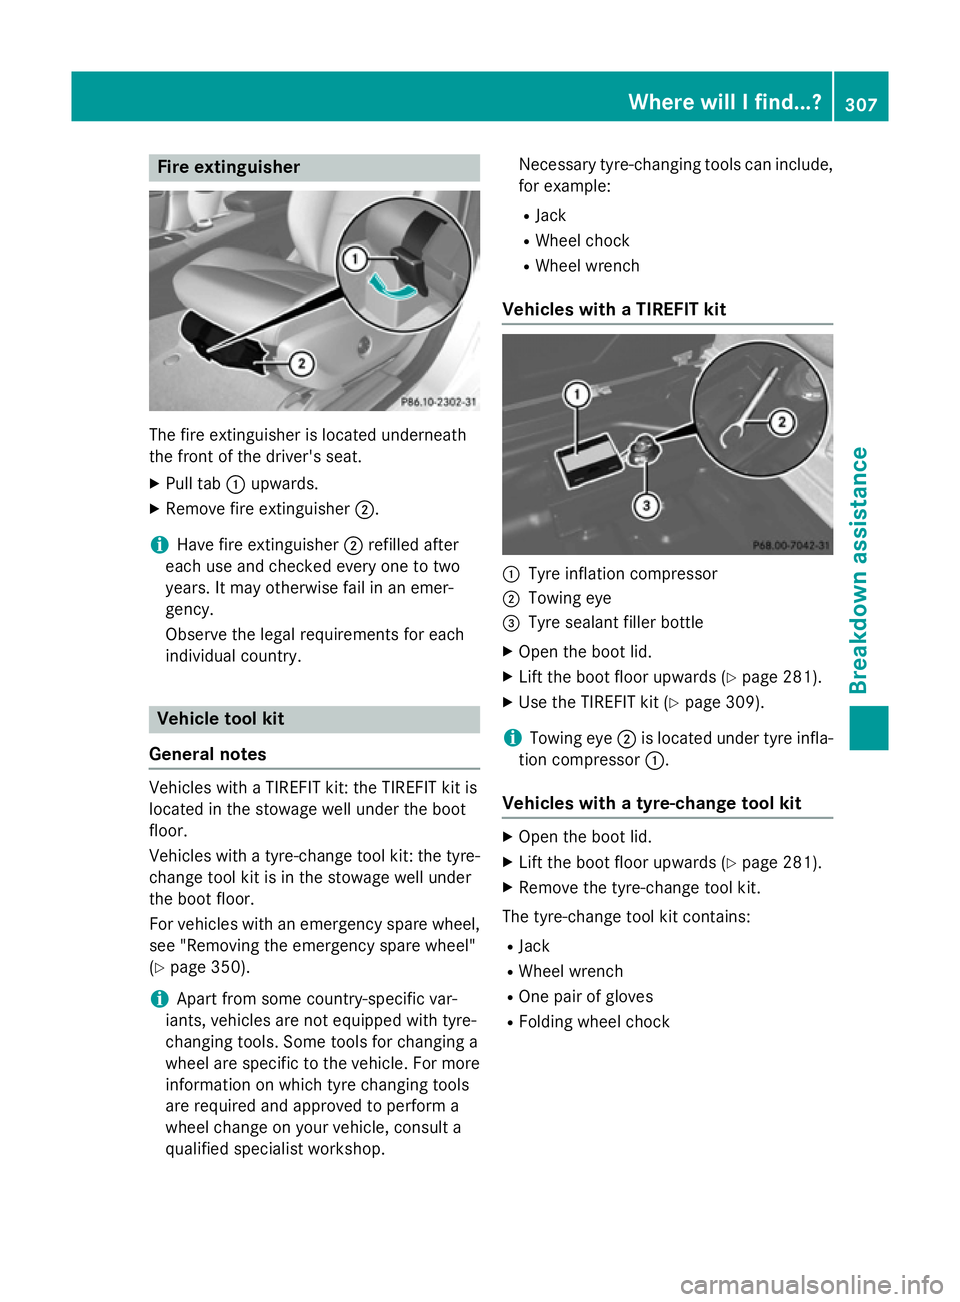
Fire extinguisher
The fire extinguisher is located underneath
the front of the driver's seat.
X Pull tab :upwards.
X Remove fire extinguisher ;.
i Have fire extinguisher
;refilled after
each use and checked every one to two
years. It may otherwise fail in an emer-
gency.
Observe the legal requirements for each
individual country. Vehicle tool kit
General notes Vehicles with a TIREFIT kit: the TIREFIT kit is
located in the stowage well under the boot
floor.
Vehicles with a tyre-change tool kit: the tyre-
change tool kit is in the stowage well under
the boot floor.
For vehicles with an emergency spare wheel, see "Removing the emergency spare wheel"
(Y page 350).
i Apart from some country-specific var-
iants, vehicles are not equipped with tyre-
changing tools. Some tools for changing a
wheel are specific to the vehicle. For more information on which tyre changing tools
are required and approved to perform a
wheel change on your vehicle, consult a
qualified specialist workshop. Necessary tyre-changing tools can include,
for example:
R Jack
R Wheel chock
R Wheel wrench
Vehicles with a TIREFIT kit :
Tyre inflation compressor
; Towing eye
= Tyre sealant filler bottle
X Open the boot lid.
X Lift the boot floor upwards (Y page 281).
X Use the TIREFIT kit (Y page 309).
i Towing eye
;is located under tyre infla-
tion compressor :.
Vehicles with a tyre-change tool kit X
Open the boot lid.
X Lift the boot floor upwards (Y page 281).
X Remove the tyre-change tool kit.
The tyre-change tool kit contains: R Jack
R Wheel wrench
R One pair of gloves
R Folding wheel chock Where will I find...?
307Breakdown assistance
Page 311 of 373
Flat tyre
Preparing the vehicle
Your vehicle may be equipped with: R MOExtended tyres (tyres with run-flat char-
acteristics) (Y page 308)
Vehicle preparation is not necessary on
vehicles with MOExtended tyres.
R a TIREFIT kit (Y page 307)
R an emergency spare wheel (only for certain
countries)
Information on changing/fitting a wheel
(Y page 336).
X Stop the vehicle as far away as possible
from traffic on solid, non-slippery and level
ground.
X Switch on the hazard warning lamps.
X Secure the vehicle against rolling away
(Y page 167).
X If possible, bring the front wheels into the
straight-ahead position.
X Switch off the engine.
X Remove the key from the ignition lock.
X All occupants must get out of the vehicle.
Make sure that they are not endangered as they do so.
X Make sure that no one is near the danger
area while a wheel is being changed. Any-
one who is not directly assisting in the
wheel change should, for example, stand
behind the barrier.
X Get out of the vehicle. Pay attention to traf-
fic conditions when doing so.
X Close the driver's door.
X Place the warning triangle a suitable dis-
tance away (Y page 306). Observe legal
requirements.
i Vehicles with MOExtended tyres are not
equipped with a TIREFIT kit at the factory. It
is therefore recommended that you addi-
tionally equip your vehicle with a TIREFIT kit if you fit tyres that do not feature run-flat
characteristics, e.g. winter tyres. A TIREFIT kit can be obtained from a qualified spe-
cialist workshop. MOExtended tyres (tyres with run-flat
characteristics)
General notes With MOExtended tyres (tyres with run-flat
characteristics), you can continue to drive
your vehicle even if there is a total loss of
pressure in one or more tyres. The affected
tyre must not show any clearly visible dam-
age.
You can recognise MOExtended tyres by the
MOExtended marking which appears on the
tyre wall. You will find this marking next to the
tyre size designation, the load-bearing capa-
city and the speed index.
MOExtended tyres may only be used in con-
junction with an active tyre pressure loss
warning system or tyre pressure monitoring
system.
If the pressure loss warning message
appears in the multifunction display:
R observe the instructions in the display mes-
sages (Y page 256).
R check the tyre for damage
R if driving on, observe the following notes
The maximum driving distance is approx-
imately 80 km when the vehicle is partially
laden and approximately 30 km when the
vehicle is fully laden.
In addition to the vehicle load, the driving dis- tance possible depends upon:
R speed
R road condition
R outside temperature
The driving distance possible in run-flat mode may be reduced by extreme driving condi-
tions/manoeuvres, or it can be increased
through a moderate style of driving.
The maximum permissible distance which
can be driven in run-flat mode is counted from 308
Flat tyreBreakdown assistance
Page 330 of 373
wheels and tyres for damage. Hidden tyre
damage could also be causing the unusual
handling characteristics. If you find no
signs of damage, have the wheels and tyres checked at a qualified specialist workshop.
R When parking your vehicle, make sure that
the tyres do not get deformed by the kerb
or other obstacles. If it is necessary to drive
over kerbs, speed humps or similar eleva-
tions, try to do so slowly and at an obtuse
angle. Otherwise, the tyres, particularly the sidewalls, may be damaged. Regular checking of wheels and tyres
G
WARNING
Damaged tyres can cause tyre inflation pres-
sure loss. As a result, you could lose control of your vehicle. There is a risk of accident.
Check the tyres regularly for signs of damage and replace any damaged tyres immediately.
Regularly check the wheels and tyres of your
vehicle for damage at least once a month, as well as after driving off-road or on rough
roads. Damaged wheels can cause a loss of
tyre pressure. Pay particular attention to
damage such as:
R cuts in the tyres
R punctures
R tears in the tyres
R bulges on tyres
R deformation or severe corrosion on wheels
Regularly check the tyre tread depth and the condition of the tread across the whole width
of the tyre (Y page 327). If necessary, turn
the front wheels to full lock in order to inspect
the inner side of the tyre surface.
All wheels must have a valve cap to protect
the valve against dirt and moisture. Do not fit
anything onto the valve other than the stand-
ard valve cap or other valve caps approved for
your vehicle by Mercedes-Benz. Do not fit any other valve caps or systems, e.g. tyre pres-
sure monitoring systems. Regularly check the pressure of all the tyres,
particularly prior to long trips. Adjust the tyre
pressure as necessary (Y page 330).
Observe the notes on the emergency spare
wheel (Y page 349).
The service life of tyres depends on various
factors, including the following:
R driving style
R tyre pressure
R mileage Important safety notes on the tyre
tread
G
WARNING
Insufficient tyre tread will reduce tyre trac-
tion. The tyre is no longer able to dissipate
water. This means that on wet road surfaces, the risk of aquaplaning increases, in particularwhere speed is not adapted to suit the driving
conditions. There is a risk of accident.
If the tyre pressure is too high or too low, tyres may exhibit different levels of wear at differ-
ent locations on the tyre tread. Thus, you
should regularly check the tread depth and
the condition of the tread across the entire
width of all tyres.
Minimum tyre tread depth for:
R summer tyres: 3 mm
R M+S tyres: 4 mm
For safety reasons, replace the tyres before
the legally prescribed limit for the minimum
tyre tread depth is reached. Selecting, fitting and replacing tyres
G
WARNING
Exceeding the stated tyre load-bearing capa-
city and the approved maximum speed could
lead to tyre damage or the tyre bursting. There is a risk of accident.
Therefore, only use tyre types and sizes
approved for your vehicle model. Observe the Operation
327Wheels and tyres
Z
Page 331 of 373
tyre load rating and speed rating required for
your vehicle.
Pay special attention to country-specific
requirements for tyre approval. These
requirements can stipulate a specific tyre
type for your vehicle. Furthermore, the use of certain tyre types in certain regions and areas
of operation can be highly beneficial. You can find further information regarding tyres at
specialist tyre retailers, at qualified specialist
workshops or at any Mercedes-Benz Service
Centre.
R Only fit tyres and wheels of the same type
and make.
Exception: it is permissible to fit a different
type or make in the event of a flat tyre.
Observe the "MOExtended tyres (tyres with
run-flat characteristics" section
(Y page 308).
R Only fit tyres of the correct size onto the
wheels.
R Run in new tyres at moderate speeds for
the first 100 km. They only reach their full
performance after this distance.
R Do not drive with tyres which have too little
tread depth. This otherwise significantly
reduces the traction on wet roads (aqua-
planing).
R Replace the tyres after six years at the lat-
est, regardless of wear.
Observe the notes on the emergency spare
wheel (Y page 349). MOExtended tyres (tyres with run-flat
characteristics)
With MOExtended tyres (tyres with run-flat
characteristics), you can continue to drive
your vehicle even if there is a total loss of
pressure in one or more tyres.
Only use MOExtended tyres in conjunction
with an activated tyre pressure loss warning
system or tyre pressure monitoring system
and only on tyres specifically inspected by
Mercedes ‑Benz. Notes on driving with MOExtended tyres with
a flat tyre (Y page 308).
i Vehicles with MOExtended tyres are not
equipped with a TIREFIT kit at the factory. It
is therefore recommended that you addi-
tionally equip your vehicle with a TIREFIT kit if you fit tyres that do not feature run-flat
characteristics, e.g. winter tyres. A TIREFIT
kit can be obtained from a qualified spe-
cialist workshop. Winter operation
General notes
Have your vehicle winterproofed at a qualified
specialist workshop at the onset of winter.
Observe the notes in the "Changing a wheel" section (Y page 335). Driving with summer tyres
At temperatures below +7 †, summer tyres
lose elasticity and therefore traction and
braking power. Change the tyres on your vehi- cle to M+S tyres. Using summer tyres at very
cold temperatures could cause tears to form, thereby damaging the tyres permanently.
Mercedes-Benz cannot accept responsibility
for this type of damage. G
WARNING
Damaged tyres can cause tyre inflation pres-
sure loss. As a result, you could lose control of your vehicle. There is a risk of accident.
Check the tyres regularly for signs of damageand replace any damaged tyres immediately. M+S tyres
G
WARNING
M+S tyres with a tyre tread depth of less than 4 mm are not suitable for use in winter as they
do not provide sufficient traction. There is a
risk of accident. 328
Winter operationWheels and tyres