2013 MERCEDES-BENZ CLA COUPE dimensions
[x] Cancel search: dimensionsPage 9 of 373
Belt tensioner
Activation ......................................... 41
Function ........................................... 50
Blind Spot Assist
Activating/deactivating ................. 225
Display message ............................ 253
Notes/functio n.............................. 203
Trailer towing ................................. 205
Bonnet
Active bonnet (pedestrian protec-tion) ............................................... 290
Closing ........................................... 292
Display message ............................ 261
Important safety notes .................. 290
Opening ......................................... 291
Boot
Emergency release .......................... 88
Important safety notes .................... 86
Opening (automatically from out-
side) ................................................. 87
Opening automatically from
inside ............................................... 87
Opening/closing (manually from
outside) ............................................ 87
Boot lid
Display message ............................ 260
Opening dimensions ...................... 362
Boot load (maximum) ........................ 362
Brake Assist
see BAS (Brake Assist System)
Brake fluid
Display message ............................ 241
Notes ............................................. 360
Brake lamps
Adaptive ........................................... 68
Changing bulb s.............................. 120
Display message ............................ 246
Brakes
ABS .................................................. 64
Adaptive Brake Assist ...................... 66
BAS .................................................. 64
Brake fluid (notes) ......................... 360
Display message ............................ 235
Driving tips .................................... 171
HOLD function ............................... 186
Important safety notes .................. 171
Parking brake ................................ 168
Warning lamp ................................. 265 Breakdown
see Flat tyre
see Towing away/tow-starting
Bulbs
see Replacing bulbs C
Calling up a fault see Display messages
Capacities (technical data) ............... 354
Car
see Vehicle
Car wash (care) ................................. 297
Care
Automatic car wash ....................... 297
Carpets .......................................... 303
Display ........................................... 302
Exhaust pipe .................................. 301
Exterior lighting ............................. 300
Gear or selector lever .................... 302
High-pressure cleaner .................... 298
Interior ........................................... 302
Matt paintwork .............................. 299
Notes ............................................. 297
Paint .............................................. 298
Plastic trim .................................... 302
Reversing camera .......................... 300
Roof lining ...................................... 303
Seat belt ........................................ 303
Seat cove r..................................... 302
Sensors ......................................... 300
Steering wheel ............................... 302
Trim pieces .................................... 302
Washing by hand ........................... 298
Wheels ........................................... 298
Windows ........................................ 299
Wiper blades .................................. 300
Wooden trim .................................. 302
Central locking
Automatic locking (on-board com-
puter) ............................................. 229
Locking/unlocking (key) .................. 79
Centre console
Lower section .................................. 35
Upper section .................................. 34
Changing bulbs
Brake lamps ................................... 120 6
Index
Page 21 of 373
Stowage well beneath the boot
floor
....................................................2 81
Summer tyres ................................... .328
Sun visor ............................................ 283
Supplemental restraint system
see SRS (Supplemental Restraint
System)
Surround lighting (on-board com-
puter) ................................................. .228 T
Tail lamps Display message ............................ 246
see Lights
Tank
see Fuel tank
Technical data
Emergency spare wheel ................. 350
Information ................................... .352
Trailer loads ................................... 364
Tyres/wheels ................................. 340
Vehicle data ................................... 362
Telephone
Accepting a call ............................ .222
Display message ............................ 262
Menu (on-board computer) ............ 221
Number from the phone book ....... .222
Redialling ....................................... 222
Rejecting/ending a call ................. 222
Telephone compartment ................ 278
Temperature
Coolant .......................................... 214
Coolant (on-board computer) ......... 231
Engine oil (on-board computer) ...... 231
Outside temperature ..................... .215
Setting (climate control) ................ 132
TEMPOMAT
Function/notes ............................ .173
Theft-deterrent system
ATA (Anti-Theft Alarm system) ......... 73
Immobiliser ...................................... 72
Through-loading ................................ 279
Through-loading feature ................... 279
Time
see Separate Owner's manual
Timing (RACETIMER) ......................... 232
TIREFIT kit .......................................... 309 Top Tether
............................................ 55
Tow-away protection
Activating ......................................... 73
Deactivating ..................................... 73
Function .......................................... .73
Tow-starting
Emergency engine starting ............ 322
Fitting the towing ey e.................... 320
Important safety notes .................. 318
Removing the towing eye ............... 320
Towing
Important safety notes .................. 318
Notes for 4MATIC vehicles ............ 321
Towing a trailer
Active Parking Assist ..................... 197
Axle load, permissibl e.................... 364
Bulb failure indicator for LED
lamps ............................................. 212
ESP® (Electronic Stability Pro-
gram) ............................................... 71
Pulling away with a traile r.............. 149
Trailer tow hitch display message .. 261
Towing away
Fitting the towing ey e.................... 320
Removing the towing eye ............... 320
With both axles on the ground ....... 321
With front axle raised ..................... 320
Trailer coupling
see Towing a trailer
Trailer towing
7-pin connecto r............................. 212
Blind Spot Assist ............................ 205
Cleaning the trailer tow hitch ......... 301
Coupling up a traile r...................... 210
Decoupling a trailer ....................... 210
Driving tip s.................................... 207
Folding in the ball coupling ............ 211
Folding out the ball coupling .......... 209
Important safety notes .................. 207
Lights display message .................. 245
Mounting dimensions .................... 363
Parktroni c...................................... 191
Power supply ................................. 211
Trailer load s................................... 364
Transmission
see Automatic transmission
see Manual transmission 18
Index
Page 22 of 373
Transmission position display
(DIRECT SELECT lever)
...................... 156
Transporting the vehicle .................. 321
Trim pieces (cleaning instruc-
tions) .................................................. 302
Trip computer (on-board com-
puter) .................................................. 217
Trip meter
Calling up ....................................... 217
Resetting (on-board computer) ...... 218
Turn signals
Changing bulbs (front) ................... 120
Changing bulbs (rear ).................... 120
Switching on/of f........................... 113
Two-way radio
Frequencies ................................... 352
Installation ..................................... 352
Transmission output (maximum) .... 352
Type identification plate
see Vehicle identification plate
Tyre pressure
Calling up (on-board computer) ..... 332
Display message ............................ 256
Important safety notes .................. 332
Not reached (TIREFIT) .................... 311
Reached (TIREFIT) .......................... 311
Recommended ............................... 330
Tyre pressure loss warning
General notes ................................ 331
Important safety notes .................. 331
Restarting ...................................... 332
Tyre pressure monitor
Checking the tyre pressure elec-
tronically ........................................ 333
Function/note s............................. 332
General notes ................................ 332
Important safety notes .................. 332
Restarting ...................................... 334
Warning lamp ................................. 274
Warning message .......................... 334
Tyres
Changing a whee l.......................... 335
Checking ........................................ 327
Direction of rotation ...................... 336
Display message ............................ 256
Important safety notes .................. 326
M+S tyres ...................................... 328
MOExtended tyre s......................... 328 Replacing ....................................... 335
Service life ..................................... 327
Storing ........................................... 336
Summer tyres ........................ 172, 328
Tyre size (data ).............................. 340
Tyre tread ...................................... 327
Wheel and tyre combinations ........ 342
see Flat tyre U
Unlocking Emergency unlocking ....................... 85
From inside the vehicle (central
unlocking button) ............................. 84 V
Vanity mirror (in sun visor) .............. 284
Variable SPEEDTRONIC
see SPEEDTRONIC
Vehicle
Correct use ...................................... 24
Data acquisition ............................... 25
Electronics ..................................... 352
Equipment ....................................... 22
Implied warranty .............................. 25
Individual settings .......................... 225
Leaving parked up ......................... 169
Locking (in an emergency) ............... 86
Locking (key) ................................... 79
Lowering ........................................ 339
Pulling away ................................... 148
Raising ........................................... 337
Registration ..................................... 24
Securing from rolling away ............ 336
Tow-starting ................................... 318
Towing away .................................. 318
Transporting .................................. 321
Unlocking (in an emergency) ........... 85
Unlocking (key) ................................ 79
Vehicle data ................................... 362
Vehicle data ....................................... 362
Vehicle dimensions ........................... 362
Vehicle emergency locking ................ 86
Vehicle identification number
see VIN
Vehicle identification plate .............. 354 Index
19
Page 90 of 373
leave persons (particularly children) unatten-
ded in the vehicle.
! The boot lid swings upwards when
opened. Therefore, make sure that there is sufficient clearance above the boot lid.
i The opening dimensions of the boot lid
can be found in the "Vehicle data" section
(Y page 362).
Stow luggage or loads preferably in the boot.
Observe the loading guidelines (Y page 276).
Do not leave the key in the boot. You could
otherwise lock yourself out.
The boot lid can be:
R opened and closed manually from outside
R opened automatically from outside
R opened automatically from inside
R unlocked from the inside with the emer-
gency key element Opening and closing manually from
outside
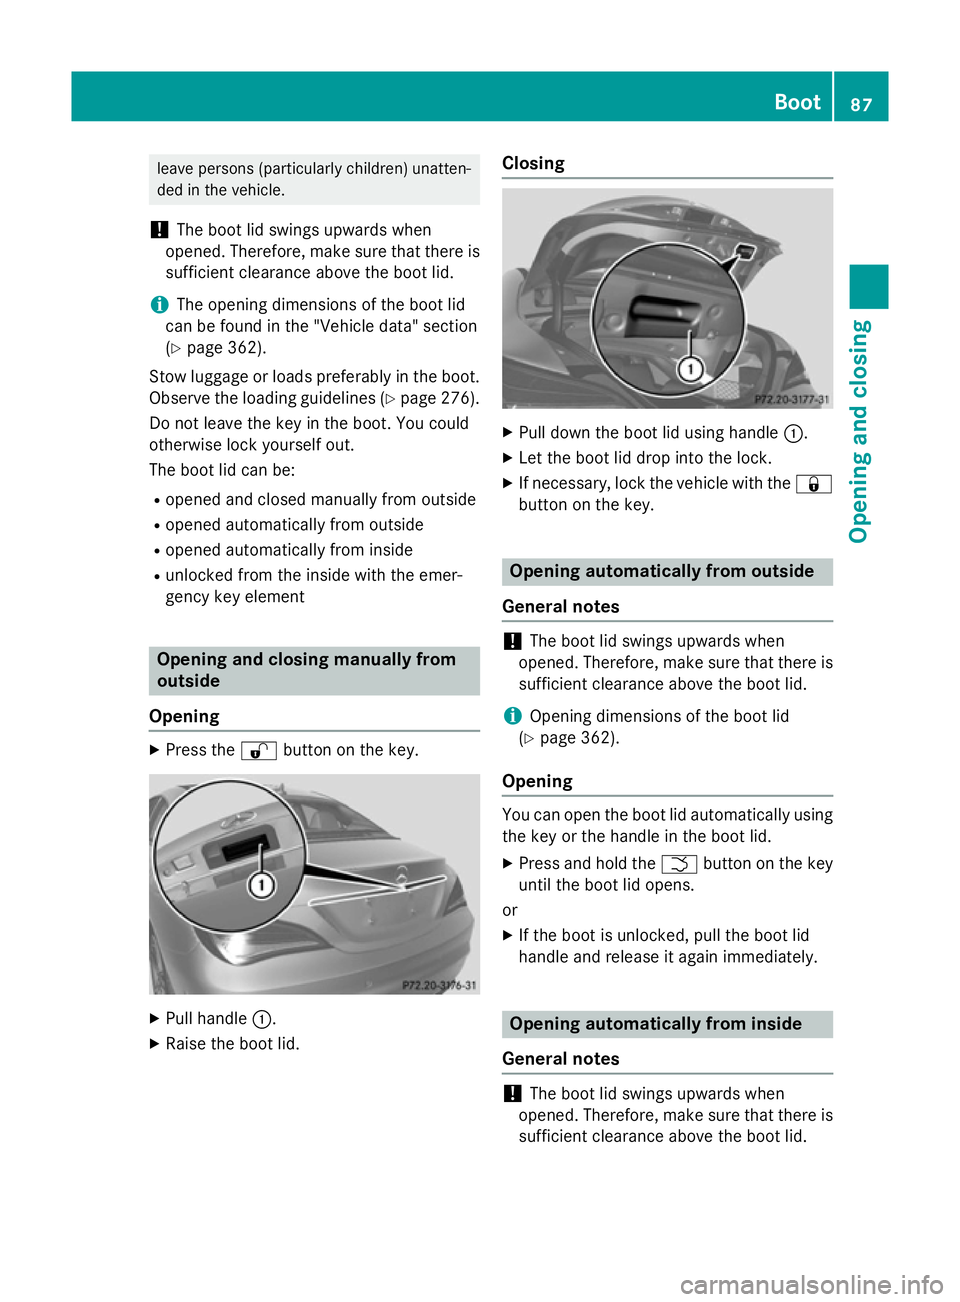
Opening X
Press the %button on the key. X
Pull handle :.
X Raise the boot lid. Closing
X
Pull down the boot lid using handle :.
X Let the boot lid drop into the lock.
X If necessary, lock the vehicle with the &
button on the key. Opening automatically from outside
General notes !
The boot lid swings upwards when
opened. Therefore, make sure that there is sufficient clearance above the boot lid.
i Opening dimensions of the boot lid
(Y page 362).
Opening You can open the boot lid automatically using
the key or the handle in the boot lid.
X Press and hold the Fbutton on the key
until the boot lid opens.
or
X If the boot is unlocked, pull the boot lid
handle and release it again immediately. Opening automatically from inside
General notes !
The boot lid swings upwards when
opened. Therefore, make sure that there is sufficient clearance above the boot lid. Boot
87Opening and closing Z
Page 91 of 373
i
The opening dimensions of the boot lid
can be found in the "Vehicle data" section
(Y page 362).
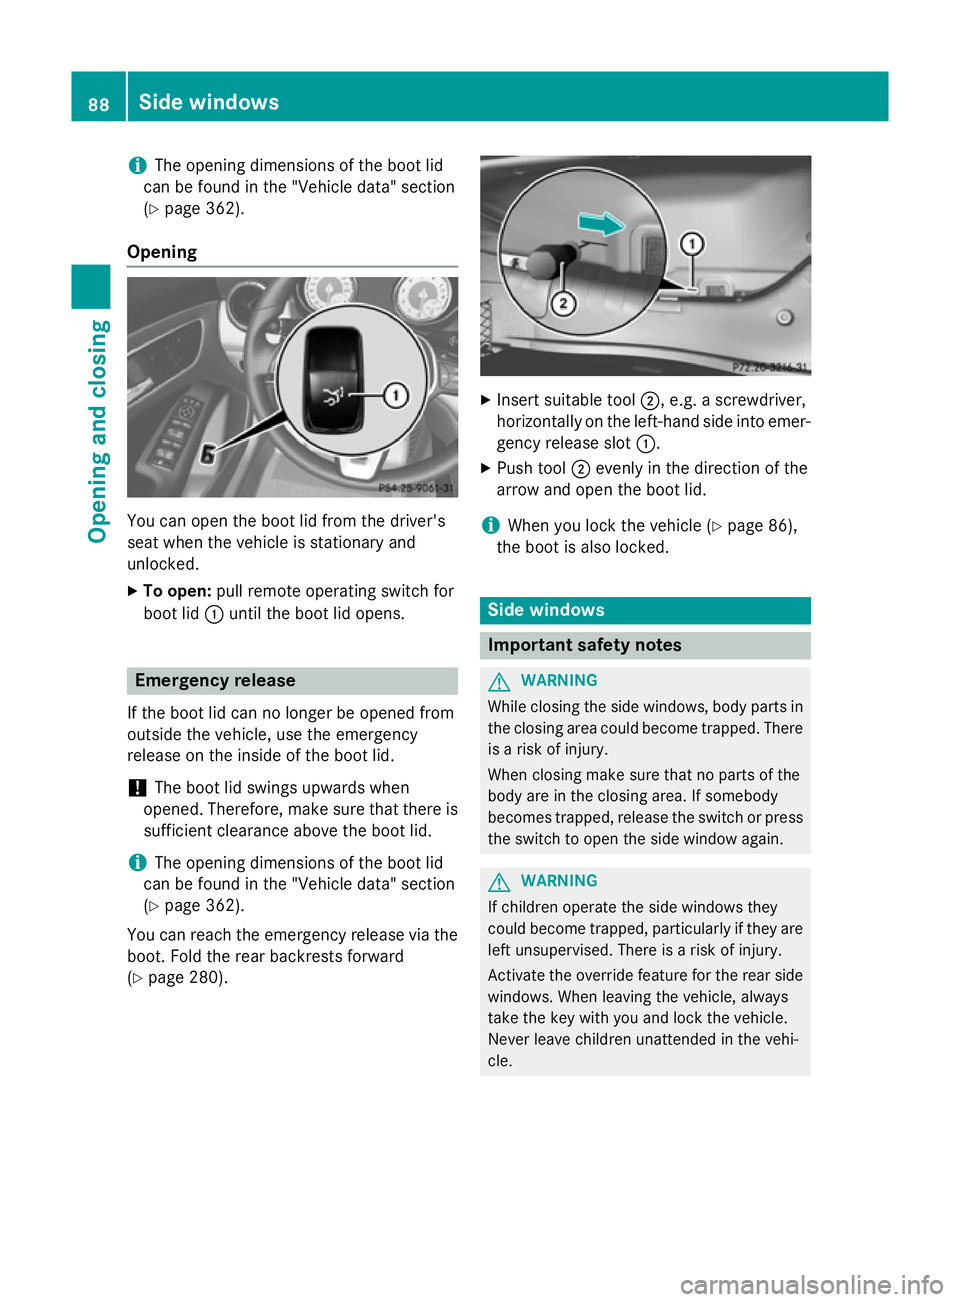
Opening You can open the boot lid from the driver's
seat when the vehicle is stationary and
unlocked.
X To open: pull remote operating switch for
boot lid :until the boot lid opens. Emergency release
If the boot lid can no longer be opened from
outside the vehicle, use the emergency
release on the inside of the boot lid.
! The boot lid swings upwards when
opened. Therefore, make sure that there is sufficient clearance above the boot lid.
i The opening dimensions of the boot lid
can be found in the "Vehicle data" section
(Y page 362).
You can reach the emergency release via the boot. Fold the rear backrests forward
(Y page 280). X
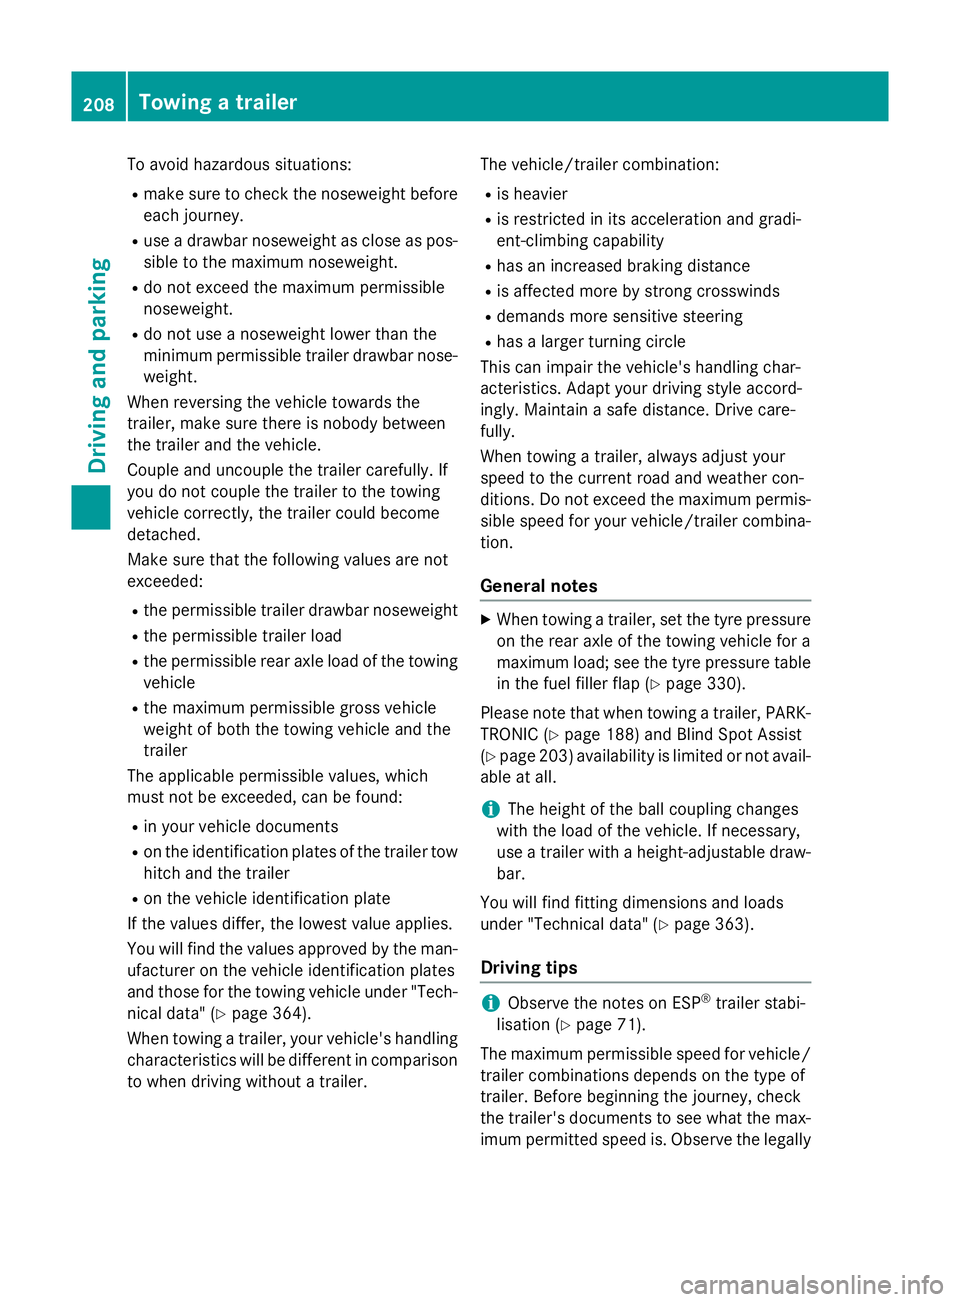
Insert suitable tool ;, e.g. a screwdriver,
horizontally on the left-hand side into emer- gency release slot :.
X Push tool ;evenly in the direction of the
arrow and open the boot lid.
i When you lock the vehicle (Y
page 86),
the boot is also locked. Side windows
Important safety notes
G
WARNING
While closing the side windows, body parts in the closing area could become trapped. There is a risk of injury.
When closing make sure that no parts of the
body are in the closing area. If somebody
becomes trapped, release the switch or press
the switch to open the side window again. G
WARNING
If children operate the side windows they
could become trapped, particularly if they are left unsupervised. There is a risk of injury.
Activate the override feature for the rear side
windows. When leaving the vehicle, always
take the key with you and lock the vehicle.
Never leave children unattended in the vehi-
cle. 88
Side windowsOpening and closing
Page 211 of 373
To avoid hazardous situations:
R make sure to check the noseweight before
each journey.
R use a drawbar noseweight as close as pos-
sible to the maximum noseweight.
R do not exceed the maximum permissible
noseweight.
R do not use a noseweight lower than the
minimum permissible trailer drawbar nose- weight.
When reversing the vehicle towards the
trailer, make sure there is nobody between
the trailer and the vehicle.
Couple and uncouple the trailer carefully. If
you do not couple the trailer to the towing
vehicle correctly, the trailer could become
detached.
Make sure that the following values are not
exceeded:
R the permissible trailer drawbar noseweight
R the permissible trailer load
R the permissible rear axle load of the towing
vehicle
R the maximum permissible gross vehicle
weight of both the towing vehicle and the
trailer
The applicable permissible values, which
must not be exceeded, can be found:
R in your vehicle documents
R on the identification plates of the trailer tow
hitch and the trailer
R on the vehicle identification plate
If the values differ, the lowest value applies.
You will find the values approved by the man-
ufacturer on the vehicle identification plates
and those for the towing vehicle under "Tech- nical data" (Y page 364).
When towing a trailer, your vehicle's handling
characteristics will be different in comparison to when driving without a trailer. The vehicle/trailer combination:
R is heavier
R is restricted in its acceleration and gradi-
ent-climbing capability
R has an increased braking distance
R is affected more by strong crosswinds
R demands more sensitive steering
R has a larger turning circle
This can impair the vehicle's handling char-
acteristics. Adapt your driving style accord-
ingly. Maintain a safe distance. Drive care-
fully.
When towing a trailer, always adjust your
speed to the current road and weather con-
ditions. Do not exceed the maximum permis- sible speed for your vehicle/trailer combina-
tion.
General notes X
When towing a trailer, set the tyre pressure
on the rear axle of the towing vehicle for a
maximum load; see the tyre pressure table in the fuel filler flap (Y page 330).
Please note that when towing a trailer, PARK-
TRONIC (Y page 188) and Blind Spot Assist
(Y page 203) availability is limited or not avail-
able at all.
i The height of the ball coupling changes
with the load of the vehicle. If necessary,
use a trailer with a height-adjustable draw- bar.
You will find fitting dimensions and loads
under "Technical data" (Y page 363).
Driving tips i
Observe the notes on ESP ®
trailer stabi-
lisation (Y page 71).
The maximum permissible speed for vehicle/
trailer combinations depends on the type of
trailer. Before beginning the journey, check
the trailer's documents to see what the max- imum permitted speed is. Observe the legally 208
Towing a trailerDriving and parking
Page 329 of 373
Useful information
i This Owner's Manual describes all mod-
els, series and optional equipment for your
vehicle that were available at the time of
going to press. National variations are pos- sible. Note that your vehicle may not be
equipped with all of the functions descri-
bed. This is also the case for systems and
functions relevant to safety.
i Read the information on qualified special-
ist workshops: (Y page 24). Important safety notes
G
WARNING
If wheels and tyres of the wrong size are used, the wheel brakes or suspension components
may be damaged. There is a risk of an acci-
dent.
Always replace wheels and tyres with those
that fulfil the specifications of the original
part.
When replacing wheels, make sure to fit the
correct:
R designation
R type
When replacing tyres, make sure to fit the
correct:
R designation
R manufacturer
R type G
WARNING
A flat tyre severely impairs the driving, steer-
ing and braking characteristics of the vehicle.
There is a risk of accident.
Tyres without run-flat characteristics:
R do not drive with a flat tyre.
R immediately replace the flat tyre with your
emergency spare wheel or spare wheel, or
consult a qualified specialist workshop. Tyres with run-flat characteristics:
R pay attention to the information and warn-
ing notices on MOExtended tyres (tyres
with run-flat characteristics).
Accessories that are not approved for your
vehicle by Mercedes-Benz or that are not
being used correctly can impair operating
safety.
Before purchasing and using non-approved
accessories, visit a qualified specialist work-
shop and enquire about:
R suitability
R legal stipulations
R factory recommendations
Information on dimensions and types of
wheels and tyres for your vehicle can be
found under: (Y page 340).
Information on air pressure for the tyres on
your vehicle can be found:
R on the tyre pressure label on the fuel filler
flap (Y page 164)
R under "Tyre pressure" (Y page 330)
Modification work on the brake system and
wheels is not permitted. The use of wheel
spacers or brake dust shields is not permit-
ted. This invalidates the general operating
permit for the vehicle.
i Further information on wheels and tyres
can be obtained at any qualified specialist
workshop. Operation
Information on driving
R Check the tyre pressures when the vehicle
is heavily laden and, if necessary, adjust.
R While driving, pay attention to vibrations,
noises and unusual handling characteris-
tics, e.g. pulling to one side. This may indi-
cate that the wheels or tyres are damaged. If you suspect that a tyre is defective,
reduce your speed immediately. Stop the
vehicle as soon as possible to check the 326
OperationWheels and tyres
Page 338 of 373
Radio type approval for the tyre pres-
sure monitor Country Radio type approval number
Brazil 1489-10-4415
Model: MRXMERCTX1
Dubai TRA, Registered NO
0016161/08
TRA, Registered NO
ER0076990/11
Dealer-NO: DA0047074/10
Morocco MR5526 ANRT 2010/
27/04/2010
MR6706 ANRT 2011/
17/11/2011
Philip-
pines ESD-1105558C
Serbia И 011 12
Singa-
pore Compliance with IDA Standard
N0140-09
South
Africa TA-2008/1068
TA-2011/1370
Changing a wheel
Flat tyre
You can find information on what to do in the event of flat tyre in the "Flat tyre" section
(Y page 308). Information on driving with
MOExtended tyres in the event of a flat tyre
can be found under "Breakdown assistance"
(Y page 308).
Vehicles with an emergency spare wheel: in the event of a flat tyre, the emergency
spare wheel is fitted according to the descrip-
tion under "Fitting a wheel" (Y page 336). Interchanging the wheels
G
WARNING
Interchanging the front and rear wheels may
severely impair the driving characteristics if
the wheels or tyres have different dimensions. The wheel brakes or suspension components may also be damaged. There is a risk of acci-
dent.
Interchange front and rear wheels only if the
wheels and tyres are of the same dimensions.
! On vehicles fitted with a tyre pressure
monitor, electronic components are loca-
ted in the wheel.
Tyre-fitting tools should not be applied in
the area of the valve, as this could damage
the electronic components.
Only have tyres changed at a qualified spe- cialist workshop.
Interchanging the front and rear wheels of
differing dimensions can render the general
operating permit invalid.
Always pay attention to the instructions and
safety notes when changing a wheel
(Y page 335).
The wear patterns on the front and rear tyres differ, depending on the operating conditions.
Interchange the wheels before a clear wear
pattern has formed on the tyres. Front tyres
typically wear more on the shoulders and the
rear tyres in the centre.
On vehicles that have the same size front and rear wheels, you can interchange the wheels
every 5,000 to 10,000 km depending on the
degree of tyre wear. Ensure that the direction of rotation is maintained.
Clean the contact surfaces of the wheel and
the brake disc thoroughly every time a wheel
is interchanged. Check the tyre pressure and, if necessary, restart the tyre pressure loss
warning system or the tyre pressure monitor. Changing a wheel
335Wheels and tyres Z