2013 MERCEDES-BENZ CLA COUPE turn signal bulb
[x] Cancel search: turn signal bulbPage 10 of 373

Cornering light function ................
.120
Dipped-beam headlamps .............. .119
Main-beam headlamps ................... 119
Rear foglamp ................................. 120
Reversing lamps ............................ 120
Turn signals (front) ......................... 120
Turn signals (rear) .......................... 120
Child seat
Automatic recognition ..................... 53
ISOFIX .............................................. 54
On the front-passenger sea t............ 52
Problem (malfunction) ..................... 62
Recommendations ........................... 59
Suitable positions ............................ 57
Top Tether ....................................... 55
Child-proof locks
Important safety notes .................... 62
Rear doors ....................................... 63
Children
In the vehicle ................................... 51
Restraint systems ............................ 51
Cigarette lighter ................................ 284
Cleaning
Trailer tow hitch ............................. 301
Climate control
Auxiliary heating/ventilation .......... 138
Controlling automaticall y............... 132
Convenience opening/closing
(air-recirculation mode) ................. 136
Cooling with air dehumidification .. 130
Demisting the windows .................. 134
Demisting the windscreen ............. 134
Important safety notes .................. 126
Indicator lamp ................................ 132
Notes on using THERMATIC auto-
matic climate control ..................... 127
Notes on using THERMOTRONIC
automatic climate control .............. 129
Overview of systems ...................... 126
Problem with the rear window
heating .......................................... 136
Problems with cooling with air
dehumidification ............................ 132
Setting the air distribution ............. 133
Setting the air vents ...................... 143
Setting the airflow ......................... 133
Setting the temperature ................ 132 Switching air-recirculation mode
on/of
f............................................ 136
Switching on/of f........................... 130
Switching residual heat on/off ...... 137
Switching the rear window heat-
ing on/of f...................................... 135
Switching the ZONE function on/
off .................................................. 133
THERMATIC automatic climate
control ........................................... 127
THERMOTRONIC (2-zone) auto-
matic climate control ..................... 129
Cockpit
Overview .......................................... 28
see Instrument cluster
COLLISION PREVENTION ASSIST
Activating/deactivating the dis-
tance warning function .................. 224
Display message ............................ 235
Operation/note s.............................. 65
COLLISION PREVENTION ASSIST
PLUS
Activating/deactivating ................. 224
Display message ............................ 242
Operation/note s.............................. 67
COMAND Online
see separate operating instructions
Combination switch .......................... 113
Consumption statistics (on-board
computer) .......................................... 217
Convenience closing feature .............. 90
Convenience opening feature ............ 90
Convenience opening/closing (air-
recirculation mode) ........................... 136
Coolant (engine)
Checking the level ......................... 294
Display message ............................ 249
Important safety notes .................. 360
Temperature (on-board com-
puter) ............................................. 231
Temperature gaug e........................ 214
Warning lamp ................................. 271
Cooling
see Climate control
Copyright ............................................. 26
Cornering lamps
Changing bulb s.............................. 120 Index
7
Page 16 of 373
Activating/deactivating the inte-
rior lighting delayed switch-off ....... 228
Active light functio n....................... 114
Automatic headlamp mode ............ 111
Cornering light function ................. 114
Dipped-beam headlamp s............... 111
Display message ............................ 245
Driving abroad ............................... 110
Foglamps ....................................... 111
Foglamps (extended range) ........... 115
Hazard warning lamps ................... 113
Headlamp flashe r........................... 113
Headlamp range ............................ 112
Light switch ................................... 110
Main-beam headlamp s................... 113
Motorway mode ............................. 114
Parking lamps ................................ 112
Rear foglamp ................................. 112
Setting the ambient lighting
brightness (on-board computer) .... 227
Side lamps ..................................... 112
Switching the daytime driving
lights on/off (on-board com-
puter) ............................................. 226
Switching the daytime driving
lights on/off (switch) ..................... 111
Switching the exterior lighting
delayed switch-off on/off (on-
board computer) ............................ 228
Switching the surround lighting
on/off (on-board computer) .......... 228
Turn signals ................................... 113
see Interior lighting
see Replacing bulbs
LIM indicator lamp
Cruise control ................................ 174
DISTRONIC PLUS ........................... 179
Variable SPEEDTRONIC ................. 176
Limiting the speed
see SPEEDTRONIC
Loading guidelines ............................ 276
Locking
see Central locking
Locking (doors)
Automatic ........................................ 85
Emergency locking ........................... 86
From inside (central locking but-
ton) .................................................. 84 Locking centrally
see Central locking
Locking verification signal (on-
board computer) ............................... 229
Luggage compartment enlarge-
ment ................................................... 279
Luggage net ....................................... 279
Lumbar support
Adjusting the 4-way lumbar sup-
port ................................................ 102 M
M+S tyres ........................................... 328
Main-beam headlamps
Changing bulb s.............................. 119
Display message ............................ 247
Switching on/of f........................... 113
Maintenance
see ASSYST PLUS
Manual transmission
Engaging reverse gear ................... 155
Gear lever ...................................... 154
Pulling away ................................... 148
Shift recommendation ................... 155
Shifting to neutral .......................... 155
Starting the engine ........................ 148
Matt finish (cleaning instructions) .. 299
Media Interface
see Separate operating instructions
Memory card (audio) ......................... 221
Memory function ............................... 107
Mercedes-Benz Service Centre
see Qualified specialist workshop
Message memory (on-board com-
puter) .................................................. 234
Messages
see Display messages
Mirrors
see Exterior mirrors
see Rear-view mirror
see Vanity mirror (in sun visor)
Mobile phone
Frequencies ................................... 352
Installation ..................................... 352
Menu (on-board computer) ............ 221
Notes/placing in the bracket ......... 286
Transmission output (maximum) .... 352 Index
13
Page 22 of 373
Transmission position display
(DIRECT SELECT lever)
...................... 156
Transporting the vehicle .................. 321
Trim pieces (cleaning instruc-
tions) .................................................. 302
Trip computer (on-board com-
puter) .................................................. 217
Trip meter
Calling up ....................................... 217
Resetting (on-board computer) ...... 218
Turn signals
Changing bulbs (front) ................... 120
Changing bulbs (rear ).................... 120
Switching on/of f........................... 113
Two-way radio
Frequencies ................................... 352
Installation ..................................... 352
Transmission output (maximum) .... 352
Type identification plate
see Vehicle identification plate
Tyre pressure
Calling up (on-board computer) ..... 332
Display message ............................ 256
Important safety notes .................. 332
Not reached (TIREFIT) .................... 311
Reached (TIREFIT) .......................... 311
Recommended ............................... 330
Tyre pressure loss warning
General notes ................................ 331
Important safety notes .................. 331
Restarting ...................................... 332
Tyre pressure monitor
Checking the tyre pressure elec-
tronically ........................................ 333
Function/note s............................. 332
General notes ................................ 332
Important safety notes .................. 332
Restarting ...................................... 334
Warning lamp ................................. 274
Warning message .......................... 334
Tyres
Changing a whee l.......................... 335
Checking ........................................ 327
Direction of rotation ...................... 336
Display message ............................ 256
Important safety notes .................. 326
M+S tyres ...................................... 328
MOExtended tyre s......................... 328 Replacing ....................................... 335
Service life ..................................... 327
Storing ........................................... 336
Summer tyres ........................ 172, 328
Tyre size (data ).............................. 340
Tyre tread ...................................... 327
Wheel and tyre combinations ........ 342
see Flat tyre U
Unlocking Emergency unlocking ....................... 85
From inside the vehicle (central
unlocking button) ............................. 84 V
Vanity mirror (in sun visor) .............. 284
Variable SPEEDTRONIC
see SPEEDTRONIC
Vehicle
Correct use ...................................... 24
Data acquisition ............................... 25
Electronics ..................................... 352
Equipment ....................................... 22
Implied warranty .............................. 25
Individual settings .......................... 225
Leaving parked up ......................... 169
Locking (in an emergency) ............... 86
Locking (key) ................................... 79
Lowering ........................................ 339
Pulling away ................................... 148
Raising ........................................... 337
Registration ..................................... 24
Securing from rolling away ............ 336
Tow-starting ................................... 318
Towing away .................................. 318
Transporting .................................. 321
Unlocking (in an emergency) ........... 85
Unlocking (key) ................................ 79
Vehicle data ................................... 362
Vehicle data ....................................... 362
Vehicle dimensions ........................... 362
Vehicle emergency locking ................ 86
Vehicle identification number
see VIN
Vehicle identification plate .............. 354 Index
19
Page 121 of 373
Bulbs and lamps are an important aspect of
vehicle safety. You must therefore make sure that these function correctly at all times.
Have the headlamp setting checked regularly.
Other bulbs G
WARNING
Bulbs, lamps and plug connectors can
become very hot during use. When replacing a bulb, you could burn yourself on these com-
ponents. There is a risk of injury.
Allow these components to cool down before replacing the bulb.
Do not use a bulb that has been dropped or if
its glass tube has been scratched.
The bulb may explode if:
R you touch it
R it is hot
R you drop it
R you scratch it
Only operate bulbs in enclosed lamps
designed for that purpose. Only fit spare
bulbs of the same type and the specified volt- age.
Marks on the glass tube reduce the service
life of the bulbs. Do not touch the glass tube
with your bare hands. If necessary, clean the
glass tube when cold with alcohol or spirit and
rub it off with a lint-free cloth.
Protect bulbs from moisture during opera-
tion. Do not allow bulbs to come into contact
with liquids.
There are bulbs other than the xenon bulbs
that you cannot replace yourself. Replace
only the bulbs listed (Y page 118). Have the
bulbs that you cannot replace yourself
replaced at a qualified specialist workshop.
If you require assistance replacing bulbs, con- sult a qualified specialist workshop.
If the new bulb still does not light up, consult
a qualified specialist workshop.
Bulbs and lamps are an important aspect of
vehicle safety. You must therefore make sure that these function correctly at all times.
Have the headlamp setting checked regularly. Overview of bulb replacement – bulbs
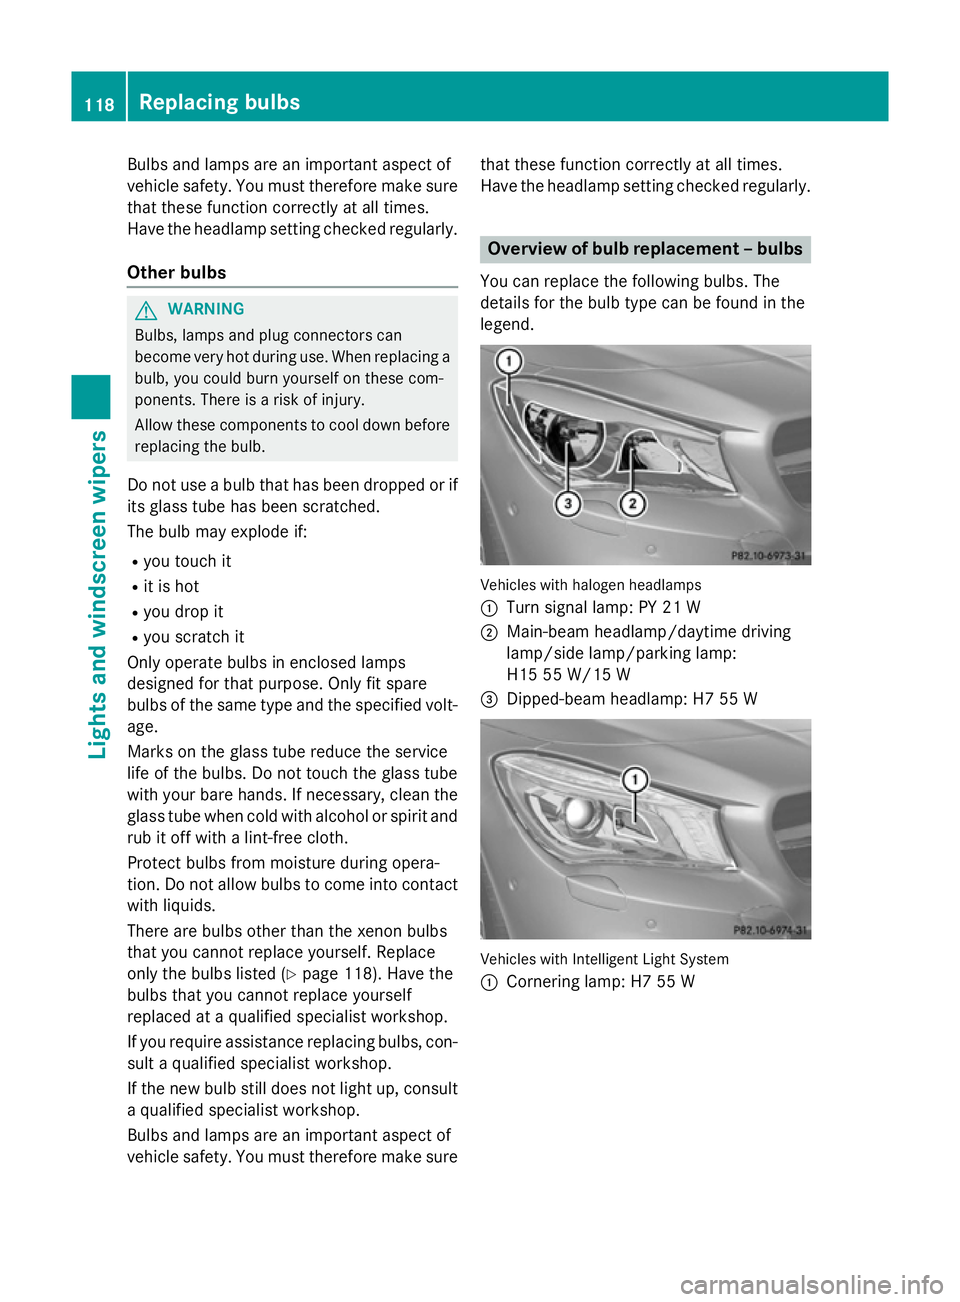
You can replace the following bulbs. The
details for the bulb type can be found in the
legend. Vehicles with halogen headlamps
:
Turn signal lamp: PY 21 W
; Main-beam headlamp/daytime driving
lamp/side lamp/parking lamp:
H15 55 W/15 W
= Dipped-beam headlamp: H7 55 W Vehicles with Intelligent Light System
:
Cornering lamp: H7 55 W 118
Replacing bulbsLights and windscreen wipers
Page 122 of 373
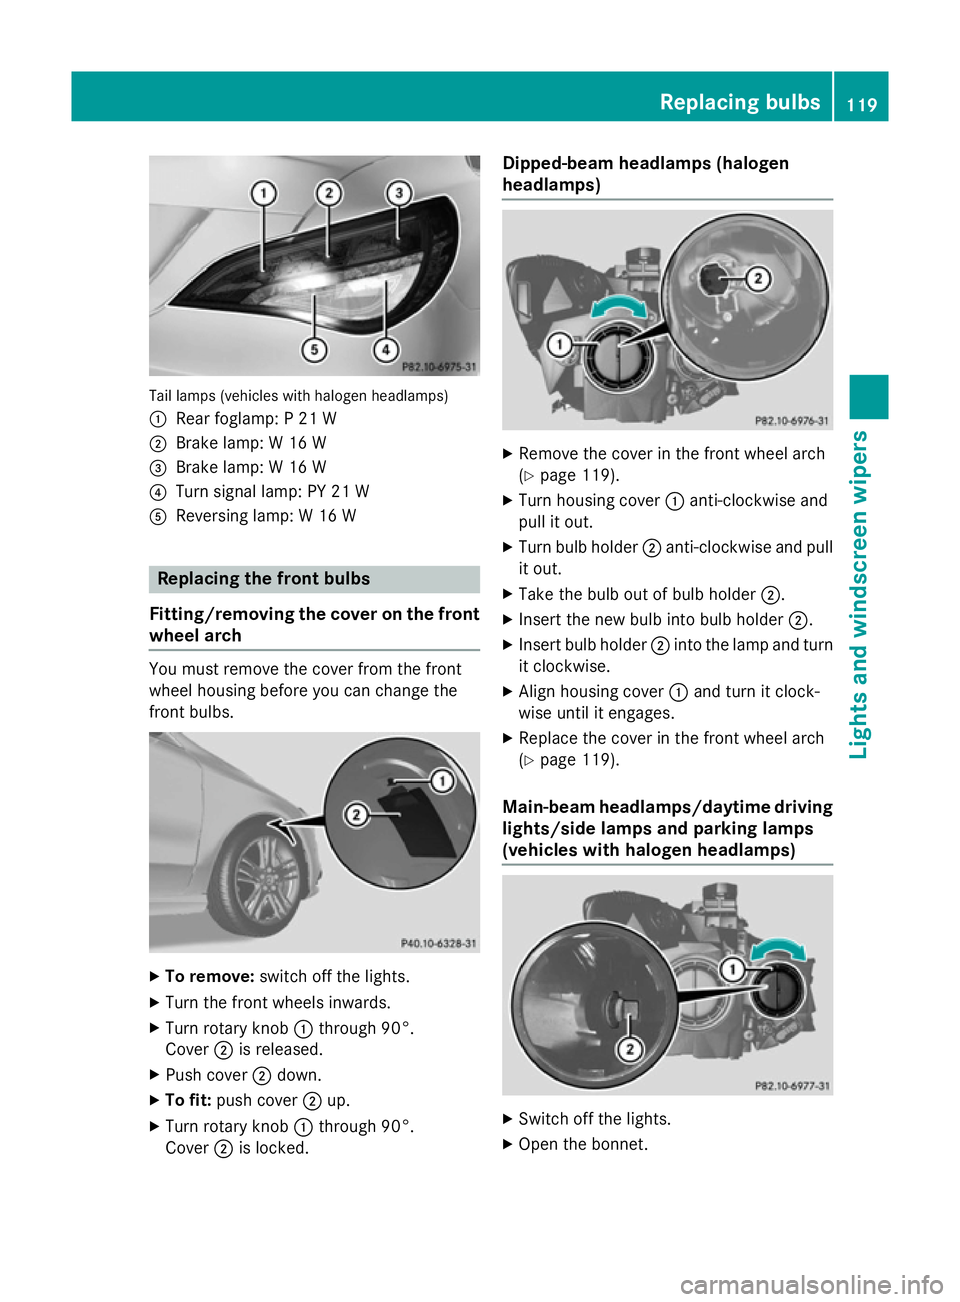
Tail lamps (vehicles with halogen headlamps)
: Rear foglamp: P 21 W
; Brake lamp: W 16 W
= Brake lamp: W 16 W
? Turn signal lamp: PY 21 W
A Reversing lamp: W 16 W Replacing the front bulbs
Fitting/removing the cover on the front wheel arch You must remove the cover from the front
wheel housing before you can change the
front bulbs. X
To remove: switch off the lights.
X Turn the front wheels inwards.
X Turn rotary knob :through 90°.
Cover ;is released.
X Push cover ;down.
X To fit: push cover ;up.
X Turn rotary knob :through 90°.
Cover ;is locked. Dipped-beam headlamps (halogen
headlamps) X
Remove the cover in the front wheel arch
(Y page 119).
X Turn housing cover :anti-clockwise and
pull it out.
X Turn bulb holder ;anti-clockwise and pull
it out.
X Take the bulb out of bulb holder ;.
X Insert the new bulb into bulb holder ;.
X Insert bulb holder ;into the lamp and turn
it clockwise.
X Align housing cover :and turn it clock-
wise until it engages.
X Replace the cover in the front wheel arch
(Y page 119).
Main-beam headlamps/daytime driving lights/side lamps and parking lamps
(vehicles with halogen headlamps) X
Switch off the lights.
X Open the bonnet. Replacing bulbs
119Lights and windscreen wipers Z
Page 123 of 373
X
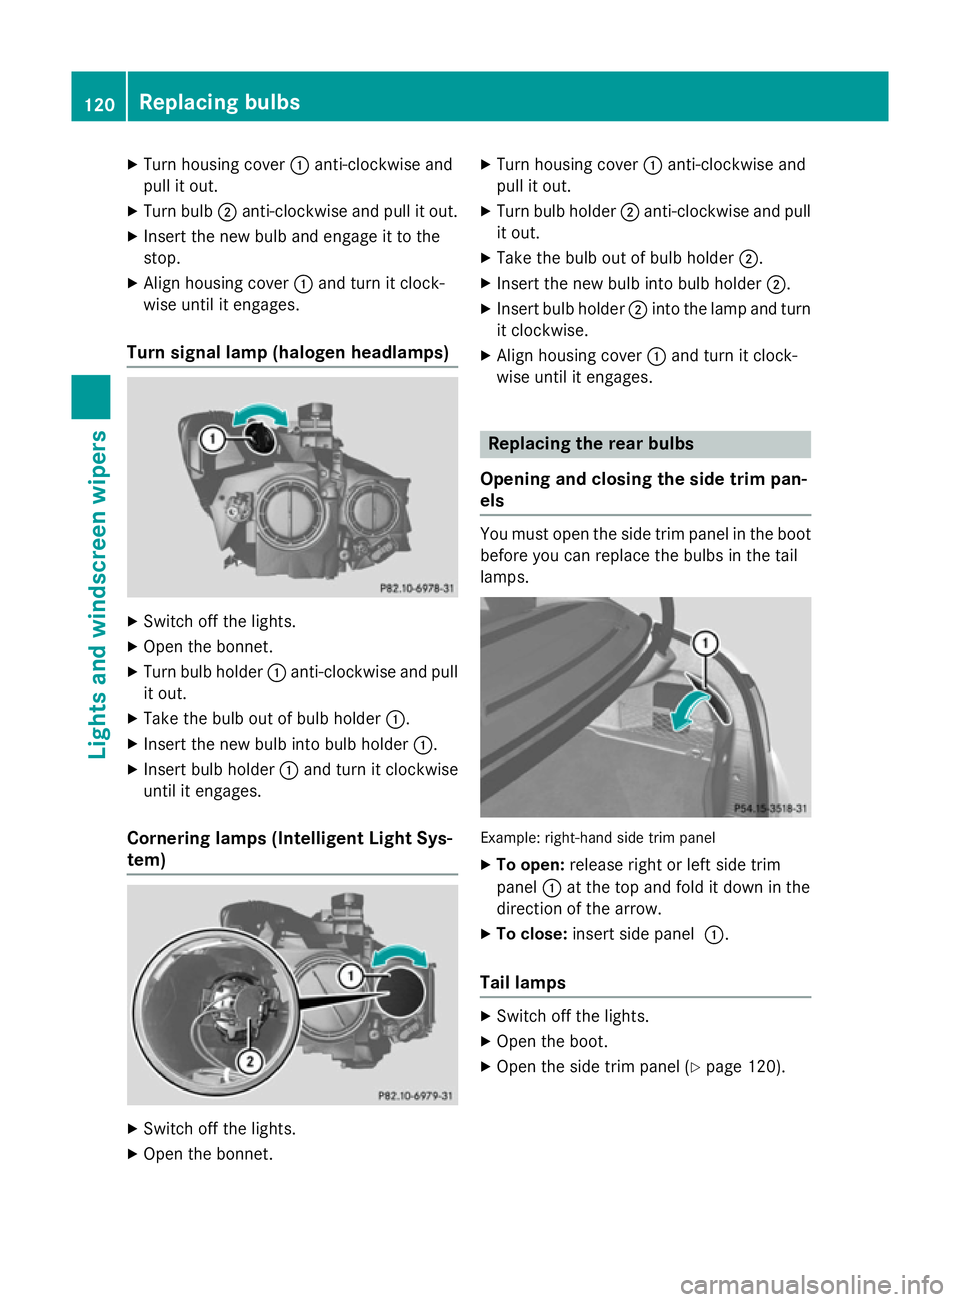
Turn housing cover :anti-clockwise and
pull it out.
X Turn bulb ;anti-clockwise and pull it out.
X Insert the new bulb and engage it to the
stop.
X Align housing cover :and turn it clock-
wise until it engages.
Turn signal lamp (halogen headlamps) X
Switch off the lights.
X Open the bonnet.
X Turn bulb holder :anti-clockwise and pull
it out.
X Take the bulb out of bulb holder :.
X Insert the new bulb into bulb holder :.
X Insert bulb holder :and turn it clockwise
until it engages.
Cornering lamps (Intelligent Light Sys-
tem) X
Switch off the lights.
X Open the bonnet. X
Turn housing cover :anti-clockwise and
pull it out.
X Turn bulb holder ;anti-clockwise and pull
it out.
X Take the bulb out of bulb holder ;.
X Insert the new bulb into bulb holder ;.
X Insert bulb holder ;into the lamp and turn
it clockwise.
X Align housing cover :and turn it clock-
wise until it engages. Replacing the rear bulbs
Opening and closing the side trim pan-
els You must open the side trim panel in the boot
before you can replace the bulbs in the tail
lamps. Example: right-hand side trim panel
X To open: release right or left side trim
panel :at the top and fold it down in the
direction of the arrow.
X To close: insert side panel :.
Tail lamps X
Switch off the lights.
X Open the boot.
X Open the side trim panel (Y page 120).120
Replacing bulbsLights and windscreen wipers
Page 124 of 373
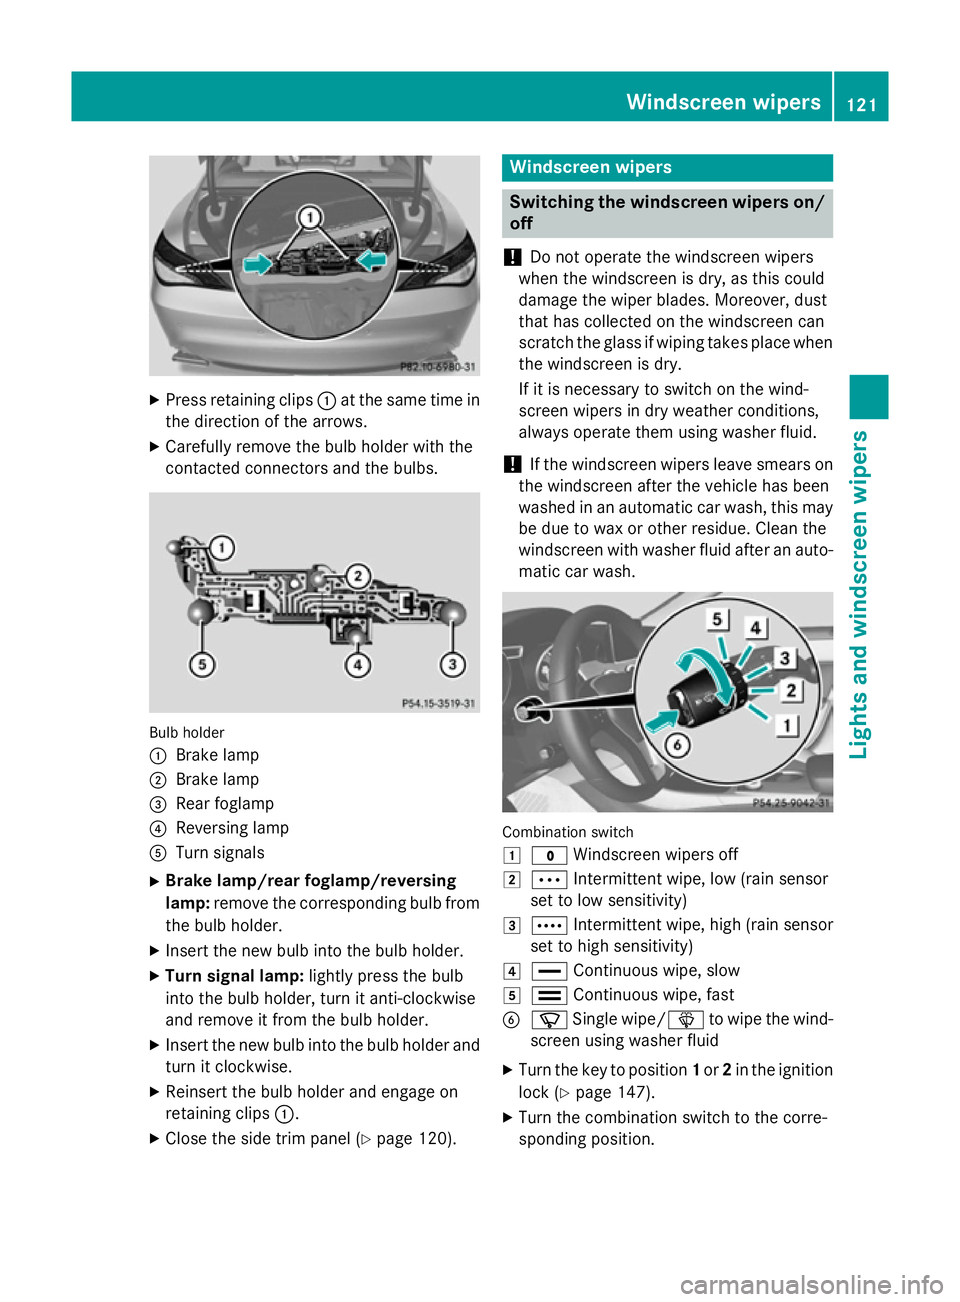
X
Press retaining clips :at the same time in
the direction of the arrows.
X Carefully remove the bulb holder with the
contacted connectors and the bulbs. Bulb holder
:
Brake lamp
; Brake lamp
= Rear foglamp
? Reversing lamp
A Turn signals
X Brake lamp/rear foglamp/reversing
lamp: remove the corresponding bulb from
the bulb holder.
X Insert the new bulb into the bulb holder.
X Turn signal lamp: lightly press the bulb
into the bulb holder, turn it anti-clockwise
and remove it from the bulb holder.
X Insert the new bulb into the bulb holder and
turn it clockwise.
X Reinsert the bulb holder and engage on
retaining clips :.
X Close the side trim panel (Y page 120). Windscreen wipers
Switching the windscreen wipers on/
off
! Do not operate the windscreen wipers
when the windscreen is dry, as this could
damage the wiper blades. Moreover, dust
that has collected on the windscreen can
scratch the glass if wiping takes place when the windscreen is dry.
If it is necessary to switch on the wind-
screen wipers in dry weather conditions,
always operate them using washer fluid.
! If the windscreen wipers leave smears on
the windscreen after the vehicle has been
washed in an automatic car wash, this may
be due to wax or other residue. Clean the
windscreen with washer fluid after an auto- matic car wash. Combination switch
1
$ Windscreen wipers off
2 Ä Intermittent wipe, low (rain sensor
set to low sensitivity)
3 Å Intermittent wipe, high (rain sensor
set to high sensitivity)
4 ° Continuous wipe, slow
5 ¯ Continuous wipe, fast
B í Single wipe/ îto wipe the wind-
screen using washer fluid
X Turn the key to position 1or 2in the ignition
lock (Y page 147).
X Turn the combination switch to the corre-
sponding position. Windscreen wipers
121Lights and windscreen wipers Z
Page 249 of 373
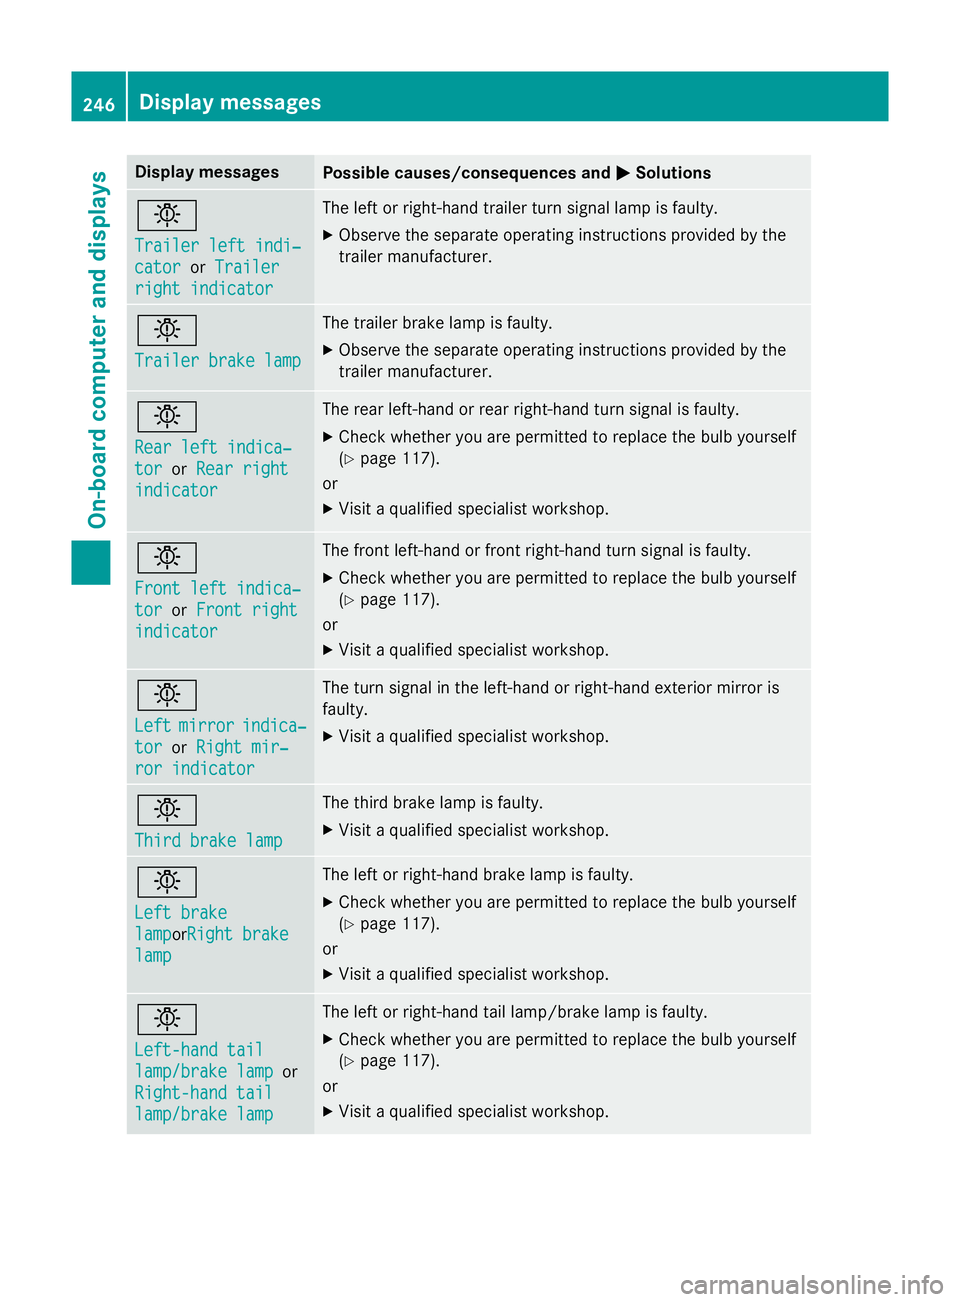
Display messages
Possible causes/consequences and
M
MSolutions b
Trailer left indi‐ Trailer left indi‐
cator cator
orTrailer
Trailer
right indicator
right indicator The left or right-hand trailer turn signal lamp is faulty.
X Observe the separate operating instructions provided by the
trailer manufacturer. b
Trailer brake lamp Trailer brake lamp The trailer brake lamp is faulty.
X Observe the separate operating instructions provided by the
trailer manufacturer. b
Rear left indica‐ Rear left indica‐
tor tor
orRear right
Rear right
indicator
indicator The rear left-hand or rear right-hand turn signal is faulty.
X Check whether you are permitted to replace the bulb yourself
(Y page 117).
or
X Visit a qualified specialist workshop. b
Front left indica‐ Front left indica‐
tor tor
orFront right
Front right
indicator
indicator The front left-hand or front right-hand turn signal is faulty.
X Check whether you are permitted to replace the bulb yourself
(Y page 117).
or
X Visit a qualified specialist workshop. b
Left Left
mirror
mirror indica‐
indica‐
tor
tor orRight mir‐
Right mir‐
ror indicator
ror indicator The turn signal in the left-hand or right-hand exterior mirror is
faulty.
X Visit a qualified specialist workshop. b
Third brake lamp Third brake lamp The third brake lamp is faulty.
X Visit a qualified specialist workshop. b
Left brake Left brake
lamp lampor
Right brake
Right brake
lamp
lamp The left or right-hand brake lamp is faulty.
X Check whether you are permitted to replace the bulb yourself
(Y page 117).
or
X Visit a qualified specialist workshop. b
Left-hand tail Left-hand tail
lamp/brake lamp lamp/brake lamp
or
Right-hand tail
Right-hand tail
lamp/brake lamp lamp/brake lamp The left or right-hand tail lamp/brake lamp is faulty.
X Check whether you are permitted to replace the bulb yourself
(Y page 117).
or
X Visit a qualified specialist workshop. 246
Display
messagesOn-board computer and displays