2013 MERCEDES-BENZ CLA COUPE door lock
[x] Cancel search: door lockPage 172 of 373
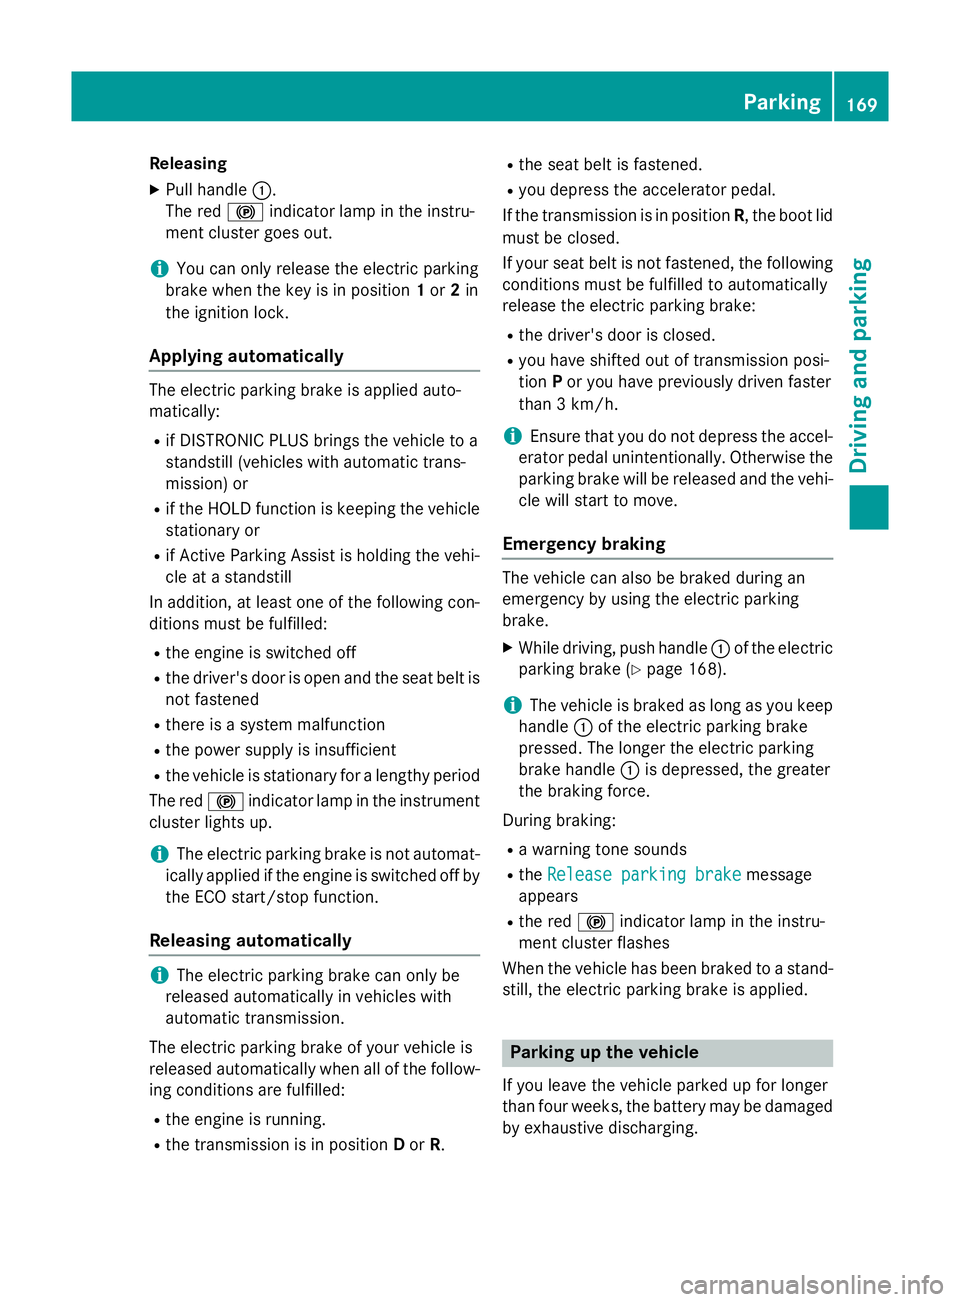
Releasing
X Pull handle :.
The red !indicator lamp in the instru-
ment cluster goes out.
i You can only release the electric parking
brake when the key is in position 1or 2in
the ignition lock.
Applying automatically The electric parking brake is applied auto-
matically:
R if DISTRONIC PLUS brings the vehicle to a
standstill (vehicles with automatic trans-
mission) or
R if the HOLD function is keeping the vehicle
stationary or
R if Active Parking Assist is holding the vehi-
cle at a standstill
In addition, at least one of the following con-
ditions must be fulfilled:
R the engine is switched off
R the driver's door is open and the seat belt is
not fastened
R there is a system malfunction
R the power supply is insufficient
R the vehicle is stationary for a lengthy period
The red !indicator lamp in the instrument
cluster lights up.
i The electric parking brake is not automat-
ically applied if the engine is switched off by
the ECO start/stop function.
Releasing automatically i
The electric parking brake can only be
released automatically in vehicles with
automatic transmission.
The electric parking brake of your vehicle is
released automatically when all of the follow- ing conditions are fulfilled:
R the engine is running.
R the transmission is in position Dor R. R
the seat belt is fastened.
R you depress the accelerator pedal.
If the transmission is in position R, the boot lid
must be closed.
If your seat belt is not fastened, the following conditions must be fulfilled to automatically
release the electric parking brake:
R the driver's door is closed.
R you have shifted out of transmission posi-
tion Por you have previously driven faster
than 3 km/h.
i Ensure that you do not depress the accel-
erator pedal unintentionally. Otherwise the
parking brake will be released and the vehi-
cle will start to move.
Emergency braking The vehicle can also be braked during an
emergency by using the electric parking
brake.
X While driving, push handle :of the electric
parking brake (Y page 168).
i The vehicle is braked as long as you keep
handle :of the electric parking brake
pressed. The longer the electric parking
brake handle :is depressed, the greater
the braking force.
During braking:
R a warning tone sounds
R the Release parking brake Release parking brake message
appears
R the red !indicator lamp in the instru-
ment cluster flashes
When the vehicle has been braked to a stand- still, the electric parking brake is applied. Parking up the vehicle
If you leave the vehicle parked up for longer
than four weeks, the battery may be damaged by exhaustive discharging. Parking
169Driving and parking Z
Page 190 of 373
R
you depress the brake pedal again with a
certain amount of pressure until :disap-
pears from the multifunction display.
R you secure the vehicle using the electric
parking brake.
R you activate DISTRONIC PLUS.
i After a short period, the vehicle is secured
by the electric parking brake, thus relieving
the service brake.
The electric parking brake secures the vehicle
automatically if the HOLD function is activa-
ted and:
R the driver's door is open and the driver's
seat belt is unfastened
R the engine is switched off, unless it is auto-
matically switched off by the ECO start/
stop function
R a system fault occurs
R the power supply is not sufficient
Vehicles with automatic transmission
If a malfunction occurs, then the transmission may also be shifted into position Pautomat-
ically.
Vehicles with manual transmission
The Brake immediately Brake immediately message can also
appear in the multifunction display.
X Immediately depress the brake pedal firmly
until the warning message in the multifunc-
tion display goes out.
The HOLD function is deactivated.
A horn will sound at regular intervals if you
turn off the engine, take off your seat belt or
open the driver's door when the HOLD func-
tion is activated. The horn alerts you to the
fact that the HOLD function is still activated.
If you attempt to lock the vehicle, the tone
becomes louder. The vehicle cannot be
locked until you have deactivated the HOLD
function.
i Once you have switched off the engine,
you cannot restart it until you have deacti-
vated the HOLD function. RACE START
Important safety notes RACE START enables optimum acceleration
from a standing start. The precondition for
this is a suitable high-grip road surface.
Only activate RACE START on dedicated race
circuits.
i RACE START is only available in AMG vehi-
cles.
Activation conditions You can activate RACE START if:
R the doors, the bonnet and the boot lid are
closed
R the engine is running and the transmission,
traction control and engine are at operating temperature
R SPORT handling mode is activated
(Y page 70)
R the steering wheel is in the straight-ahead
position.
R the vehicle is stationary and the brake
pedal is depressed (left foot)
R the transmission is in position D
R drive program Mis selected (Y page 159).
Activating RACE START X
Depress the brake pedal with your left foot
and keep it depressed.
X Pull and hold both steering wheel gearshift
paddles.
X The RACE START Confirm: Paddle UP RACE START Confirm: Paddle UP
Cancel: Paddle DOWN
Cancel: Paddle DOWN message appears
in the multifunction display.
X Release both steering wheel gearshift pad-
dles.
i If the activation conditions are no longer
fulfilled, RACE START is cancelled. The
RACE START not possible See Own‐ RACE START not possible See Own‐
er's er's Manual
Manual message appears in the mul-
tifunction display. Driving syste
ms
187Driving an d parking Z
Page 231 of 373
Activating/deactivating the surround
lighting and exterior lighting delayed
switch-off
If you have activated the Surround light‐ Surround light‐
ing
ing function and the light switch is set to
Ã, the following functions are activated
when it is dark:
R surround lighting: the exterior lighting
remains lit for 40 seconds after unlocking
with the key. If you start the engine, the
surround lighting is switched off and auto-
matic headlamp mode is activated
(Y page 111).
R exterior lighting delayed switch-off: the
exterior lighting remains lit for 60 seconds
after the engine is switched off. If you close all the doors and the boot lid, the exterior
lighting goes off after 15 seconds.
X Press the =or; button on the steer-
ing wheel to select the Settings
Settings menu.
X Press the :or9 button to select the
Lights Lights submenu.
X Press ato confirm.
X Press the :or9 button to select the
Surround lighting
Surround lighting function.
When the Surround lighting
Surround lighting function is
activated, the light cone and the area
around the vehicle are displayed in orange
in the multifunction display.
X Press the abutton to save the setting.
Deactivating delayed switch-off of the exte-
rior lighting temporarily:
X Before leaving the vehicle, turn the key to
position 0in the ignition lock.
X Turn the key to position 2in the ignition
lock.
The exterior lighting delayed switch-off is
deactivated.
Delayed switch-off of the exterior lighting is
reactivated the next time you start the
engine.
i Depending on your vehicle's equipment,
when the surround lighting and delayed switch-off exterior lighting are on, the fol-
lowing light up:
R side lamps
R foglamps
R dipped-beam headlamps
R daytime driving lights
R surround lighting in the exterior mirrors
Activating/deactivating the interior light-
ing delayed switch-off
If you activate the Lighting delayed sw.-
Lighting delayed sw.-
off off function, the interior lighting remains on
for 20 seconds after you remove the key from the ignition lock.
X Press the =or; button on the steer-
ing wheel to select the Settings
Settingsmenu.
X Press the :or9 button to select the
Lights
Lights submenu.
X Press ato confirm.
X Press the :or9 button to select the
Lighting delayed sw.-off
Lighting delayed sw.-off function.
If the Lighting delayed sw.-off
Lighting delayed sw.-off func-
tion has been switched on, the vehicle inte-
rior is displayed in orange in the multifunc- tion display.
X Press the abutton to save the setting.
Vehicle Setting permanent SPEEDTRONIC
You can set permanent SPEEDTRONIC using
the
Limit
Limit speed speed(winter
(winter tyres)
tyres)function.
X Press the =or; button on the steer-
ing wheel to select the Settings
Settingsmenu.
X Press the :or9 button to select the
Vehicle Vehicle submenu.
X Press ato confirm.
X Press :or9 to select the Limit Limit
speed (winter tyres)
speed (winter tyres) function.
You will see the current setting.
X Press ato confirm.
X Press the :or9 button to adjust
permanent SPEEDTRONIC in increments of
ten (240 km/h 240 km/h to160 km/h
160 km/h). The Off
Offset- 228
Menus and submenusOn-board computer and displays
Page 232 of 373
ting switches permanent SPEEDTRONIC
off.
X Press the abutton to store the entry.
For further information on permanent SPEED-
TRONIC (Y page 177).
Switching the automatic locking feature
on/off X Press the =or; button on the steer-
ing wheel to select the Settings Settingsmenu.
X Press the :or9 button to select the
Vehicle
Vehicle submenu.
X Press ato confirm.
X Press the :or9 button to select the
Automatic door locks
Automatic door locks function.
When the Automatic door locks
Automatic door locks func-
tion is activated, the vehicle doors are dis-
played in orange in the multifunction dis-
play.
X Press the abutton to save the setting.
If you activate the Automatic door locks
Automatic door locks
function, the vehicle is centrally locked above
a speed of approximately 15 km/h.
For further information on the automatic lock- ing feature, see (Y page 85).
Activating/deactivating the acoustic
locking confirmation
If you switch on the Acoustic AcousticLock
Lockfunction,
an acoustic signal sounds when you lock the
vehicle.
X Press the =or; button on the steer-
ing wheel to select the Settings Settingsmenu.
X Press the :or9 button to select the
Vehicle
Vehicle submenu.
X Press ato confirm.
X Press the :or9 button to select the
Acoustic Lock
Acoustic Lock function.
If the Acoustic
Acoustic Lock
Lockfunction is activated,
the & symbol in the multifunction dis-
play lights up orange.
X Press the abutton to save the setting. Activating/deactivating the radar sensor
system
X Press the =or; button on the steer-
ing wheel to select the Settings Settingsmenu.
X Press the :or9 button to select the
Vehicle
Vehicle submenu.
X Press ato confirm.
X Press the 9or: button to select
Radar sensor (See Owner's Man.)
Radar sensor (See Owner's Man.).
You will see the selected setting: on onoroff
off .
X Press the abutton to save the setting.
If the radar sensor system is switched off,
Blind Spot Assist is deactivated (Y page 203).
Heating Auxiliary heating departure time
G
WARNING
When the auxiliary heating is switched on,
parts of the vehicle can become very hot.
Flammable materials such as leaves, grass or twigs may ignite if they come into contact
with:
R hot parts of the exhaust system
R the exhaust gas itself
There is a risk of fire.
When the auxiliary heating is switched on,
make sure that:
R no flammable materials come into contact
with hot vehicle components
R the exhaust gas can escape from the
exhaust pipe unhindered
R the exhaust gas does not come into contact
with flammable materials.
! Operating the auxiliary heating/ventila-
tion draws on the vehicle battery. After you
have heated or ventilated the vehicle a
maximum of two times, drive for a longer
distance.
Only vehicles with auxiliary heating
(Y page 138) have this function. Menus and submenus
229On-board computer and displays Z
Page 233 of 373
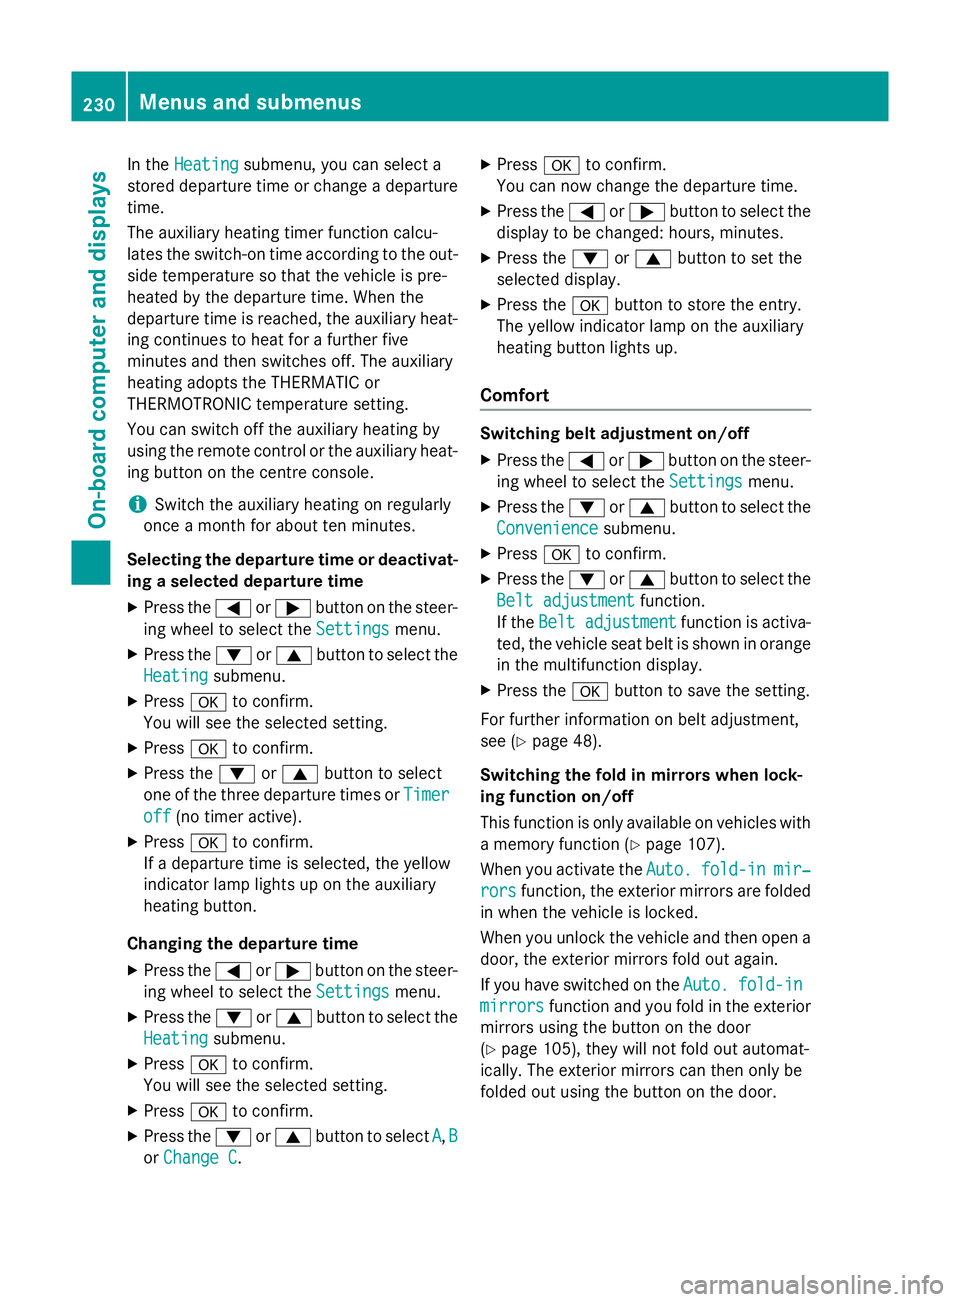
In the
Heating
Heating submenu, you can select a
stored departure time or change a departure
time.
The auxiliary heating timer function calcu-
lates the switch-on time according to the out-
side temperature so that the vehicle is pre-
heated by the departure time. When the
departure time is reached, the auxiliary heat- ing continues to heat for a further five
minutes and then switches off. The auxiliary
heating adopts the THERMATIC or
THERMOTRONIC temperature setting.
You can switch off the auxiliary heating by
using the remote control or the auxiliary heat- ing button on the centre console.
i Switch the auxiliary heating on regularly
once a month for about ten minutes.
Selecting the departure time or deactivat-
ing a selected departure time
X Press the =or; button on the steer-
ing wheel to select the Settings
Settings menu.
X Press the :or9 button to select the
Heating Heating submenu.
X Press ato confirm.
You will see the selected setting.
X Press ato confirm.
X Press the :or9 button to select
one of the three departure times or Timer
Timer
off
off (no timer active).
X Press ato confirm.
If a departure time is selected, the yellow
indicator lamp lights up on the auxiliary
heating button.
Changing the departure time
X Press the =or; button on the steer-
ing wheel to select the Settings
Settings menu.
X Press the :or9 button to select the
Heating Heating submenu.
X Press ato confirm.
You will see the selected setting.
X Press ato confirm.
X Press the :or9 button to select A
A, B
B
or Change C
Change C. X
Press ato confirm.
You can now change the departure time.
X Press the =or; button to select the
display to be changed: hours, minutes.
X Press the :or9 button to set the
selected display.
X Press the abutton to store the entry.
The yellow indicator lamp on the auxiliary
heating button lights up.
Comfort Switching belt adjustment on/off
X Press the =or; button on the steer-
ing wheel to select the Settings Settingsmenu.
X Press the :or9 button to select the
Convenience
Convenience submenu.
X Press ato confirm.
X Press the :or9 button to select the
Belt adjustment
Belt adjustment function.
If the Belt adjustment
Belt adjustment function is activa-
ted, the vehicle seat belt is shown in orange
in the multifunction display.
X Press the abutton to save the setting.
For further information on belt adjustment,
see (Y page 48).
Switching the fold in mirrors when lock-
ing function on/off
This function is only available on vehicles with
a memory function (Y page 107).
When you activate the Auto. Auto.fold-in
fold-in mir‐
mir‐
rors
rors function, the exterior mirrors are folded
in when the vehicle is locked.
When you unlock the vehicle and then open a door, the exterior mirrors fold out again.
If you have switched on the Auto. Auto.fold-in
fold-in
mirrors
mirrors function and you fold in the exterior
mirrors using the button on the door
(Y page 105), they will not fold out automat-
ically. The exterior mirrors can then only be
folded out using the button on the door. 230
Menus and submenusOn-board computer and displays
Page 262 of 373
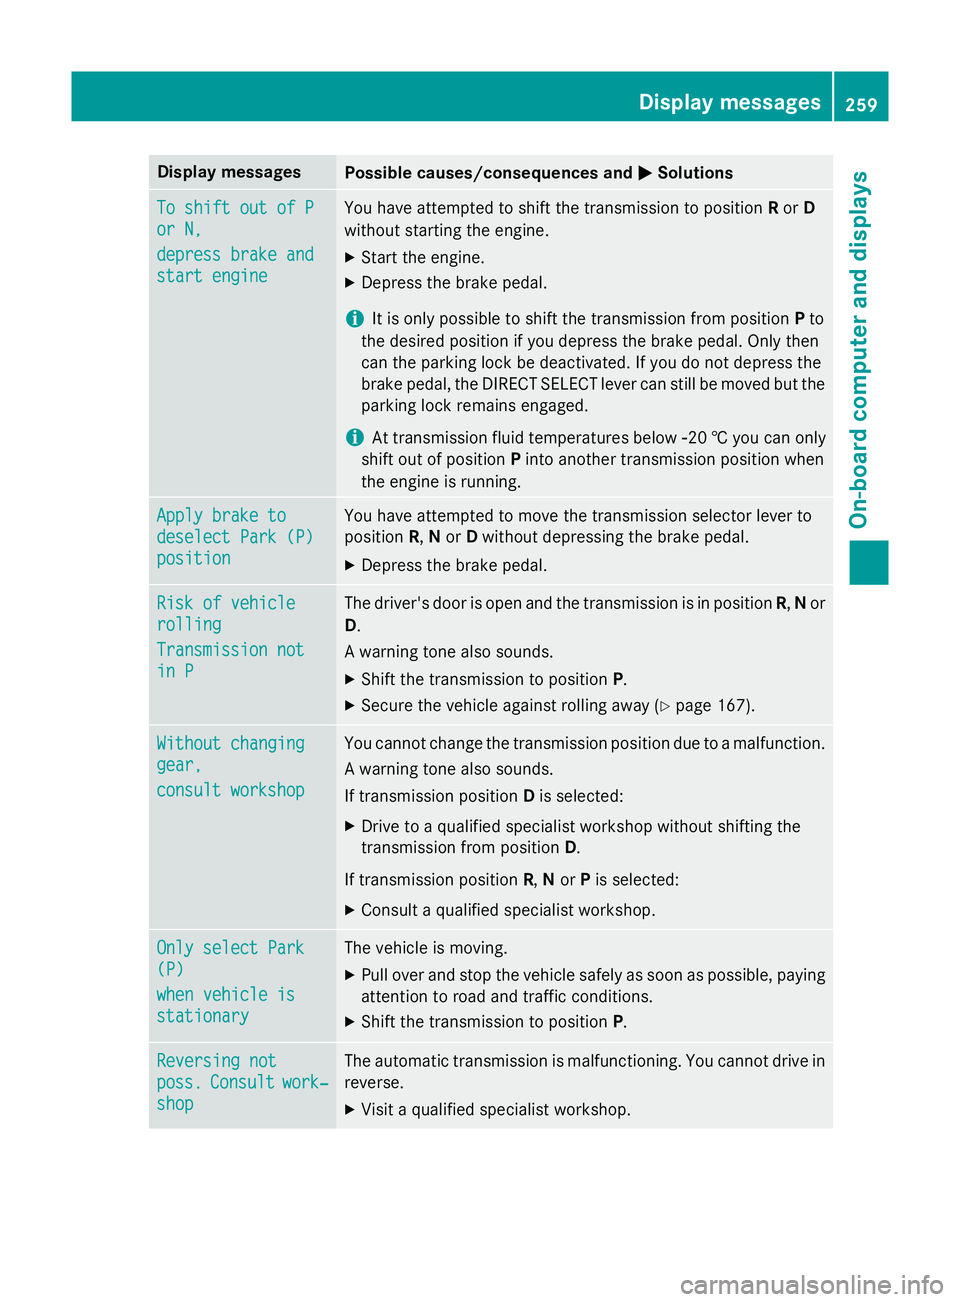
Display messages
Possible causes/consequences and
M
MSolutions To shift out of P
To shift out of P
or N, or N,
depress brake and depress brake and
start engine start engine You have attempted to shift the transmission to position
Ror D
without starting the engine.
X Start the engine.
X Depress the brake pedal.
i It is only possible to shift the transmission from position
Pto
the desired position if you depress the brake pedal. Only then
can the parking lock be deactivated. If you do not depress the
brake pedal, the DIRECT SELECT lever can still be moved but the parking lock remains engaged.
i At transmission fluid temperatures below
Ò20 † you can only
shift out of position Pinto another transmission position when
the engine is running. Apply brake to Apply brake to
deselect Park (P) deselect Park (P)
position position You have attempted to move the transmission selector lever to
position
R,Nor Dwithout depressing the brake pedal.
X Depress the brake pedal. Risk of vehicle Risk of vehicle
rolling rolling
Transmission not Transmission not
in P in P The driver's door is open and the transmission is in position
R,Nor
D.
A warning tone also sounds. X Shift the transmission to position P.
X Secure the vehicle against rolling away (Y page 167).Without changing
Without changing
gear, gear,
consult workshop consult workshop You cannot change the transmission position due to a malfunction.
A warning tone also sounds.
If transmission position Dis selected:
X Drive to a qualified specialist workshop without shifting the
transmission from position D.
If transmission position R,Nor Pis selected:
X Consult a qualified specialist workshop. Only select Park Only select Park
(P) (P)
when vehicle is when vehicle is
stationary stationary The vehicle is moving.
X
Pull over and stop the vehicle safely as soon as possible, paying
attention to road and traffic conditions.
X Shift the transmission to position P.Reversing not Reversing not
poss. poss.
Consult
Consult work‐
work‐
shop
shop The automatic transmission is malfunctioning. You cannot drive in
reverse.
X Visit a qualified specialist workshop. Display
messages
259On-board computer and displays Z
Page 264 of 373
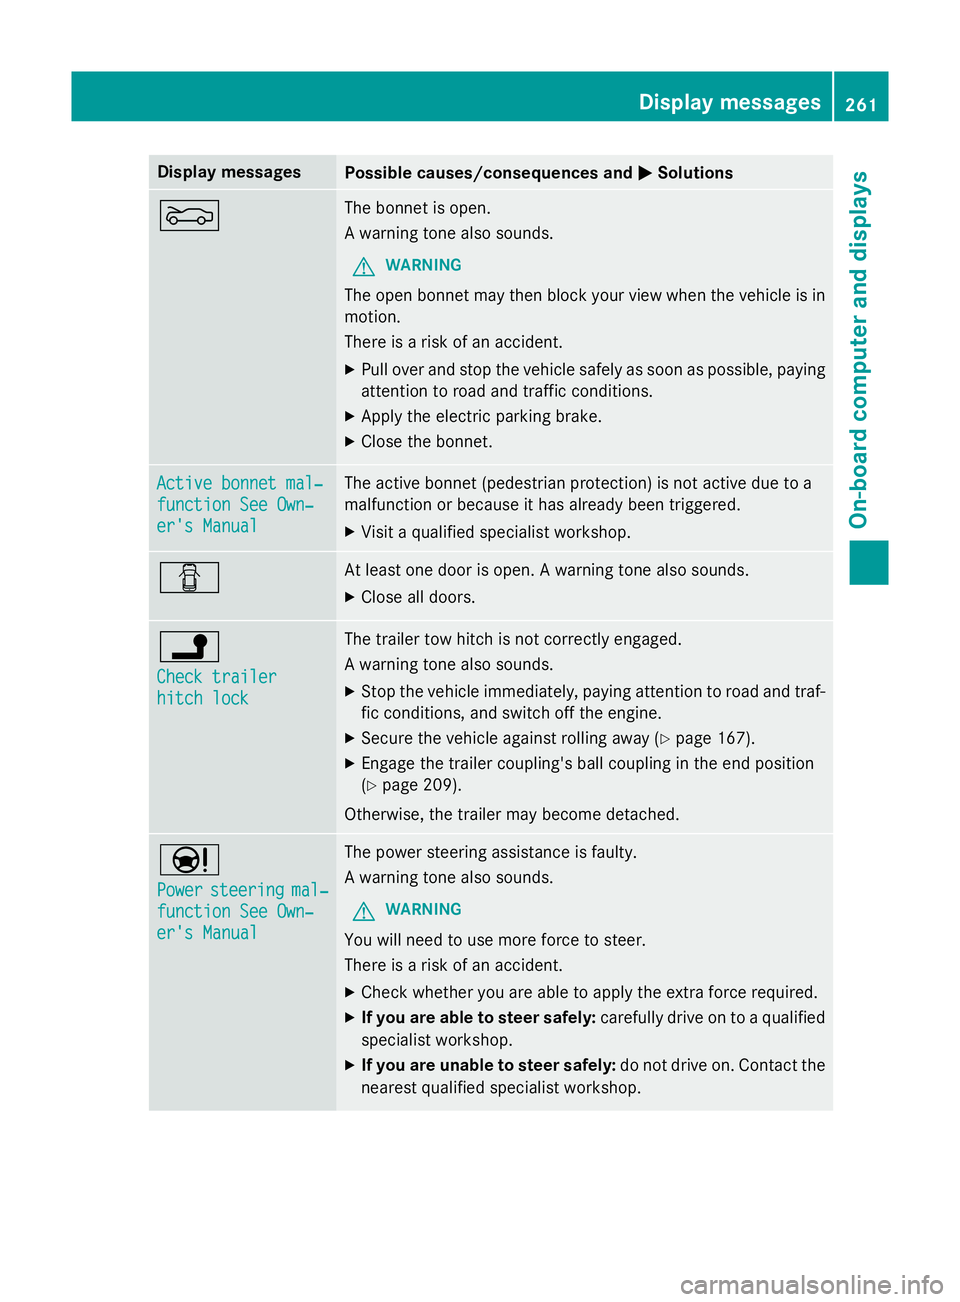
Display messages
Possible causes/consequences and
M
MSolutions M The bonnet is open.
A warning tone also sounds.
G WARNING
The open bonnet may then block your view when the vehicle is in
motion.
There is a risk of an accident.
X Pull over and stop the vehicle safely as soon as possible, paying
attention to road and traffic conditions.
X Apply the electric parking brake.
X Close the bonnet. Active bonnet mal‐ Active bonnet mal‐
function See Own‐ function See Own‐
er's Manual er's Manual The active bonnet (pedestrian protection) is not active due to a
malfunction or because it has already been triggered.
X Visit a qualified specialist workshop. C At least one door is open. A warning tone also sounds.
X Close all doors. j
Check trailer Check trailer
hitch lock hitch lock The trailer tow hitch is not correctly engaged.
A warning tone also sounds.
X Stop the vehicle immediately, paying attention to road and traf-
fic conditions, and switch off the engine.
X Secure the vehicle against rolling away (Y page 167).
X Engage the trailer coupling's ball coupling in the end position
(Y page 209).
Otherwise, the trailer may become detached. Ð
Power Power
steering
steering mal‐
mal‐
function See Own‐
function See Own‐
er's Manual er's Manual The power steering assistance is faulty.
A warning tone also sounds.
G WARNING
You will need to use more force to steer.
There is a risk of an accident. X Check whether you are able to apply the extra force required.
X If you are able to steer safely: carefully drive on to a qualified
specialist workshop.
X If you are unable to steer safely: do not drive on. Contact the
nearest qualified specialist workshop. Display
messages
261On-board computer and displays Z
Page 266 of 373
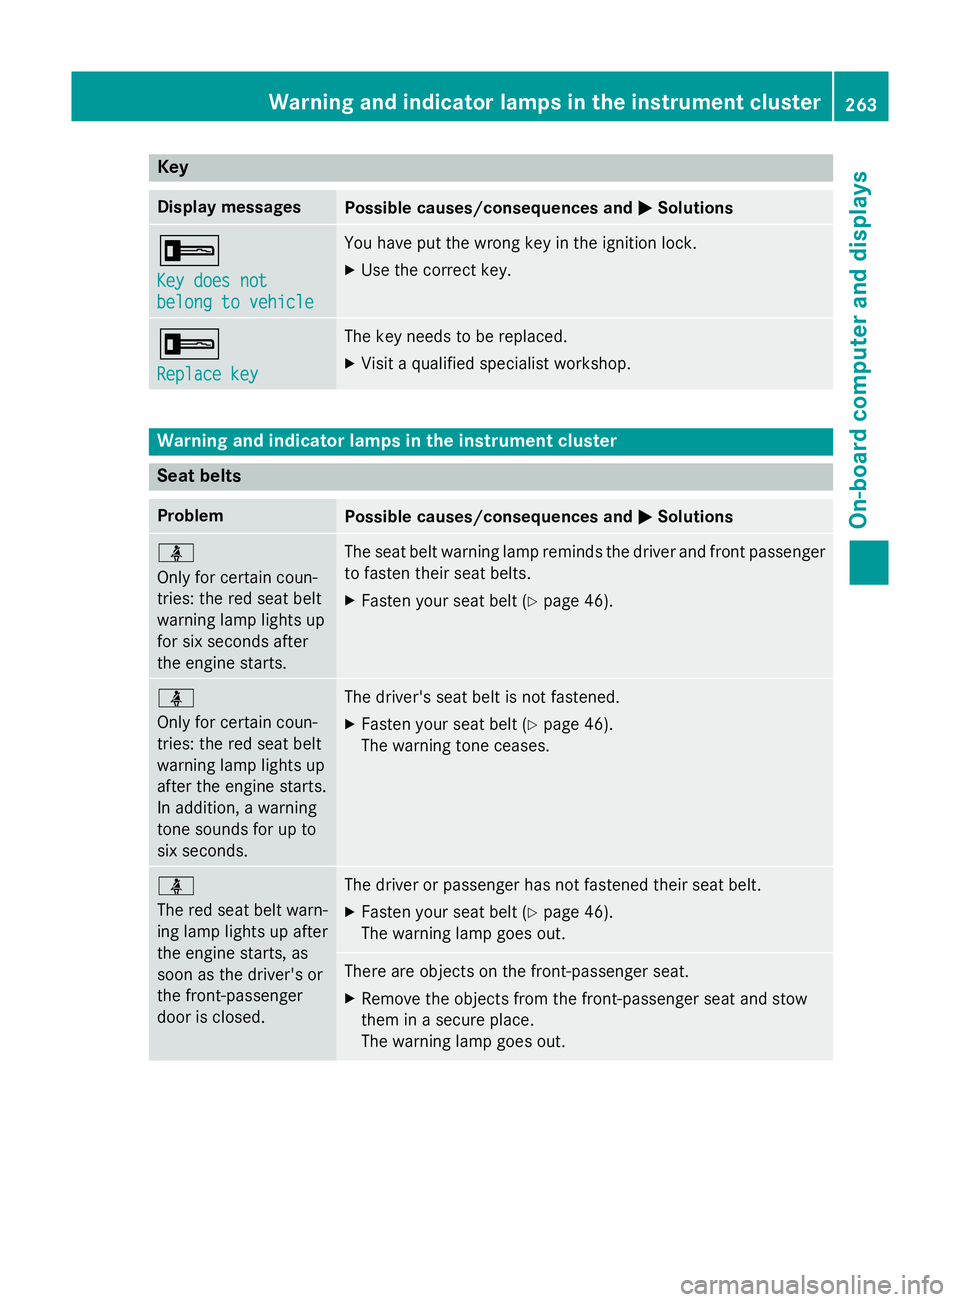
Key
Display messages
Possible causes/consequences and
M
M Solutions +
Key does not Key does not
belong to vehicle belong to vehicle You have put the wrong key in the ignition lock.
X Use the correct key. +
Replace key Replace key The key needs to be replaced.
X Visit a qualified specialist workshop. Warning and indicator lamps in the instrument cluster
Seat belts
Problem
Possible causes/consequences and
M
M Solutions ü
Only for certain coun-
tries: the red seat belt
warning lamp lights up
for six seconds after
the engine starts.
The seat belt warning lamp reminds the driver and front passenger
to fasten their seat belts.
X Fasten your seat belt (Y page 46).ü
Only for certain coun-
tries: the red seat belt
warning lamp lights up
after the engine starts.
In addition, a warning
tone sounds for up to
six seconds.
The driver's seat belt is not fastened.
X Fasten your seat belt (Y page 46).
The warning tone ceases. ü
The red seat belt warn-
ing lamp lights up after
the engine starts, as
soon as the driver's or
the front-passenger
door is closed.
The driver or passenger has not fastened their seat belt.
X Fasten your seat belt (Y page 46).
The warning lamp goes out. There are objects on the front-passenger seat.
X Remove the objects from the front-passenger seat and stow
them in a secure place.
The warning lamp goes out. Warning and indicator lamps in the instrument cluster
263On-board computer and displays Z