2013 MERCEDES-BENZ CLA-CLASS isofix
[x] Cancel search: isofixPage 9 of 352

Child seatAutomatic recognition .....................53
ISOFIX .............................................. 54
On the front-passenger seat ............52
Problem (malfunction) .....................62
Recommendations ...........................59
Suitable positions ............................ 57
Top Tether ....................................... 55
Cigarette lighter ................................ 276
Cleaning Trailer tow hitch ............................. 292
Climate control
Auxiliary heating/ventilation .......... 136
Controlling automatically ...............130
Convenience opening/closing
(air-recirculation mode) .................134
Cooling with air dehumidification ..128
Demisting the windows .................. 132
Demisting the windscreen .............132
Important safety notes ..................124
Indicator lamp ................................ 130
Notes on using THERMATIC auto-
matic climate control .....................125
Notes on using THERMOTRONIC
automatic climate control ..............127
Overview of systems ......................124
Problems with cooling with air
dehumidification ............................ 130
Problem with the rear window
heating .......................................... 134
Setting the air distribution .............131
Setting the airflow .........................131
Setting the air vents ......................141
Setting the temperature ................130
Switching air-recirculation mode
on/off ............................................ 134
Switching on/off ........................... 128
Switching residual heat on/off ......135
Switching the rear window heat-
ing on/off ...................................... 133
Switching the ZONE function on/
off .................................................. 131
THERMATIC automatic climate
control ........................................... 125
THERMOTRONIC (2-zone) auto-
matic climate control .....................127Cockpit
Overview .......................................... 28
see Instrument cluster
COLLISION PREVENTION ASSIST
Activating/deactivating the dis-
tance warning function ..................218
Display message ............................ 227
Operation/notes .............................. 65
COLLISION PREVENTION ASSIST
PLUS Activating/deactivating .................218
Display message ............................ 233
Operation/notes .............................. 67
COMAND Online
see separate operating instructions
Combination switch .......................... 109
Consumption statistics (on-board
computer) .......................................... 211
Convenience closing feature .............. 88
Convenience opening/closing (air-
recirculation mode) ........................... 134
Convenience opening feature ............ 88
Coolant (engine) Checking the level .........................285
Display message ............................ 240
Important safety notes ..................341
Temperature gauge ........................ 208
Warning lamp ................................. 262
Cooling
see Climate control
Copyright ............................................. 25
Cornering lamps Changing bulbs .............................. 117
Cornering light function
Display message ............................ 236
Function/notes ............................. 111
Crash-responsive emergency light-
ing ....................................................... 114
Cruise control Activation conditions .....................169
Cruise control lever .......................169
Deactivating ................................... 170
Display message ............................ 247
Driving system ............................... 168
Important safety notes ..................168
LIM indicator lamp .........................169
Selecting ........................................ 169Index7ProCarManuals.com
Page 14 of 352

Overview ........................................ 113
Reading lamp ................................. 113
Setting the ambient lighting
brightness (on-board computer) ....222
Interior motion sensor ........................ 72
ISOFIX child seat securing system .... 54
J
Jack Storage location ............................ 297
Using ............................................. 326
Jump starting (engine) ...................... 306
K
Key Changing the battery .......................79
Checking the battery .......................78
Convenience closing feature ............88
Convenience opening feature ..........88
Display message ............................ 254
Door central locking/unlocking .......77
Emergency key element ................... 77
Important safety notes ....................76
Loss ................................................. 80
Modifying the programming .............77
Positions (ignition lock) .................145
Problem (malfunction) .....................80
Starting the engine ........................146
Key positions (ignition lock) ............ 145
Kickdown Driving tips .................................... 155
Manual drive program ....................157
Kneebag ............................................... 44
L
Lamps see Warning and indicator lamps
Lane Keeping Assist
Activating/deactivating .................219
Display message ............................ 244
Function/information ....................199
Lane package ..................................... 197
Lashing eyelets ................................. 272
Licence plate lamp (display mes-
sage) ................................................... 238
Lights
Activating/deactivating the Intel-
ligent Light System ........................221
Activating/deactivating the inte-
rior lighting delayed switch-off .......222
Active light function .......................110
Automatic headlamp mode ............107
Cornering light function .................111
Dipped-beam headlamps ...............107
Display message ............................ 236
Driving abroad ............................... 106
Foglamps ....................................... 108
Foglamps (extended range) ...........111
Hazard warning lamps ...................110
Headlamp flasher ........................... 109
Headlamp range ............................ 108
Light switch ................................... 107
Main-beam headlamps ................... 109
Motorway mode ............................. 111
Parking lamps ................................ 108
Rear foglamp ................................. 108
Setting the ambient lighting
brightness (on-board computer) ....222
Side lamps ..................................... 108
Switching Adaptive Highbeam
Assist on/off ................................. 221
Switching the daytime driving
lights on/off (on-board computer) . 220
Switching the daytime driving
lights on/off (switch) .....................107
Switching the exterior lighting
delayed switch-off on/off (on-
board computer) ............................ 222
Switching the surround lighting
on/off (on-board computer) ..........222
Turn signals ................................... 109
see Interior lighting
see Replacing bulbs
Light sensor (display message) ....... 239
LIM indicator lamp Cruise control ................................ 169
DISTRONIC PLUS ........................... 174
Variable SPEEDTRONIC .................171
Limiting the speed
see SPEEDTRONIC
Loading guidelines ............................ 268
Locking see Central locking 12IndexProCarManuals.com
Page 56 of 352
GWARNING
Electronic devices on the front-passenger
seat can affect the function of the automatic
child seat recognition, for example:
R laptop
R mobile phone
R transponder cards such as ski passes or
access passes
The front-passenger front airbag could deploy
unintentionally or not function as intended
during an accident. This poses an increased
risk of injury or even fatal injury.
Do not place any of the devices mentioned
above or similar devices on the front-
passenger seat.
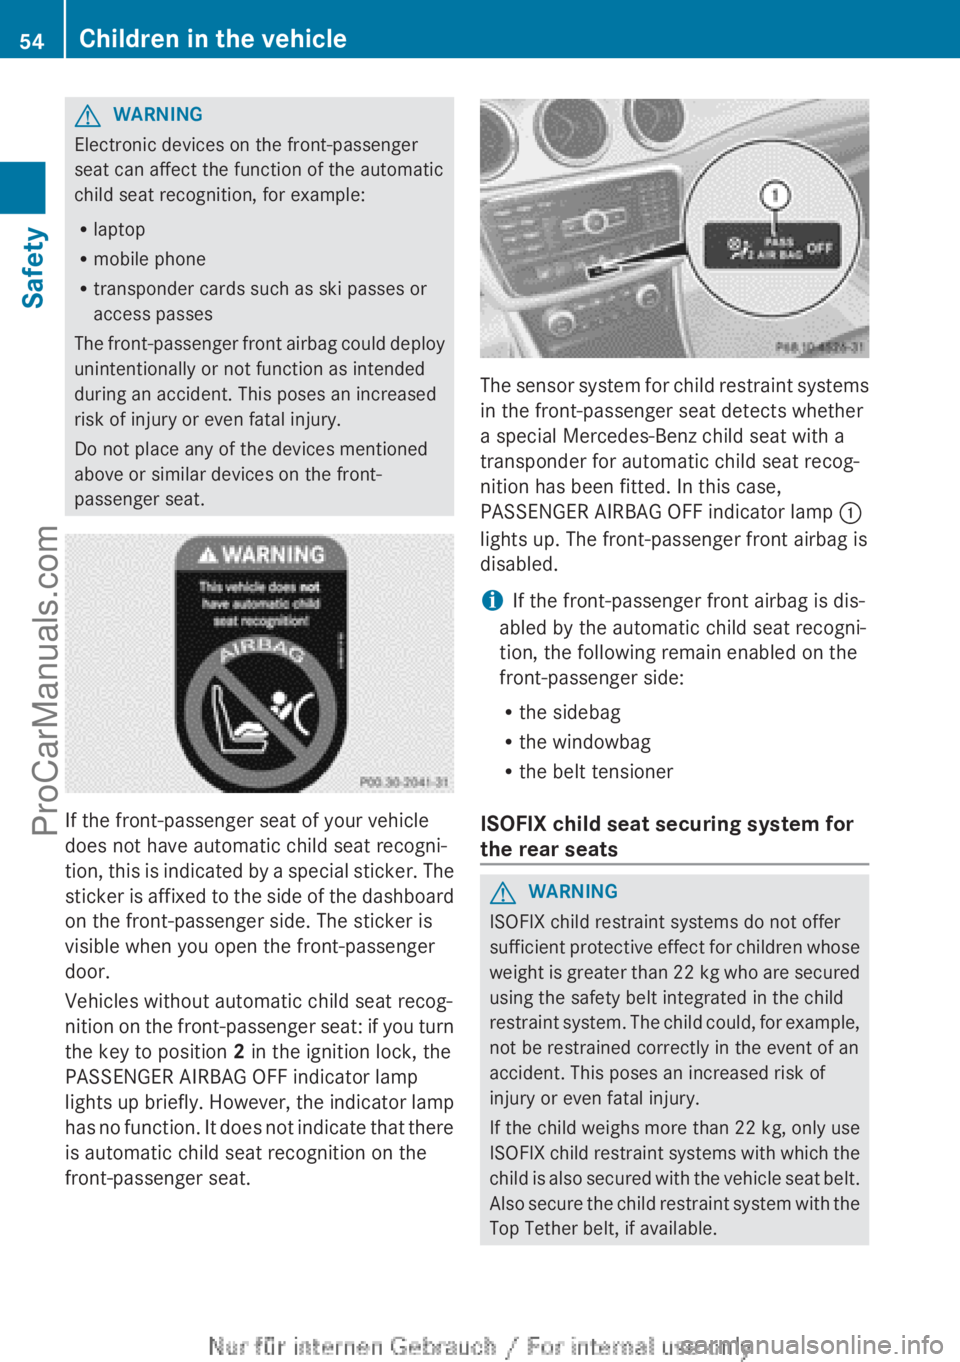
If the front-passenger seat of your vehicle
does not have automatic child seat recogni-
tion, this is indicated by a special sticker. The
sticker is affixed to the side of the dashboard
on the front-passenger side. The sticker is
visible when you open the front-passenger
door.
Vehicles without automatic child seat recog-
nition on the front-passenger seat: if you turn
the key to position 2 in the ignition lock, the
PASSENGER AIRBAG OFF indicator lamp
lights up briefly. However, the indicator lamp
has no function. It does not indicate that there
is automatic child seat recognition on the
front-passenger seat.
The sensor system for child restraint systems
in the front-passenger seat detects whether
a special Mercedes-Benz child seat with a
transponder for automatic child seat recog-
nition has been fitted. In this case,
PASSENGER AIRBAG OFF indicator lamp :
lights up. The front-passenger front airbag is
disabled.
i If the front-passenger front airbag is dis-
abled by the automatic child seat recogni-
tion, the following remain enabled on the
front-passenger side:
R the sidebag
R the windowbag
R the belt tensioner
ISOFIX child seat securing system for
the rear seats
GWARNING
ISOFIX child restraint systems do not offer
sufficient protective effect for children whose
weight is greater than 22 kg who are secured
using the safety belt integrated in the child
restraint system. The child could, for example,
not be restrained correctly in the event of an
accident. This poses an increased risk of
injury or even fatal injury.
If the child weighs more than 22 kg, only use
ISOFIX child restraint systems with which the
child is also secured with the vehicle seat belt.
Also secure the child restraint system with the
Top Tether belt, if available.
54Children in the vehicleSafety
ProCarManuals.com
Page 57 of 352
When fitting a child restraint system, be sure
to observe the manufacturer's installation
instructions and the instructions for correct
use of the child restraint system.GWARNING
The child restraint system cannot perform its
protective function if it is not correctly fitted
to a suitable vehicle seat. The child cannot be
restrained in the event of an accident, heavy
braking or sudden changes of direction. The
child could be seriously or even fatally injured.
For this reason, when securing a child
restraint system, always observe the manu-
facturer's installation instructions and the
correct use of the child restraint system.
For safety reasons, on the rear seats use only
child restraint systems with an ISOFIX child
seat securing system which have been tested
and approved for Mercedes-Benz vehicles.
An incorrectly fitted child restraint system
could come loose and seriously or even fatally
injure the child or other vehicle occupants.
When fitting the child restraint system, always
make sure that it is engaged correctly in the
ISOFIX securing rings on both sides.
! When fitting the ISOFIX child restraint
system, make sure that the seat belt for the
centre seat does not get trapped. Other-
wise, the seat belt could be damaged.
XInstall the ISOFIX child restraint system.
Comply with the child restrain system man-
ufacturer's instructions when installing the
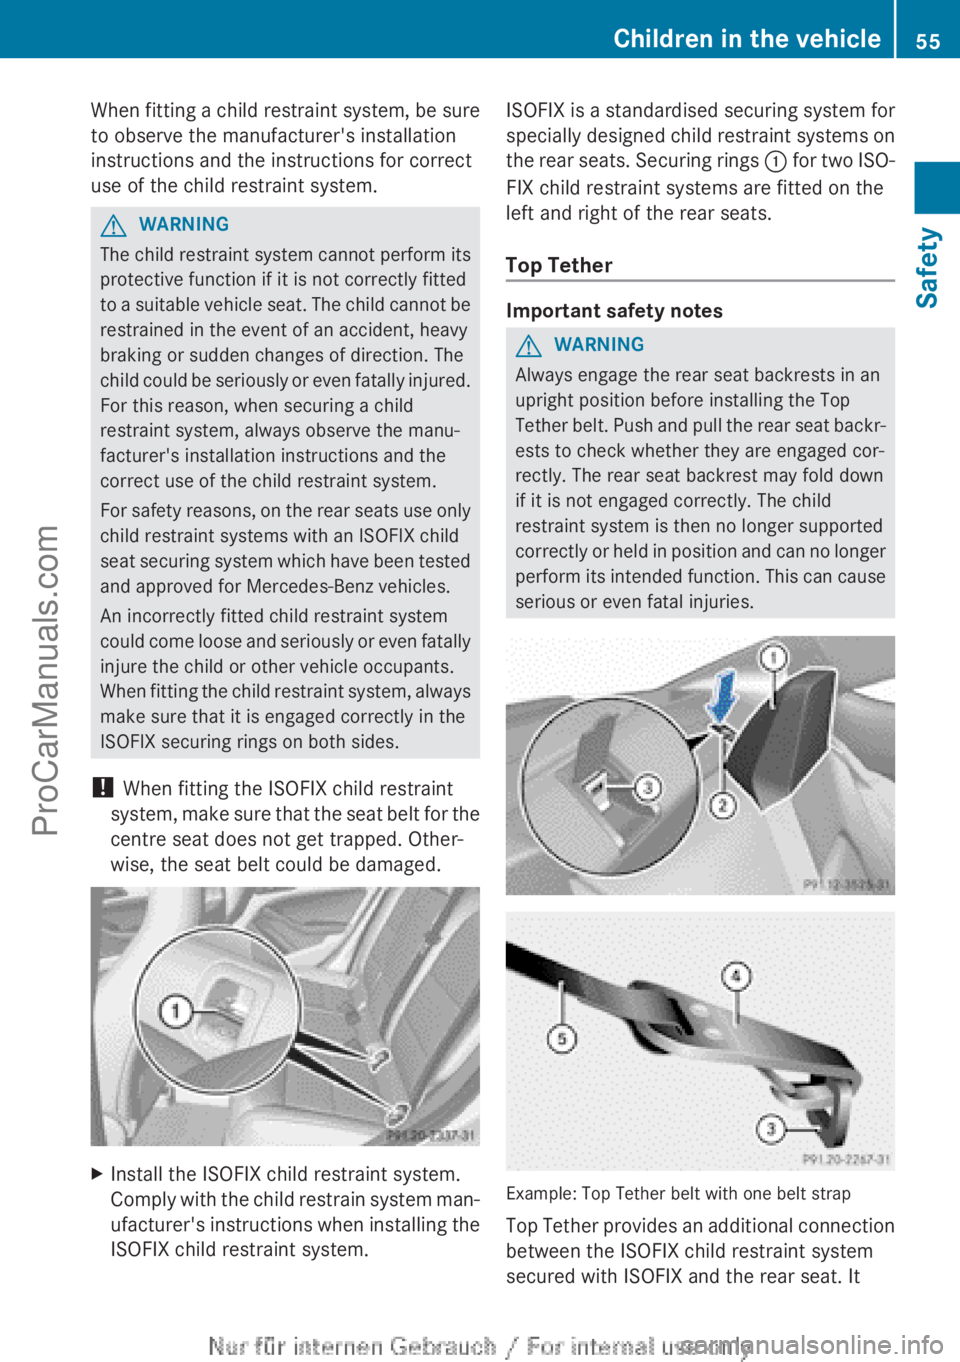
ISOFIX child restraint system.ISOFIX is a standardised securing system for
specially designed child restraint systems on
the rear seats. Securing rings : for two ISO-
FIX child restraint systems are fitted on the
left and right of the rear seats.
Top Tether
Important safety notes
GWARNING
Always engage the rear seat backrests in an
upright position before installing the Top
Tether belt. Push and pull the rear seat backr-
ests to check whether they are engaged cor-
rectly. The rear seat backrest may fold down
if it is not engaged correctly. The child
restraint system is then no longer supported
correctly or held in position and can no longer
perform its intended function. This can cause
serious or even fatal injuries.
Example: Top Tether belt with one belt strap
Top Tether provides an additional connection
between the ISOFIX child restraint system
secured with ISOFIX and the rear seat. It
Children in the vehicle55SafetyZProCarManuals.com
Page 58 of 352
helps reduce the risk of injury even further. If
the child restraint system is fitted with Top
Tether, this should always be used.
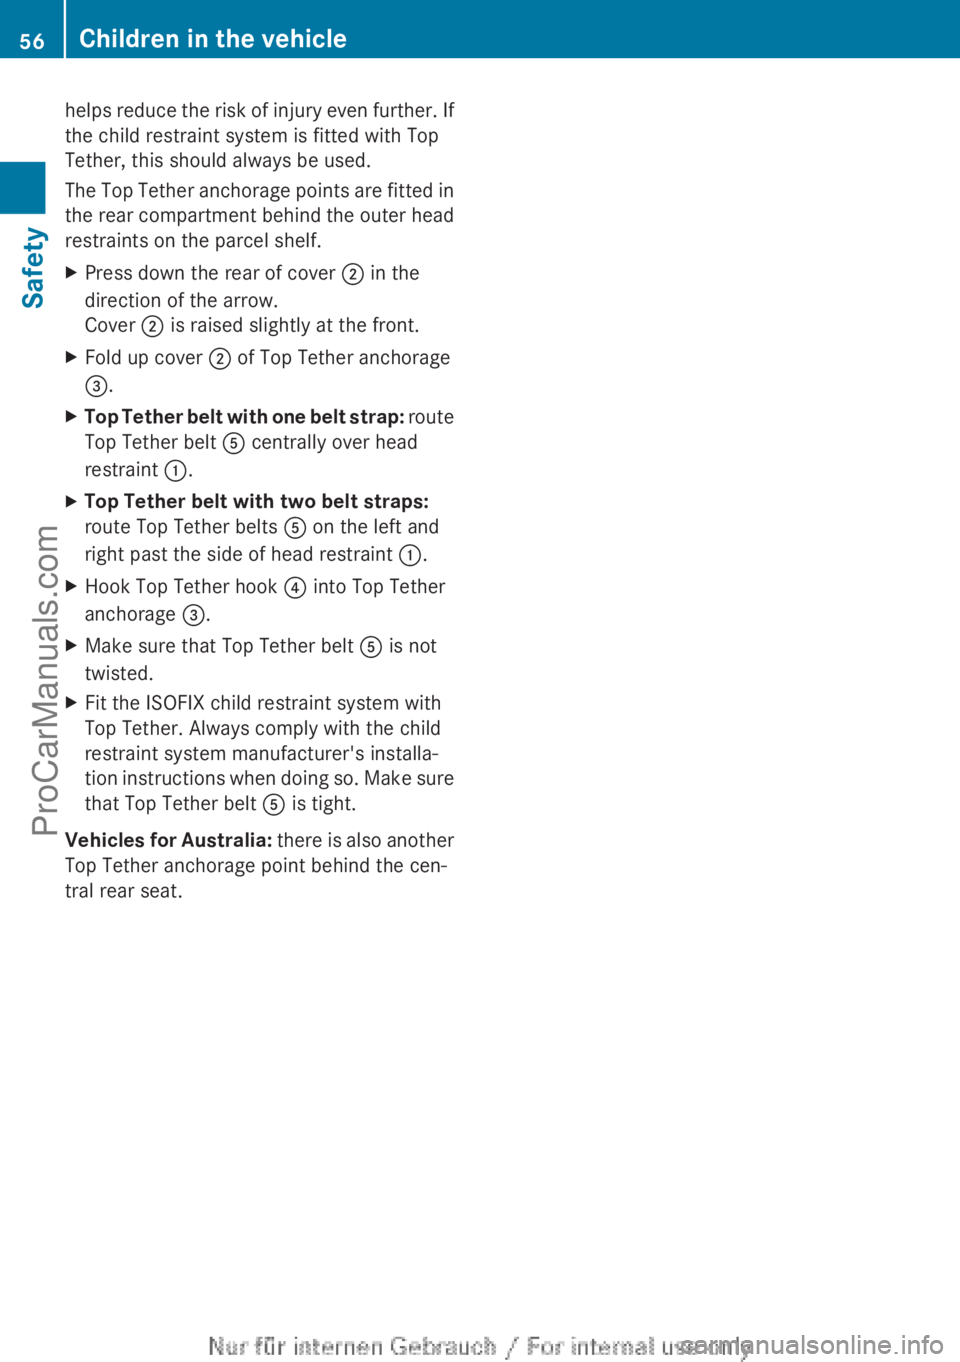
The Top Tether anchorage points are fitted in
the rear compartment behind the outer head
restraints on the parcel shelf.XPress down the rear of cover ; in the
direction of the arrow.
Cover ; is raised slightly at the front.XFold up cover ; of Top Tether anchorage
= .XTop Tether belt with one belt strap: route
Top Tether belt A centrally over head
restraint :.XTop Tether belt with two belt straps:
route Top Tether belts A on the left and
right past the side of head restraint :.XHook Top Tether hook ? into Top Tether
anchorage =.XMake sure that Top Tether belt A is not
twisted.XFit the ISOFIX child restraint system with
Top Tether. Always comply with the child
restraint system manufacturer's installa-
tion instructions when doing so. Make sure
that Top Tether belt A is tight.
Vehicles for Australia: there is also another
Top Tether anchorage point behind the cen-
tral rear seat.
56Children in the vehicleSafety
ProCarManuals.com
Page 60 of 352
Seat positionsWeight catego-
riesFront-passenger seatRear seat 1Front-
passenger
front airbag is
not disabledFront-
passenger
front airbag is
disabledLeft, rightCentreCategory II: 15
to 25 kgUF 3
, L 3U3
, L 3U, LU, LCategory III:
22 to 36 kgUF 3, 4
, L3, 4UF 3, 4
, L3, 4U, L 4U, L4
Example: approval label on the child restraint system
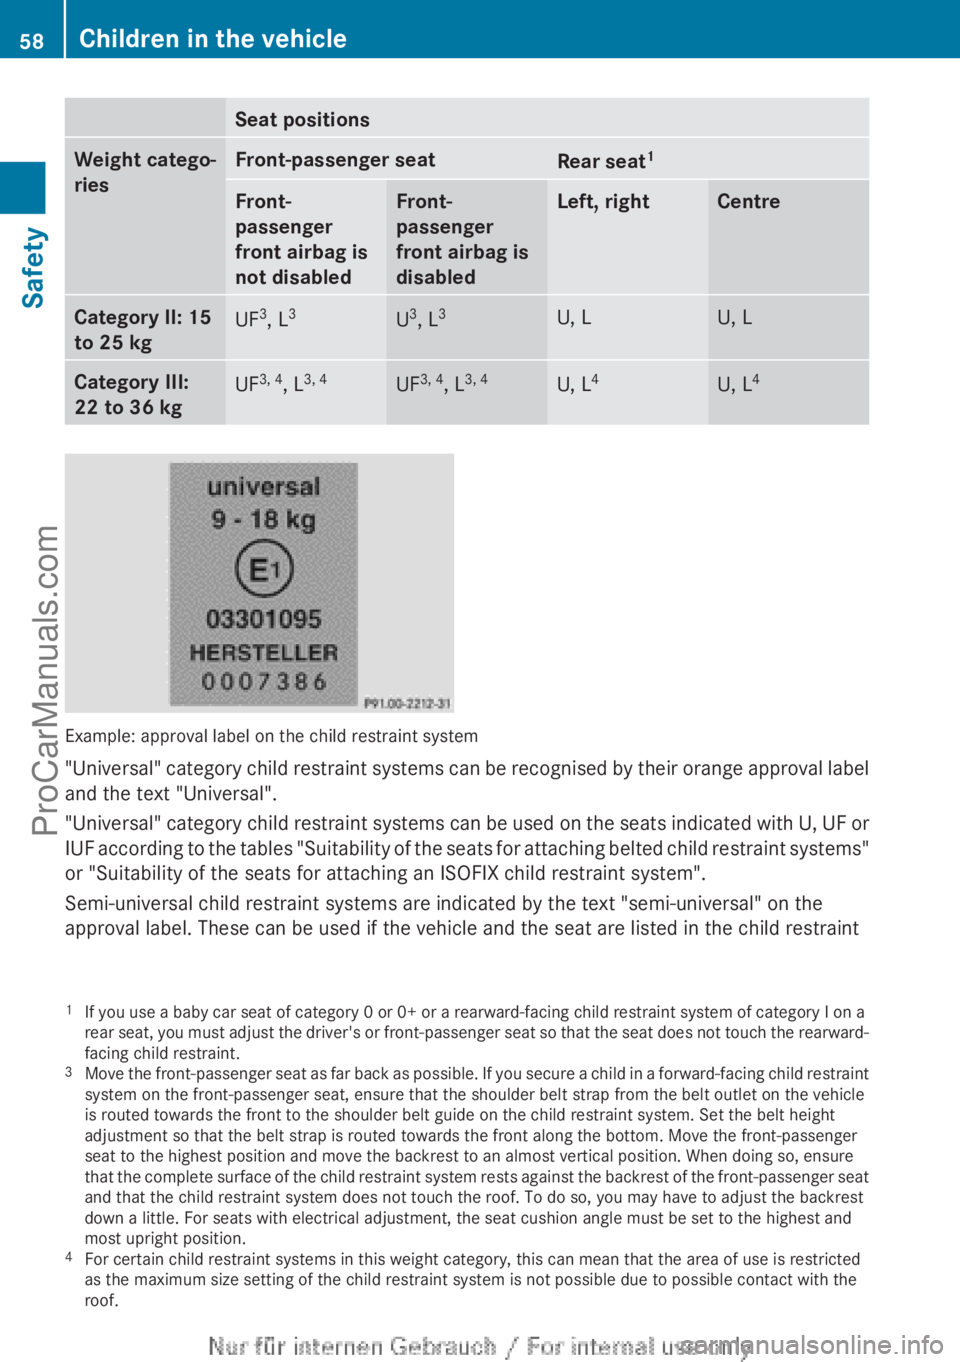
" Universal" category child restraint systems can be recognised by their orange approval label
and the text "Universal".
" Universal" category child restraint systems can be used on the seats indicated with U, UF or
IUF according to the tables "Suitability of the seats for attaching belted child restraint systems"
or "Suitability of the seats for attaching an ISOFIX child restraint system".
Semi-universal child restraint systems are indicated by the text "semi-universal" on the
approval label. These can be used if the vehicle and the seat are listed in the child restraint
1 If you use a baby car seat of category 0 or 0+ or a rearward-facing child restraint system of category I on a
rear seat, you must adjust the driver's or front-passenger seat so that the seat does not touch the rearward-
facing child restraint.
3 Move the front-passenger seat as far back as possible. If you secure a child in a forward-facing child restraint
system on the front-passenger seat, ensure that the shoulder belt strap from the belt outlet on the vehicle
is routed towards the front to the shoulder belt guide on the child restraint system. Set the belt height
adjustment so that the belt strap is routed towards the front along the bottom. Move the front-passenger
seat to the highest position and move the backrest to an almost vertical position. When doing so, ensure
that the complete surface of the child restraint system rests against the backrest of the front-passenger seat
and that the child restraint system does not touch the roof. To do so, you may have to adjust the backrest
down a little. For seats with electrical adjustment, the seat cushion angle must be set to the highest and
most upright position.
4 For certain child restraint systems in this weight category, this can mean that the area of use is restricted
as the maximum size setting of the child restraint system is not possible due to possible contact with the
roof.58Children in the vehicleSafety
ProCarManuals.com
Page 61 of 352
system manufacturer's vehicle model list. For more information, contact the child restraint
system manufacturer or visit their website.
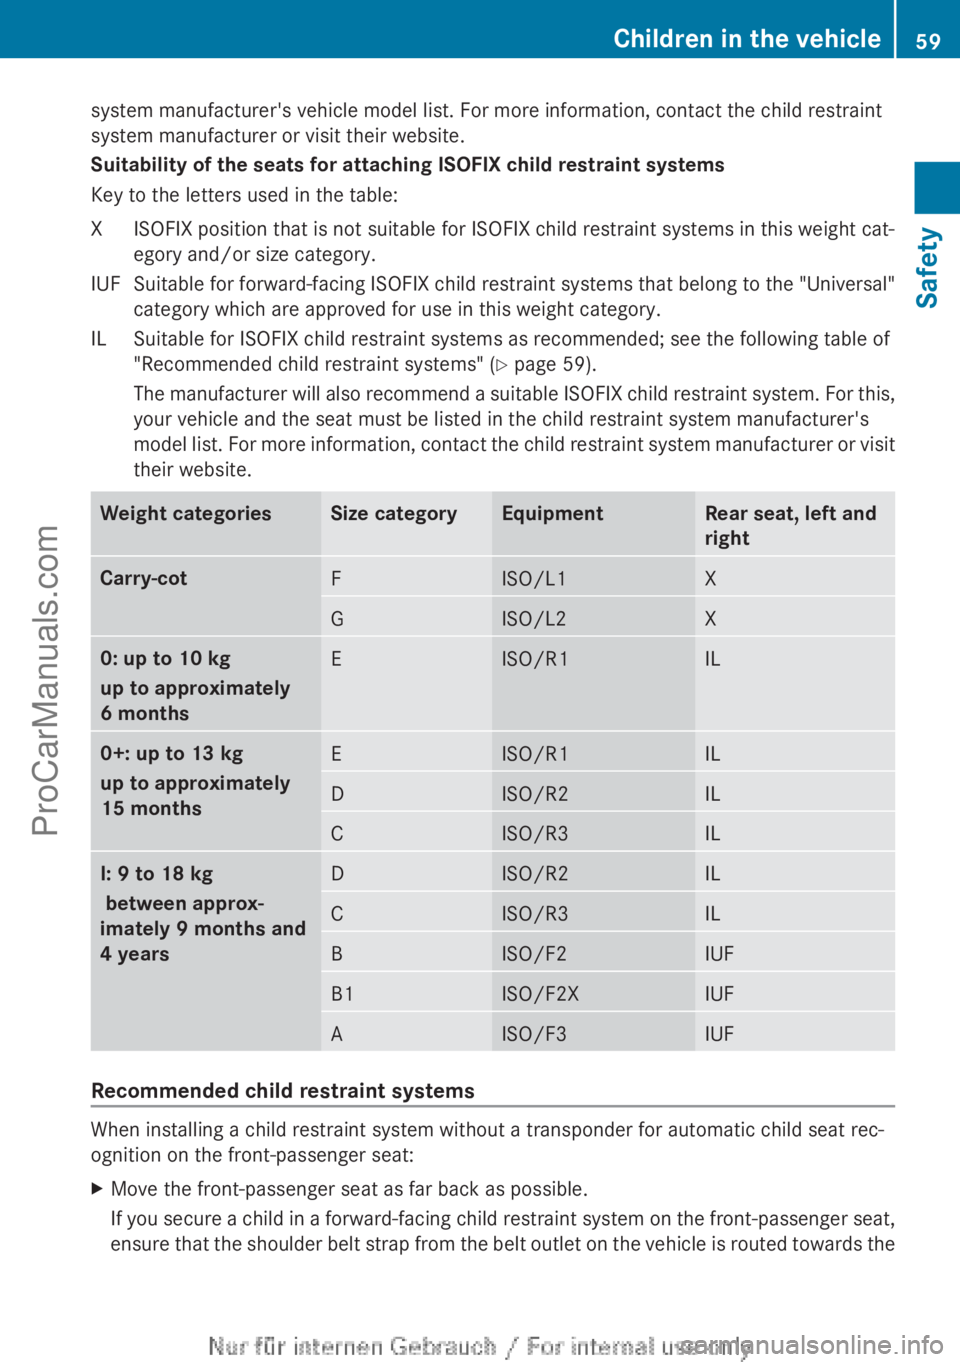
Suitability of the seats for attaching ISOFIX child restraint systems
Key to the letters used in the table:XISOFIX position that is not suitable for ISOFIX child restraint systems in this weight cat-
egory and/or size category.IUFSuitable for forward-facing ISOFIX child restraint systems that belong to the "Universal"
category which are approved for use in this weight category.ILSuitable for ISOFIX child restraint systems as recommended; see the following table of
"Recommended child restraint systems" ( Y page 59).
The manufacturer will also recommend a suitable ISOFIX child restraint system. For this,
your vehicle and the seat must be listed in the child restraint system manufacturer's
model list. For more information, contact the child restraint system manufacturer or visit
their website.Weight categoriesSize categoryEquipmentRear seat, left and
rightCarry-cotFISO/L1XGISO/L2X0: up to 10 kg
up to approximately
6 monthsEISO/R1IL0+: up to 13 kg
up to approximately
15 monthsEISO/R1ILDISO/R2ILCISO/R3ILI: 9 to 18 kg
between approx-
imately 9 months and
4 yearsDISO/R2ILCISO/R3ILBISO/F2IUFB1ISO/F2XIUFAISO/F3IUF
Recommended child restraint systems
When installing a child restraint system without a transponder for automatic child seat rec-
ognition on the front-passenger seat:
XMove the front-passenger seat as far back as possible.
If you secure a child in a forward-facing child restraint system on the front-passenger seat,
ensure that the shoulder belt strap from the belt outlet on the vehicle is routed towards theChildren in the vehicle59SafetyZProCarManuals.com
Page 62 of 352
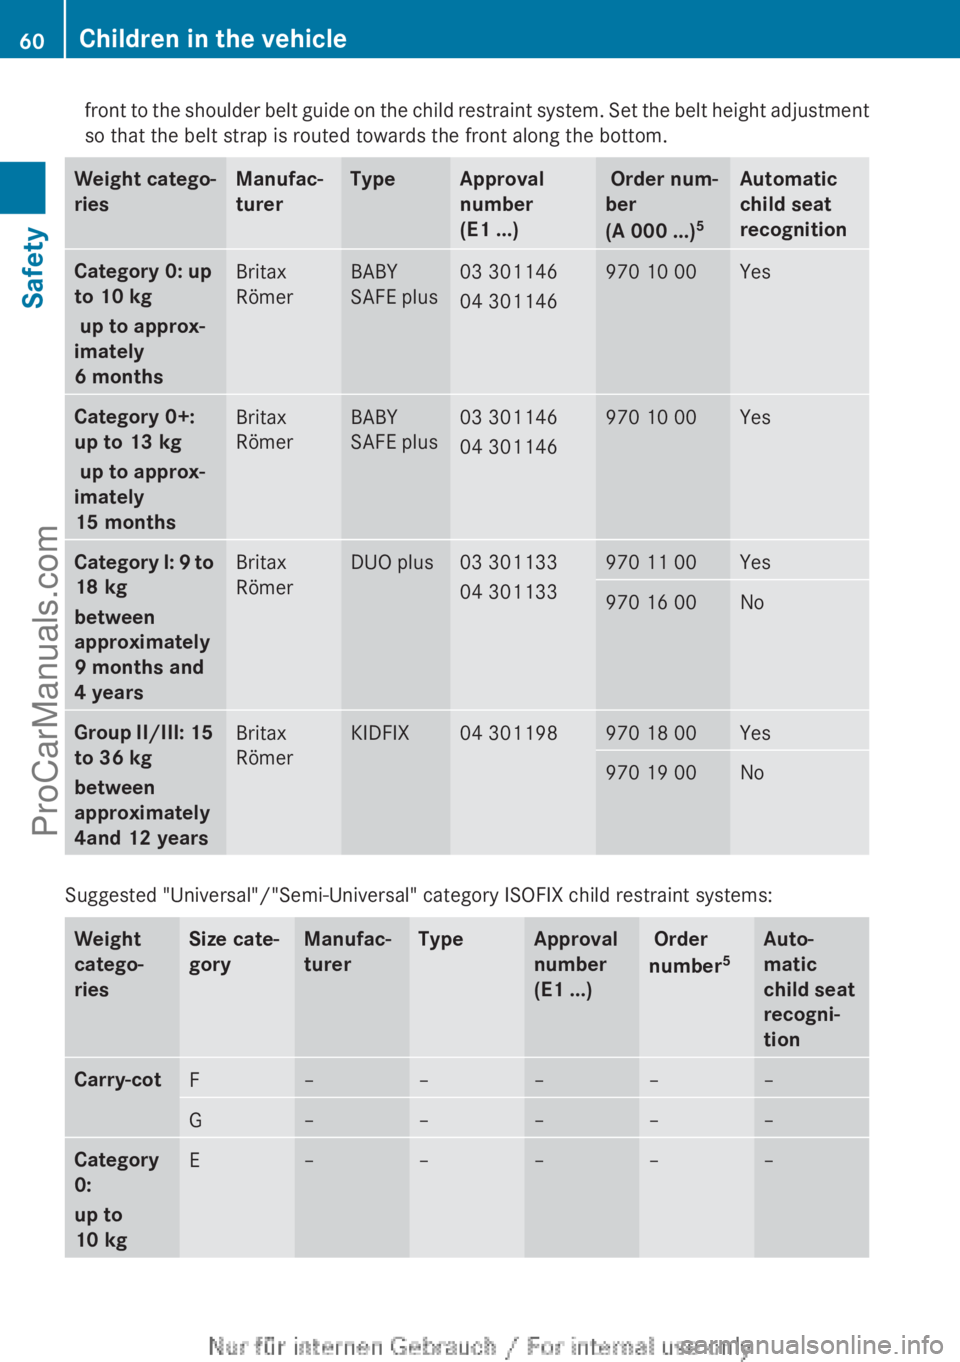
front to the shoulder belt guide on the child restraint system. Set the belt height adjustment
so that the belt strap is routed towards the front along the bottom.Weight catego-
riesManufac-
turerTypeApproval
number
(E1 ...) Order num-
ber
(A 000 ...) 5Automatic
child seat
recognitionCategory 0: up
to 10 kg
up to approx-
imately
6 monthsBritax
RömerBABY
SAFE plus03 301146
04 301146970 10 00YesCategory 0+:
up to 13 kg
up to approx-
imately
15 monthsBritax
RömerBABY
SAFE plus03 301146
04 301146970 10 00YesCategory I: 9 to
18 kg
between
approximately
9 months and
4 yearsBritax
RömerDUO plus03 301133
04 301133970 11 00Yes970 16 00NoGroup II/III: 15
to 36 kg
between
approximately
4and 12 yearsBritax
RömerKIDFIX04 301198970 18 00Yes970 19 00No
Suggested "Universal"/"Semi-Universal" category ISOFIX child restraint systems:
Weight
catego-
riesSize cate-
goryManufac-
turerTypeApproval
number
(E1 ...) Order
number 5Auto-
matic
child seat
recogni-
tionCarry-cotF–––––G–––––Category
0:
up to
10 kgE–––––60Children in the vehicleSafety
ProCarManuals.com