2013 MERCEDES-BENZ CLA-CLASS wheel
[x] Cancel search: wheelPage 192 of 352
XVehicles with manual transmission:
engage first or reverse gear.
Vehicles with automatic transmission:
shift the transmission to position D or R.
The Start Park Assist? Yes: OK No:
% message appears in the multifunction
display.XTo cancel the procedure: press the
% button on the multifunction steering
wheel or pull away.
or
XTo exit a parking space using Active
Parking Assist: press the a button on
the multifunction steering wheel.
The Park Assist active Accelerate
and brake Observe surroundings mes-
sage appears in the multifunction display.XRelease the multifunction steering wheel.XReverse the vehicle or drive forwards, being
ready to brake at all times. Do not exceed
a maximum speed of approximately
10 km/h when exiting a parking space.
Otherwise, Active Parking Assist will be
cancelled.XStop when PARKTRONIC sounds the con-
tinuous warning tone, if not before.XVehicles with manual transmission:
engage first gear or reverse gear when the
vehicle is stationary, depending on the
message or requirement.
Vehicles with automatic transmission:
shift the transmission to position D or R
when the vehicle is stationary, depending
on the message or requirement.
Active Parking Assist immediately steers in
the other direction. The Park Assist
active Accelerate and brake
Observe surroundings message appears
in the multifunction display.
i You will achieve the best results by wait-
ing for the steering procedure to complete
before pulling away.
If you reverse after activation, the steering
wheel is moved to the straight-ahead posi-
tion.
XDrive forwards and reverse as prompted by
the PARKTRONIC warning displays, several
times if necessary.XStop as soon as PARKTRONIC sounds the
continuous warning tone, if not before.
Once you have exited the parking space com-
pletely, the steering wheel is moved to the
straight-ahead position. You hear a tone and
the message Park Assist switched off
appears in the multifunction display. You will
then have to steer and merge into traffic on
your own. PARKTRONIC is still available. You
can take over the steering before the vehicle
has exited the parking space completely. This
is useful, for example when you recognise
that it is already possible to pull out of the
parking space.
Cancelling Active Parking Assist
You can cancel Active Parking Assist at any
time.
XStop the movement of the multifunction
steering wheel or steer yourself.
Active Parking Assist will be cancelled at
once. The Park Assist cancelled mes-
sage appears in the multifunction display.
or
XPress the PARKTRONIC button on the
centre console ( Y page 185).
PARKTRONIC is switched off and Active
Parking Assist is immediately cancelled.
The Park Assist cancelled message
appears in the multifunction display.
Active Parking Assist is cancelled automati-
cally if:
R the electric parking brake is engaged
R transmission position P is selected
R parking using Active Parking Assist is no
longer possible
R you are driving faster than 10 km/h
R a wheel spins and ESP ®
intervenes or fails.
The ÷ warning lamp lights up in the
instrument cluster.
190Driving systemsDriving and parking
ProCarManuals.com
Page 194 of 352
COMAND Online; see the separate audio
system/COMAND Online operating
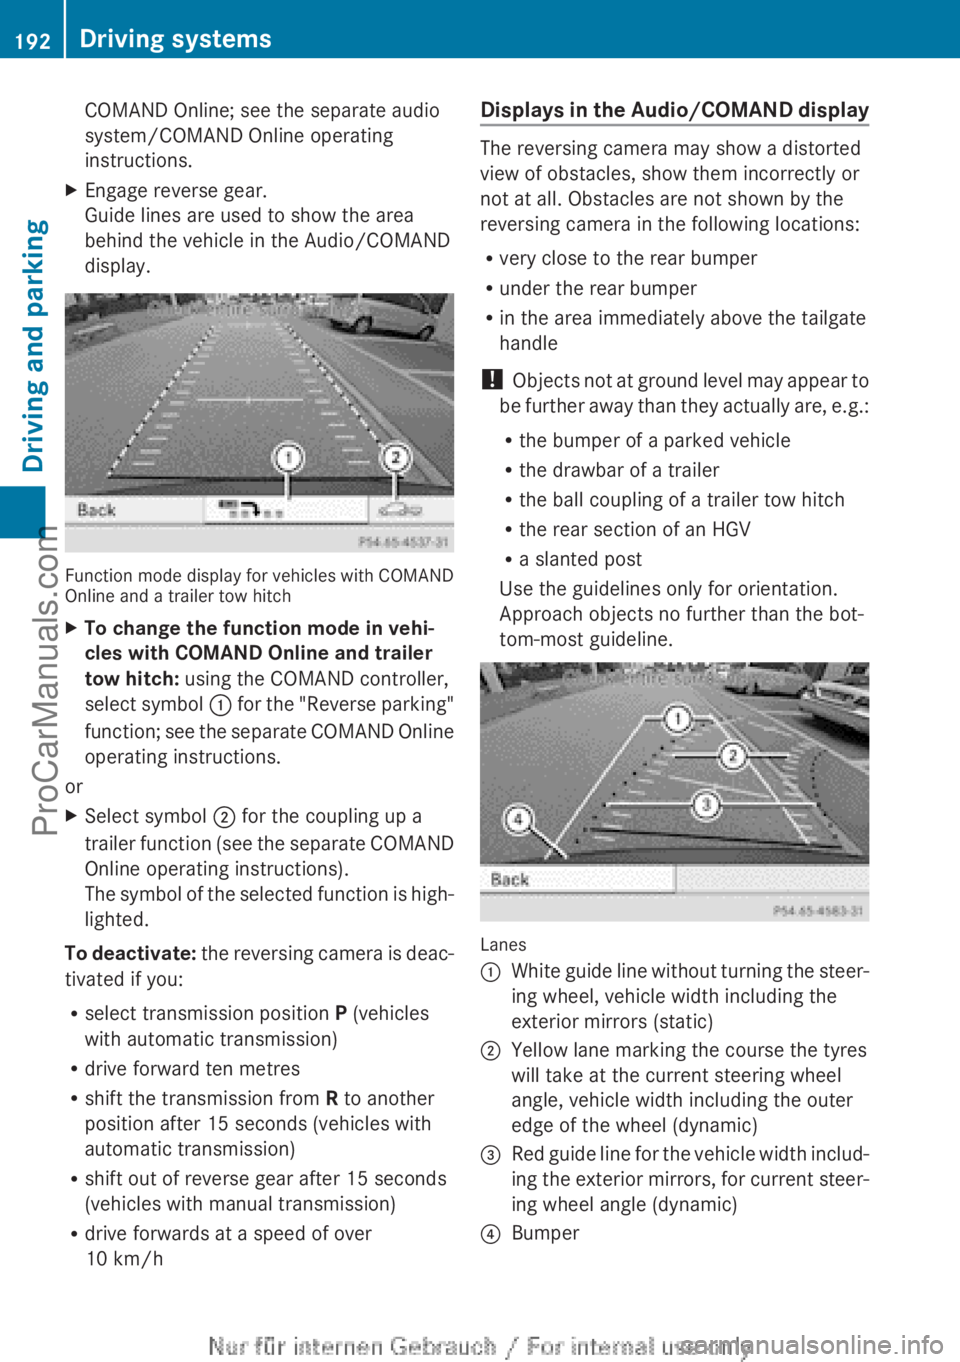
instructions.XEngage reverse gear.
Guide lines are used to show the area
behind the vehicle in the Audio/COMAND
display.
Function mode display for vehicles with COMAND
Online and a trailer tow hitch
XTo change the function mode in vehi-
cles with COMAND Online and trailer
tow hitch: using the COMAND controller,
select symbol : for the "Reverse parking"
function; see the separate COMAND Online
operating instructions.
or
XSelect symbol ; for the coupling up a
trailer function (see the separate COMAND
Online operating instructions).
The symbol of the selected function is high-
lighted.
To deactivate: the reversing camera is deac-
tivated if you:
R select transmission position P (vehicles
with automatic transmission)
R drive forward ten metres
R shift the transmission from R to another
position after 15 seconds (vehicles with
automatic transmission)
R shift out of reverse gear after 15 seconds
(vehicles with manual transmission)
R drive forwards at a speed of over
10 km/h
Displays in the Audio/COMAND display
The reversing camera may show a distorted
view of obstacles, show them incorrectly or
not at all. Obstacles are not shown by the
reversing camera in the following locations:
R very close to the rear bumper
R under the rear bumper
R in the area immediately above the tailgate
handle
! Objects not at ground level may appear to
be further away than they actually are, e.g.:
R the bumper of a parked vehicle
R the drawbar of a trailer
R the ball coupling of a trailer tow hitch
R the rear section of an HGV
R a slanted post
Use the guidelines only for orientation.
Approach objects no further than the bot-
tom-most guideline.
Lanes
:White guide line without turning the steer-
ing wheel, vehicle width including the
exterior mirrors (static);Yellow lane marking the course the tyres
will take at the current steering wheel
angle, vehicle width including the outer
edge of the wheel (dynamic)=Red guide line for the vehicle width includ-
ing the exterior mirrors, for current steer-
ing wheel angle (dynamic)?Bumper192Driving systemsDriving and parking
ProCarManuals.com
Page 195 of 352
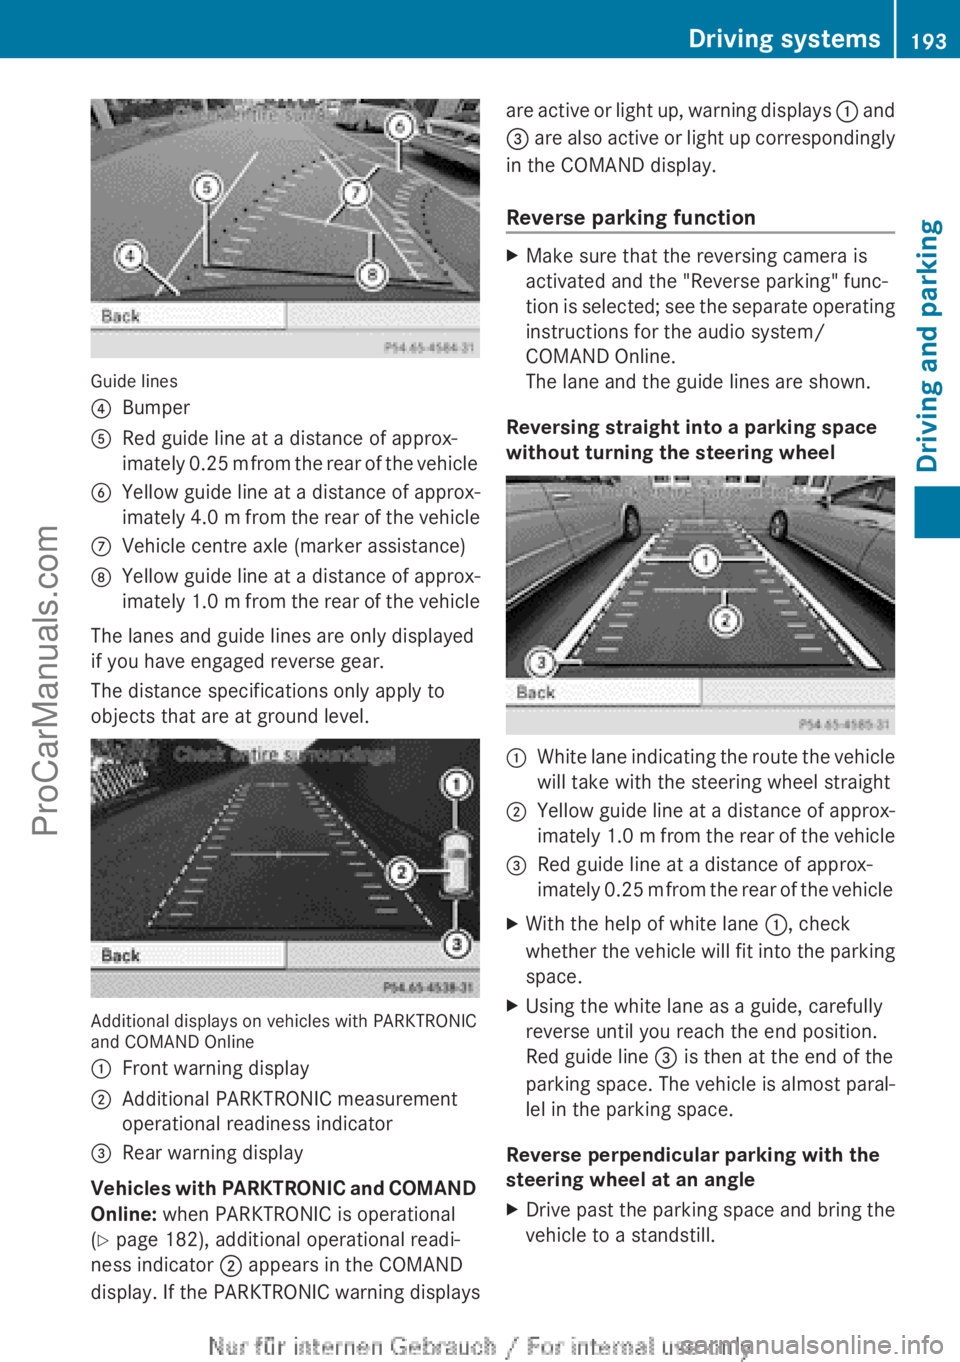
Guide lines
?BumperARed guide line at a distance of approx-
imately 0.25 m from the rear of the vehicleBYellow guide line at a distance of approx-
imately 4.0 m from the rear of the vehicleCVehicle centre axle (marker assistance)DYellow guide line at a distance of approx-
imately 1.0 m from the rear of the vehicle
The lanes and guide lines are only displayed
if you have engaged reverse gear.
The distance specifications only apply to
objects that are at ground level.
Additional displays on vehicles with PARKTRONIC
and COMAND Online
:Front warning display;Additional PARKTRONIC measurement
operational readiness indicator=Rear warning display
Vehicles with PARKTRONIC and COMAND
Online: when PARKTRONIC is operational
( Y page 182), additional operational readi-
ness indicator ; appears in the COMAND
display. If the PARKTRONIC warning displays
are active or light up, warning displays : and
= are also active or light up correspondingly
in the COMAND display.
Reverse parking functionXMake sure that the reversing camera is
activated and the "Reverse parking" func-
tion is selected; see the separate operating
instructions for the audio system/
COMAND Online.
The lane and the guide lines are shown.
Reversing straight into a parking space
without turning the steering wheel
:White lane indicating the route the vehicle
will take with the steering wheel straight;Yellow guide line at a distance of approx-
imately 1.0 m from the rear of the vehicle=Red guide line at a distance of approx-
imately 0.25 m from the rear of the vehicleXWith the help of white lane :, check
whether the vehicle will fit into the parking
space.XUsing the white lane as a guide, carefully
reverse until you reach the end position.
Red guide line = is then at the end of the
parking space. The vehicle is almost paral-
lel in the parking space.
Reverse perpendicular parking with the
steering wheel at an angle
XDrive past the parking space and bring the
vehicle to a standstill.Driving systems193Driving and parkingZProCarManuals.com
Page 196 of 352
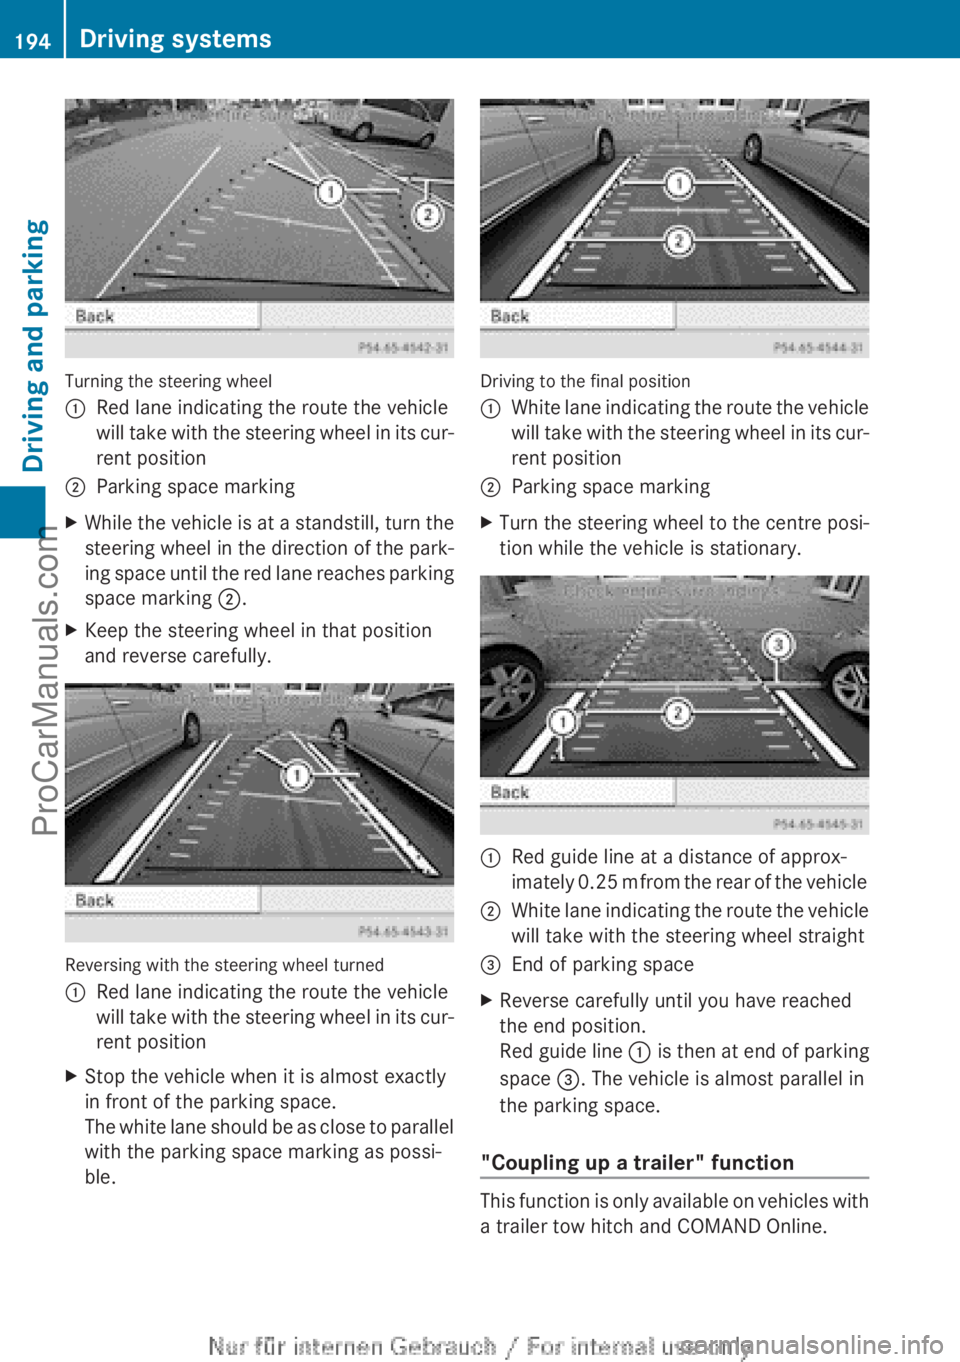
Turning the steering wheel
:Red lane indicating the route the vehicle
will take with the steering wheel in its cur-
rent position;Parking space markingXWhile the vehicle is at a standstill, turn the
steering wheel in the direction of the park-
ing space until the red lane reaches parking
space marking ;.XKeep the steering wheel in that position
and reverse carefully.
Reversing with the steering wheel turned
:Red lane indicating the route the vehicle
will take with the steering wheel in its cur-
rent positionXStop the vehicle when it is almost exactly
in front of the parking space.
The white lane should be as close to parallel
with the parking space marking as possi-
ble.
Driving to the final position
:White lane indicating the route the vehicle
will take with the steering wheel in its cur-
rent position;Parking space markingXTurn the steering wheel to the centre posi-
tion while the vehicle is stationary.:Red guide line at a distance of approx-
imately 0.25 m from the rear of the vehicle;White lane indicating the route the vehicle
will take with the steering wheel straight=End of parking spaceXReverse carefully until you have reached
the end position.
Red guide line : is then at end of parking
space =. The vehicle is almost parallel in
the parking space.
"Coupling up a trailer" function
This function is only available on vehicles with
a trailer tow hitch and COMAND Online.
194Driving systemsDriving and parking
ProCarManuals.com
Page 202 of 352
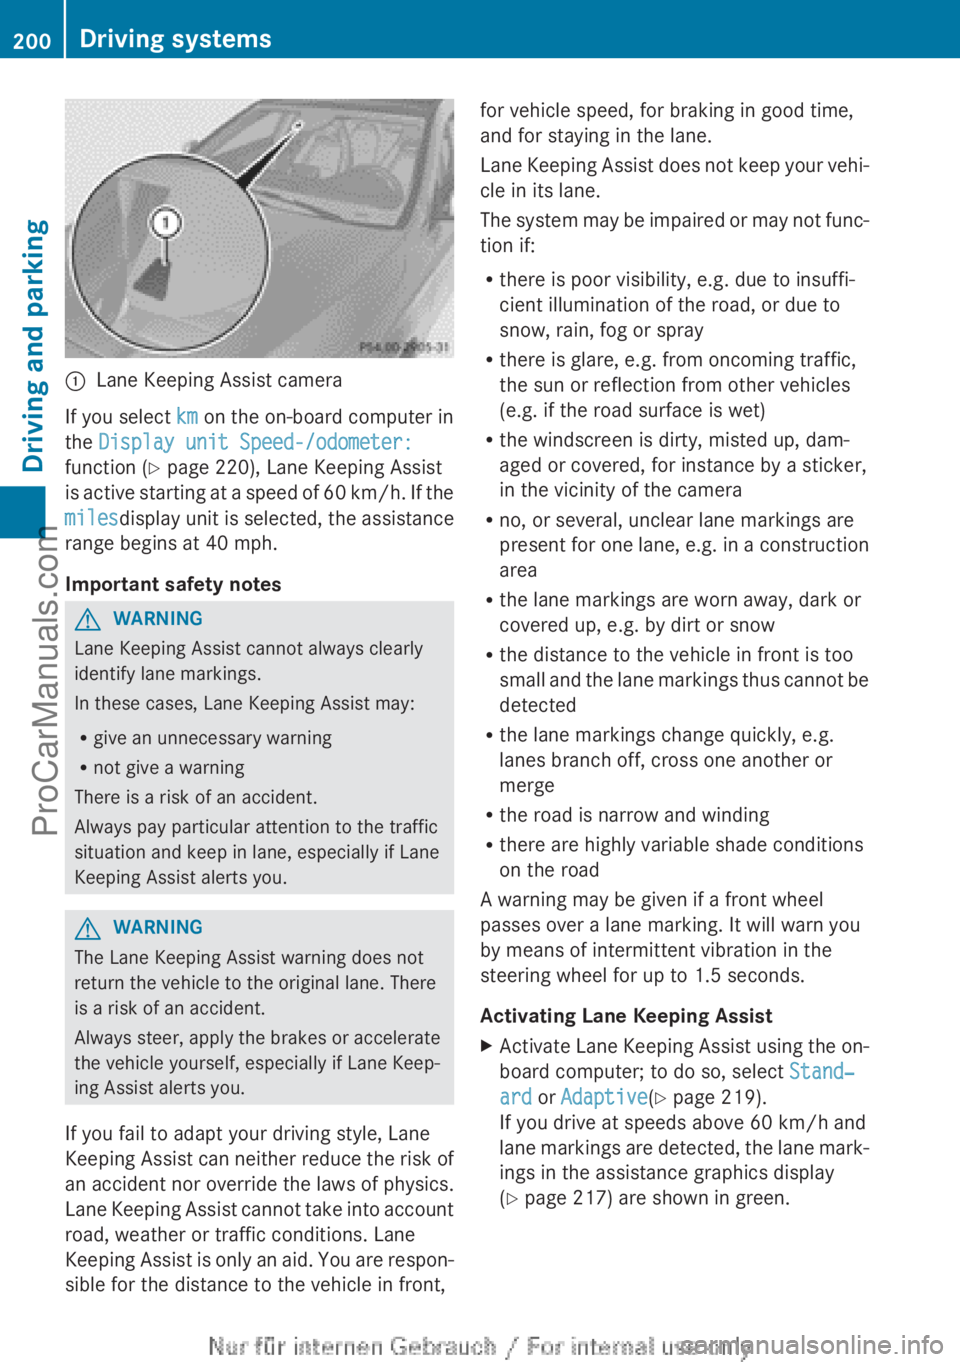
:Lane Keeping Assist camera
If you select km on the on-board computer in
the Display unit Speed-/odometer:
function ( Y page 220), Lane Keeping Assist
is active starting at a speed of 60 km/h. If the
miles display unit is selected, the assistance
range begins at 40 mph.
Important safety notes
GWARNING
Lane Keeping Assist cannot always clearly
identify lane markings.
In these cases, Lane Keeping Assist may:
R give an unnecessary warning
R not give a warning
There is a risk of an accident.
Always pay particular attention to the traffic
situation and keep in lane, especially if Lane
Keeping Assist alerts you.
GWARNING
The Lane Keeping Assist warning does not
return the vehicle to the original lane. There
is a risk of an accident.
Always steer, apply the brakes or accelerate
the vehicle yourself, especially if Lane Keep-
ing Assist alerts you.
If you fail to adapt your driving style, Lane
Keeping Assist can neither reduce the risk of
an accident nor override the laws of physics.
Lane Keeping Assist cannot take into account
road, weather or traffic conditions. Lane
Keeping Assist is only an aid. You are respon-
sible for the distance to the vehicle in front,
for vehicle speed, for braking in good time,
and for staying in the lane.
Lane Keeping Assist does not keep your vehi-
cle in its lane.
The system may be impaired or may not func-
tion if:
R there is poor visibility, e.g. due to insuffi-
cient illumination of the road, or due to
snow, rain, fog or spray
R there is glare, e.g. from oncoming traffic,
the sun or reflection from other vehicles
(e.g. if the road surface is wet)
R the windscreen is dirty, misted up, dam-
aged or covered, for instance by a sticker,
in the vicinity of the camera
R no, or several, unclear lane markings are
present for one lane, e.g. in a construction
area
R the lane markings are worn away, dark or
covered up, e.g. by dirt or snow
R the distance to the vehicle in front is too
small and the lane markings thus cannot be
detected
R the lane markings change quickly, e.g.
lanes branch off, cross one another or
merge
R the road is narrow and winding
R there are highly variable shade conditions
on the road
A warning may be given if a front wheel
passes over a lane marking. It will warn you
by means of intermittent vibration in the
steering wheel for up to 1.5 seconds.
Activating Lane Keeping AssistXActivate Lane Keeping Assist using the on-
board computer; to do so, select Stand‐
ard or Adaptive (Y page 219).
If you drive at speeds above 60 km/h and
lane markings are detected, the lane mark-
ings in the assistance graphics display
( Y page 217) are shown in green.200Driving systemsDriving and parking
ProCarManuals.com
Page 206 of 352
Before you can tow a trailer with your vehicle,
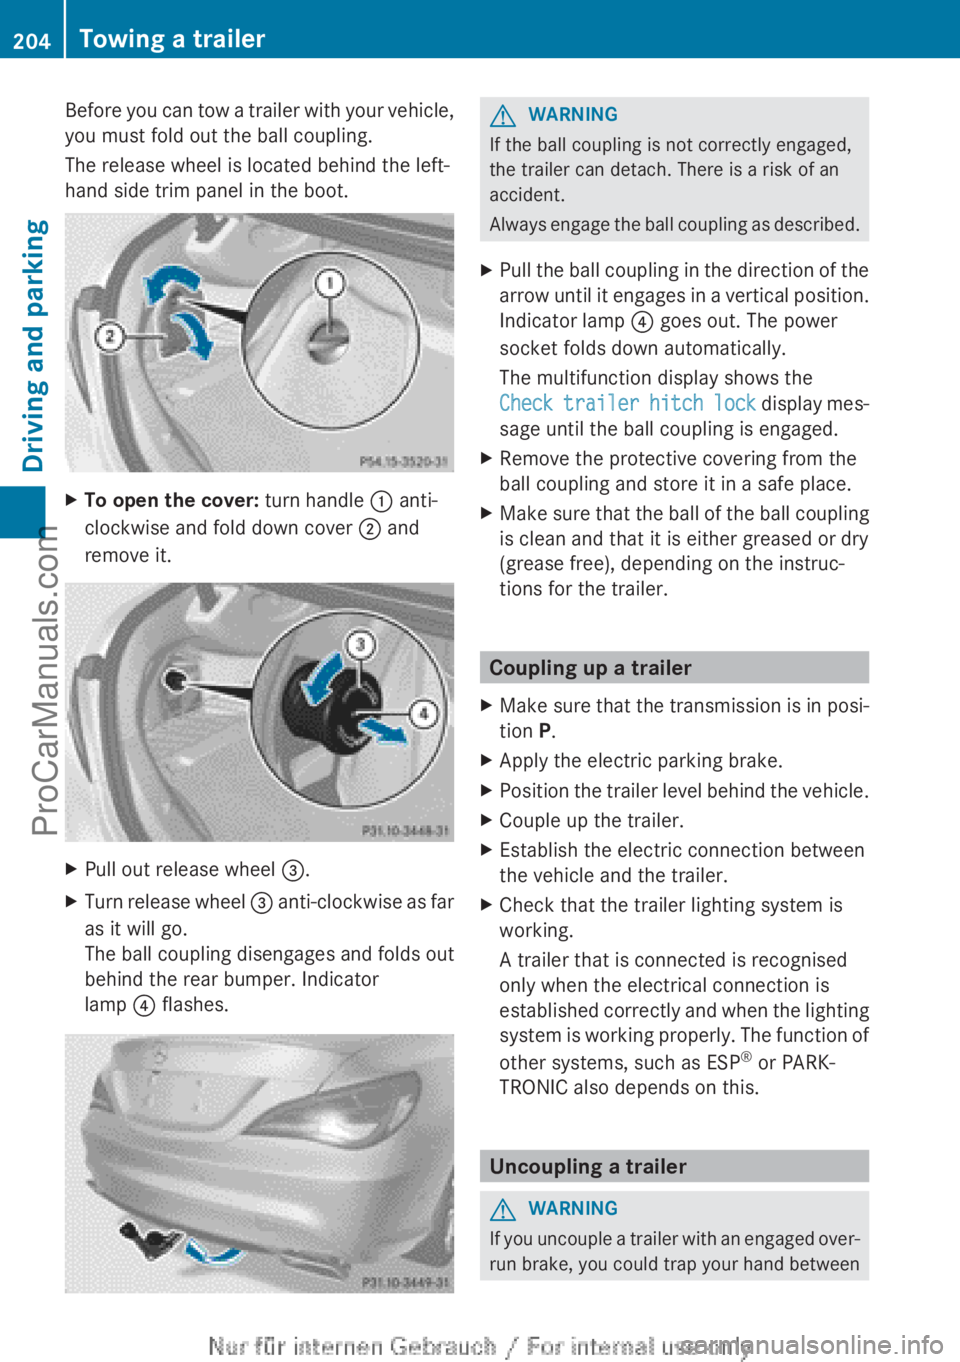
you must fold out the ball coupling.
The release wheel is located behind the left-
hand side trim panel in the boot.XTo open the cover: turn handle : anti-
clockwise and fold down cover ; and
remove it.XPull out release wheel =.XTurn release wheel = anti-clockwise as far
as it will go.
The ball coupling disengages and folds out
behind the rear bumper. Indicator
lamp ? flashes.GWARNING
If the ball coupling is not correctly engaged,
the trailer can detach. There is a risk of an
accident.
Always engage the ball coupling as described.
XPull the ball coupling in the direction of the
arrow until it engages in a vertical position.
Indicator lamp ? goes out. The power
socket folds down automatically.
The multifunction display shows the
Check trailer hitch lock display mes-
sage until the ball coupling is engaged.XRemove the protective covering from the
ball coupling and store it in a safe place.XMake sure that the ball of the ball coupling
is clean and that it is either greased or dry
(grease free), depending on the instruc-
tions for the trailer.
Coupling up a trailer
XMake sure that the transmission is in posi-
tion P.XApply the electric parking brake.XPosition the trailer level behind the vehicle.XCouple up the trailer.XEstablish the electric connection between
the vehicle and the trailer.XCheck that the trailer lighting system is
working.
A trailer that is connected is recognised
only when the electrical connection is
established correctly and when the lighting
system is working properly. The function of
other systems, such as ESP ®
or PARK-
TRONIC also depends on this.
Uncoupling a trailer
GWARNING
If you uncouple a trailer with an engaged over-
run brake, you could trap your hand between
204Towing a trailerDriving and parking
ProCarManuals.com
Page 207 of 352
the vehicle and the trailer drawbar. This poses
a risk of injury.
Do not uncouple a trailer with an engaged
overrun brake.
! Do not disconnect a trailer with an
engaged overrun brake. Otherwise, your
vehicle could be damaged by the rebound-
ing of the overrun brake.
! Remove the installed adapter cable
before folding in the ball coupling. Other-
wise, damage may occur to the rear
bumper and the adapter cable.XMake sure that the transmission is in posi-
tion P.XApply the electric parking brake.XSecure the trailer against rolling away.XRemove the trailer cable and decouple the
trailer.
Folding in the ball coupling
GWARNING
If you release the ball coupling or it does not
engage correctly when folding in, it will swing
out. Within pivoting range of the ball coupling,
there is an increased risk of an accident and
injury.
Only release the ball coupling if the pivoting
range is unobstructed. Always make sure that
the ball coupling engages when folding in.
XFold the ball coupling back in if you are not
using the trailer tow hitch.XPlace the protective covering on the ball
coupling.
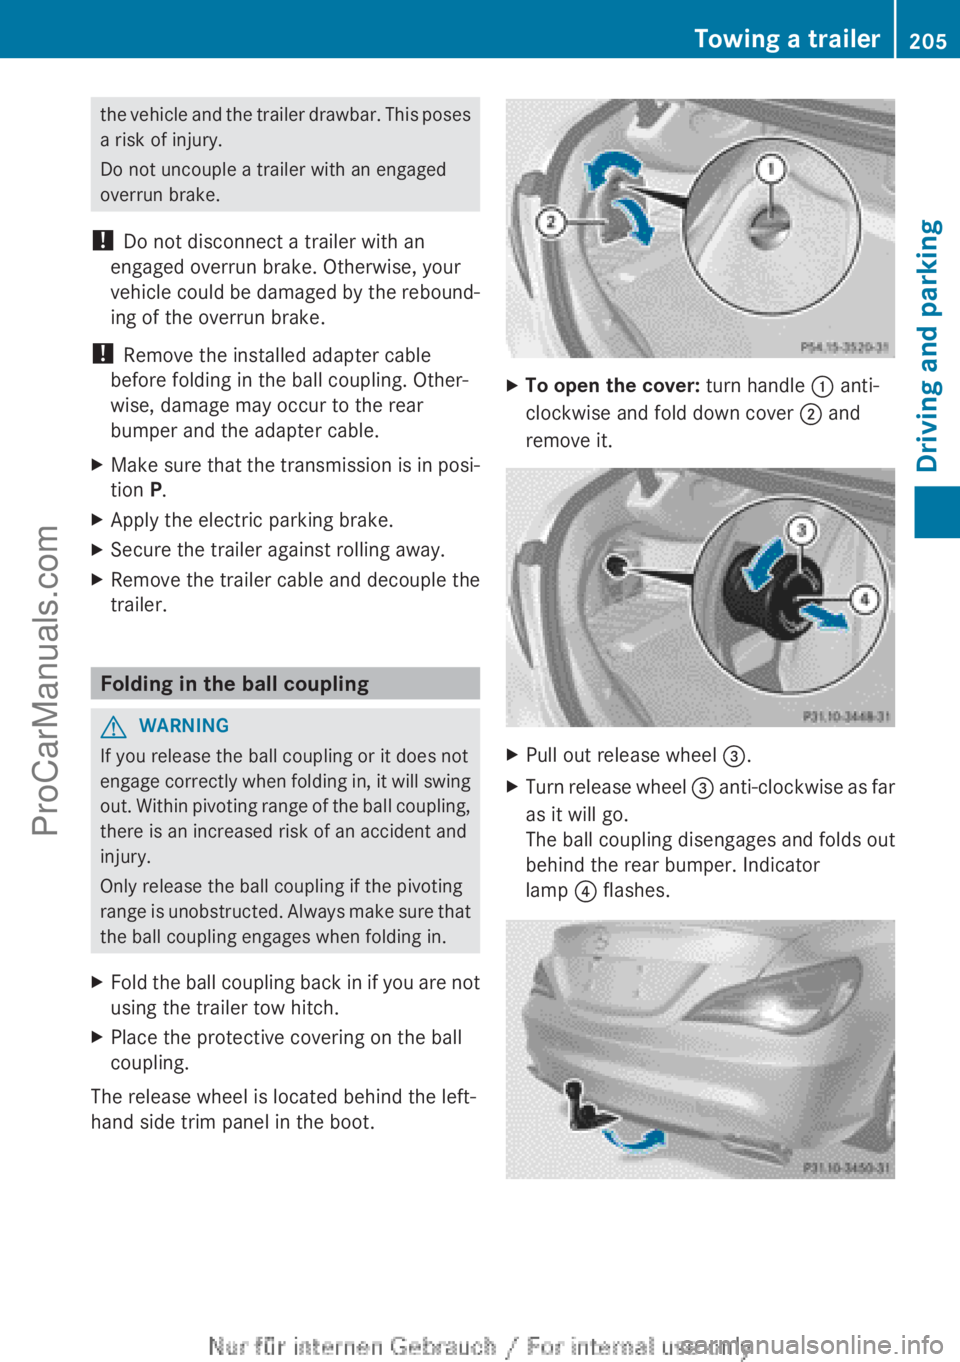
The release wheel is located behind the left-
hand side trim panel in the boot.
XTo open the cover: turn handle : anti-
clockwise and fold down cover ; and
remove it.XPull out release wheel =.XTurn release wheel = anti-clockwise as far
as it will go.
The ball coupling disengages and folds out
behind the rear bumper. Indicator
lamp ? flashes.Towing a trailer205Driving and parkingZProCarManuals.com
Page 211 of 352
At high outside temperatures and when driv-
ing uphill, the coolant temperature may rise
to the end of the scale.
Rev counter
! Do not drive in the overrevving range.
Doing so will damage the engine.
The red band in the rev counter indicates the
engine's overrevving range.
The fuel supply is interrupted to protect the
engine when the red band is reached.
Outside temperature display
You should pay special attention to road con-
ditions when temperatures are around the
freezing point.
The outside temperature display is in the mul-
tifunction display.
Changes in the outside temperature are dis-
played after a short delay.
Speedometer with segments
The speedometer is divided into segments on
vehicles with DISTRONIC PLUS.
The segments in the speedometer indicate
which speed range is available.
R Cruise control activated ( Y page 168):
The segments light up from the stored
speed to the maximum speed.
R Variable SPEEDTRONIC activated
( Y page 171):
The segments light up from the start of the
scale to the selected limit speed.
R DISTRONIC PLUS activated ( Y page 173):
One or two segments in the set speed
range light up.
R DISTRONIC PLUS detects a vehicle in front:
The segments between the speed of the
vehicle in front and the stored speed light
up.
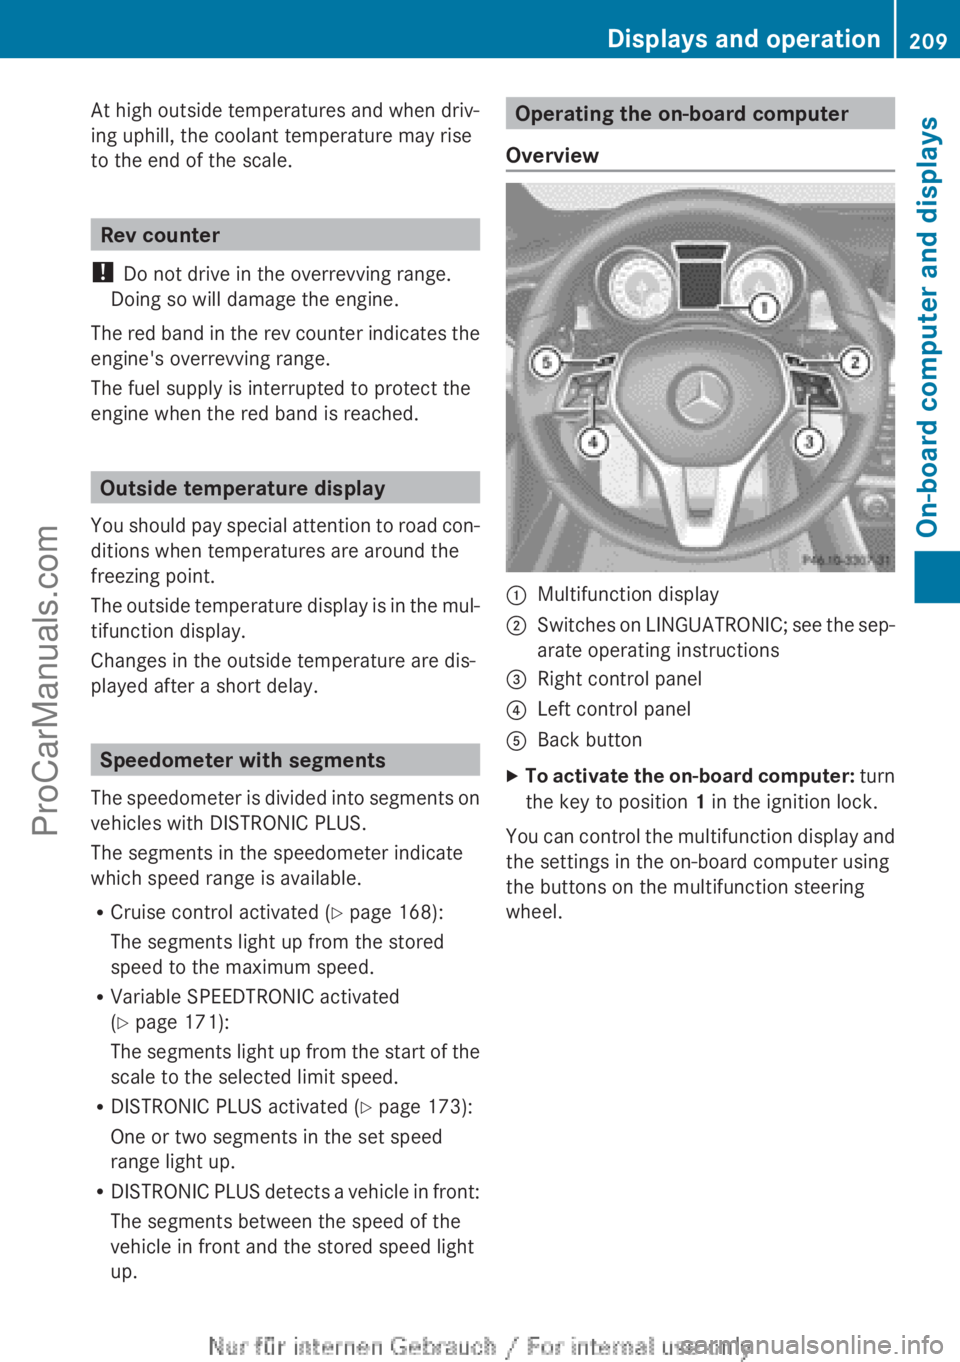
Operating the on-board computer
Overview:Multifunction display;Switches on LINGUATRONIC; see the sep-
arate operating instructions=Right control panel?Left control panelABack buttonXTo activate the on-board computer: turn
the key to position 1 in the ignition lock.
You can control the multifunction display and
the settings in the on-board computer using
the buttons on the multifunction steering
wheel.
Displays and operation209On-board computer and displaysZProCarManuals.com