2013 MERCEDES-BENZ CLA-CLASS door lock
[x] Cancel search: door lockPage 225 of 352
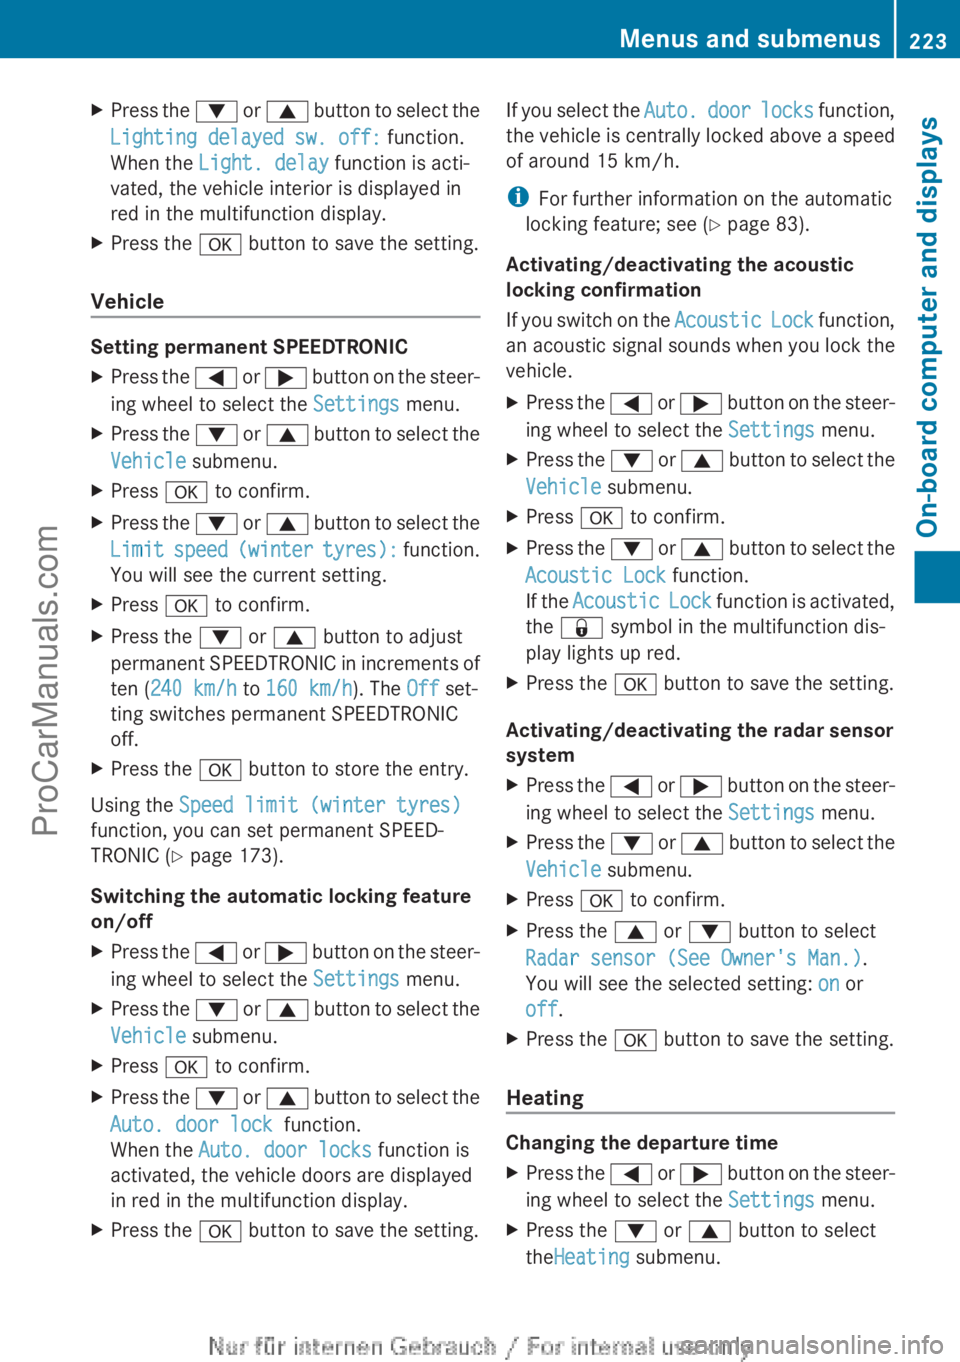
XPress the : or 9 button to select the
Lighting delayed sw. off: function.
When the Light. delay function is acti-
vated, the vehicle interior is displayed in
red in the multifunction display.XPress the a button to save the setting.
Vehicle
Setting permanent SPEEDTRONIC
XPress the = or ; button on the steer-
ing wheel to select the Settings menu.XPress the : or 9 button to select the
Vehicle submenu.XPress a to confirm.XPress the : or 9 button to select the
Limit speed (winter tyres): function.
You will see the current setting.XPress a to confirm.XPress the : or 9 button to adjust
permanent SPEEDTRONIC in increments of
ten ( 240 km/h to 160 km/h ). The Off set-
ting switches permanent SPEEDTRONIC
off.XPress the a button to store the entry.
Using the Speed limit (winter tyres)
function, you can set permanent SPEED-
TRONIC ( Y page 173).
Switching the automatic locking feature
on/off
XPress the = or ; button on the steer-
ing wheel to select the Settings menu.XPress the : or 9 button to select the
Vehicle submenu.XPress a to confirm.XPress the : or 9 button to select the
Auto. door lock function.
When the Auto. door locks function is
activated, the vehicle doors are displayed
in red in the multifunction display.XPress the a button to save the setting.If you select the Auto. door locks function,
the vehicle is centrally locked above a speed
of around 15 km/h.
i For further information on the automatic
locking feature; see ( Y page 83).
Activating/deactivating the acoustic
locking confirmation
If you switch on the Acoustic Lock function,
an acoustic signal sounds when you lock the
vehicle.XPress the = or ; button on the steer-
ing wheel to select the Settings menu.XPress the : or 9 button to select the
Vehicle submenu.XPress a to confirm.XPress the : or 9 button to select the
Acoustic Lock function.
If the Acoustic Lock function is activated,
the & symbol in the multifunction dis-
play lights up red.XPress the a button to save the setting.
Activating/deactivating the radar sensor
system
XPress the = or ; button on the steer-
ing wheel to select the Settings menu.XPress the : or 9 button to select the
Vehicle submenu.XPress a to confirm.XPress the 9 or : button to select
Radar sensor (See Owner's Man.) .
You will see the selected setting: on or
off .XPress the a button to save the setting.
Heating
Changing the departure time
XPress the = or ; button on the steer-
ing wheel to select the Settings menu.XPress the : or 9 button to select
the Heating submenu.Menus and submenus223On-board computer and displaysZProCarManuals.com
Page 227 of 352
Convenience
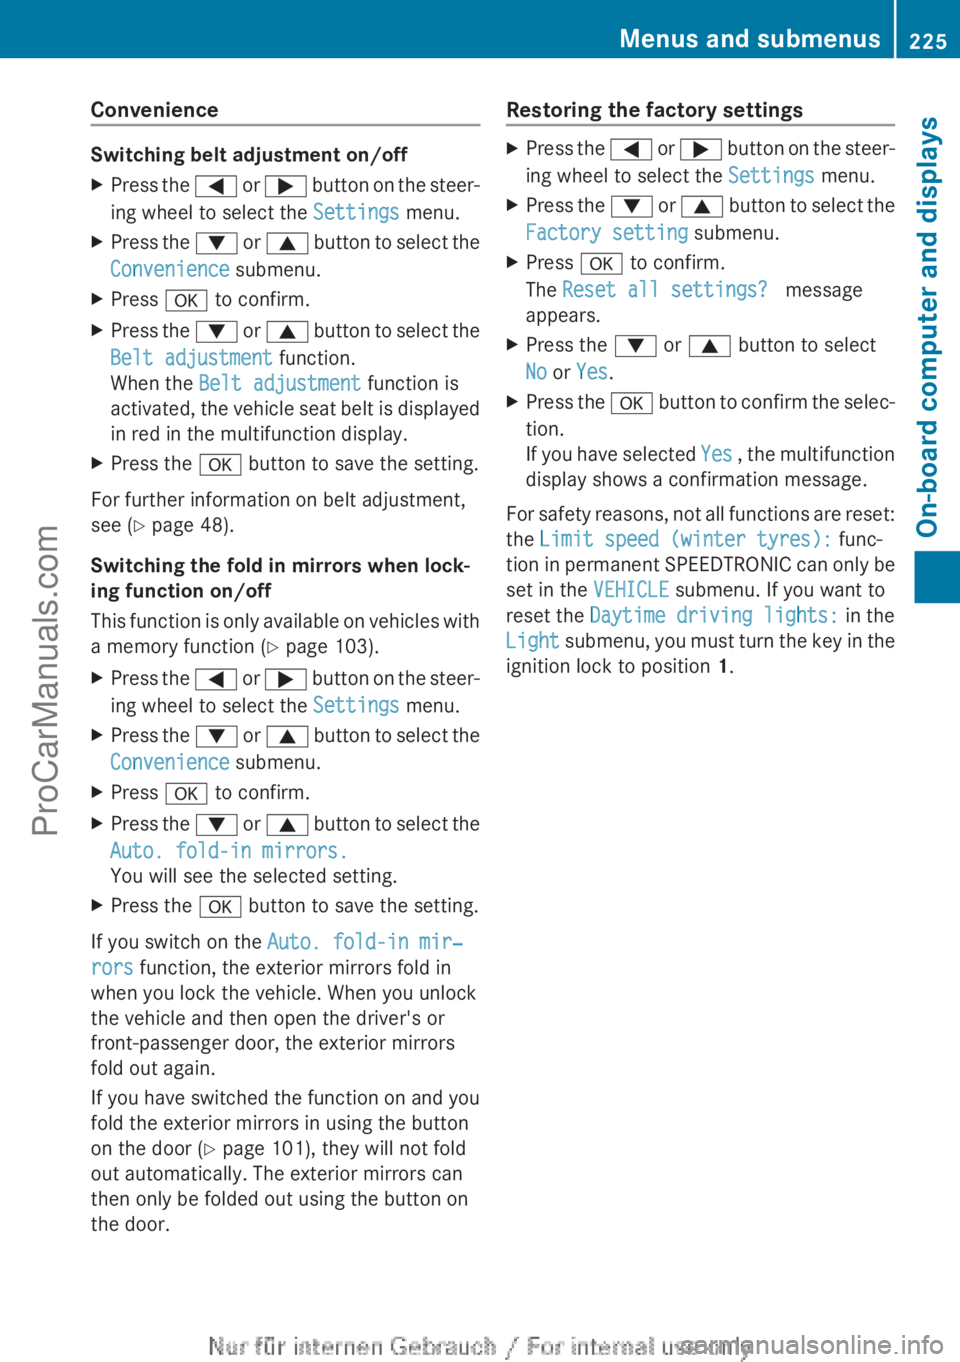
Switching belt adjustment on/off
XPress the = or ; button on the steer-
ing wheel to select the Settings menu.XPress the : or 9 button to select the
Convenience submenu.XPress a to confirm.XPress the : or 9 button to select the
Belt adjustment function.
When the Belt adjustment function is
activated, the vehicle seat belt is displayed
in red in the multifunction display.XPress the a button to save the setting.
For further information on belt adjustment,
see ( Y page 48).
Switching the fold in mirrors when lock-
ing function on/off
This function is only available on vehicles with
a memory function ( Y page 103).
XPress the = or ; button on the steer-
ing wheel to select the Settings menu.XPress the : or 9 button to select the
Convenience submenu.XPress a to confirm.XPress the : or 9 button to select the
Auto. fold-in mirrors.
You will see the selected setting.XPress the a button to save the setting.
If you switch on the Auto. fold-in mir‐
rors function, the exterior mirrors fold in
when you lock the vehicle. When you unlock
the vehicle and then open the driver's or
front-passenger door, the exterior mirrors
fold out again.
If you have switched the function on and you
fold the exterior mirrors in using the button
on the door ( Y page 101), they will not fold
out automatically. The exterior mirrors can
then only be folded out using the button on
the door.
Restoring the factory settingsXPress the = or ; button on the steer-
ing wheel to select the Settings menu.XPress the : or 9 button to select the
Factory setting submenu.XPress a to confirm.
The Reset all settings? message
appears.XPress the : or 9 button to select
No or Yes .XPress the a button to confirm the selec-
tion.
If you have selected Yes , the multifunction
display shows a confirmation message.
For safety reasons, not all functions are reset:
the Limit speed (winter tyres): func-
tion in permanent SPEEDTRONIC can only be
set in the VEHICLE submenu. If you want to
reset the Daytime driving lights: in the
Light submenu, you must turn the key in the
ignition lock to position 1.
Menus and submenus225On-board computer and displaysZProCarManuals.com
Page 253 of 352
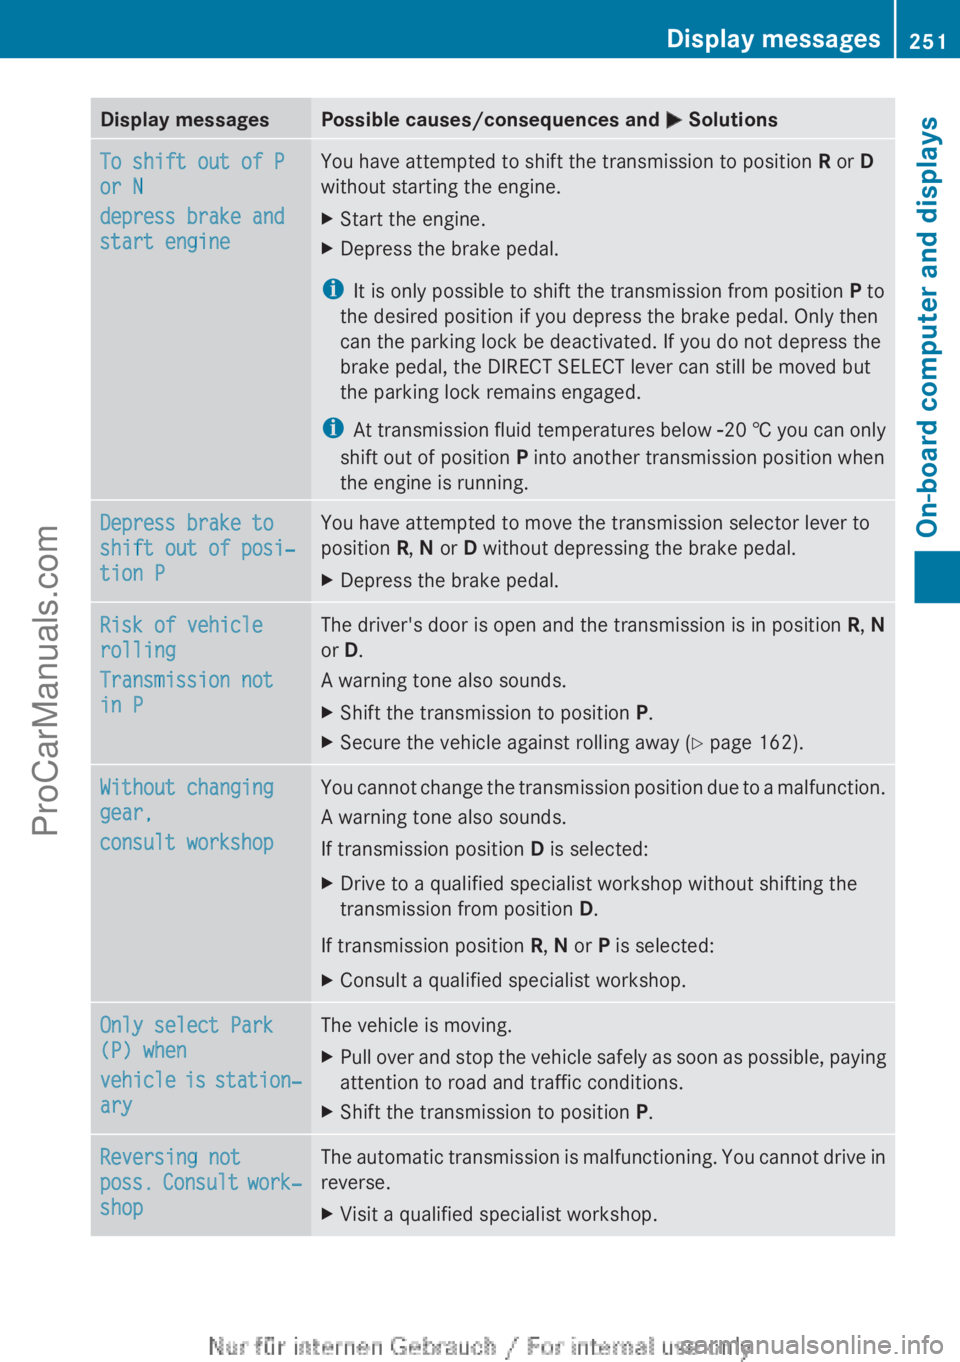
Display messagesPossible causes/consequences and M SolutionsTo shift out of P
or N
depress brake and
start engineYou have attempted to shift the transmission to position R or D
without starting the engine.XStart the engine.XDepress the brake pedal.
i It is only possible to shift the transmission from position P to
the desired position if you depress the brake pedal. Only then
can the parking lock be deactivated. If you do not depress the
brake pedal, the DIRECT SELECT lever can still be moved but
the parking lock remains engaged.
i At transmission fluid temperatures below Ò20 † you can only
shift out of position P into another transmission position when
the engine is running.
Depress brake to
shift out of posi‐
tion PYou have attempted to move the transmission selector lever to
position R, N or D without depressing the brake pedal.XDepress the brake pedal.Risk of vehicle
rolling
Transmission not
in PThe driver's door is open and the transmission is in position R, N
or D.
A warning tone also sounds.XShift the transmission to position P.XSecure the vehicle against rolling away ( Y page 162).Without changing
gear,
consult workshopYou cannot change the transmission position due to a malfunction.
A warning tone also sounds.
If transmission position D is selected:XDrive to a qualified specialist workshop without shifting the
transmission from position D.
If transmission position R, N or P is selected:
XConsult a qualified specialist workshop.Only select Park
(P) when
vehicle is station‐
aryThe vehicle is moving.XPull over and stop the vehicle safely as soon as possible, paying
attention to road and traffic conditions.XShift the transmission to position P.Reversing not
poss. Consult work‐
shopThe automatic transmission is malfunctioning. You cannot drive in
reverse.XVisit a qualified specialist workshop.Display messages251On-board computer and displaysZProCarManuals.com
Page 254 of 352
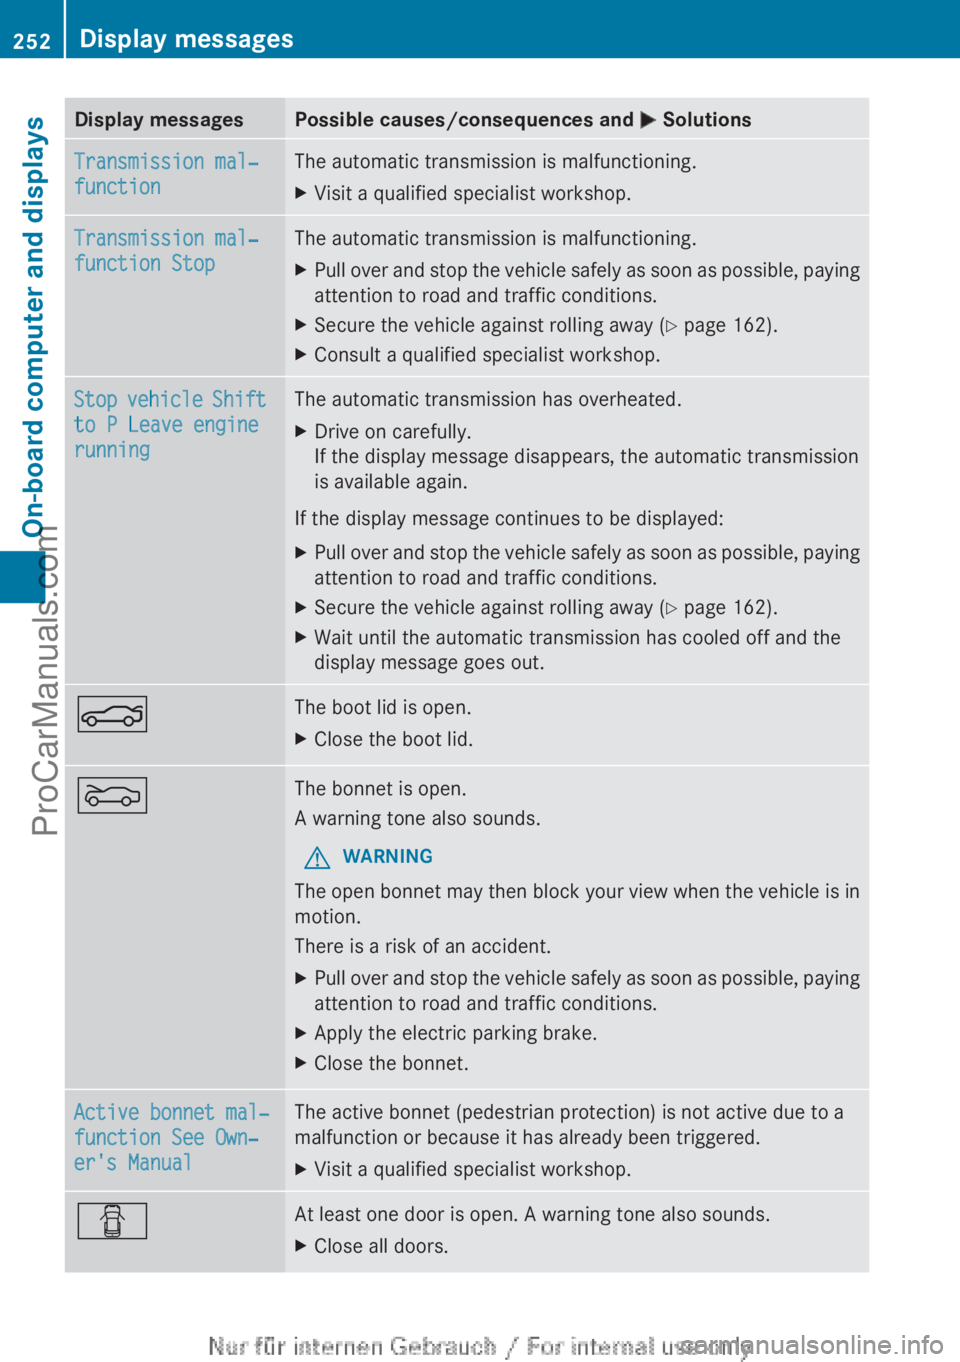
Display messagesPossible causes/consequences and M SolutionsTransmission mal‐
functionThe automatic transmission is malfunctioning.XVisit a qualified specialist workshop.Transmission mal‐
function StopThe automatic transmission is malfunctioning.XPull over and stop the vehicle safely as soon as possible, paying
attention to road and traffic conditions.XSecure the vehicle against rolling away ( Y page 162).XConsult a qualified specialist workshop.Stop vehicle Shift
to P Leave engine
runningThe automatic transmission has overheated.XDrive on carefully.
If the display message disappears, the automatic transmission
is available again.
If the display message continues to be displayed:
XPull over and stop the vehicle safely as soon as possible, paying
attention to road and traffic conditions.XSecure the vehicle against rolling away ( Y page 162).XWait until the automatic transmission has cooled off and the
display message goes out.NThe boot lid is open.XClose the boot lid.MThe bonnet is open.
A warning tone also sounds.GWARNING
The open bonnet may then block your view when the vehicle is in
motion.
There is a risk of an accident.
XPull over and stop the vehicle safely as soon as possible, paying
attention to road and traffic conditions.XApply the electric parking brake.XClose the bonnet.Active bonnet mal‐
function See Own‐
er's ManualThe active bonnet (pedestrian protection) is not active due to a
malfunction or because it has already been triggered.XVisit a qualified specialist workshop.CAt least one door is open. A warning tone also sounds.XClose all doors.252Display messagesOn-board computer and displays
ProCarManuals.com
Page 276 of 352
An incorrectly secured roof carrier or roof
load may become detached from the vehicle.
You must therefore ensure that you observe
the roof carrier manufacturer's installation
instructions.
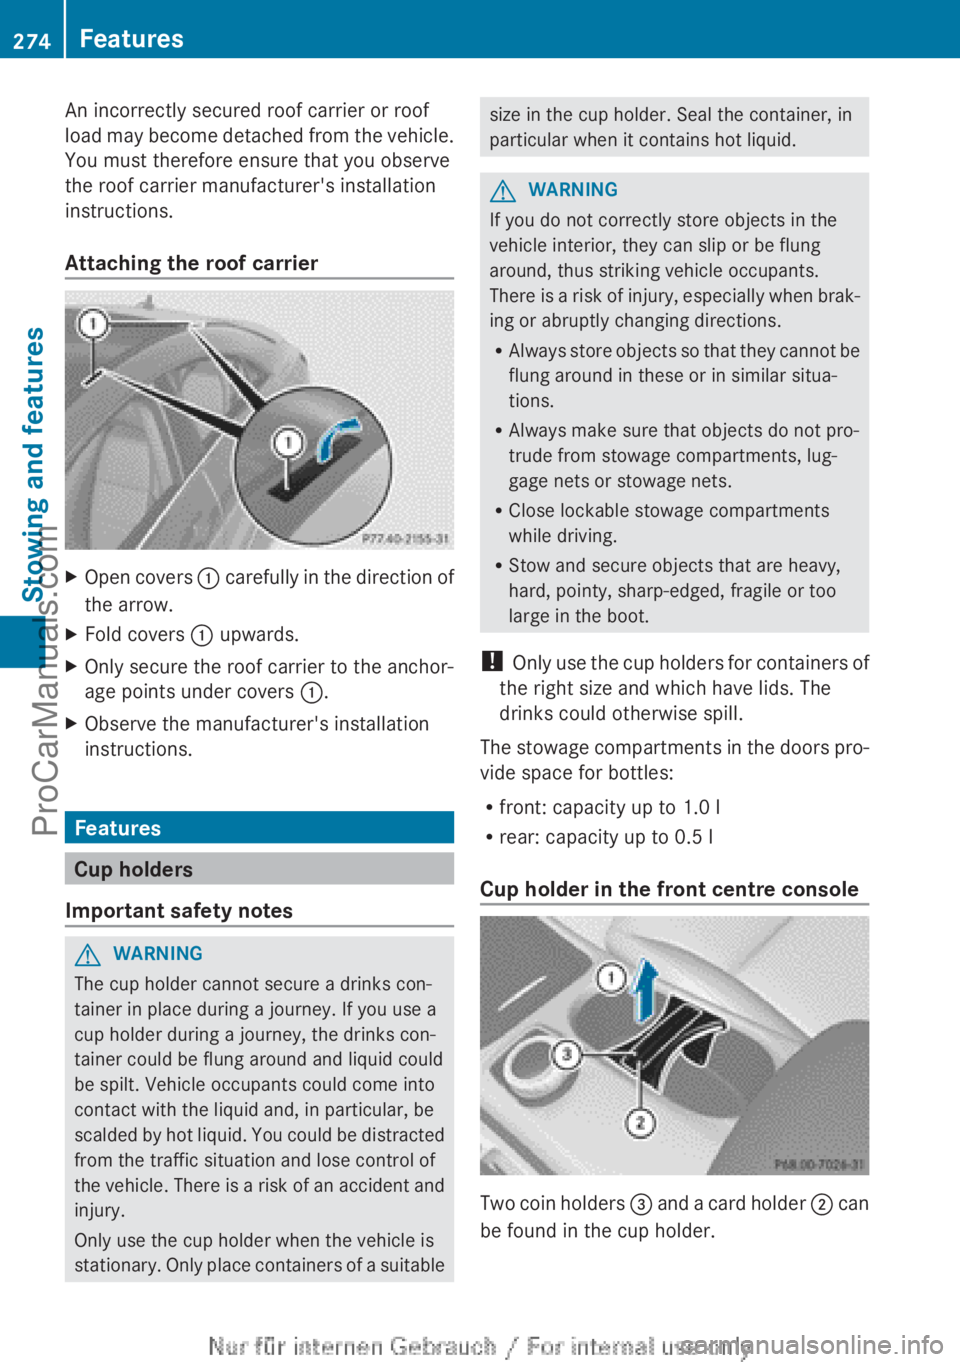
Attaching the roof carrierXOpen covers : carefully in the direction of
the arrow.XFold covers : upwards.XOnly secure the roof carrier to the anchor-
age points under covers :.XObserve the manufacturer's installation
instructions.
Features
Cup holders
Important safety notes
GWARNING
The cup holder cannot secure a drinks con-
tainer in place during a journey. If you use a
cup holder during a journey, the drinks con-
tainer could be flung around and liquid could
be spilt. Vehicle occupants could come into
contact with the liquid and, in particular, be
scalded by hot liquid. You could be distracted
from the traffic situation and lose control of
the vehicle. There is a risk of an accident and
injury.
Only use the cup holder when the vehicle is
stationary. Only place containers of a suitable
size in the cup holder. Seal the container, in
particular when it contains hot liquid.GWARNING
If you do not correctly store objects in the
vehicle interior, they can slip or be flung
around, thus striking vehicle occupants.
There is a risk of injury, especially when brak-
ing or abruptly changing directions.
R Always store objects so that they cannot be
flung around in these or in similar situa-
tions.
R Always make sure that objects do not pro-
trude from stowage compartments, lug-
gage nets or stowage nets.
R Close lockable stowage compartments
while driving.
R Stow and secure objects that are heavy,
hard, pointy, sharp-edged, fragile or too
large in the boot.
! Only use the cup holders for containers of
the right size and which have lids. The
drinks could otherwise spill.
The stowage compartments in the doors pro-
vide space for bottles:
R front: capacity up to 1.0 l
R rear: capacity up to 0.5 l
Cup holder in the front centre console
Two coin holders = and a card holder ; can
be found in the cup holder.
274FeaturesStowing and features
ProCarManuals.com
Page 300 of 352
Flat tyre
Preparing the vehicle
Your vehicle may be equipped with:
R MOExtended tyres (tyres with run-flat char-
acteristics) ( Y page 298)
Vehicle preparation is not necessary on
vehicles with MOExtended tyres.
R a TIREFIT kit ( Y page 297)
R an emergency spare wheel (only for certain
countries)
Information on changing/fitting a wheel
( Y page 325).
XStop the vehicle as far away as possible
from traffic on solid, non-slippery and level
ground.XSwitch on the hazard warning lamps.XSecure the vehicle against rolling away
( Y page 162).XIf possible, bring the front wheels into the
straight-ahead position.XSwitch off the engine.XRemove the key from the ignition lock.XAll occupants must get out of the vehicle.
Make sure that they are not endangered as
they do so.XMake sure that no one is near the danger
area while a wheel is being changed. Any-
one who is not directly assisting in the
wheel change should, for example, stand
behind the barrier.XGet out of the vehicle. Pay attention to traf-
fic conditions when doing so.XClose the driver's door.XPlace the warning triangle a suitable dis-
tance away ( Y page 296). Observe legal
requirements.
i Vehicles with MOExtended tyres are not
equipped with a TIREFIT kit at the factory.
It is therefore recommended that you addi-
tionally equip your vehicle with a TIREFIT kit
if you fit tyres that do not feature run-flat
characteristics, e.g. winter tyres. A TIREFIT
kit can be obtained from a qualified spe-
cialist workshop.
MOExtended tyres (tyres with run-flat
characteristics)
General notes
With MOExtended tyres (tyres with run-flat
characteristics), you can continue to drive
your vehicle even if there is a total loss of
pressure in one or more tyres. The affected
tyre must not show any clearly visible dam-
age.
You can recognise MOExtended tyres by the
MOExtended marking which appears on the
tyre wall. You will find this marking next to the
tyre size designation, the load-bearing capa-
city and the speed index.
MOExtended tyres may only be used in con-
junction with an active tyre pressure loss
warning system.
If the pressure loss warning message
appears in the multifunction display:
R Observe the instructions in the display
messages ( Y page 248).
R Check the tyre for damage.
R If driving on, observe the following notes.
The maximum driving distance is approx-
imately 80 km when the vehicle is partially
laden and approximately 30 km when the
vehicle is fully laden.
In addition to the vehicle load, the driving dis-
tance possible depends upon:
R speed
R road condition
R outside temperature
The driving distance possible in run-flat mode
may be reduced by extreme driving condi-
tions/manoeuvres, or it can be increased
through a moderate style of driving.
The maximum permissible distance which
can be driven in run-flat mode is counted from
the moment the tyre pressure loss warning
appears in the multifunction display.
298Flat tyreBreakdown assistance
ProCarManuals.com
Page 313 of 352
the combination switch, the hazard warn-
ing lamps start flashing again.
Vehicles with automatic transmission: the
automatic transmission automatically shifts
to position P when you open the driver's or
front-passenger door or when you remove the
key from the ignition lock. In order to ensure
that the automatic transmission stays in posi-
tion N when towing the vehicle, you must
observe the following points:XMake sure that the vehicle is stationary.XTurn the key to position 2 in the ignition
lock.XDepress and hold the brake pedal.XShift the automatic transmission to posi-
tion N.
Vehicles with manual transmission:
XTurn the key to position 2 in the ignition
lock.XDepress and hold the brake pedal.XDepress the clutch pedal fully and shift to
neutral.
Vehicles with manual or automatic trans-
mission:
XLeave the key in position 2 in the ignition
lock.XRelease the brake pedal.XRelease the electric parking brake.XSwitch on the hazard warning lamps
( Y page 110).
It is important that you observe the safety
instructions when towing away your vehicle
( Y page 308).
Transporting the vehicle
! You may only secure the vehicle by the
wheels, not by parts of the vehicle such as
axle or steering components. Otherwise,
the vehicle could be damaged.
XVehicles with manual transmission:
depress the clutch pedal fully and shift to
neutral.XVehicles with automatic transmission:
turn the key to position 2 in the ignition
lock.XMove the transmission to position N.
As soon as the vehicle is loaded:
XPrevent the vehicle from rolling away by
applying the electric parking brake.XVehicles with manual transmission:
depress the clutch pedal fully and engage
first or reverse gear.XVehicles with automatic transmission:
shift the transmission to position P.XTurn the key to position 0 in the ignition
lock and remove it.XSecure the vehicle.
The towing eyes or trailer tow hitch can be
used to pull the vehicle onto a trailer or trans-
porter if you wish to transport it.
Tow-starting (emergency engine
starting)
! Do not tow-start vehicles with automatic
transmission. You could otherwise damage
the automatic transmission.
Before tow-starting the following conditions
must be fulfilled:
R the battery is connected.
R the engine has cooled down.
R the exhaust system has cooled down.
XSwitch on the hazard warning lamps
( Y page 110).XFit the towing eye ( Y page 310).XSecure the rigid towing bar or the towing
rope.XDepress and hold the brake pedal.XTurn the key to position 2 in the ignition
lock.Towing and tow-starting311Breakdown assistanceZProCarManuals.com
Page 329 of 352
Rthe jack must be placed on a firm, flat and
non-slip surface. On a loose surface, a
large, load-bearing underlay must be used.
On a slippery surface, a non-slip underlay
must be used, e.g. rubber mats.
R do not use wooden blocks or similar
objects as a jack underlay. Otherwise, the
jack will not be able to achieve its load-
bearing capacity due to the restricted
height.
R make sure that the distance between the
underside of the tyres and the ground does
not exceed 3 cm.
R never place your hands or feet under the
raised vehicle.
R never lie under the raised vehicle.
R never start the engine when the vehicle is
raised.
R never open or close a door or the boot lid
when the vehicle is raised.
R make sure that no persons are present in
the vehicle when the vehicle is raised.
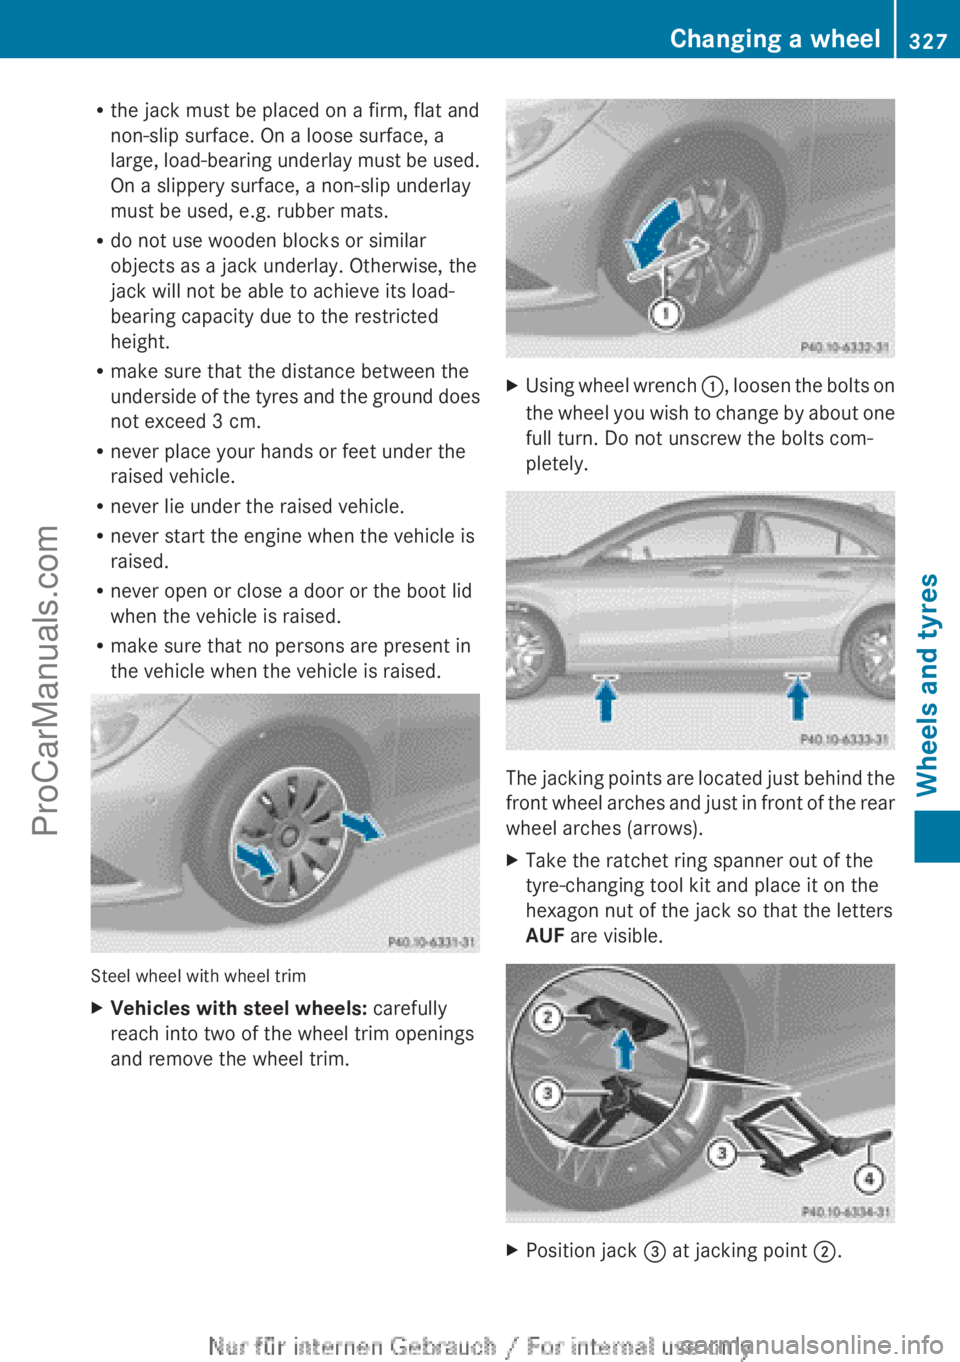
Steel wheel with wheel trim
XVehicles with steel wheels: carefully
reach into two of the wheel trim openings
and remove the wheel trim.XUsing wheel wrench :, loosen the bolts on
the wheel you wish to change by about one
full turn. Do not unscrew the bolts com-
pletely.
The jacking points are located just behind the
front wheel arches and just in front of the rear
wheel arches (arrows).
XTake the ratchet ring spanner out of the
tyre-changing tool kit and place it on the
hexagon nut of the jack so that the letters
AUF are visible.XPosition jack = at jacking point ;.Changing a wheel327Wheels and tyresZProCarManuals.com