2013 MERCEDES-BENZ CLA-CLASS door lock
[x] Cancel search: door lockPage 109 of 352
Rcombination switch ( Y page 109)
R on-board computer ( Y page 220)
Light switch
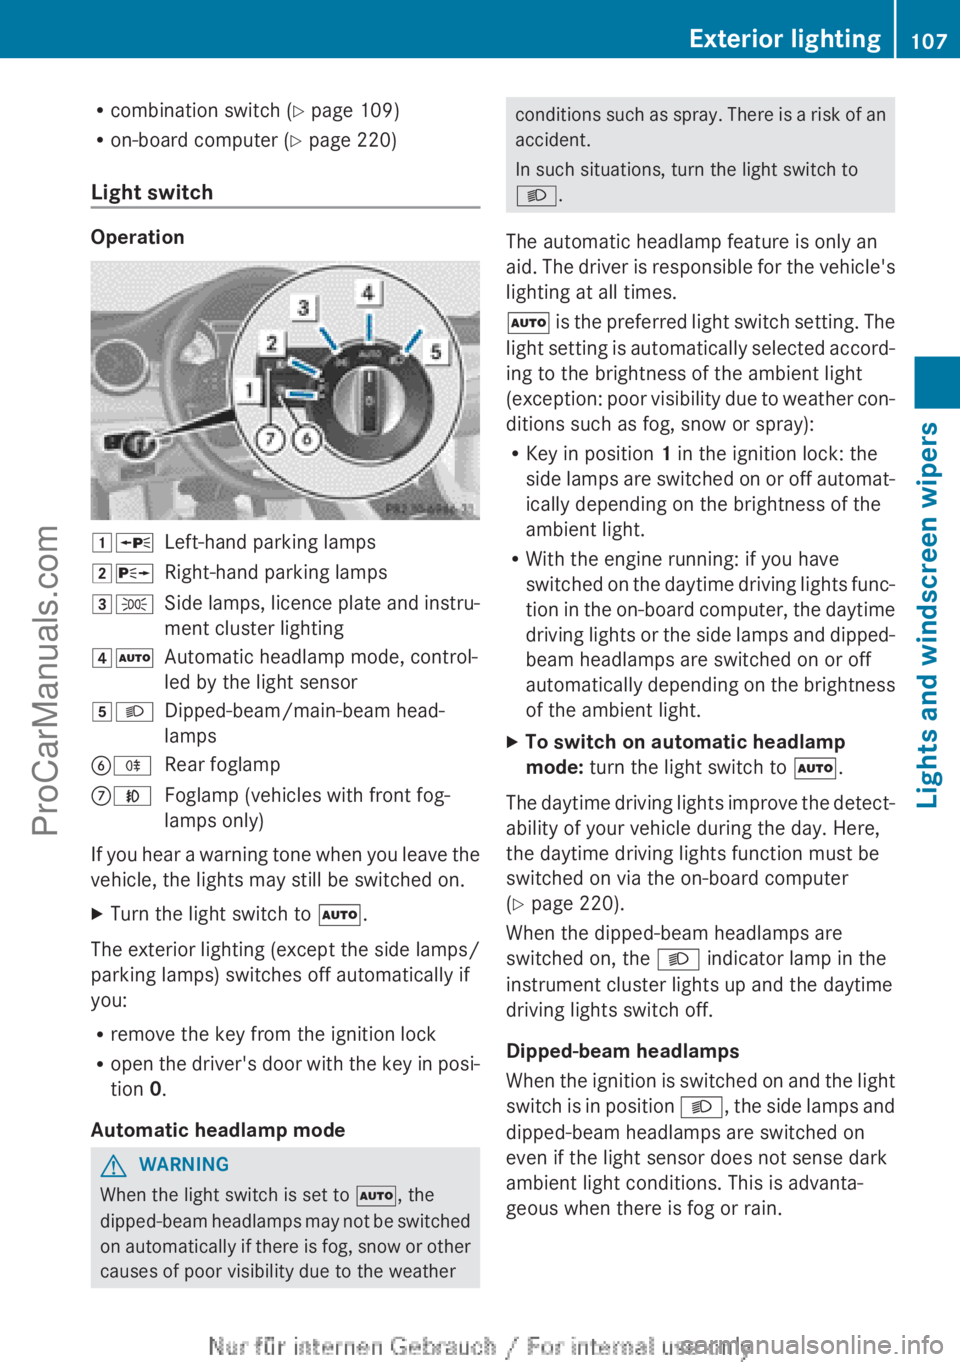
Operation
1 WLeft-hand parking lamps2XRight-hand parking lamps3TSide lamps, licence plate and instru-
ment cluster lighting4 ÃAutomatic headlamp mode, control-
led by the light sensor5 LDipped-beam/main-beam head-
lampsB RRear foglampCNFoglamp (vehicles with front fog-
lamps only)
If you hear a warning tone when you leave the
vehicle, the lights may still be switched on.
XTurn the light switch to Ã.
The exterior lighting (except the side lamps/
parking lamps) switches off automatically if
you:
R remove the key from the ignition lock
R open the driver's door with the key in posi-
tion 0.
Automatic headlamp mode
GWARNING
When the light switch is set to Ã, the
dipped-beam headlamps may not be switched
on automatically if there is fog, snow or other
causes of poor visibility due to the weather
conditions such as spray. There is a risk of an
accident.
In such situations, turn the light switch to
L .
The automatic headlamp feature is only an
aid. The driver is responsible for the vehicle's
lighting at all times.
à is the preferred light switch setting. The
light setting is automatically selected accord-
ing to the brightness of the ambient light
(exception: poor visibility due to weather con-
ditions such as fog, snow or spray):
R Key in position 1 in the ignition lock: the
side lamps are switched on or off automat-
ically depending on the brightness of the
ambient light.
R With the engine running: if you have
switched on the daytime driving lights func-
tion in the on-board computer, the daytime
driving lights or the side lamps and dipped-
beam headlamps are switched on or off
automatically depending on the brightness
of the ambient light.XTo switch on automatic headlamp
mode: turn the light switch to Ã.
The daytime driving lights improve the detect-
ability of your vehicle during the day. Here,
the daytime driving lights function must be
switched on via the on-board computer
( Y page 220).
When the dipped-beam headlamps are
switched on, the L indicator lamp in the
instrument cluster lights up and the daytime
driving lights switch off.
Dipped-beam headlamps
When the ignition is switched on and the light
switch is in position L, the side lamps and
dipped-beam headlamps are switched on
even if the light sensor does not sense dark
ambient light conditions. This is advanta-
geous when there is fog or rain.
Exterior lighting107Lights and windscreen wipersZProCarManuals.com
Page 116 of 352

Interior lighting control
Important notes
In order to prevent the vehicle's battery from
discharging, the interior lighting functions are
automatically deactivated after some time
except for when the key is in position 2 in the
ignition lock.
The brightness of the ambient lighting may be
set using the on-board computer
( Y page 222).
Automatic interior lighting control
XTo switch on: set the switch to centre
position B.XTo switch off: set the switch to the |
position.
The interior lighting automatically switches
on if you:
R unlock the vehicle
R open a door
R remove the key from the ignition lock
The interior lighting is activated for a short
time when the key is removed from the igni-
tion lock. You can activate this delayed
switch-off using the on-board computer
( Y page 222).
Manual interior lighting control
XTo switch the front interior lighting on:
set the switch to the c position.XTo switch off the interior lighting: set the
switch to the | position or (if the door
is closed) to the centre position.XTo switch the rear interior lighting on/
off: press the u button.XTo switch the reading lamps on/off:
press the p button.
Crash-responsive emergency lighting
The interior lighting is activated automatically
if the vehicle is involved in an accident.
XTo switch off the crash-responsive
emergency lighting: press the hazard
warning lamp button.
or
XLock and then unlock the vehicle using the
key.
Replacing bulbs
Important safety notes
Xenon bulbs
GDANGER
Xenon bulbs are under high voltage. You can
get an electric shock if you remove the cover
of the xenon bulb and touch the electrical
contacts. There is a risk of fatal injury.
Never touch the parts or the electrical con-
tacts of the xenon bulb. Always have work on
the xenon bulbs carried out at a qualified spe-
cialist workshop.
If your vehicle is equipped with xenon bulbs,
you can recognise this by the following: the
cone of light from the xenon bulbs moves
from the top to the bottom and back again
when you start the engine. For this to be
observed, the lights must be switched on
before starting the engine.
Bulbs and lamps are an important aspect of
vehicle safety. You must therefore make sure
that these function correctly at all times.
Have the headlamp setting checked regularly.
Other bulbs
GWARNING
Bulbs, lamps and plug connectors can
become very hot during use. When replacing
a bulb, you could burn yourself on these com-
ponents. There is a risk of injury.
Allow these components to cool down before
replacing the bulb.
Do not use a bulb that has been dropped or if
its glass tube has been scratched.
114Replacing bulbsLights and windscreen wipers
ProCarManuals.com
Page 137 of 352
in the door. The side window stops. To con-
tinue closing the side window, pull on the
W switch.XConvenience closing feature: press and
hold the e button until the side win-
dows and the panorama sliding sunroof are
closed.
The indicator lamp in the e button lights
up. Air-recirculation mode is activated.
If parts of the body are in the closing area
during convenience closing, proceed as fol-
lows:
XTo open/close the side window, press the
W button.
The side window stops.XTo then open the side window, press the
W button again.
or
XPress and hold the e button again for
at least two seconds.
The side windows move in the opposite
direction.XPress the 3 button for opening/closing
the panorama sliding sunroof.
The panorama sliding sunroof stops.XTo then open the panorama sliding sunroof,
press the 3 button again.
iNotes on the automatic reversing func-
tion for:
R the side window ( Y page 87)
R the panorama sliding sunroof
( Y page 90)
XConvenience opening feature: press and
hold the e button until the side win-
dows and the panorama sliding sunroof
have opened. The side windows and the
panorama sliding sunroof move back to
their original position.
The indicator lamp in the e button goes
out. Air-recirculation mode is deactivated.
i If you open the side windows or the pan-
orama sliding sunroof manually after clos-
ing with the convenience closing feature,
they will remain in this position when
opened using the convenience opening fea-
ture.
Activating/deactivating the residual
heat function
The residual heat function is only available
with THERMOTRONIC automatic climate con-
trol.
It is possible to make use of the residual heat
of the engine to continue heating the vehicle
for approximately 30 minutes after the engine
has been switched off. The heating time
depends on the temperature that has been
set for the vehicle interior.
i The blower will run at a low speed regard-
less of the airflow setting.
i If you activate the residual heat function
at high temperatures, only the ventilation
will be activated. The blower runs at
medium speed.
XTurn the key to position 0 in the ignition
lock or remove it ( Y page 145).XTo activate: press the Ì button.
The indicator lamp in the Ì button lights
up.XTo deactivate: press the Ì button.
The indicator lamp in the Ì button goes
out.
i Residual heat is deactivated automati-
cally:
R after approximately 30 minutes
R when the ignition is switched on
R if the battery voltage drops
R when the auxiliary heating is switched on
Operating the climate control system135Climate controlZProCarManuals.com
Page 148 of 352
iWhen the transmission is in position N,
you can also start the engine with the brake
pedal depressed.
Starting procedureXTo start a petrol engine: turn the key to
position 3 in the ignition lock
( Y page 145) and release it as soon as the
engine is running.XTo start a diesel engine: turn the key to
position 2 in the ignition lock
( Y page 145).
The % preglow indicator lamp in the
instrument cluster lights up.XWhen the % preglow indicator lamp
goes out, turn the key to position
3 (Y page 145) and release it as soon as the
engine is running.
i You can start the engine without preglow
if the engine is warm.
Pulling away
Manual transmission
! Change gear in good time and avoid spin-
ning the wheels. Otherwise, you could dam-
age the vehicle.
XDepress the brake pedal and keep it
depressed.XDepress the clutch pedal fully.XShift to either first gear or reverse gear R.XRelease the electric parking brake
( Y page 163).XRelease the brake pedal.XSlowly release the clutch pedal and gently
depress the accelerator pedal.
i Follow the shift recommendations in the
multifunction display for an economical
driving style ( Y page 152).
i The vehicle locks centrally once you have
pulled away. The locking knobs in the doors
drop down.
You can open the doors from the inside at
any time.
You can also deactivate the automatic lock-
ing feature ( Y page 223).
Automatic transmission
i It is only possible to shift the transmission
from position P to the desired position if
you depress the brake pedal. Only then can
the parking lock be deactivated. If you do
not depress the brake pedal, the DIRECT
SELECT lever can still be moved but the
parking lock remains engaged.
i At transmission fluid temperatures below
Ò 20 †, you can only shift out of position P
into another transmission position when
the engine is running.
XDepress the brake pedal and keep it
depressed.XShift the transmission to position D or R.XRelease the brake pedal.XCarefully depress the accelerator pedal.
The electric parking brake ( Y page 163) is
automatically released.
The red ! indicator lamp in the instru-
ment cluster goes out.
i The vehicle locks centrally once you have
pulled away. The locking knobs in the doors
drop down.
You can open the doors from the inside at
any time.
You can also deactivate the automatic lock-
ing feature ( Y page 223).
i Upshifts take place at higher engine
speeds after a cold start. This helps the
catalytic converter to reach its operating
temperature more quickly.
146DrivingDriving and parking
ProCarManuals.com
Page 155 of 352
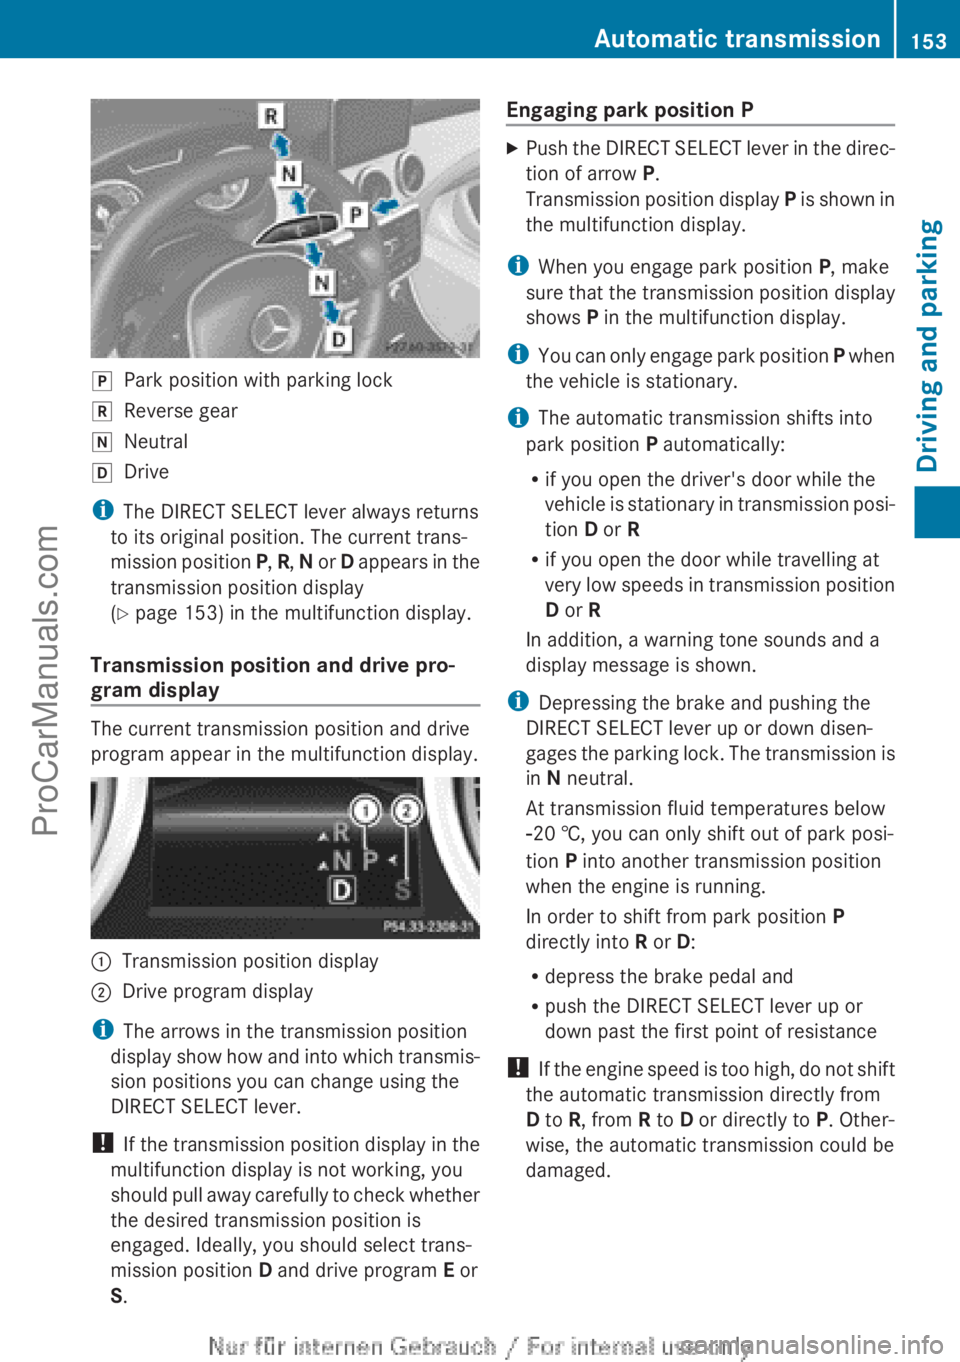
jPark position with parking lockkReverse geariNeutralhDrive
iThe DIRECT SELECT lever always returns
to its original position. The current trans-
mission position P, R , N or D appears in the
transmission position display
( Y page 153) in the multifunction display.
Transmission position and drive pro-
gram display
The current transmission position and drive
program appear in the multifunction display.
:Transmission position display;Drive program display
i The arrows in the transmission position
display show how and into which transmis-
sion positions you can change using the
DIRECT SELECT lever.
! If the transmission position display in the
multifunction display is not working, you
should pull away carefully to check whether
the desired transmission position is
engaged. Ideally, you should select trans-
mission position D and drive program E or
S .
Engaging park position PXPush the DIRECT SELECT lever in the direc-
tion of arrow P.
Transmission position display P is shown in
the multifunction display.
i When you engage park position P, make
sure that the transmission position display
shows P in the multifunction display.
i You can only engage park position P when
the vehicle is stationary.
i The automatic transmission shifts into
park position P automatically:
R if you open the driver's door while the
vehicle is stationary in transmission posi-
tion D or R
R if you open the door while travelling at
very low speeds in transmission position
D or R
In addition, a warning tone sounds and a
display message is shown.
i Depressing the brake and pushing the
DIRECT SELECT lever up or down disen-
gages the parking lock. The transmission is
in N neutral.
At transmission fluid temperatures below
Ò 20 †, you can only shift out of park posi-
tion P into another transmission position
when the engine is running.
In order to shift from park position P
directly into R or D:
R depress the brake pedal and
R push the DIRECT SELECT lever up or
down past the first point of resistance
! If the engine speed is too high, do not shift
the automatic transmission directly from
D to R, from R to D or directly to P. Other-
wise, the automatic transmission could be
damaged.
Automatic transmission153Driving and parkingZProCarManuals.com
Page 165 of 352
cle from rolling away by applying the parking
brake.
Vehicles with manual transmissionXShift to either first gear or reverse gear R.XTurn the key to position 0 in the ignition
lock and remove it.
The immobiliser is activated.XApply the electric parking brake.
Vehicles with automatic transmission
XApply the electric parking brake.XShift the transmission to position P.XTurn the key to position 0 in the ignition
lock and remove it.
The immobiliser is activated.
i If you switch the engine off with the trans-
mission in position R or D, the automatic
transmission shifts to N automatically.
If you then open one of the front doors or
remove the key from the ignition, the auto-
matic transmission shifts to P.
If you shift the automatic transmission to
N before switching off the engine, the auto-
matic transmission remains in N even if a
door is opened.
Electric parking brake
General notes
GWARNING
If you leave children unattended in the vehi-
cle, they could set the vehicle in motion by,
for example:
R releasing the parking brake
R shifting an automatic transmission out of
parking position P
R shifting a manual transmission into neutral
R starting the engine
They could also operate vehicle equipment.
There is a risk of an accident and injury.
When leaving the vehicle, always take the key
with you and lock the vehicle. Never leave
children unattended in the vehicle.
i The electric parking brake carries out a
function check at regular intervals when
the engine is switched off. Noises that
occur are normal.
Engaging/releasing manually
Engaging
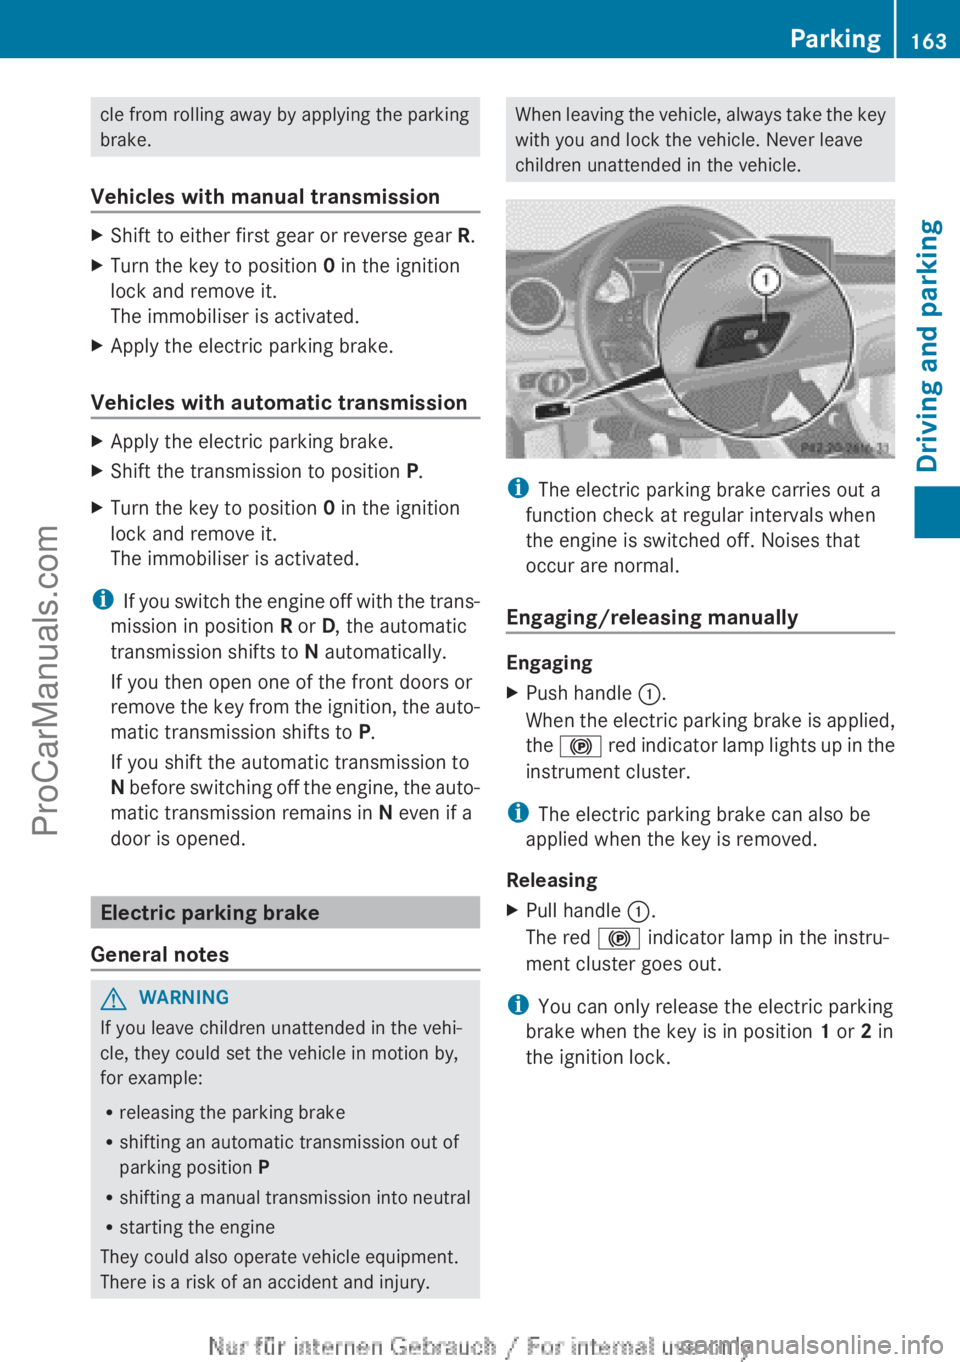
XPush handle :.
When the electric parking brake is applied,
the ! red indicator lamp lights up in the
instrument cluster.
i The electric parking brake can also be
applied when the key is removed.
Releasing
XPull handle :.
The red ! indicator lamp in the instru-
ment cluster goes out.
i You can only release the electric parking
brake when the key is in position 1 or 2 in
the ignition lock.
Parking163Driving and parkingZProCarManuals.com
Page 184 of 352
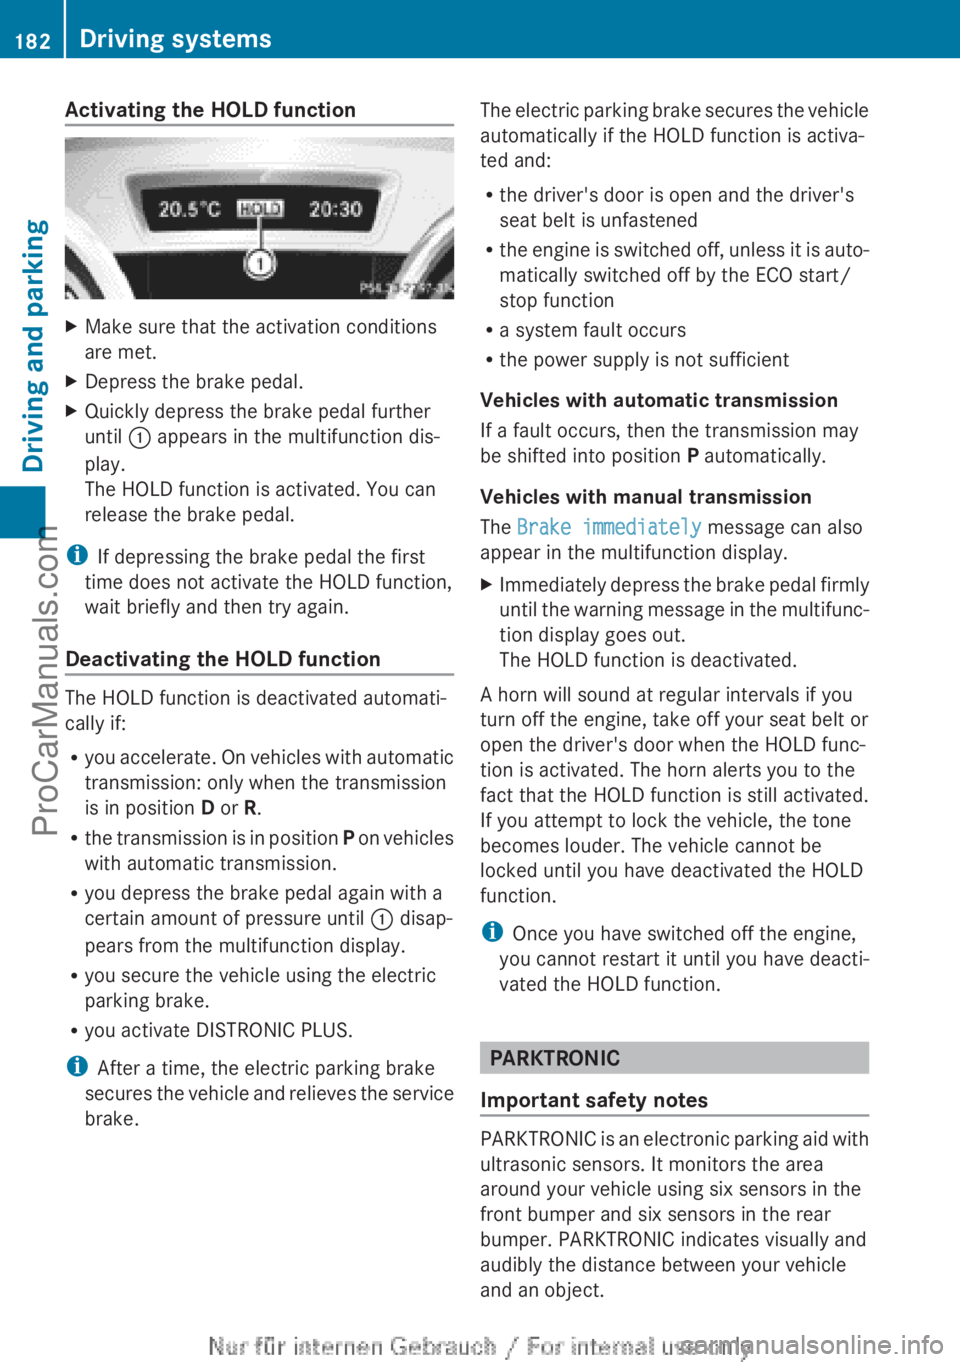
Activating the HOLD functionXMake sure that the activation conditions
are met.XDepress the brake pedal.XQuickly depress the brake pedal further
until : appears in the multifunction dis-
play.
The HOLD function is activated. You can
release the brake pedal.
i If depressing the brake pedal the first
time does not activate the HOLD function,
wait briefly and then try again.
Deactivating the HOLD function
The HOLD function is deactivated automati-
cally if:
R you accelerate. On vehicles with automatic
transmission: only when the transmission
is in position D or R.
R the transmission is in position P on vehicles
with automatic transmission.
R you depress the brake pedal again with a
certain amount of pressure until : disap-
pears from the multifunction display.
R you secure the vehicle using the electric
parking brake.
R you activate DISTRONIC PLUS.
i After a time, the electric parking brake
secures the vehicle and relieves the service
brake.
The electric parking brake secures the vehicle
automatically if the HOLD function is activa-
ted and:
R the driver's door is open and the driver's
seat belt is unfastened
R the engine is switched off, unless it is auto-
matically switched off by the ECO start/
stop function
R a system fault occurs
R the power supply is not sufficient
Vehicles with automatic transmission
If a fault occurs, then the transmission may
be shifted into position P automatically.
Vehicles with manual transmission
The Brake immediately message can also
appear in the multifunction display.XImmediately depress the brake pedal firmly
until the warning message in the multifunc-
tion display goes out.
The HOLD function is deactivated.
A horn will sound at regular intervals if you
turn off the engine, take off your seat belt or
open the driver's door when the HOLD func-
tion is activated. The horn alerts you to the
fact that the HOLD function is still activated.
If you attempt to lock the vehicle, the tone
becomes louder. The vehicle cannot be
locked until you have deactivated the HOLD
function.
i Once you have switched off the engine,
you cannot restart it until you have deacti-
vated the HOLD function.
PARKTRONIC
Important safety notes
PARKTRONIC is an electronic parking aid with
ultrasonic sensors. It monitors the area
around your vehicle using six sensors in the
front bumper and six sensors in the rear
bumper. PARKTRONIC indicates visually and
audibly the distance between your vehicle
and an object.
182Driving systemsDriving and parking
ProCarManuals.com
Page 224 of 352

This function is only available on vehicles with
the Intelligent Light System.
For further information about Adaptive High-
beam Assist, see ( Y page 111).
Setting the brightness of the ambient
lightingXPress the = or ; button on the steer-
ing wheel to select the Settings menu.XPress the : or 9 button to select the
Light submenu.XPress a to confirm.XPress the : or 9 button to select the
Amb. light +/- function.
You will see the selected setting.XPress a to confirm.XPress the : or 9 button to adjust the
brightness to any level from Off toLevel
5 (bright) .XPress the a or % button to save the
setting.
Activating/deactivating the surround
lighting and exterior lighting delayed
switch-off
If you have activated the Surround light‐
ing function and the light switch is set to
à , the following functions are activated
when it is dark:
R surround lighting: the exterior lighting
remains lit for 40 seconds after unlocking
with the key. If you start the engine, the
surround lighting is switched off and auto-
matic headlamp mode is activated
( Y page 107).
R exterior lighting delayed switch-off: the
exterior lighting remains lit for
60 seconds after the engine is switched off.
If you close all the doors and the boot lid,
the exterior lighting goes off after
15 seconds.
XPress the = or ; button on the steer-
ing wheel to select the Settings menu.XPress the : or 9 button to select the
Light submenu.XPress a to confirm.XPress the : or 9 button to select the
Surround lighting function.
When the Surround lighting function is
activated, the light cone and the area
around the vehicle are displayed in red in
the multifunction display.XPress the a button to save the setting.
Deactivating delayed switch-off of the exte-
rior lighting temporarily:
XBefore leaving the vehicle, turn the key to
position 0 in the ignition lock.XTurn the key to position 2 in the ignition
lock.
The exterior lighting delayed switch-off is
deactivated.
Delayed switch-off of the exterior lighting is
reactivated the next time you start the
engine.
i Depending on your vehicle's equipment,
when the surround lighting and delayed
switch-off exterior lighting are on, the fol-
lowing light up:
R Side lamps
R Foglamps
R Dipped-beam headlamps
R Daytime driving lights
R Surround lighting in the exterior mirrors
Activating/deactivating the interior light-
ing delayed switch-off
If you activate the Lighting delayed sw.
off function, the interior lighting remains on
for 20 seconds after you remove the key from
the ignition lock.
XPress the = or ; button on the steer-
ing wheel to select the Settings menu.XPress the : or 9 button to select the
Light submenu.XPress a to confirm.222Menus and submenusOn-board computer and displays
ProCarManuals.com