2013 MERCEDES-BENZ B-CLASS SPORTS warning
[x] Cancel search: warningPage 91 of 336
Keep the area around head restraints clear of
articles (e.g. clothing) to not obstruct the
folding operation of the head restraints.
G
WARNING
For yourp rotection, drive only with properly
positioned head restraints.
Adjust the head restraint in such a way that it
is as close to the head as possible and the
center of the head restraint supports the back
of the head at eye level .This will reduce the
potential for injury to the head and neck in the
event of an accident or similar situation.
With a rear seat occupied, make sure to move
the respective head restraint up from the
lowest non-use position and have the
occupant adjust the head restraint properly.
Do not drive the vehicle without the seat head
restraints installed when the rear seats are
occupied. Head restraints are intended to
help reduce injuries during an accident.
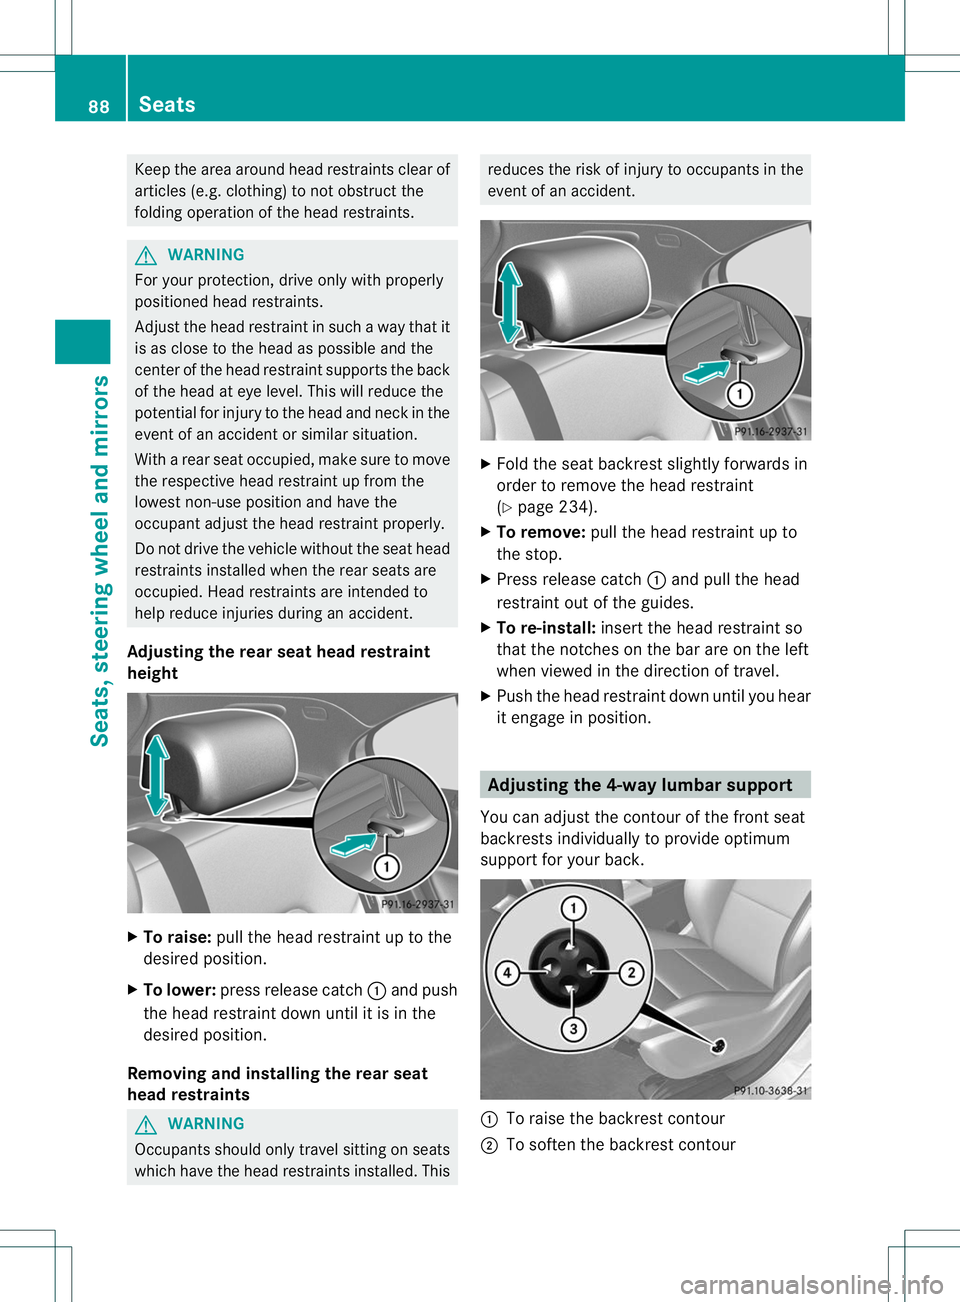
Adjusting the rear seat head restraint
height X
To raise: pull the head restraint up to the
desired position.
X To lower: press release catch :and push
the head restraint down until it is in the
desired position.
Removing and installing the rear seat
head restraints G
WARNING
Occupants should only travel sitting on seats
which have the head restraints installed. This reduces the risk of injury to occupants in the
event of an accident.
X
Fold the seat backrest slightly forwards in
order to remove the head restraint
(Y page 234).
X To remove: pull the head restraint up to
the stop.
X Press release catch :and pull the head
restraint out of the guides.
X To re-install: insert the head restraint so
that the notches on the bar are on the left
when viewed in the direction of travel.
X Push the head restraint down until you hear
it engage in position. Adjusting the 4-way lumbar support
You can adjust the contour of the front seat
backrests individually to provide optimum
support for your back. :
To raise the backrest contour
; To soften the backrest contour 88
SeatsSeats, steering wheel and mirrors
Page 92 of 336
=
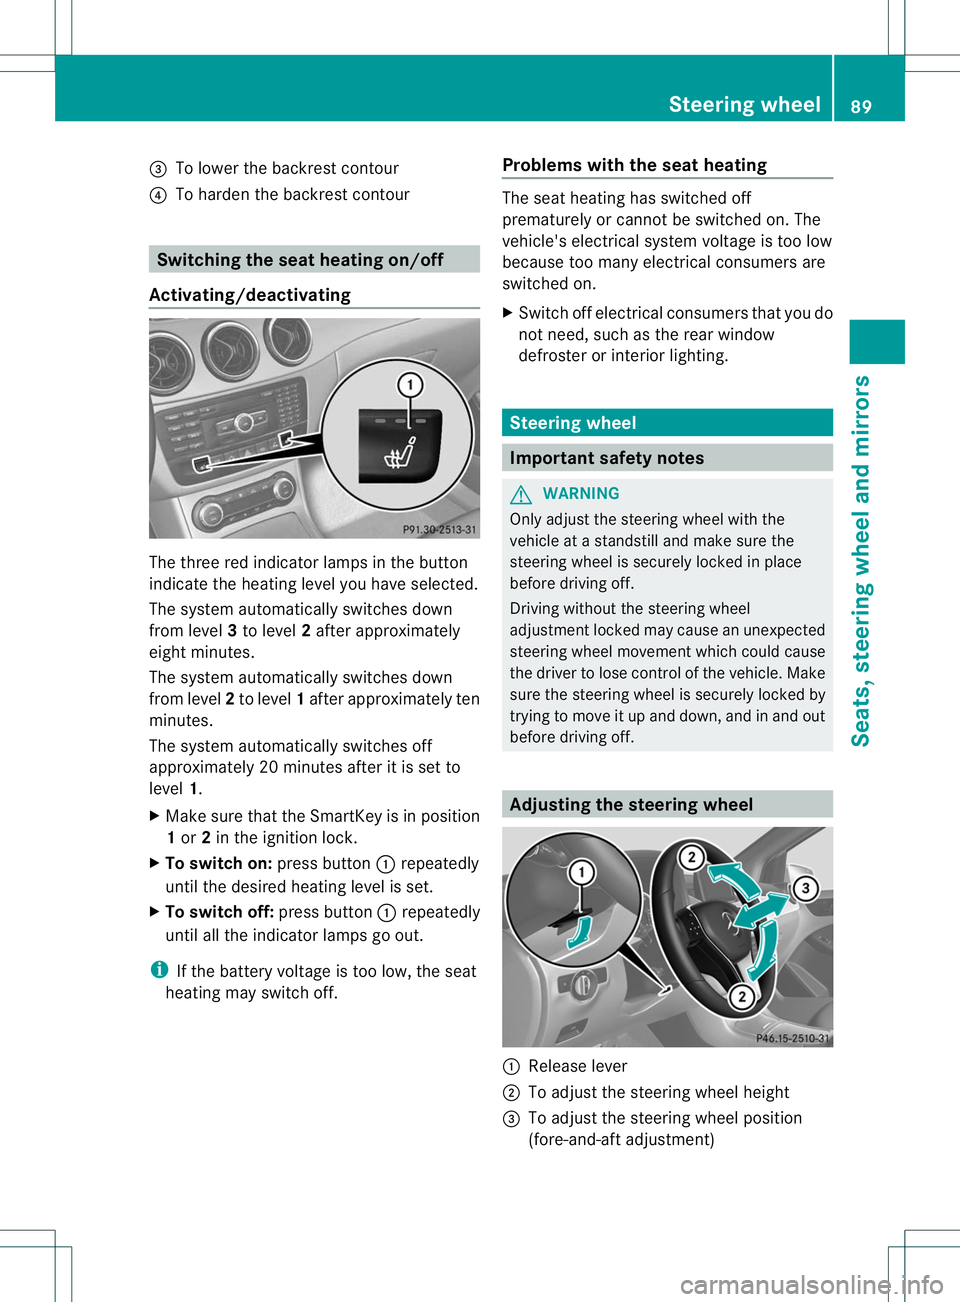
To lower the backrest contour
? To harden the backrest contour Switching the seat heating on/off
Activating/deactivating The three red indicator lamps in the button
indicate the heating level you have selected.
The system automatically switches down
from level
3to level 2after approximately
eight minutes.
The system automatically switches down
from level 2to level 1after approximately ten
minutes.
The system automatically switches off
approximately 20 minutes after it is set to
level 1.
X Make sure that the SmartKey is in position
1or 2in the ignition lock.
X To switch on: press button:repeatedly
until the desired heating level is set.
X To switch off: press button:repeatedly
until all the indicator lamps go out.
i If the battery voltage is too low, the seat
heating may switch off. Problems with the seat heating The seat heating has switched off
prematurely or cannot be switched on. The
vehicle's electrical system voltage is too low
because too many electrical consumers are
switched on.
X
Switch off electrical consumers that you do
not need, such as the rear window
defroster or interior lighting. Steering wheel
Important safety notes
G
WARNING
Only adjust the steering wheel with the
vehicle at a standstill and make sure the
steering wheel is securely locked in place
before driving off.
Driving without the steering wheel
adjustmen tlocked may cause an unexpected
steering wheel movement which could cause
the driver to lose control of the vehicle. Make
sure the steering wheel is securely locked by
trying to move it up and down, and in and out
before driving off. Adjusting the steering wheel
:
Release lever
; To adjust the steering wheel height
= To adjust the steering wheel position
(fore-and-aft adjustment) Steering wheel
89Seats, steering wheel and mirrors Z
Page 93 of 336
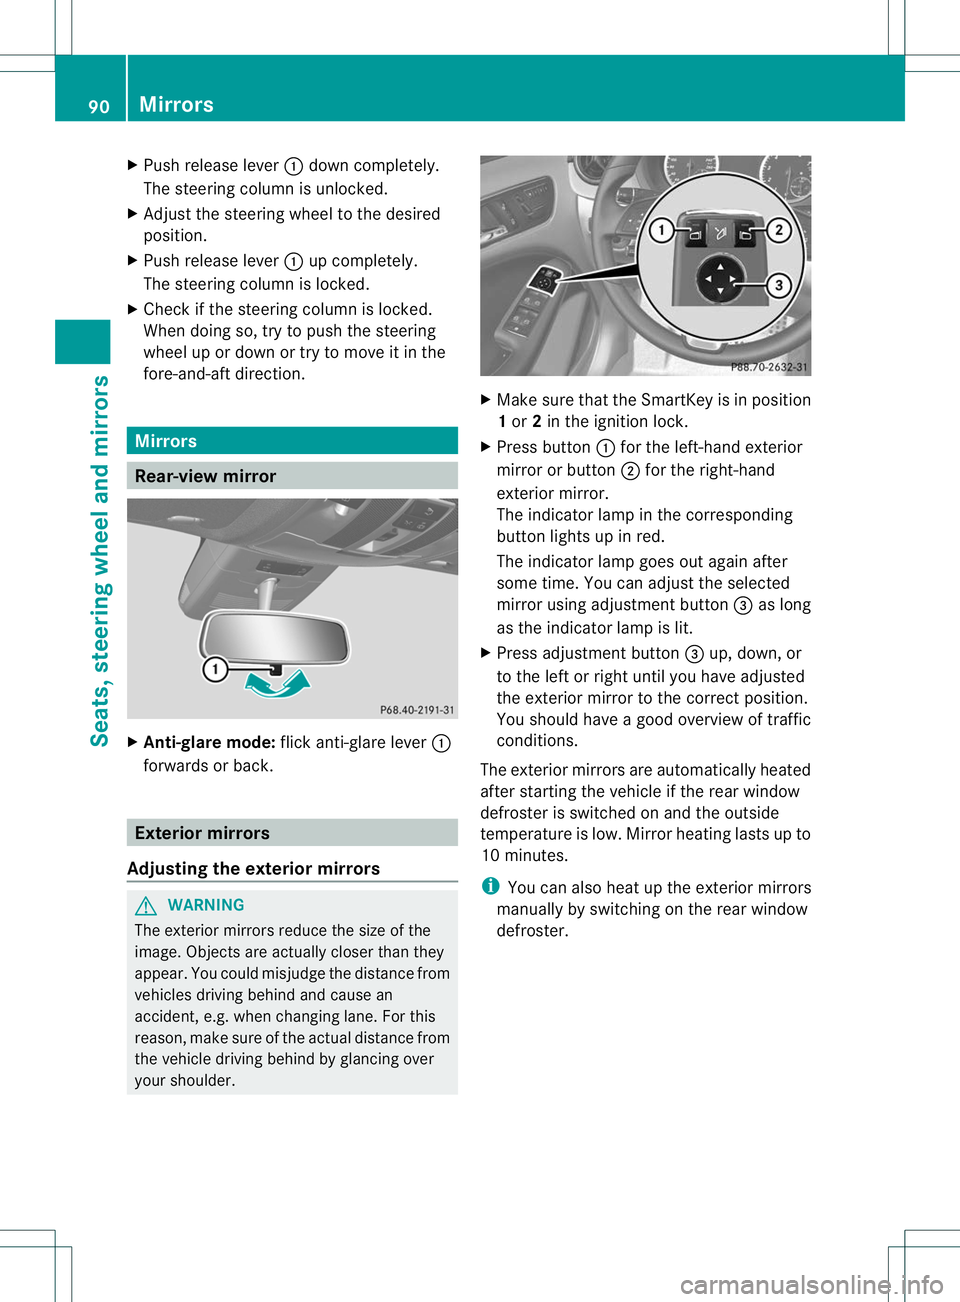
X
Push release lever :down completely.
The steering column is unlocked.
X Adjust the steering wheel to the desired
position.
X Push release lever :up completely.
The steering column is locked.
X Check if the steering column is locked.
When doing so, try to push the steering
wheel up or down or try to move it in the
fore-and-aft direction. Mirrors
Rear-view mirror
X
Anti-glare mode: flick anti-glare lever :
forwards or back. Exterior mirrors
Adjusting the exterior mirrors G
WARNING
The exterior mirrors reduce the size of the
image. Objects are actually closer than they
appear. You could misjudge the distance from
vehicles driving behind and cause an
accident, e.g. when changing lane. For this
reason, make sure of the actual distance from
the vehicle driving behind by glancing over
your shoulder. X
Make sure that the SmartKey is in position
1or 2in the ignition lock.
X Press button :for the left-hand exterior
mirror or button ;for the right-hand
exterior mirror.
The indicator lamp in the corresponding
button lights up in red.
The indicator lamp goes out again after
some time. You can adjust the selected
mirror using adjustment button =as long
as the indicator lamp is lit.
X Press adjustmen tbutton =up, down, or
to the left or right until you have adjusted
the exterior mirror to the correct position.
You should have a good overview of traffic
conditions.
The exterio rmirrors are automatically heated
after starting the vehicle if the rear window
defroster is switched on and the outside
temperature is low. Mirror heating lasts up to
10 minutes.
i You can also heat up the exterior mirrors
manually by switching on the rear window
defroster. 90
MirrorsSeats, steering wheel and mirrors
Page 94 of 336
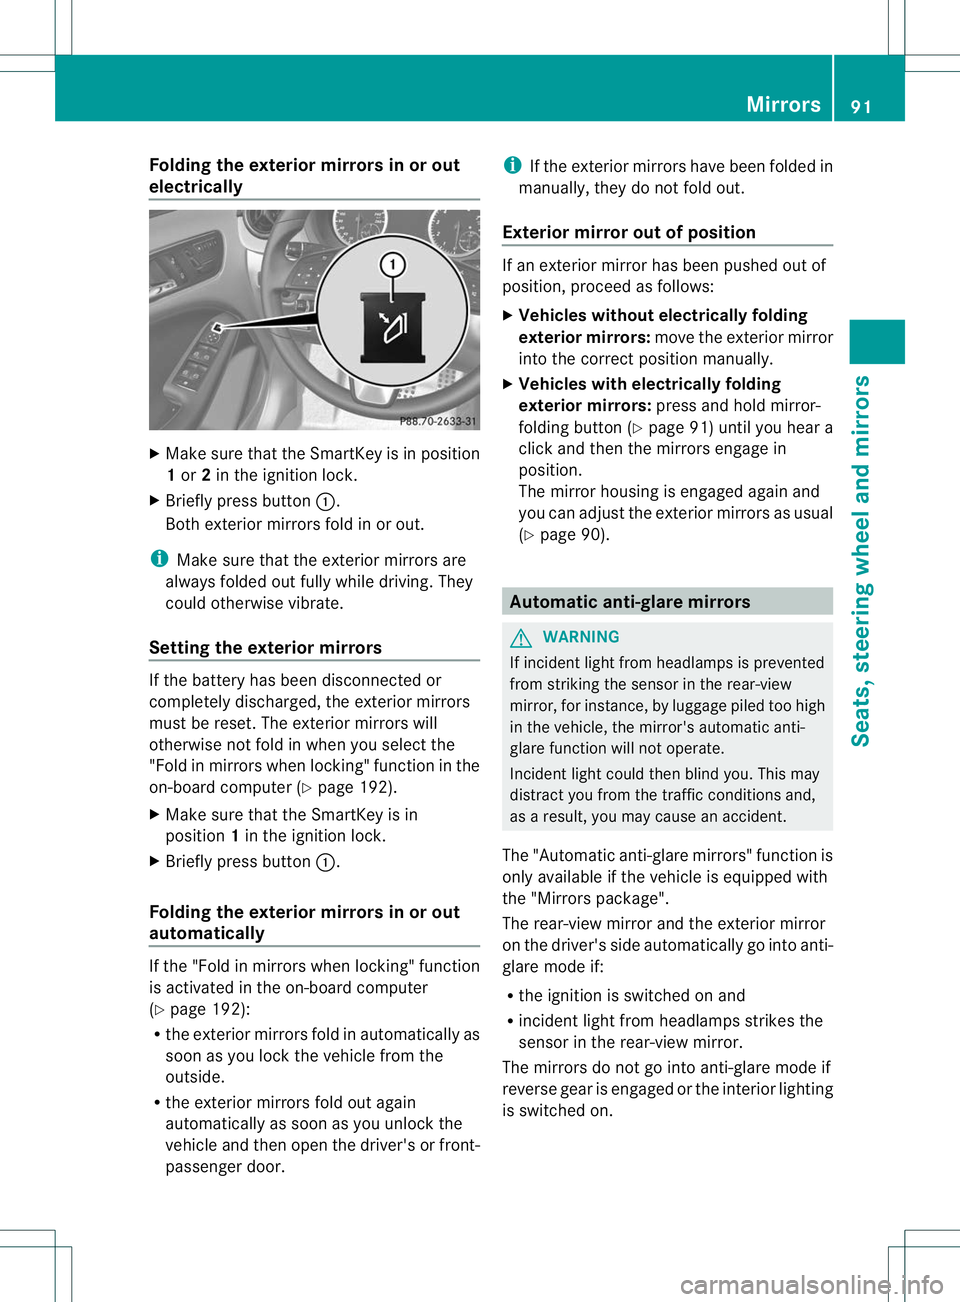
Folding the exterior mirrors in or out
electrically
X
Make sure that the SmartKey is in position
1or 2in the ignition lock.
X Briefly press button :.
Both exterior mirrors fold in or out.
i Make sure that the exterior mirrors are
always folded out fully while driving .They
could otherwise vibrate.
Setting the exterior mirrors If the battery has been disconnected or
completely discharged, the exterior mirrors
must be reset. The exterior mirrors will
otherwise not fold in when you select the
"Fold in mirrors when locking" function in the
on-board computer (Y
page 192).
X Make sure that the SmartKey is in
position 1in the ignition lock.
X Briefly press button :.
Folding the exterior mirrors in or out
automatically If the "Fold in mirrors when locking" function
is activated in the on-board computer
(Y
page 192):
R the exterior mirrors fold in automatically as
soon as you lock the vehicle from the
outside.
R the exterior mirrors fold out again
automatically as soon as you unlock the
vehicle and then open the driver's or front-
passenger door. i
If the exterior mirrors have been folded in
manually, they do not fold out.
Exterior mirror out of position If an exterior mirror has been pushed out of
position, proceed as follows:
X
Vehicles without electrically folding
exterior mirrors: move the exterior mirror
into the correct position manually.
X Vehicles with electrically folding
exterior mirrors: press and hold mirror-
folding button (Y page 91) until you hear a
click and then the mirrors engage in
position.
The mirror housing is engaged again and
you can adjust the exterior mirrors as usual
(Y page 90). Automatic anti-glare mirrors
G
WARNING
If incident light from headlamps is prevented
from striking the sensor in the rear-view
mirror, for instance, by luggage piled too high
in the vehicle, the mirror's automatic anti-
glare function will not operate.
Incident light could then blind you. This may
distract you from the traffic conditions and,
as a result, you may cause an accident.
The "Automatic anti-glare mirrors" function is
only available if the vehicle is equipped with
the "Mirrors package".
The rear-view mirror and the exterior mirror
on the driver's side automatically go into anti-
glare mode if:
R the ignition is switched on and
R incident light from headlamps strikes the
sensor in the rear-view mirror.
The mirrors do not go into anti-glare mode if
reverse gear is engaged or the interior lighting
is switched on. Mirrors
91Seats, steering wheel and mirrors Z
Page 96 of 336
Memory functions
Storing settings
G
WARNING
Only use the memory function on the driver's
side when the vehicle is stationary. You could
otherwise be distracted from the traffic
conditions by the seat moving of its own
accord, and as a result cause an accident.
With the memory function, you can store up
to three different settings, e.g. for three
different people.
The following settings are stored as a single
memory preset:
R position of the seat, backrest and head
restraint
R driver's side :position of the exterior
mirrors on the driver's and front-passenger
sides X
Adjust the seat (Y page 87).
X Adjust the exterior mirror on the driver's
side (Y page 90).
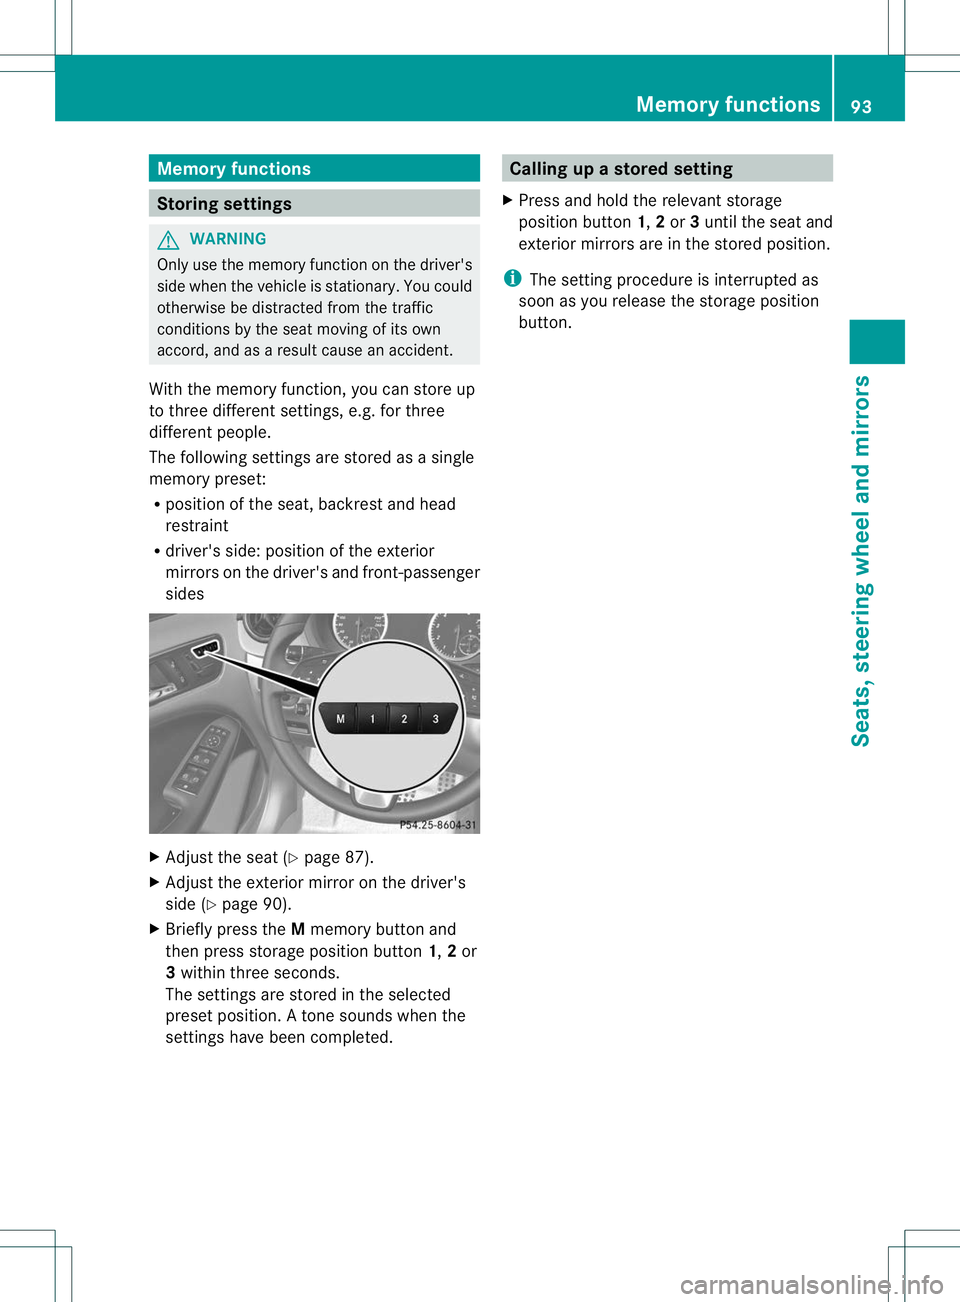
X Briefly press the Mmemory button and
then press storage position button 1,2or
3 within three seconds.
The settings are stored in the selected
preset position. Atone sounds when the
settings have been completed. Calling up
astore dsetting
X Press and hold the relevant storage
position button 1,2or 3until the seat and
exterio rmirrors are in the stored position.
i The setting procedure is interrupted as
soon as you release the storage position
button. Memory functions
93Seats, steering wheel and mirrors Z
Page 99 of 336
Useful information
i This Operator's Manual describes all
models and all standard and optional
equipment of your vehicle available at the
time of publication of the Operator's
Manual. Country-specific differences are
possible. Please note that your vehicle may
not be equipped with all features
described. This also applies to safety-
related systems and functions.
i Please read the information on qualified
specialist workshops (Y page 23).Exterior lighting
Important safety notes
For reasons of safety, Mercedes-Benz
recommends that you drive with the lights
switched on even during the daytime. In some
countries, operation of the headlamps varies
due to legal requirements and self-imposed
obligations. Driving abroad
Conversion to symmetrical low beam Switch the headlamps to symmetrical low
beam in countries in which traffic drives on
the opposite side of the road from the country
where the vehicle is registered. This prevents
glare to oncoming traffic. When using
symmetrical lights, the edge of the road is not
lit as widely and as far ahead as normal.
Have the headlamps converted at a qualified
specialist workshop as close to the border as
possible before driving in these countries.
Conversion to asymmetrical low beam
after returning
Have the headlamps converted back to
asymmetrical low-beam headlamps at a
qualified specialist workshop as soon as
possible after crossing the border again. Setting the exterior lighting
Setting options Exterior lighting can be set using:
R
the light switch
R the combination switch (Y page 98)
R the on-board computer (Y page 190)
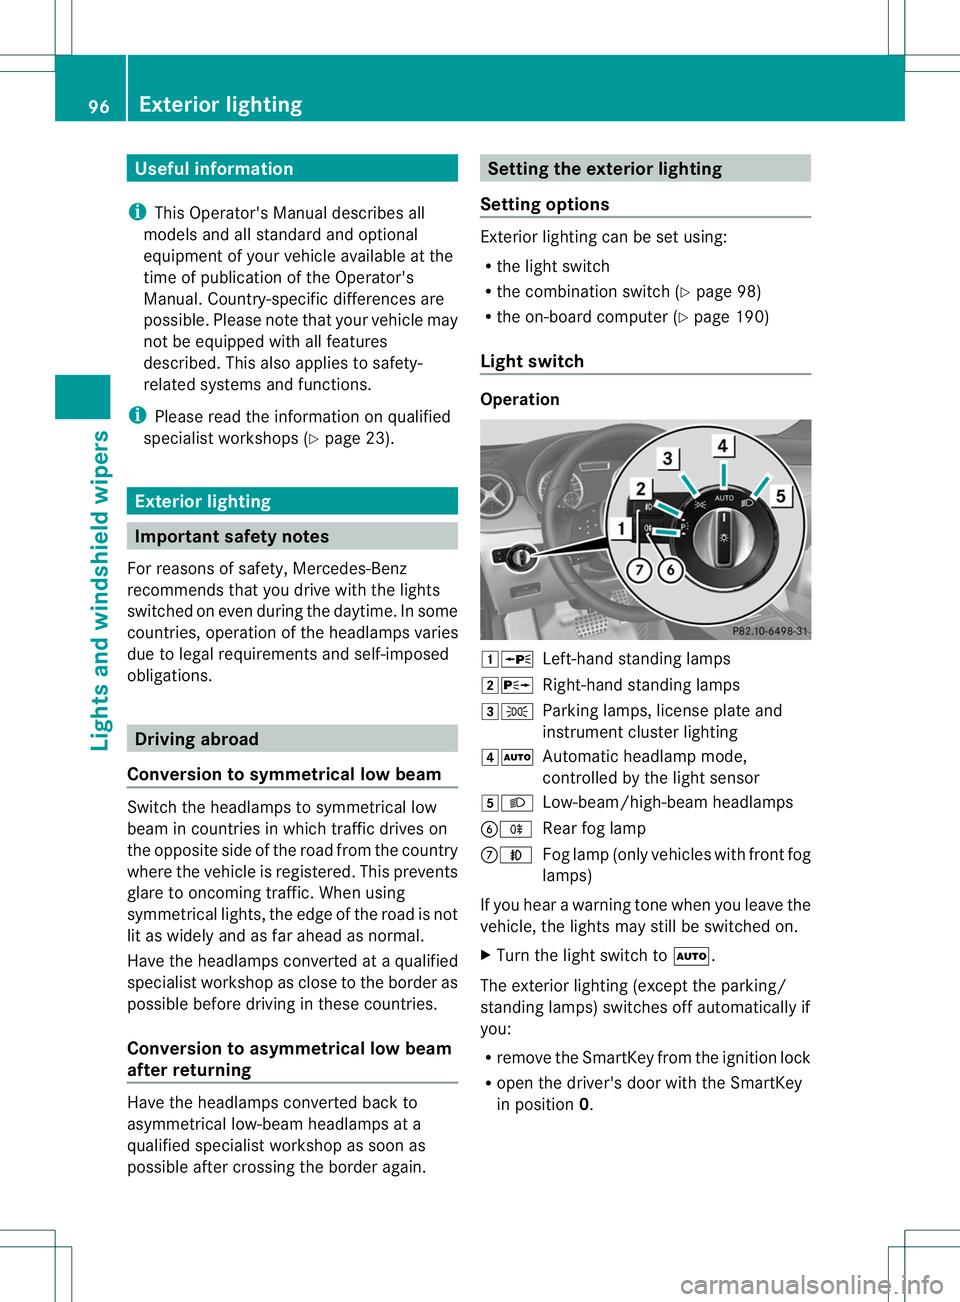
Light switch Operation
1W
Left-hand standing lamps
2X Right-hand standing lamps
3T Parking lamps, license plate and
instrumen tcluste rlighting
4Ã Automatic headlamp mode,
controlled by the light sensor
5L Low-beam/high-beam headlamps
BR Rear fog lamp
CN Fog lamp (only vehicles with front fog
lamps)
If you hear a warning tone when you leave the
vehicle, the lights may still be switched on.
X Turn the light switch to Ã.
The exterior lighting (except the parking/
standing lamps) switches off automatically if
you:
R remove the SmartKey fromt he ignition lock
R open the driver's door with the SmartKey
in position 0. 96
Exterior lightingLights and windshield wipers
Page 100 of 336
Automatic headlamp mode
G
WARNING
If the ligh tswitch is set to Ãand it is foggy,
snowing or there is poor visibility, the low-
beam headlamps will not come on
automatically. This could endange ryou and
others. In such situations turn the light switch
to L.
The automatic headlamp feature is only an
aid. The driver is responsible for the vehicle's
lighting at all times.
à is the favored light switch setting. The
light setting is automatically selected
according to the brightness of the ambient
light (exception: poor visibility due to weather
conditions such as fog, snow or spray):
R SmartKey in position 1in the ignition lock:
the parking lamps are switched on or off
automatically depending on the brightness
of the ambient light.
R With the engine running: if you have
activated the daytime running lamps
function via the on-board computer, the
daytime running lamps or the low-beam
headlamps and parking lamps are switched
on or off automatically depending on the
brightness of the ambient light.
X To switch on automatic headlamp
mode: turn the light switch to Ã.
The daytime running lamps improve the
visibility of your vehicle during the day. The
daytime running lamps function is required by
law in Canada. It cannot therefore be
deactivated.
When the engine is running and the vehicle is
stationary: if you move the selector lever from
a drive position to P, the daytime running
lamps/low-beam headlamps go out after
three minutes.
When the engine is running, the vehicle is
stationary and in high ambient light
brightness :ifyou turn the light switch
to T, you turn on the daytime running
lamps and parking lamps. If the engine is running and you turn the light
switch to
L, the manual settings take
precedence over the daytime running lamps.
Low-beam headlamps G
WARNING
If the light switch is set to Ãand it is foggy,
snowing or there is poor visibility, the low-
beam headlamps will not come on
automatically. This could endanger you and
others. In such situations turn the light switch
to L.
The automatic headlamp feature is only an
aid. The driver is responsible for the vehicle's
lighting at all times.
Even if the light sensor does not detect that
is dark, the parking lamps and low-beam
headlamps switch on when the SmartKey is
inserted into the ignition lock and the light
switch is set to the Lposition. This is a
particularly useful function in the event of rain
and fog.
X To switch on the low-beam headlamps:
turn the SmartKey in the ignition lock to
position 2or start the engine.
X Turn the light switch to L.
The green Lindicator lamp in the
instrument cluster lights up.
Front fog lamps
In conditions where visibility is poor due to
fog, snow or rain, the fog lamps improve
visibility as well as making it easier for other
road users to see you. They can be operated
together with the parking lamps or together
with the parking lamps and low-beam
headlamps.
X To switch on the front fog lamps: turn
the SmartKey in the ignition lock to position
2 or start the engine.
X Turn the light switch to LorÃ. Exterior lighting
97Lights and windshiel dwipers Z
Page 102 of 336
X
Press the combination switch beyond the
pressure point in the direction of
arrow :.
In the Ãposition, the high-beam
headlamps are only switched on when it is
dark and the engine is running.
The blue Kindicator lamp in the
instrument cluster lights up when the high-
beam headlamps are switched on.
X To switch off the high-beam
headlamps: move the combination switch
back to its normal position.
The blue Kindicator lamp in the
instrument cluster goes out.
i Vehicles with Adaptive Highbeam Assist:
when Adaptive Highbeam Assist is active,
it controls activation of the high-beam
headlamps (Y page 100).
High-beam flasher X
To switch on: turn the SmartKey in the
ignition lock to position 1or 2or start the
engine.
X Pull the combination switch in the direction
of arrow =. Hazard warning lamps
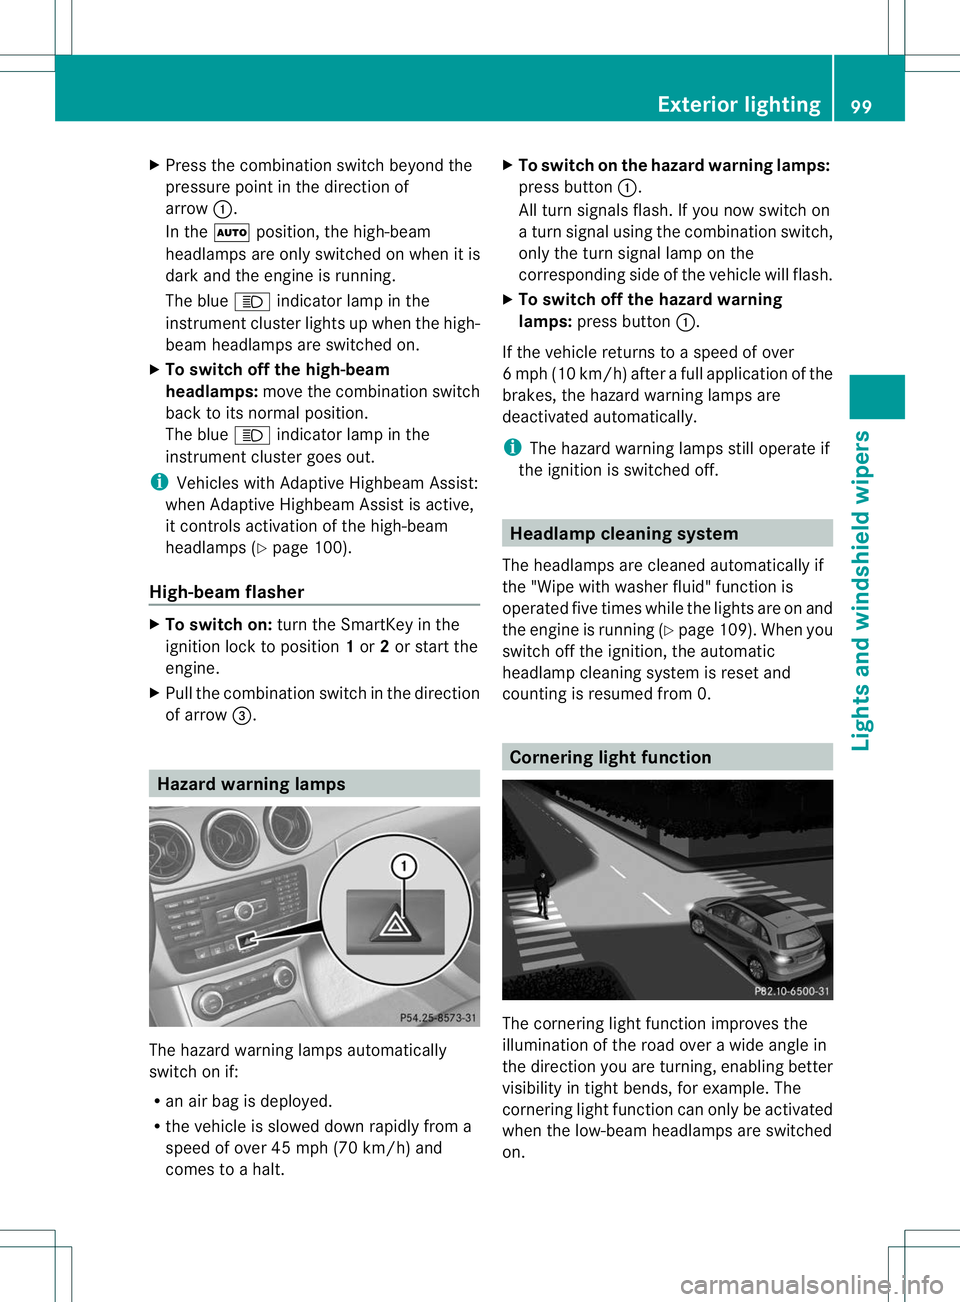
The hazard warning lamps automatically
switch on if:
R
an air bag is deployed.
R the vehicle is slowed down rapidly from a
speed of over 45 mph (70 km/h) and
comes to a halt. X
To switch on the hazard warning lamps:
press button :.
All turn signals flash. If you now switch on
a turn signal using the combination switch,
only the turn signal lamp on the
corresponding side of the vehicle will flash.
X To switch off the hazard warning
lamps: press button :.
If the vehicle returns to a speed of over
6m ph (10 km/h) after a full application of the
brakes, the hazard warning lamps are
deactivated automatically.
i The hazard warning lamps still operate if
the ignition is switched off. Headlamp cleaning system
The headlamps are cleaned automatically if
the "Wipe with washer fluid" function is
operated five times while the lights are on and
the engine is running (Y page 109). When you
switch off the ignition, the automatic
headlamp cleaning system is reset and
counting is resumed from 0. Cornering light function
The cornering light function improves the
illumination of the road over a wide angle in
the direction you are turning, enabling better
visibility in tight bends, for example. The
cornering light function can only be activated
when the low-beam headlamps are switched
on. Exterior lighting
99Lights and windshield wipers Z