2013 MERCEDES-BENZ B-CLASS SPORTS window
[x] Cancel search: windowPage 184 of 336
W
X R
Adjusts the volume 8 R
Mute Back button
%
Press briefly:
R
Back
R Switches off the Voice Control
System; see the separate
operating instructions
R Hides display messages/calls
up the last Trip menu function
used
R Exits the telephone book/redial
memory %
Press and hold:
R
Calls up the standard display in
the Trip menu
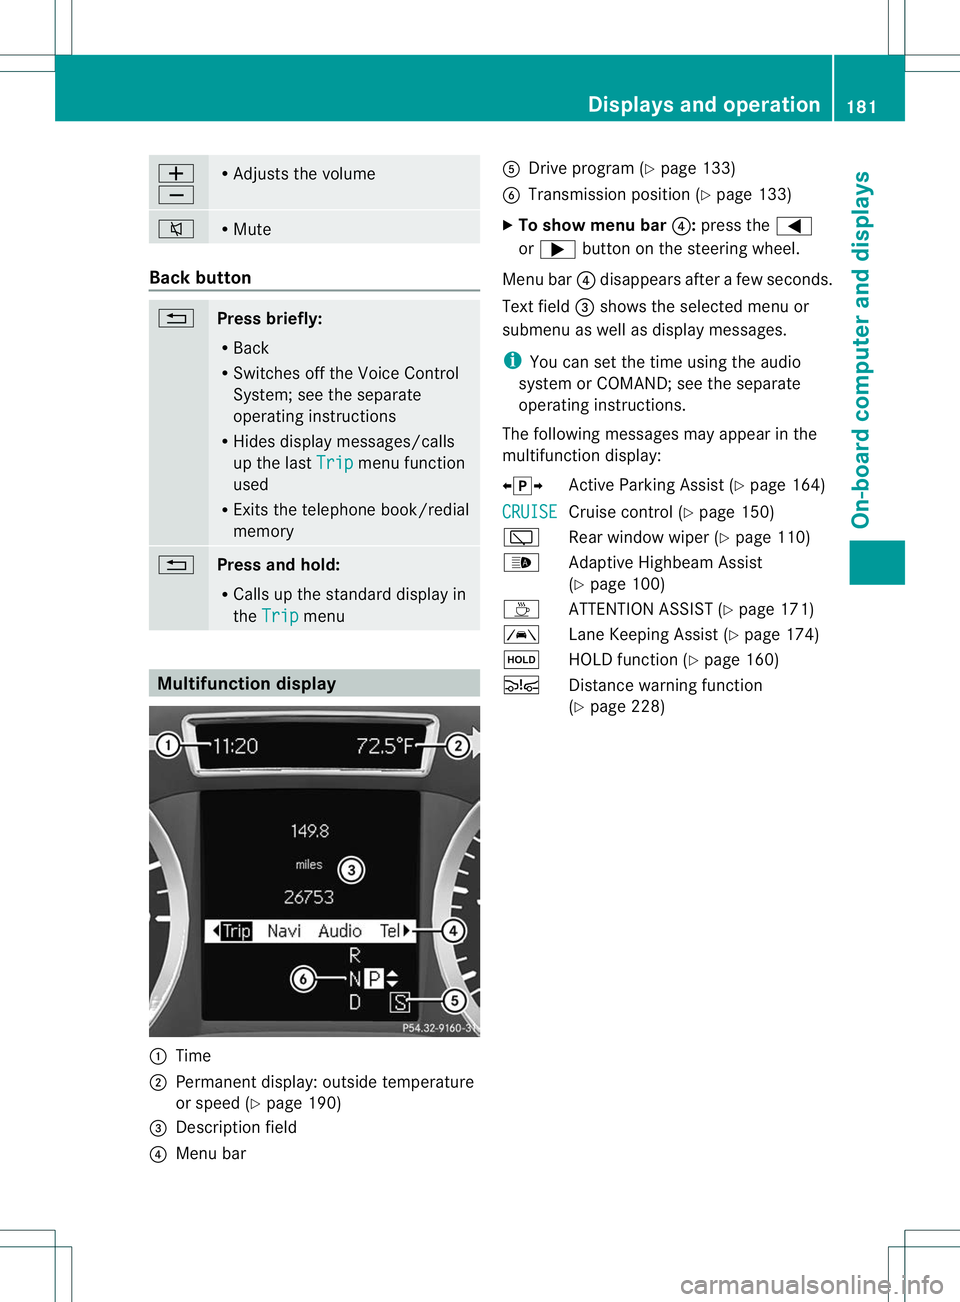
Multifunction display
:
Time
; Permanent display: outside temperature
or speed (Y page 190)
= Descriptio nfield
? Menu bar A
Drive program (Y page 133)
B Transmission position (Y page 133)
X To show menu bar ?:press the =
or ; button on the steering wheel.
Menu bar ?disappears after a few seconds.
Text field =shows the selected menu or
submenu as well as display messages.
i You can set the time using the audio
system or COMAND; see the separate
operating instructions.
The following messages may appear in the
multifunction display:
XjY Active Parking Assist (Y page 164)
CRUISE Cruise control (Y
page 150)
è Rear window wiper (Y page 110)
_ Adaptive Highbeam Assist
(Ypage 100)
À ATTENTION ASSIST( Ypage 171)
à Lane Keeping Assist (Y page 174)
ë HOLD function (Y page 160)
Ä Distance warning function
(Ypage 228) Displays and operation
181On-board computer and displays Z
Page 205 of 336
Display messages Possible causes/consequences and
M Solutions
6
Front Left
Malfunction
Service Required
or
Front Right Malfunction
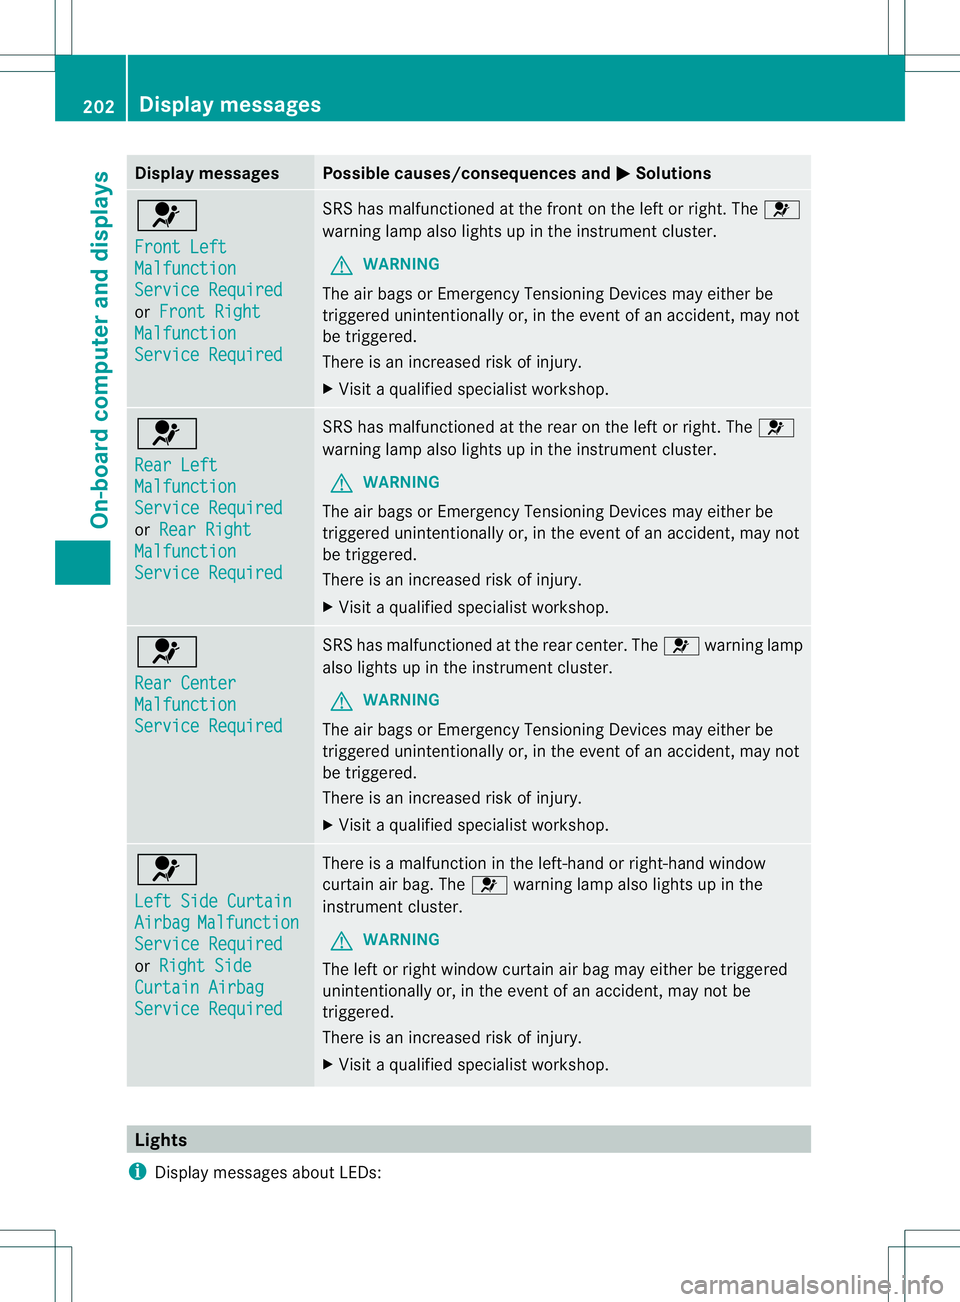
Service Required SRS has malfunctioned at the front on the left or right. The
6
warning lamp also lights up in the instrumen tcluster.
G WARNING
The air bags or Emergency Tensioning Devices may either be
triggered unintentionally or, in the event of an accident, may not
be triggered.
There is an increased risk of injury.
X Visit a qualified specialist workshop. 6
Rear Left
Malfunction
Service Required
or
Rear Right Malfunction
Service Required SRS has malfunctioneda
t the rear on the left or right. The 6
warning lamp also lights up in the instrument cluster.
G WARNING
The ai rbags or Emergency Tensioning Devices may either be
triggered unintentionally or, in the event of an accident, may not
be triggered.
There is an increased ris kofinjury.
X Visi taqualified specialist workshop. 6
Rear Center
Malfunction
Service Required SRS has malfunctioned at the rear center. The
6warning lamp
also lights up in the instrument cluster.
G WARNING
The air bags or Emergency Tensioning Devices may either be
triggered unintentionally or, in the event of an accident, may not
be triggered.
There is an increased risk of injury.
X Visit a qualified specialist workshop. 6
Left Side Curtain
Airbag Malfunction
Service Required
or
Right Side Curtain Airbag
Service Required There is a malfunction in the left-hand or right-hand window
curtain air bag. The
6warning lamp also lights up in the
instrument cluster.
G WARNING
The left or right window curtain air bag may either be triggered
unintentionally or, in the event of an accident, may not be
triggered.
There is an increased risk of injury.
X Visit a qualified specialist workshop. Lights
i Display messages about LEDs: 202
Display messagesOn-board computer and displays
Page 240 of 336
X
Pull right or left release loop ;forwards in
the direction of the arrow.
Corresponding seat backrest :is
released.
X Pull backrest :forward in the direction of
the arrow, or push it back and let it engage.
X To ensure that the backrest has engaged,
lean firmly against backrest :.
Adjusting the seat fore-and-aft position
! When moving the rear seats back, make
sure there are no objects in the footwell or
behind the seats. The rear seats and/or the
objects could otherwise be damaged. X
Lift the left or right release handle and slide
the corresponding seat forwards or
backwards.
X Let go of the release handle again.
Make sure that you hear the seat engage in
position. Securing cargo
Cargo tie-down rings Observe the following notes on securing
loads:
R
secure the load using the cargo tie-down
rings.
R do not use elastic straps or nets to secure
a load, as these are only intended as an
anti-slip protection for light loads. R
do not route tie-downs across sharp edges
or corners.
R pad sharp edges for protection.
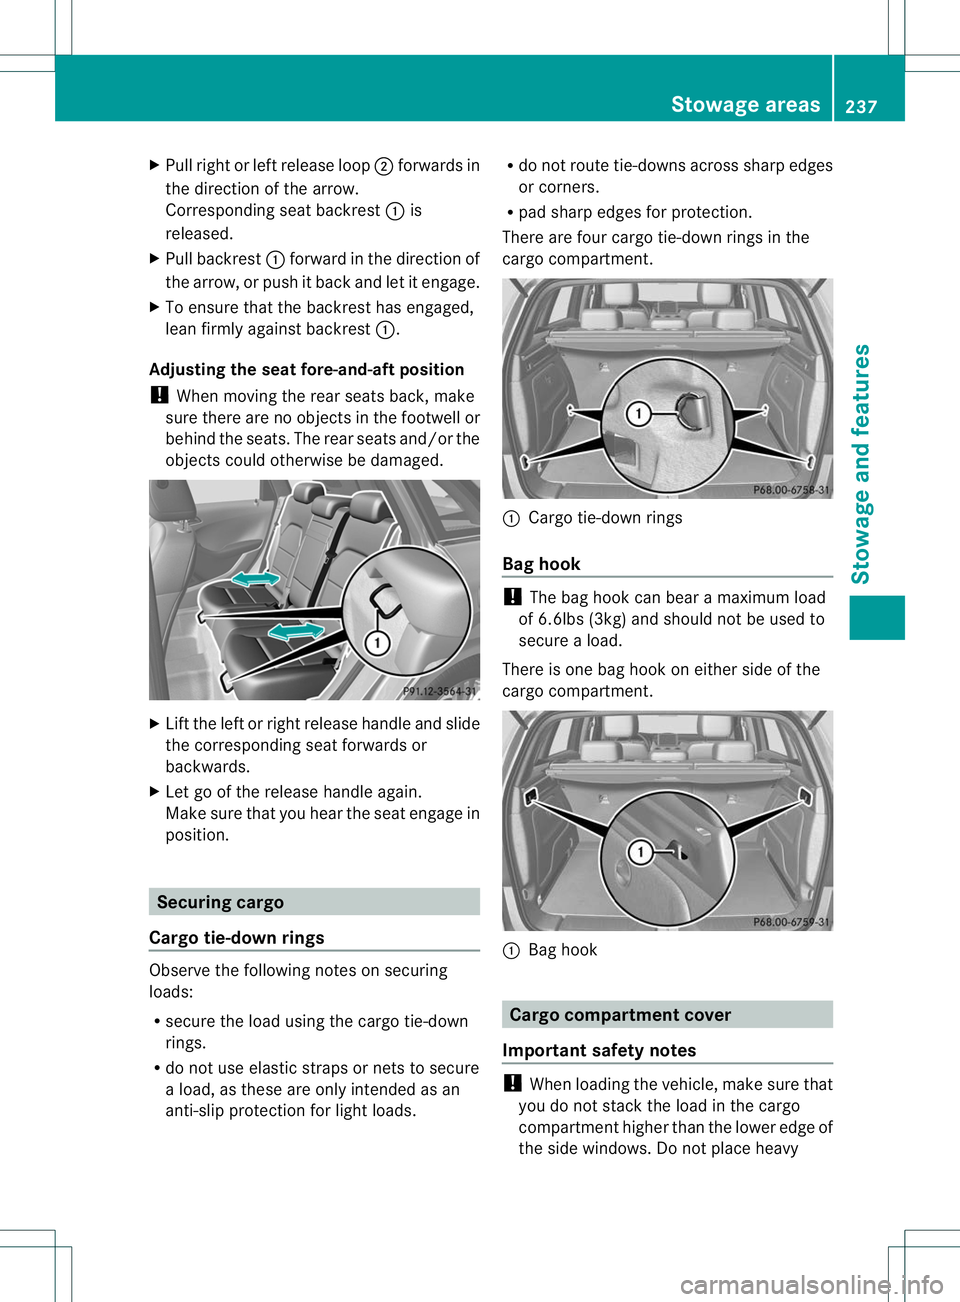
There are four cargo tie-down rings in the
cargo compartment. :
Cargo tie-down rings
Bag hook !
The bag hook can bear a maximum load
of 6.6lbs (3kg) and should not be used to
secure a load.
There is one bag hook on either side of the
cargo compartment. :
Bag hook Cargo compartment cover
Important safety notes !
When loading the vehicle, make sure that
you do not stack the load in the cargo
compartment higher than the lower edge of
the side windows. Do not place heavy Stowage areas
237Stowage and features Z
Page 253 of 336
Search
&Send General notes
i
To use "Search &Send", your vehicle
must be equipped with mbrace and a
navigation system. You must also have an
mbrace service subscription.
"Search & Send" is a destination entry
service. Adestination address which is found
on Google Maps ®
can be transferred via
mbrace directly to your vehicle's navigation
system.
Specifying and sending the destination
address
X Go to the website http://
www.maps.google.com and enter a
destination address into the entry field.
X To send the destination address to the
e-mail address of your mbrace
account: click on the corresponding
button.
i Example:
If you select 'Send to vehicle' and then
'Mercedes-Benz', the destination address
will be sent to your vehicle.
X When the "Send" dialog window appears:
In the relevant field, enter the e-mail
address which you specified when
activating your mbrace account.
X Click "Send".
i Information on specific commands such
as "Address entry" or "Sending" can be
found on the website.
Calling up destination addresses
X Switch on the ignition.
The destination address is loaded into the
vehicle's navigation system. Ad
isplay message appears, asking
whether navigation should be started.
X Select Yes by sliding
XVYand turning
cVd the COMAND controller and press
W to confirm.
The system calculates the route and
subsequently starts the routeg uidance
with the address entered.
i If you select No , the address can be stored
in the address book.
i If you have sent more than one
destination address, each individual
destination must be confirmed separately.
i Destination addresses are loaded in the
same order as the order in which they were
sent. If you have multiple Mercedes-Benz
vehicles with mbrace and active mbrace
accounts:
if multiple vehicles are registered under the
same e-mail address, the destination will
be sen tto all the vehicles.
Vehicle remote opening You can use the vehicle remote opening if you
have unintentionally locked your vehicle and
a replacement SmartKey is not available. The
vehicle can be opened by the Mercedes-Benz
Customer Assistance Center.
The vehicle can be immediately opened
remotely within four days of the ignition being
turned off. After this time, the remote opening
may be delayed by 15 to 60 minutes. After
30 days the vehicle can no longer be opened
remotely.
X
Contact the following service hotlines:
R
USA: Mercedes-Benz Customer
Assistance Center at 250
FeaturesStowage and features
Page 260 of 336
i
Make sure that you clear the memory of
the integrated garage door opener before
selling the vehicle. Compass
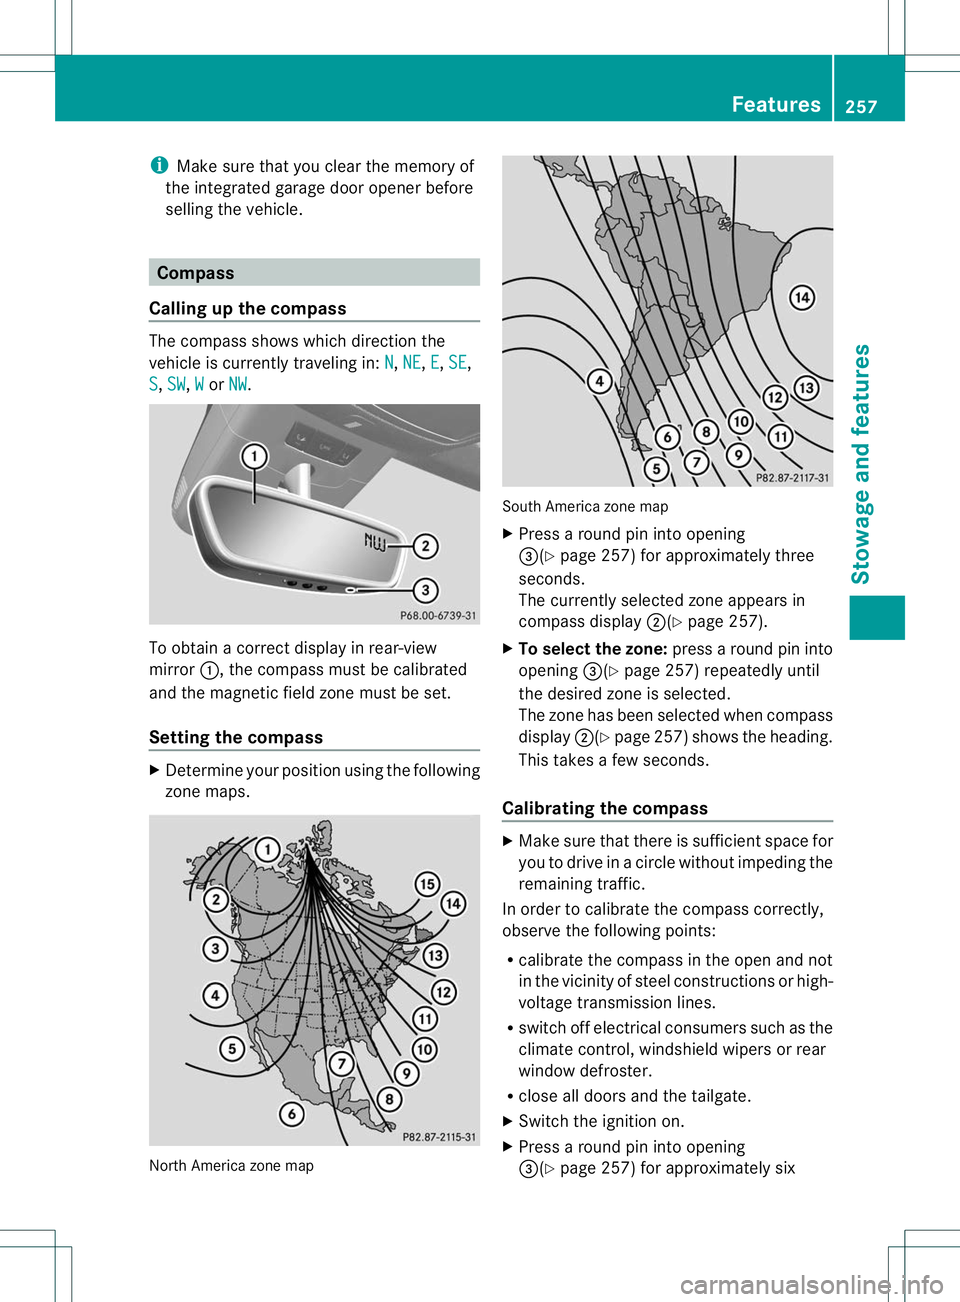
Calling up the compass The compass shows which direction the
vehicle is currently traveling in:
N ,
NE ,
E ,
SE ,
S ,
SW ,
W or
NW .
To obtain a correct displayinr
ear-view
mirror :, the compass must be calibrated
and the magnetic field zone must be set.
Setting the compass X
Determine your position using the following
zone maps. North America zone map South America zone map
X
Press a round pin into opening
=(Y page 257) for approximately three
seconds.
The currently selected zonea ppears in
compass display ;(Ypage 257).
X To select the zone: press a round pin into
opening =(Ypage 257) repeatedly until
the desired zone is selected.
The zone has been selected when compass
display ;(Ypage 257)s hows the heading.
This takes a few seconds.
Calibrating the compass X
Make sure that there is sufficient space for
you to drive in a circle without impeding the
remaining traffic.
In order to calibrate the compass correctly,
observe the following points:
R calibrate the compass in the open and not
in the vicinity of steel constructions or high-
voltage transmission lines.
R switch off electrical consumers such as the
climate control, windshield wipers or rear
window defroster.
R close all doors and the tailgate.
X Switch the ignition on.
X Press a round pin into opening
=(Y page 257) for approximately six Features
257Stowage and features Z
Page 268 of 336
Aq
ualified specialist workshop, e.g. an
authorized Mercedes-Ben zCenter, will reset
the ASSYST PLUS service interval display
after the service work has been carried out.
You can obtain further information, e.g.
regarding service work, from an authorized
Mercedes-Benz Center or directly from
Mercedes-Benz.
Special service requirements
Arduous operating conditions or increased
loads on the vehicle will require some service
work to be performed more often than for a
vehicle in normal use. Such arduous
conditions include regular city driving with
frequent intermediate stops and use in
mountainous terrain or on poor road
surfaces.
For example, if the vehicle is used under
arduous operating conditions, have air filters,
engine oil and oil filters changed frequently
and chec kthe wheels often.F urther
information can be obtaine dataqualified
specialist workshop, e.g. an authorized
Mercedes-Benz Center.
Driving abroad
An extensive Mercedes-Benz Service network
is also available in other countries. You can
obtain further information from any
authorized Mercedes-Benz Center. Care
General notes
G
WARNING
Many cleaning products can be hazardous.
Some are poisonous, others are flammable.
Always follow the instructions on the
particular container .Always open your
vehicle's doors or windows when cleaning the
inside.
Never use fluids or solvents that are not
designed for cleaning your vehicle.
Always lock away cleaning products and keep
them out of reach of children. H
Environmental note
Dispose of empty packaging and cleaning
cloths in an environmentally responsible
manner.
! For cleaning your vehicle, do not use any
of the following:
R dry, rough or hard cloths
R abrasive cleaning agents
R solvents
R cleaning agents containing solvents
Do not scrub.
Do not touch the surfaces or protective
films with hard objects, e.g. a ring or ice
scraper. You could otherwise scratch or
damage the surfaces and protective film.
! Do not park the vehicle for an extended
period straight after cleaning it, particularly
after having cleaned the wheels with wheel
cleaner. Wheel cleaners could cause
increased corrosio nofthe brake discs and
brake pads/linings. For this reason, you
should drive for a few minutes after
cleaning. Braking heats the brake discs and
the brake pads/linings, thus drying them.
The vehicle can then be parked.
Regular care of your vehicle is a condition for
retaining the quality in the long term.
Use care products and cleaning agents
recommended and approved by Mercedes-
Benz. Exterior care
Automatic car wash G
WARNING
Braking efficiency is reduced after washing
the vehicle. This could cause an accident. For
this reason, you must drive particularly
carefully after washing the vehicle until the
brakes have dried. Care
265Maintenance and care Z
Page 269 of 336
G
WARNING
The vehicle is braked when the HOLD function
or DISTRONIC PLUS is activated. Therefore,
deactivate the HOLD function and DISTRONIC
PLUS before the vehicle is washed in an
automatic car wash.
! Never cleany our vehicle in a Touchless
Automatic Car Wash as these use special
cleaning agents. These cleaning agents can
damage the paintwork or plastic parts.
! Make sure that the automatic
transmission is in position Nwhen washing
your vehicle in a tow-through car wash. The
vehicle could be damaged if the
transmission is in another position.
! Make sure that:
R the side windows and the sliding sunroof
are fully closed.
R the ventilation/heating is switched off
(the OFF button has been pressed/the
airflow control is set to position 0).
R the windshield wiper switch is in position
0.
Otherwise, the vehicle might be damaged.
You can wash the vehicle in an automatic car
wash from the very start.
If the vehicle is very dirty, pre-wash it before
cleaning it in an automatic car wash.
After using an automatic car wash, wipe off
wax from the windshield and the wiper
blades. This will prevent smears and reduce
wiping noises caused by residue on the
windshield.
Washing by hand In some countries, washing by hand is only
allowed at wash bays that are specially
designed for this purpose. Observe the legal
requirements in all countries concerned.
X
Do not use hot water and do not wash the
vehicle in direct sunlight.
X Use a soft sponge to clean. X
Use a mild cleaning agent, such as a car
shampoo approved by Mercedes-Benz.
X Thoroughly hose down the vehicle with a
gentle jet of water.
X Do not point the water jet directly towards
the air inlet.
X Use plenty of water and rinse out the
sponge frequently.
X Rinse the vehicle with clean water and dry
thoroughly with a chamois.
X Do not let the cleaning agent dry on the
paintwork.
When using the vehicle in winter, remove all
traces of road salt deposits carefully and as
soon as possible.
Power washers G
WARNING
Do not use power washers with circular-jet
nozzles (dirt grinders) to clean your vehicle, in
particular the tires. You could otherwise
damage the tires and cause an accident.
! Always maintain a distance of at least
11.8i n (30cm) between the vehicle and the
powerw asher nozzle. Information about
the correct distance is available from the
equipmen tmanufacturer.
Move the power washe rnozzle around
when cleaning your vehicle.
Do not aim directly at any of the following:
R tires
R door gaps, roof gaps, joints, etc.
R electrical components
R battery
R connectors
R lights
R seals
R trim
R ventilation slots
Damaged seals or electrical components
can lead to leaks or failures. 266
CareMaintenance and care
Page 271 of 336
These notes also apply to light alloy wheels
with a clear matte finish.
i
The vehicle should preferably be washed
by hand using a soft sponge, car shampoo
and plenty of water.
i Use only insect remover and car shampoo
from the range of recommended and
approved Mercedes-Benz care products.
Cleaning the windows G
WARNING
Switch off the windshield wipers and remove
the SmartKey from the ignition lock before
cleaning the windshield or the wiper blades.
The windshield wipers could otherwise move
and injure you.
! Only fold the windshield wipers away from
the windshield when vertical. Otherwise,
you will damage the hood.
! Do not use dry cloths, abrasive products,
solvents or cleaning agents containing
solvents to clean the inside of the windows.
Do not touch the insides of the windows
with hard objects, e.g. an ice scraper or
ring. There is otherwise a risk of damaging
the windows.
! Clean the water drainage channels of the
windshield and the rear window at regular
intervals. Deposits such as leaves, petals
and pollen may under certain
circumstances prevent water from draining
away.T his can lead to corrosion damage
and damage to electronic components.
X Cleant he inside and outside of the
windows with a damp cloth and a cleaning
agent that is recommended and approved
by Mercedes-Benz.
Cleaning the wiper blades G
WARNING
Switch off the windshield wipers and remove
the SmartKey from the ignition lock before cleaning the windshield or the wiper blades.
The windshield wipers could otherwise move
and injure you.
! Only fold the windshield wipers away from
the windshield when vertical. Otherwise,
you will damage the hood.
! Do not pull the wiper blade. Otherwise,
the wiper blade could be damaged.
! Do not clean wiper blades too often and
do not rub them too hard. Otherwise, the
graphite coating could be damaged. This
could cause wiper noise.
X Fold the windshield wiper arms away from
the windshield.
X Carefully clean the wiper blades with a
damp cloth.
X Fold the windshield wiper arms back again
before switching on the ignition.
! Hold the wiper arm securely when folding
back. The windshield could be damaged if
the wiper arm smacks against it suddenly.
Cleaning the exterior lighting !
Only use cleaning agents or cleaning
cloths which are suitable for plastic light
lenses. Unsuitable cleaning agents or
cleaning cloths could scratch or damage
the plastic light lenses.
X Cleant he plastic lenses of the exterior
lighting using a wet sponge and a mild
cleaning agent, e.g. Mercedes-Ben zcar
shampoo or cleaning cloths.
Cleaning the mirror turn signals !
Only use cleaning agents or cleaning
cloths that are suitable for plastic lenses.
Unsuitable cleaning agents or cleaning
cloths could scratch or damage the plastic
lenses of the mirror tur nsignals.
X Clean the plasti clenses of the mirror turn
signals in the exterior mirror housing using
a wet sponge and a mild cleaning agent, 268
CareMaintenance and care