2013 MERCEDES-BENZ B-CLASS SPORTS warning light
[x] Cancel search: warning lightPage 79 of 336
Cargo compartment
Important safety notes
G
WARNING
When leaving the vehicle, always remove the
SmartKey from the ignition lock. Always take
the SmartKey with you and loc kthe vehicle.
Do not leave children unsupervised in the
vehicle, even if they are secured in a child
restraint system, and do not give them access
to an unlocked vehicle. Achild's unsupervised
access to a vehicle could result in an accident
and/or serious personal injury. They could:
R injure themselves on vehicle parts
R be seriously or fatally injured by extreme
heat or cold
R injure themselves or have an accident with
vehicle equipment that may still be in
operation even after the SmartKey has
been removed from the ignition, such as the
seat adjustment, steering wheel
adjustment or memory function.
If children open a door, they could cause
severe or even fatal injury to other persons; if
they get out of the vehicle, they could injure
themselves when doing so or be seriously or
even fatally injured by any passing traffic.
Do not expose the child restraint system to
direct sunlight. The child restraint system's
metal parts, for example, could become very
hot, and a child could be burned on these
parts. G
WARNING
Do not carry heavy or hard objects in the
passenger compartment or cargo
compartmentu nless they are firmly secured
in place.
Unsecured or improperly positioned cargo
increases a child's risk of injury in the event
of
R strong braking maneuvers
R sudden changes of direction
R an accident G
WARNING
Make sure the tailgate is closed when the
engine is running and whiled riving. Among
other dangers, deadly carbon monoxide (CO)
gases may enter vehicle interior resulting in
unconsciousness and death.
! The tailgate swings upwards and to the
rear when opened.T herefore, make sure
that there is sufficient clearance above and
behind the tailgate.
i The opening dimensions of the tailgate
can be found in the "Vehicle data" section
(Y page 329).
Do not leave the SmartKey in the cargo
compartment. You could otherwise lock
yourself out.
The tailgate can be:
R opened and closed manually from outside
R unlocked from inside with the mechanical
key Opening/closing from outside
Opening X
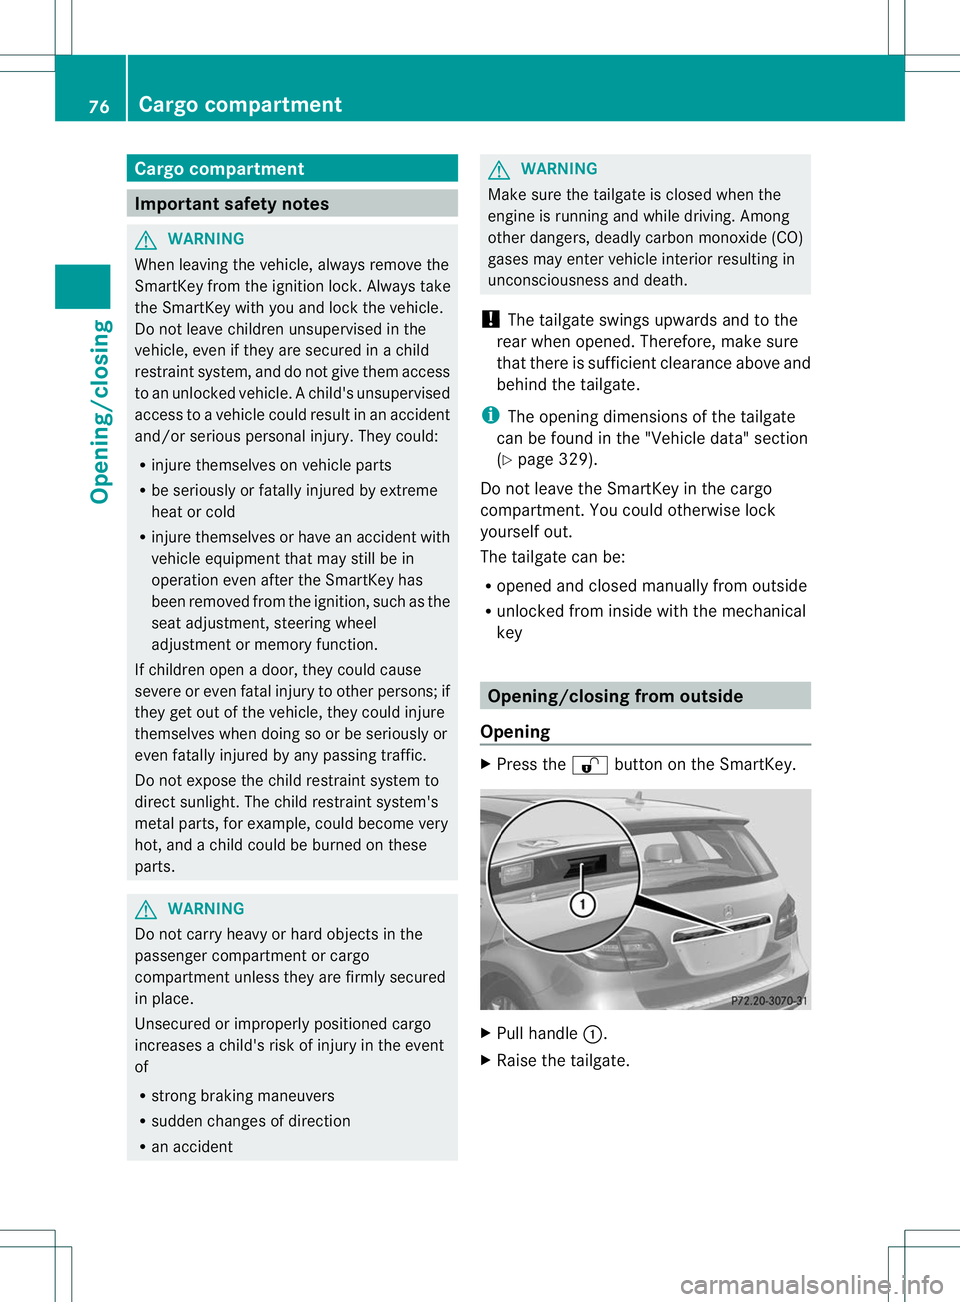
Press the %button on the SmartKey. X
Pull handle :.
X Raise the tailgate. 76
Cargo compartmentOpening/closing
Page 80 of 336
Closing
G
WARNING
To preventp ossible personal injury, always
keep hands and fingers away from the cargo
compartment opening when closing the
tailgate. Be especially careful when small
children are around. X
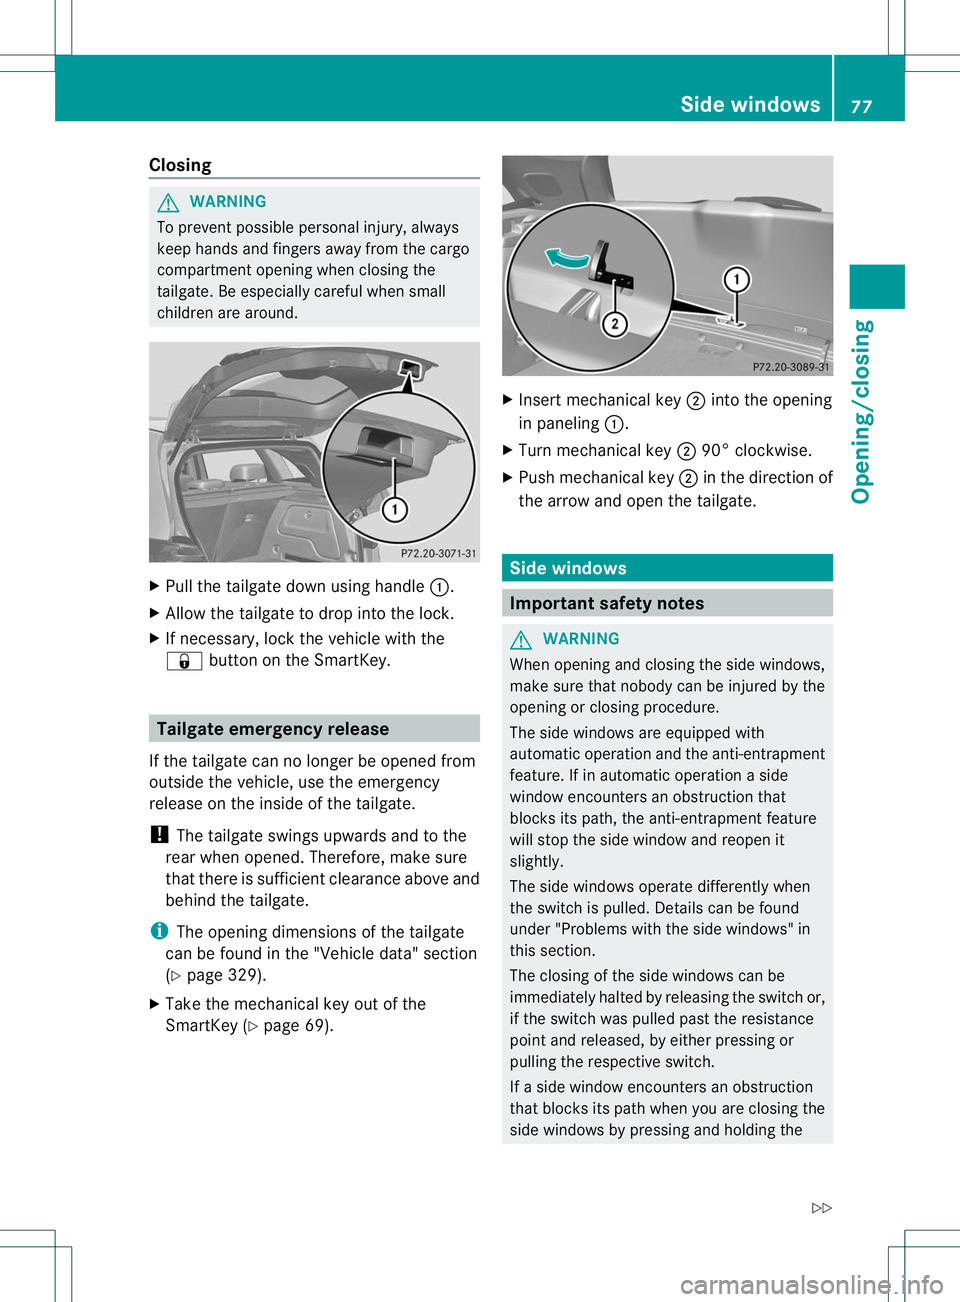
Pull the tailgate down using handle :.
X Allow the tailgate to drop into the lock.
X If necessary, lock the vehicle with the
& button on the SmartKey. Tailgate emergency release
If the tailgate can no longer be opened from
outside the vehicle, use the emergency
release on the inside of the tailgate.
! The tailgate swings upwards and to the
rear when opened. Therefore, make sure
that there is sufficient clearance above and
behind the tailgate.
i The opening dimensions of the tailgate
can be found in the "Vehicle data" section
(Y page 329).
X Take the mechanical key out of the
SmartKey (Y page 69). X
Insert mechanical key ;into the opening
in paneling :.
X Turn mechanical key ;90° clockwise.
X Push mechanical key ;in the direction of
the arrow and open the tailgate. Side windows
Important safety notes
G
WARNING
When opening and closing the side windows,
make sure that nobody can be injured by the
opening or closing procedure.
The side windows are equipped with
automatic operation and the anti-entrapment
feature. If in automatic operation a side
window encounters an obstruction that
blocks its path, the anti-entrapment feature
will stop the side window and reopen it
slightly.
The side windows operate differently when
the switch is pulled. Details can be found
under "Problems with the side windows" in
this section.
The closing of the side windows can be
immediately halted by releasing the switch or,
if the switch was pulled past the resistance
point and released, by either pressing or
pulling the respective switch.
If a side window encounters an obstruction
that blocks its path when you are closing the
side windows by pressing and holding the Side windows
77Opening/closing
Z
Page 82 of 336
On vehicles with a panorama roof with power
tilt/sliding panel, you can then close the
roller sunblinds.
i
The SmartKey must be close to the
driver's door handle.
X Point the tip of the SmartKey at the driver's
door handle.
X Press and hold the &button until the
side windows and the panorama roof with
power tilt/sliding panel are fully closed.
X Make sure that all the side windows and the
panorama roof with power tilt/sliding
panel are closed.
On vehicles with a panorama roof with power
tilt/sliding panel:
X Press and hold the &button againu ntil
the rolle rsunblinds of th epanorama roof
with power tilt/sliding panel close.
X To interrup tconvenience closing:
release the &button. Resetting the side windows
You must rese teach side window if:
R the side window opens again slightly after
being closed fully.
R the side window can no longer be fully
opened or closed.
X Close all the doors.
X Turn the SmartKey to position 1or 2in the
ignition lock.
X Pull the corresponding switch on the door
control panel until the side window is
completely closed (Y page 78).
X Hold the switch for an additional second.
If the side window opens again slightly:
X Immediately pull the corresponding switch
on the door control panel until the side
window is completely closed (Y page 78).
X Hold the switch for an additional second.
X If the corresponding side window remains
closed after the butto nhas been released, the side window has been reset correctly.
If this is nott
he case, repeat the steps
above again. Problems with the side windows
G
WARNING
Closing the side windows with increased force
or without the anti-entrapment feature could
lead to serious or even fatal injury. Make sure
that nobody can become trapped when
closing the side windows. G
WARNING
Pulling and holding the switch to close the
door window immediately after it had been
blocked two times will cause the door window
to close without the anti-entrapment feature
for as long as you hold the switch.
Problem: aside window cannot be closed
because it is blocked by objects, e.g.
leaves in the window guide.
X Remove the objects.
X Close the side window.
Problem :aside window cannot be closed
and you cannot see the cause. If a side
window is obstructed during closing and
reopens again slightly:
X Immediately afte rthe window blocks, pull
the corresponding switch again until the
side window has closed.
The side window is closed with increased
force.
If a side window is obstructed again during
closing and reopens again slightly:
X Immediately after the window blocks, pull
the corresponding switch again until the
side window has closed.
The side window is closed without the anti-
entrapment feature. Side windows
79Opening/closing Z
Page 83 of 336
Sliding sunroof
Important safety notes
In the following section, the term "sliding
sunroof" refers to the panorama roof with
power tilt/sliding panel. G
WARNING
When opening or closing the sliding sunroof,
make sure that there is no danger of anyone
being harmed by the opening/closing
procedure.
The sliding sunroof is equipped with
automatic operation and the anti-entrapment
feature. If the movement of the sliding sunroof
is blocked during the closing procedure, the
sliding sunroof will stop and open slightly.
The sliding sunroof operates differently when
the sliding sunroof switch is pressed and held.
See the "Problems with the sliding sunroof"
section for more details.
The opening/closing procedure of the sliding
sunroof can be immediately halted by
releasing the sliding sunroof switch or, if the
sliding sunroof switch was moved past the
resistance point and released, by moving the
sliding sunroof switch in any direction. G
WARNING
The sliding sunroof is made out of glass. In the
event of an accident, the glass may shatter.
This may result in an opening in the roof.
In a vehicle rollover, occupants not wearing
their seat belts or not wearing them properly
may be thrown out of the opening. Such an
opening also presents a potential for injury for
occupants wearing their seat belts properly,
as entire body parts or portions of them may
protrude from the passenger compartment.
! Only open the sliding sunroof if it is free
of snow and ice. Otherwise, malfunctions
may occur.
Do not allow anything to protrude from the
sliding sunroof. Otherwise, the seals could
be damaged. !
The weather can change abruptly. It could
start to rain or snow. Make sure that the
sliding sunroof is closed when you leave the
vehicle. The vehicle electronics can be
damaged if water enters the vehicle
interior.
i Resonance noises can occur in addition
to the usual airflow noises when the sliding
sunroof is open. They are caused by minor
pressure fluctuations in the vehicle interior.
Change the position of the sliding sunroof
or open a side window slightly to reduce or
eliminate these noises. Operating the panorama roof with
power tilt/sliding panel
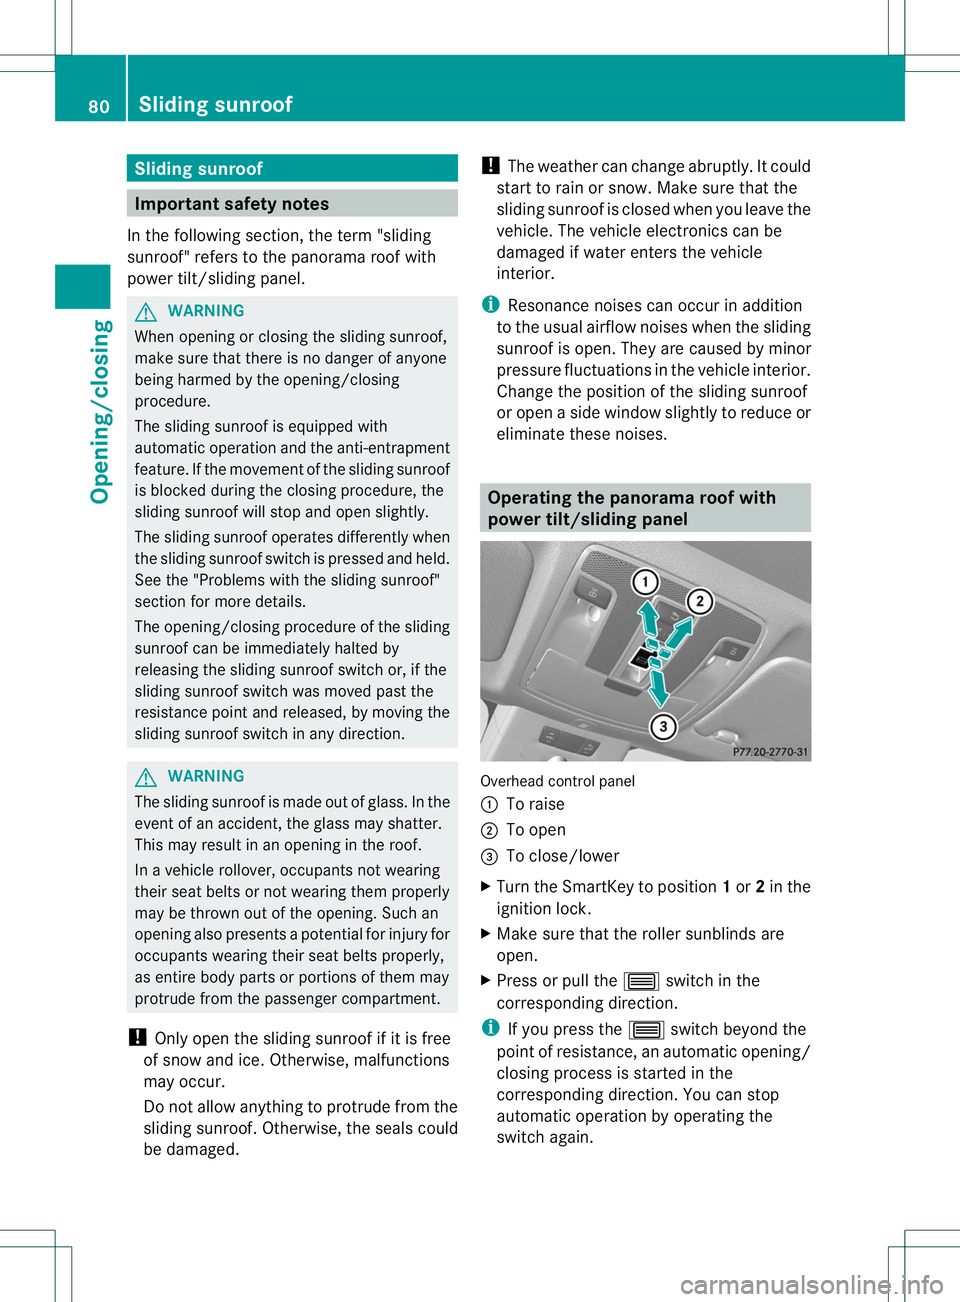
Overhead control panel
:
To raise
; To open
= To close/lower
X Turn the SmartKey to position 1or 2in the
ignition lock.
X Make sure that the roller sunblinds are
open.
X Press or pull the 3switch in the
corresponding direction.
i If you press the 3switch beyond the
point of resistance, an automatic opening/
closing process is started in the
corresponding direction. You can stop
automatic operation by operating the
switch again. 80
Sliding sunroofOpening/closing
Page 84 of 336
The automatic raising feature is available
only when the panorama roof with power
tilt/sliding panel is closed.
i You can continue to operate the
panorama roof with power tilt/sliding
panel after switching off the engine or
removing the SmartKey. This function
remains active for five minutes or until you
open a front door. Operating the roller sunblinds for the
panorama roof with power tilt/sliding
panel
Important safety notes G
WARNING
When opening or closing the roller sunblinds,
make sure that no one can be injured.
The roller sunblinds have automatic operation
and an anti-entrapment feature. If the roller
sunblinds are blocked during the closing
procedure, the anti-entrapment feature stops
the roller sunblinds and they open again
slightly.
The opening and closing of the roller
sunblinds can be terminated immediately by
releasing the button .Inautomatic operation,
press the butto nbriefly in any directio nto
stop the roller sunblinds.
The roller sunblinds shield the vehicle interior
from sunlight. The two roller sunblinds can
only be opened and closed together when the
panorama roof with power tilt/sliding panel
is closed. Opening/closing Overhead control panel
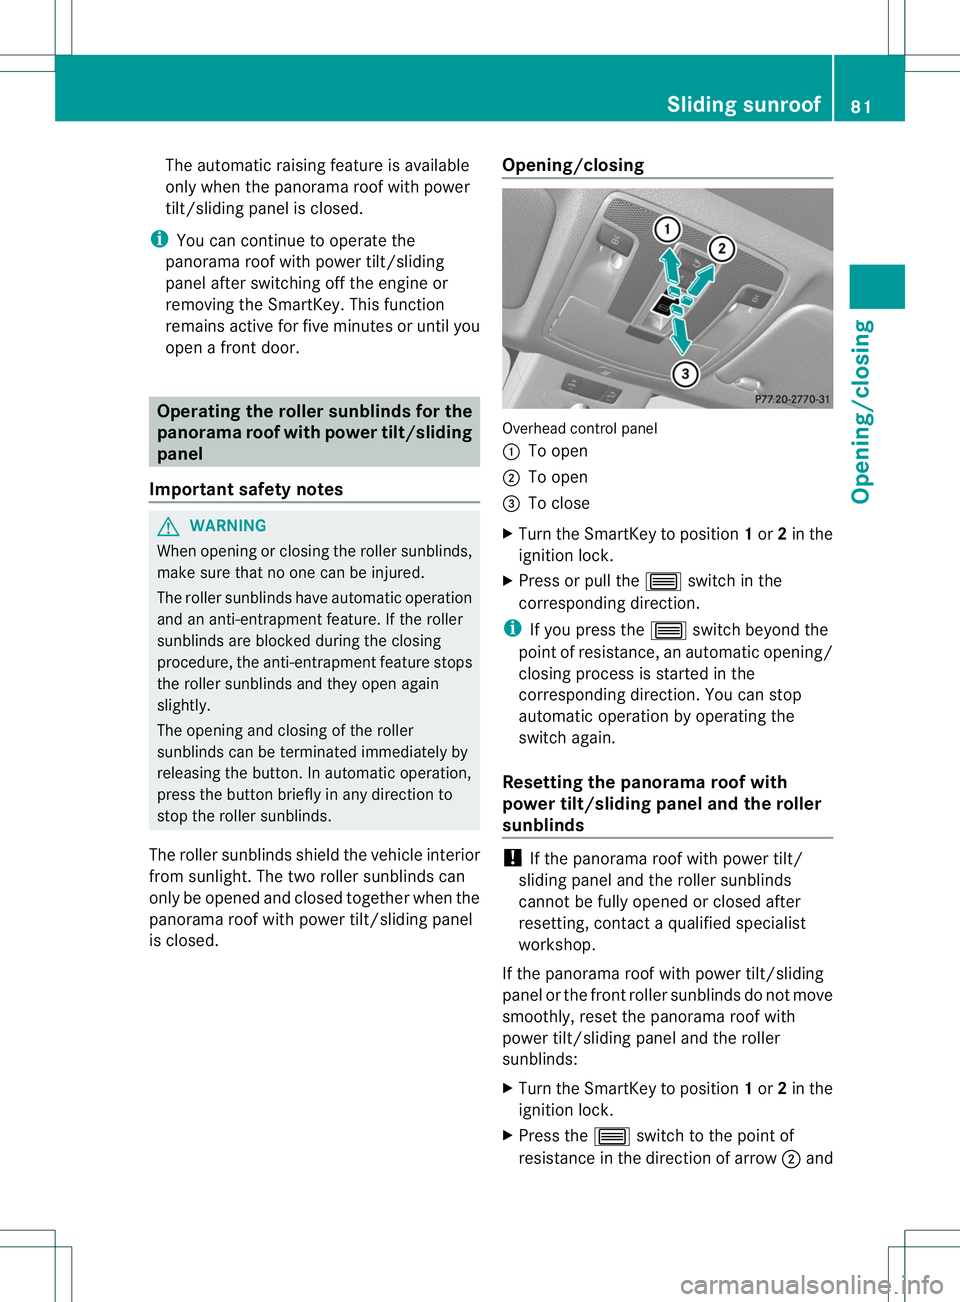
:
To open
; To open
= To close
X Turn the SmartKey to position 1or 2in the
ignition lock.
X Press or pull the 3switch in the
corresponding direction.
i If you press the 3switch beyond the
point of resistance, an automatic opening/
closing process is started in the
corresponding direction. You can stop
automatic operation by operating the
switch again.
Resetting the panorama roof with
power tilt/sliding panel and the roller
sunblinds !
If the panorama roof with power tilt/
sliding panel and the roller sunblinds
cannot be fully opened or closed after
resetting, contact a qualified specialist
workshop.
If the panorama roof with power tilt/sliding
panel or the front roller sunblinds do not move
smoothly, reset the panorama roof with
power tilt/sliding panel and the roller
sunblinds:
X Turn the SmartKey to position 1or 2in the
ignition lock.
X Press the 3switch to the point of
resistance in the direction of arrow ;and Sliding sunroof
81Opening/closing Z
Page 85 of 336
hold it until the panorama roof with power
tilt/sliding panel has opened about
4 in(10 cm).
X Pull the 3switch repeatedly to the point
of resistance in the direction of arrow =
until the panorama roof with power tilt/
sliding panel is fully closed.
X Keep the 3switch pulled for an
additional second.
X Press the 3switch to the point of
resistance in the direction of arrow ;and
hold it until the roller sunblinds have
opened about 4in(10 cm).
X Pull the 3switch repeatedly to the point
of resistance in the direction of arrow =
until the rolle rsunblinds are fully closed.
X Keep the 3switch pulled for an
additional second.
X Make sure that the panoram aroof with
power tilt/sliding panel (Y page 80) and the
roller sunblinds (Y page 81) can be fully
opened and closed again.
X If this is not the case, repeat the steps
above again. Problems with the sliding sunroof
In the following section, the term "sliding
sunroof" refers to the panorama roof with
power tilt/sliding panel. G
WARNING
You could be severely or even fatally injured
when closing the sliding sunroof with
increased closing force or if the anti-
entrapment feature is deactivated. Make sure
that nobody can become trapped when
closing the sliding sunroof. G
WARNING
Pressing and holding the sliding sunroof
switch to close the sliding sunroof
immediately after it had been blocked two
times will cause the sliding sunroof to close without the anti-entrapment feature for as
long as you hold the switch.
! If the sliding sunroof still cannot be
opened or closed as a result of a
malfunction, contact a qualified specialist
workshop.
Problem: the sunroof cannot be closed
and you cannot see the cause. If the sliding
sunroof is obstructed during closing and
reopens again slightly:
X Immediately after the sliding sunroof
blocks, pull the 3switch in the
overhead control panel down to the point
of resistance and hold it until the sliding
sunroof is closed.
The sliding sunroof is closed with increased
force.
If the sliding sunroof is obstructed again
during closing and reopens again slightly:
X Immediately after the sliding sunroof
blocks, pull the 3switch in the
overhead control panel down to the point
of resistance and hold it until the sliding
sunroof is closed.
The sliding sunroof is closed without the
anti-entrapment feature. 82
Sliding sunroofOpening/closing
Page 88 of 336
Seats
Important safety notes
G
WARNING
The seats can still be adjusted when there is
no key in the ignition lock. For this reason,
children should never be left unsupervised in
the vehicle. They could otherwise become
trapped when adjusting the seat. G
WARNING
In order to avoid possible loss of vehicle
control, all seat, head restraint, steering
wheel and rear view mirror adjustments, as
well as fastening of seat belts, must be done
before setting the vehicle in motion. G
WARNING
Do not adjust the driver's seat while driving.
Adjusting the seat while driving could cause
the driver to lose control of the vehicle.
Never travel in a moving vehicle with the seat
backrest in an excessively reclined position as
this can be dangerous. You could slide under
the seat belt in a collision. If you slide under
it, the seat belt would apply force at the
abdomen or neck.T his could cause serious or
fatal injuries. The seat backrest and seat belts
provide the best restraint when the wearer is
in a position that is as upright as possible and
seat belts are properly positioned on the
body. G
WARNING
Your seat belt must be adjusted so that you
can correctly fasten your seat belt.
Observe the following points:
R adjust the seat backrest until your arms are
slightly angled when holding the steering
wheel.
R adjust the seat to a comfortable seating
position that still allows you to reach the
accelerator/brake pedal safely. The
position should be as far back as possible with the driver still able to operate the
controls properly.
R adjust the head restraint so that it is as
close to the head as possible and the center
of the head restraint supports the back of
the head at eye level.
R never place hands under the seat or near
any moving parts while a seat is being
adjusted.
Failure to do so could result in an accident
and/or serious personal injury. G
WARNING
According to accident statistics, children are
safer when properly restrained on the rear
seats than on the front-passenger seat. Thus,
we strongly recommend that children be
placed in the rear seat whenever possible.
Regardless of seating position, children 12
years old and under must be seated and
properly secured in an appropriately sized
child restraint system or booster seat
recommended for the size and weight of the
child. For additional information, see the
"Children in the vehicle" section.
Ac hild's risk of serious or fatal injuries is
significantly increased if the child restraints
are not properly secured in the vehicle and/
or the child is not properly secured in the child
restraint. G
WARNING
Make sure that the back of your head is
supported at eye level by the central area of
the head restraint.Ify our head is not
supported correctly by the head restraint, you
could suffer a severe neck injury in the event
of an accident. Never drive if the head
restraints are not engaged and set correctly. Seats
85Seats, steering wheel and mirrors Z
Page 91 of 336
Keep the area around head restraints clear of
articles (e.g. clothing) to not obstruct the
folding operation of the head restraints.
G
WARNING
For yourp rotection, drive only with properly
positioned head restraints.
Adjust the head restraint in such a way that it
is as close to the head as possible and the
center of the head restraint supports the back
of the head at eye level .This will reduce the
potential for injury to the head and neck in the
event of an accident or similar situation.
With a rear seat occupied, make sure to move
the respective head restraint up from the
lowest non-use position and have the
occupant adjust the head restraint properly.
Do not drive the vehicle without the seat head
restraints installed when the rear seats are
occupied. Head restraints are intended to
help reduce injuries during an accident.
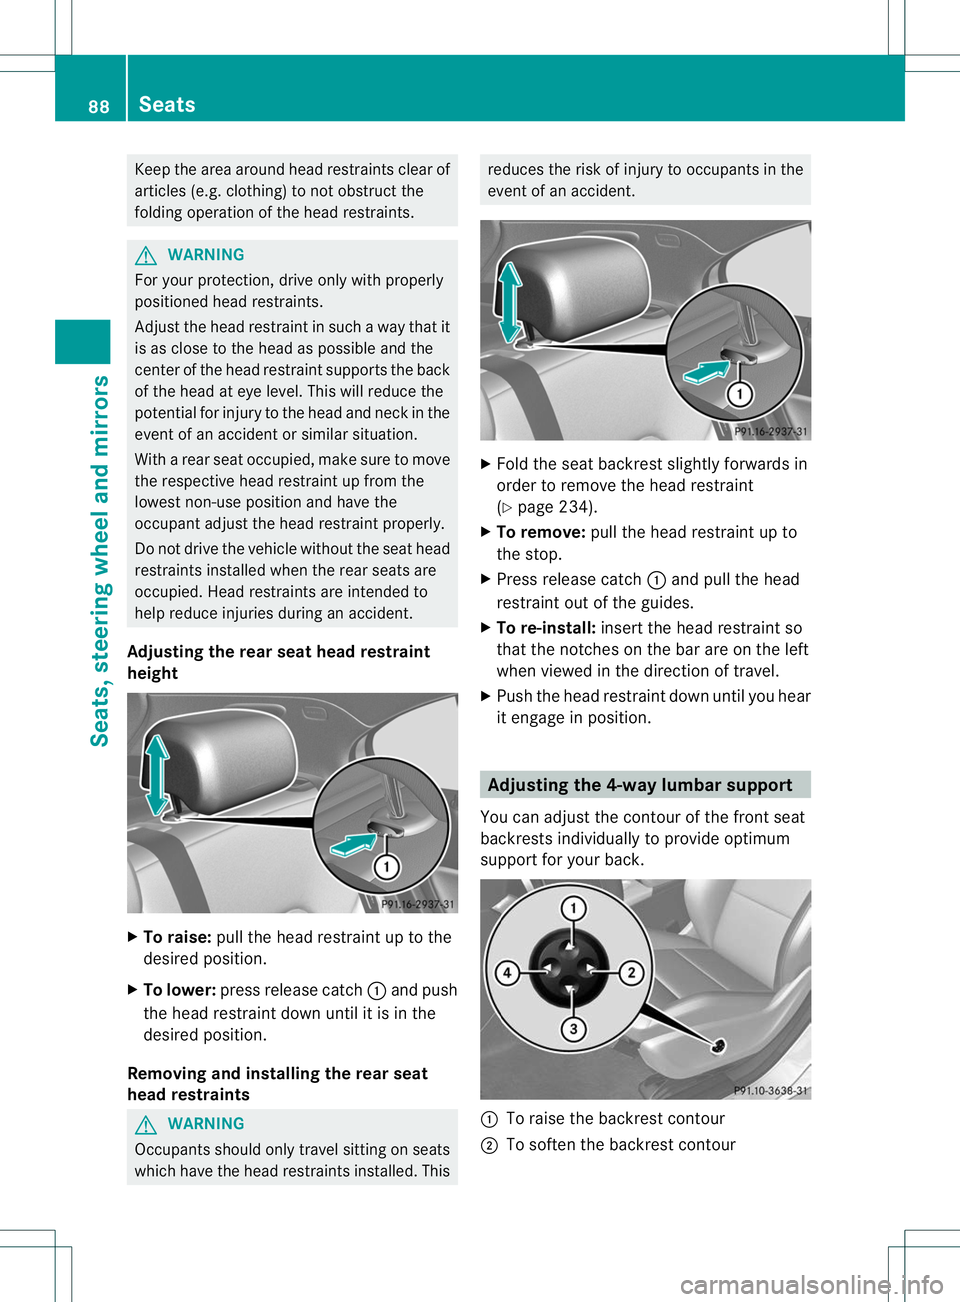
Adjusting the rear seat head restraint
height X
To raise: pull the head restraint up to the
desired position.
X To lower: press release catch :and push
the head restraint down until it is in the
desired position.
Removing and installing the rear seat
head restraints G
WARNING
Occupants should only travel sitting on seats
which have the head restraints installed. This reduces the risk of injury to occupants in the
event of an accident.
X
Fold the seat backrest slightly forwards in
order to remove the head restraint
(Y page 234).
X To remove: pull the head restraint up to
the stop.
X Press release catch :and pull the head
restraint out of the guides.
X To re-install: insert the head restraint so
that the notches on the bar are on the left
when viewed in the direction of travel.
X Push the head restraint down until you hear
it engage in position. Adjusting the 4-way lumbar support
You can adjust the contour of the front seat
backrests individually to provide optimum
support for your back. :
To raise the backrest contour
; To soften the backrest contour 88
SeatsSeats, steering wheel and mirrors