Page 130 of 256
130
3. MEMORY POINTS
GS450h_300h_350_250_NAVI_OM30D64E_(EE)
13.10.23 11:07
1Select “Menu”.
2Select “Memory point” on the navi-
gation menu screen.
3Select “Quick access” on the “Mem-
ory point” screen.
4Select “Edit”.
5Select the screen button of the de-
sired quick access.
6Select the screen button to be edited.
7Select “OK”.
EDITING QUICK ACCESS
No.FunctionPage
Select to change the
icons to be displayed on
the map. 133
Select to edit the quick
access name. The names
can be displayed on the
map.
134
Select to illuminate the
indicator. When the indi-
cator is illuminated, the
registered name is dis-
played on the upper part
of the map screen.
135
Select to edit location in-
formation. 135
Select to edit telephone
number. 135
Page 132 of 256

132
3. MEMORY POINTS
GS450h_300h_350_250_NAVI_OM30D64E_(EE)
13.10.23 11:07
1Select “Menu”.
2Select “Memory point” on the navi-
gation menu screen.
3Select “Memory points” on the
“Memory point” screen.
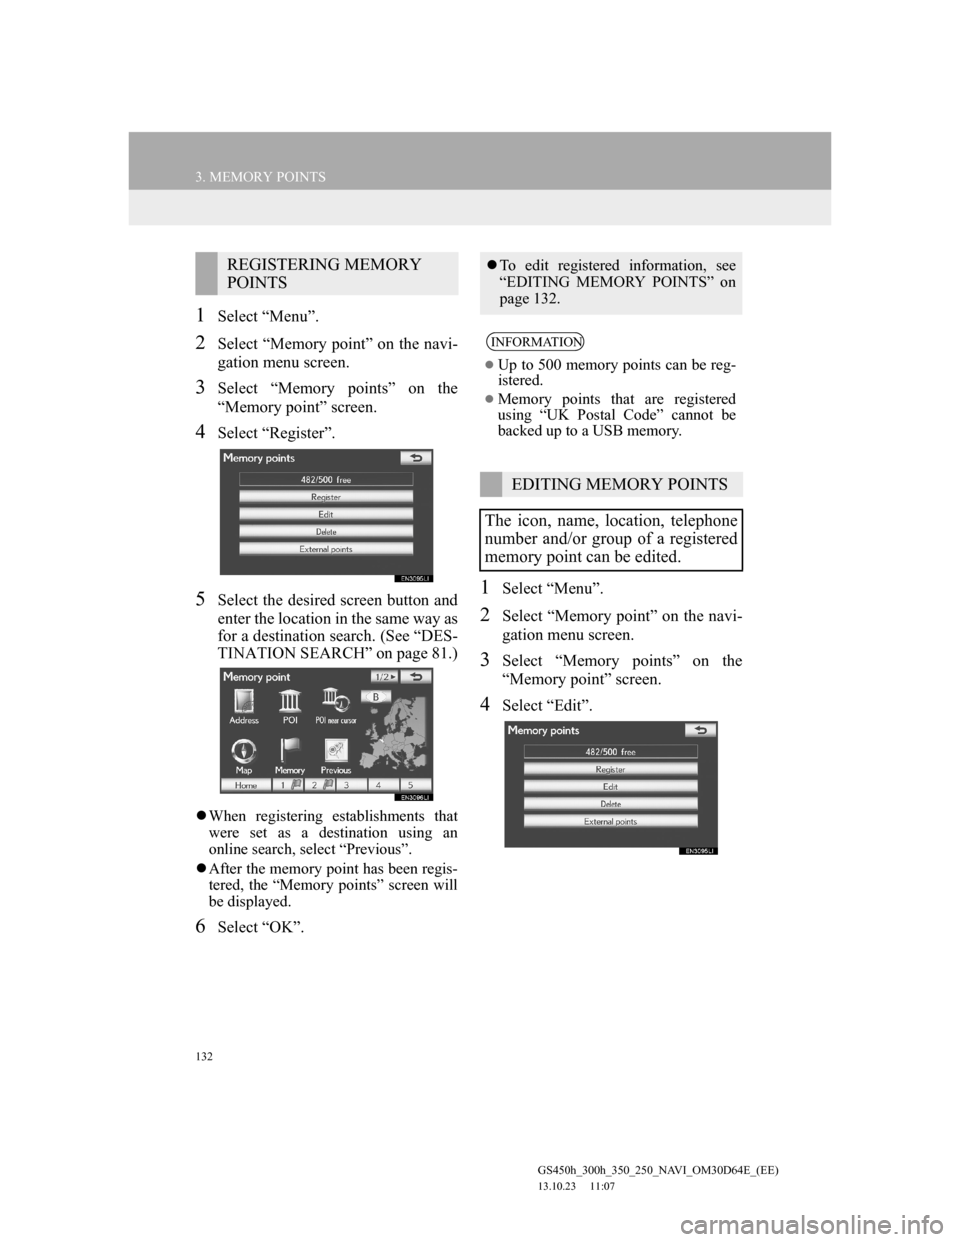
4Select “Register”.
5Select the desired screen button and
enter the location in the same way as
for a destination search. (See “DES-
TINATION SEARCH” on page 81.)
When registering establishments that
were set as a destination using an
online search, select “Previous”.
After the memory point has been regis-
tered, the “Memory points” screen will
be displayed.
6Select “OK”.
1Select “Menu”.
2Select “Memory point” on the navi-
gation menu screen.
3Select “Memory points” on the
“Memory point” screen.
4Select “Edit”.
REGISTERING MEMORY
POINTSTo edit registered information, see
“EDITING MEMORY POINTS” on
page 132.
INFORMATION
Up to 500 memory points can be reg-
istered.
Memory points that are registered
using “UK Postal Code” cannot be
backed up to a USB memory.
EDITING MEMORY POINTS
The icon, name, location, telephone
number and/or group of a registered
memory point can be edited.
Page 133 of 256
133
3. MEMORY POINTS
GS450h_300h_350_250_NAVI_OM30D64E_(EE)
13.10.23 11:07
3
NAVIGATION SYSTEM
5Select the screen button of the de-
sired memory point.
6Select the screen button to be edited.
7Select “OK”.
TO CHANGE “Mark”
1Select “Mark”.
2Select the desired icon.
Change pages by selecting the “Page
1”, “Page 2” or “With sound” tab.
No.FunctionPage
Select to change the icon
to be displayed on the
map. 133
Select to edit the memory
point name. The names
can be displayed on the
map.
134
Select to illuminate the
indicator. When the indi-
cator is illuminated, the
registered name is dis-
played on the upper part
of the map screen.
135
Select to edit location in-
formation. 135
Select to edit the tele-
phone number. 135
Select to register group. 136
No.FunctionPage
Page 135 of 256
135
3. MEMORY POINTS
GS450h_300h_350_250_NAVI_OM30D64E_(EE)
13.10.23 11:07
3
NAVIGATION SYSTEM
DISPLAYING MEMORY POINT
NAMES
1To display a memory point name, se-
lect “Show name”. The indicator
will illuminate. To hide memory
point names, select “Show name”
again. The indicator will turn off.
TO CHANGE “Location”
1Select “Location”.
2Select one of the 8 directional screen
buttons to move the cursor to the
desired point on the map.
3Select “OK”.
The previous screen will be displayed.
TO CHANGE “Tel. no.” (TELE-
PHONE NUMBER)
1Select “Tel. no.”.
2Enter the number using the number
keys.
3Select “OK”.
The previous screen will be displayed.
The name of a memory point can be
set to be displayed on the map.
Page 157 of 256
157
4. SETUP
GS450h_300h_350_250_NAVI_OM30D64E_(EE)
13.10.23 11:07
3
NAVIGATION SYSTEM
4Select “Set dealer”.
5If the dealer has not been registered,
enter the location of the dealer in the
same way as for a destination search.
(See “DESTINATION SEARCH”
on page 81.)
When “Set dealer” registration is fin-
ished, the “Set dealer” screen will be
displayed.
6Select the screen button to be edited.
No
.Function
Select to enter the name of a deal-
er. (See page 158.)
Select to enter the name of a dealer
member. (See page 158.)
Select to set the location. (See
page 158.)
Select to set the telephone num-
ber. (See page 158.)
Select to delete the dealer infor-
mation displayed on the screen.
Select to set the displayed dealer
as a destination. (See “START-
ING ROUTE GUIDANCE” on
page 102.)
Page 158 of 256
158
4. SETUP
GS450h_300h_350_250_NAVI_OM30D64E_(EE)
13.10.23 11:07
TO EDIT “Dealer” OR “Contact”
1Select “Dealer” or “Contact”.
2Enter the name using the alphanu-
meric keys.
Up to 70 characters can be entered for
“Dealer” and 24 characters for “Con-
tact”.
3Select “OK”.
The previous screen will be displayed.
TO EDIT “Location”
1Select “Location”.
2Select one of the 8 directional screen
buttons to move the cursor to the
desired point on the map.
3Select “OK”.
The previous screen will be displayed.
TO EDIT “Tel. no.” (TELEPHONE
NUMBER)
1Select “Tel. no.”.
2Enter the number using number
keys.
3Select “OK”.
The previous screen will be displayed.
Page 166 of 256

166
GS450h_300h_350_250_NAVI_OM30D64E_(EE)
13.10.23 11:07
1. SPEECH COMMAND SYSTEM OPERATION
1. SPEECH COMMAND SYSTEM
Talk switch
Press the talk switch to start the speech
command system.
To cancel voice recognition, press and
hold the talk switch.
Back switch
Press the back switch to return to the
previous screen.
1Press the talk switch.
After the “Shortcuts” screen has been
displayed, voice guidance will com-
mence.
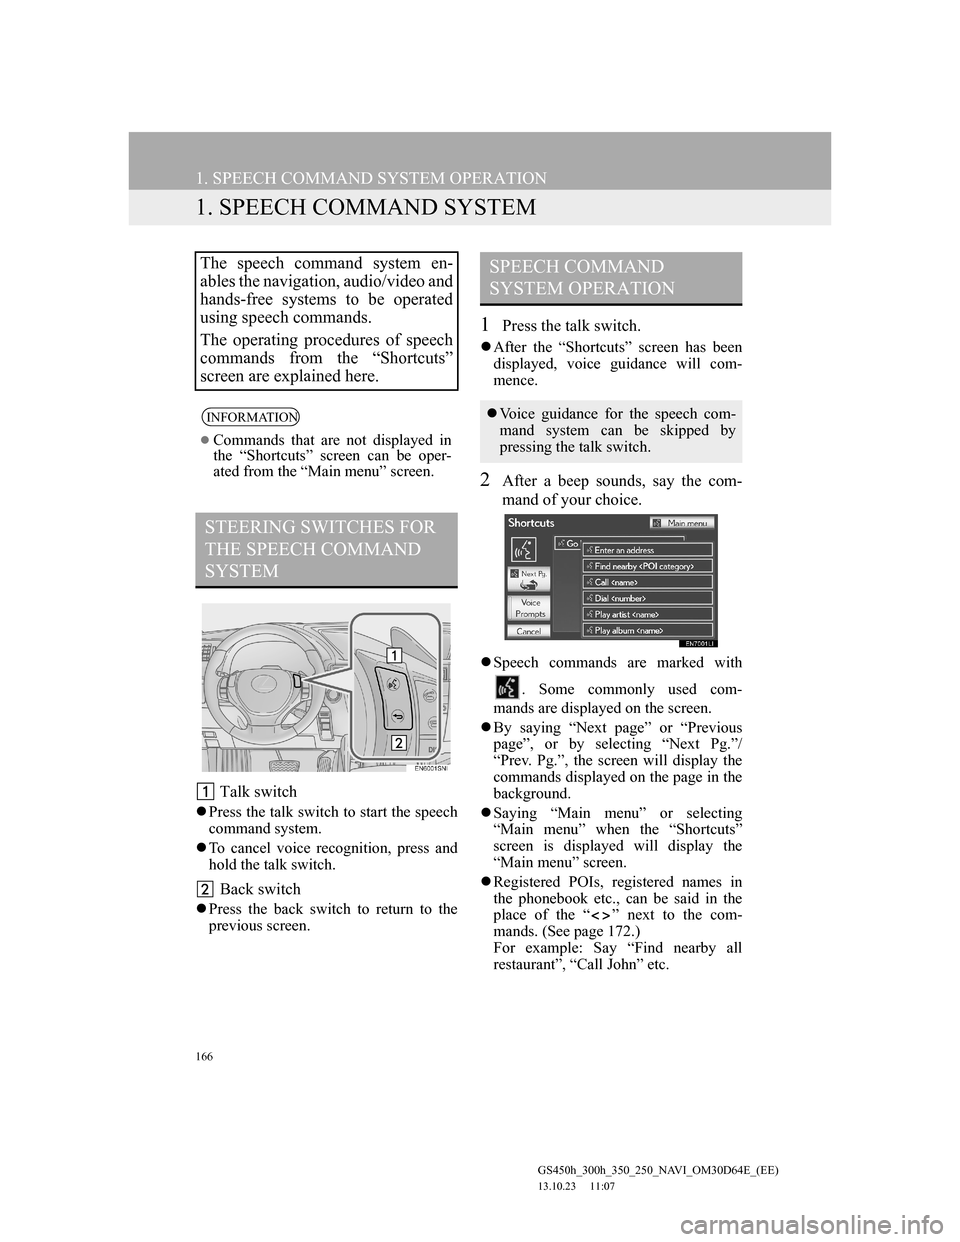
2After a beep sounds, say the com-
mand of your choice.
Speech commands are marked with
. Some commonly used com-
mands are displayed on the screen.
By saying “Next page” or “Previous
page”, or by selecting “Next Pg.”/
“Prev. Pg.”, the screen will display the
commands displayed on the page in the
background.
Saying “Main menu” or selecting
“Main menu” when the “Shortcuts”
screen is displayed will display the
“Main menu” screen.
Registered POIs, registered names in
the phonebook etc., can be said in the
place of the “ ” next to the com-
mands. (See page 172.)
For example: Say “Find nearby all
restaurant”, “Call John” etc.
The speech command system en-
ables the navigation, audio/video and
hands-free systems to be operated
using speech commands.
The operating procedures of speech
commands from the “Shortcuts”
screen are explained here.
INFORMATION
Commands that are not displayed in
the “Shortcuts” screen can be oper-
ated from the “Main menu” screen.
STEERING SWITCHES FOR
THE SPEECH COMMAND
SYSTEM
SPEECH COMMAND
SYSTEM OPERATION
Voice guidance for the speech com-
mand system can be skipped by
pressing the talk switch.
Page 168 of 256
168
1. SPEECH COMMAND SYSTEM OPERATION
GS450h_300h_350_250_NAVI_OM30D64E_(EE)
13.10.23 11:07
MICROPHONE
It is unnecessary to speak directly
into the microphone when giving a
command.INFORMATION
Wait for the confirmation beep before
speaking a command.
Speech commands may not be recog-
nized if:
• Spoken too quickly.
• Spoken at a low or high volume.
• The roof or windows are open.
• Passengers are talking while speech
commands are spoken.
• The air conditioning speed is set
high.
• The air conditioning vents are
turned towards the microphone.
In the following conditions, the sys-
tem may not recognize the command
properly and using speech commands
may not be possible:
• The command is incorrect or
unclear. Note that certain words,
accents or speech patterns may be
difficult for the system to recognize.
• There is excessive background
noise, such as wind noise.