Page 123 of 410
123
2. DESTINATION SEARCH
CT200h_Navi_OM76113E_(EE)
13.12.06 15:16
3
NAVIGATION SYSTEM
1Display the “Destination” screen.
(P.118)
2Select “POI”.
3Enter the name of the POI and select
“OK”.
4Select the desired POI.
“Category”: Select to narrow down the
category.
“Town”: Select to narrow down a town.
When entering the name of a specific
POI, and there are 2 or more sites with
the same name, the list screen is dis-
played.
NARROWING DOWN CATEGO-
RIES
1Select “Category”.
2Select the desired category.
“List all categories”: Select to display
all POI categories.
NARROWING DOWN A TOWN
1Select “Town”.
2Enter the town name and select
“OK”.
“Option”: Select to select a town in a
different way. (P.121)
3Select the desired town name.
SEARCHING BY POI
Page 124 of 410
124
2. DESTINATION SEARCH
CT200h_Navi_OM76113E_(EE)
13.12.06 15:16
1Display the “Destination” screen.
(P.118)
2Select “Map”.
3Scroll the map to the desired point
(P.103) and select “Enter”.
1Display the “Destination” screen.
(P.118)
2Select “Memory”.
3Select the desired memory point.
“Stored routes”: Select to select a stored
route established and downloaded from
the Lexus portal site. (P.125)
SEARCHING BY MAP
By selecting “Map” the last dis-
played location is displayed again on
the map screen. You can search for a
destination from this map.
SEARCHING BY MEMORY
POINTS
Page 125 of 410
125
2. DESTINATION SEARCH
CT200h_Navi_OM76113E_(EE)
13.12.06 15:16
3
NAVIGATION SYSTEM
SELECTING A STORED ROUTE
1Select “Stored routes”.
2Select the desired stored route.
3Select “OK”.
A map of the destination will be dis-
played when a destination is selected
from the list.
1Display the “Destination” screen.
(P.118)
2Select “Previous”.
3Select the desired destination.
“Previous start point”: Select to display
the start point map of the previous guid-
ed route.
“Delete”: Select to delete the previous
destination. (P.126)
This feature is available when a route
established and downloaded from
Lexus portal site is stored in the nav-
igation system. (P.387)
SEARCHING FROM
PREVIOUS DESTINATIONS
INFORMATION
The previous starting point and up to
100 previously set destinations are
displayed on the screen.
Page 126 of 410
126
2. DESTINATION SEARCH
CT200h_Navi_OM76113E_(EE)
13.12.06 15:16
DELETING PREVIOUS DESTI-
NATIONS
1Select “Delete”.
2Select the previous destination to be
deleted and select “Delete”.
3Select “Yes” when the confirmation
screen appears.
1Display the “Destination” screen.
(P.118)
2Select “Intersection”.
3Enter the name of the first intersect-
ing street and select “OK”.
4Select the desired street name.
5Enter the name of the second inter-
secting street and select “OK”.
6Select the desired street name.
SEARCHING BY
INTERSECTION
Page 127 of 410
127
2. DESTINATION SEARCH
CT200h_Navi_OM76113E_(EE)
13.12.06 15:16
3
NAVIGATION SYSTEM
1Display the “Destination” screen.
(P.118)
2Select “Motorway ent./exit”.
3Enter a motorway name and select
“OK”.
4Select the desired motorway.
5Select “Entrance” or “Exit”.
6Select the desired entrance or exit
name.
“Enter name”: Select to enter an en-
trance or exit name to narrow down the
listed items.
INFORMATION
If the same 2 streets cross at more
than 1 intersection, the screen
changes and displays the menu to
select the town name where the
streets intersect.
SEARCHING BY
MOTORWAY ENTRANCE/
EXIT
Page 128 of 410
128
2. DESTINATION SEARCH
CT200h_Navi_OM76113E_(EE)
13.12.06 15:16
1Display the “Destination” screen.
(P.118)
2Select “Coordinates”.
3Enter the latitude and longitude, and
select “OK”.
, , : Used to enter co-
ordinates in DMS format.
: Used to enter coordinates in
DEG format.
1Display the “Destination” screen.
(P.118)
2Select “Telephone no.”.
3Enter a telephone number and select
“OK”.
: Select to change the search ar-
ea. (P.119)
If there is more than 1 site with the
same number, the list screen will be
displayed and select desired item.
SEARCHING BY
COORDINATES
Searching by latitude and longitude
coordinates is available using both
DMS format (for example:
1234’56”) and DEG format (for ex-
ample: 12.345678).
SEARCHING BY
TELEPHONE NUMBER
INFORMATION
To set a memory point as a destina-
tion using the telephone number, the
number must already be registered
with the memory point. (P.155)
Page 129 of 410

129
2. DESTINATION SEARCH
CT200h_Navi_OM76113E_(EE)
13.12.06 15:16
3
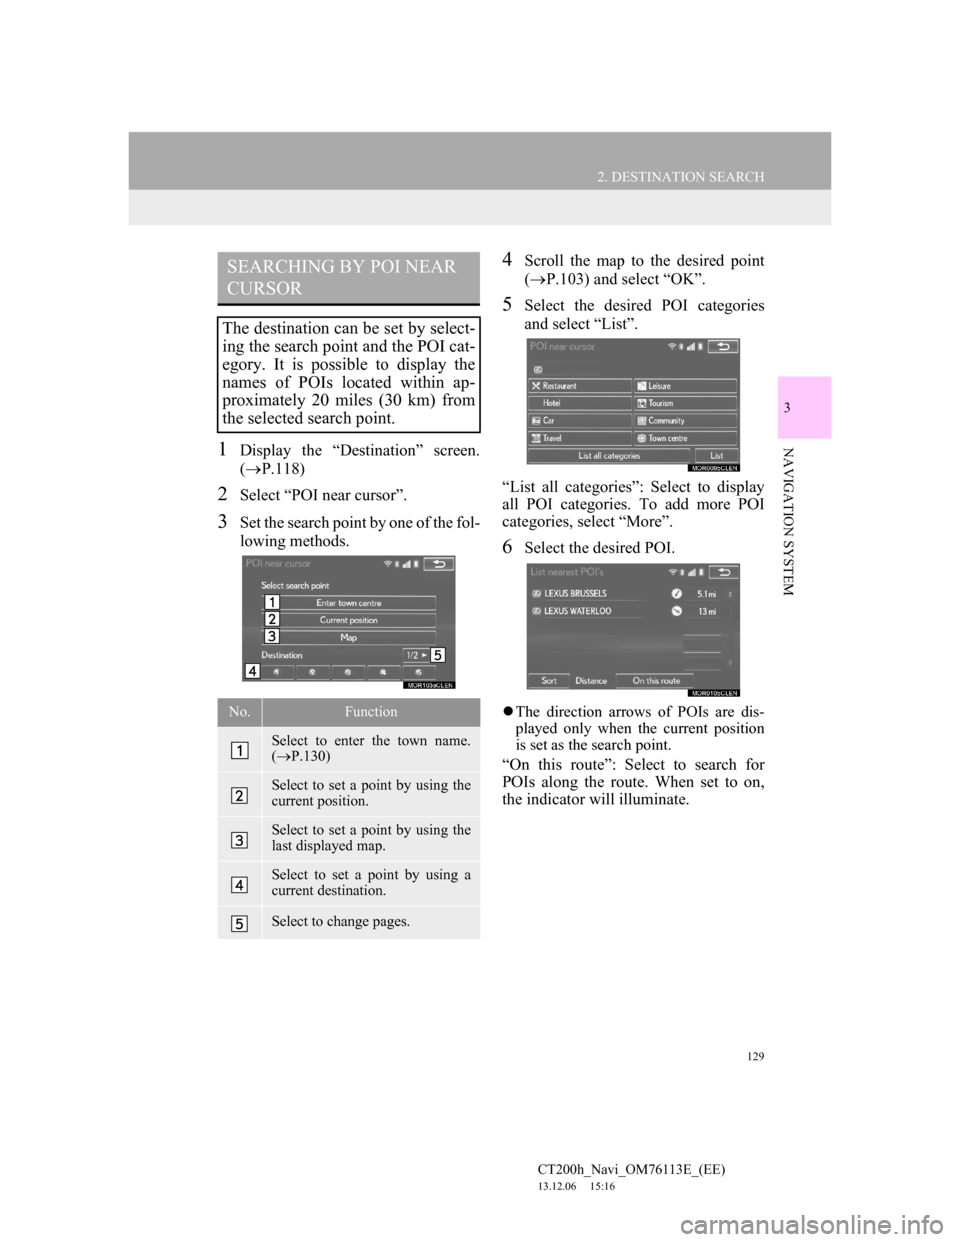
NAVIGATION SYSTEM1Display the “Destination” screen.
(P.118)
2Select “POI near cursor”.
3Set the search point by one of the fol-
lowing methods.
4Scroll the map to the desired point
(P.103) and select “OK”.
5Select the desired POI categories
and select “List”.
“List all categories”: Select to display
all POI categories. To add more POI
categories, select “More”.
6Select the desired POI.
The direction arrows of POIs are dis-
played only when the current position
is set as the search point.
“On this route”: Select to search for
POIs along the route. When set to on,
the indicator will illuminate.
SEARCHING BY POI NEAR
CURSOR
The destination can be set by select-
ing the search point and the POI cat-
egory. It is possible to display the
names of POIs located within ap-
proximately 20 miles (30 km) from
the selected search point.
No.Function
Select to enter the town name.
(P.130)
Select to set a point by using the
current position.
Select to set a point by using the
last displayed map.
Select to set a point by using a
current destination.
Select to change pages.
Page 130 of 410
130
2. DESTINATION SEARCH
CT200h_Navi_OM76113E_(EE)
13.12.06 15:16
WHEN “Enter town centre” IS SE-
LECTED
1Select “Enter town centre”.
2Enter the town name.
3Select the desired town name.
1Display the “Destination” screen.
(P.118)
2Select “UK Postal code” or “NL
Postal code”.
3Enter the postal code and select
“OK”.
4Select the desired code.
SEARCHING BY UK/NL
POSTAL CODE
Search by postal code is only avail-
able when the United Kingdom or
Netherlands is set as the search area.