Page 220 of 360

STEERING WHEEL
AUDIO CONTROLS
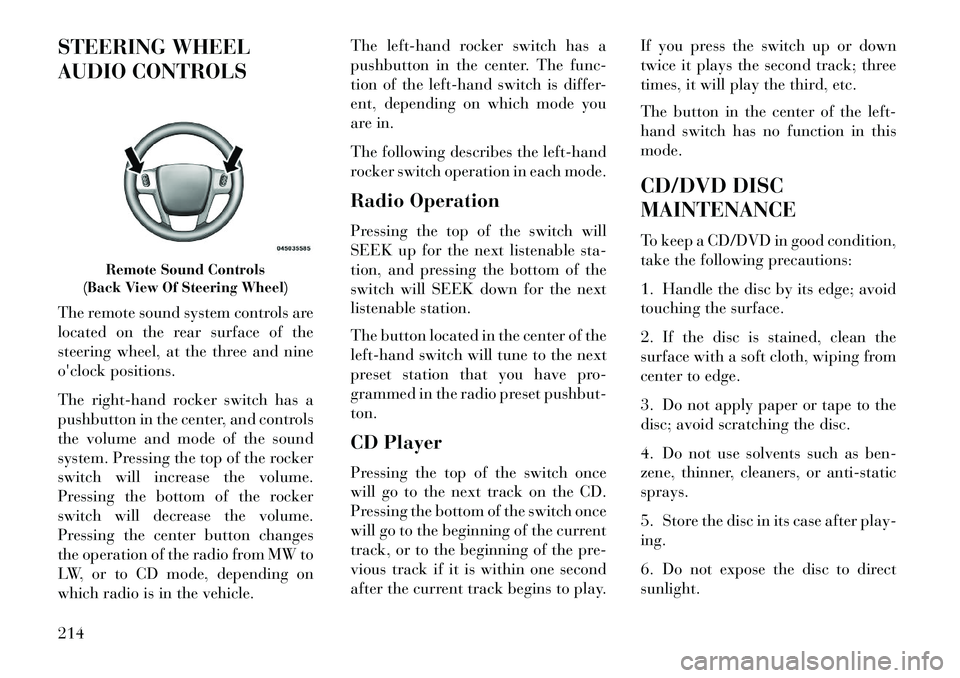
The remote sound system controls are
located on the rear surface of the
steering wheel, at the three and nine
o'clock positions.
The right-hand rocker switch has a
pushbutton in the center, and controls
the volume and mode of the sound
system. Pressing the top of the rocker
switch will increase the volume.
Pressing the bottom of the rocker
switch will decrease the volume.
Pressing the center button changes
the operation of the radio from MW to
LW, or to CD mode, depending on
which radio is in the vehicle.The left-hand rocker switch has a
pushbutton in the center. The func-
tion of the left-hand switch is differ-
ent, depending on which mode you
are in.
The following describes the left-hand
rocker switch operation in each mode.
Radio Operation
Pressing the top of the switch will
SEEK up for the next listenable sta-
tion, and pressing the bottom of the
switch will SEEK down for the next
listenable station.
The button located in the center of the
left-hand switch will tune to the next
preset station that you have pro-
grammed in the radio preset pushbut-
ton.
CD Player
Pressing the top of the switch once
will go to the next track on the CD.
Pressing the bottom of the switch once
will go to the beginning of the current
track, or to the beginning of the pre-
vious track if it is within one second
after the current track begins to play.
If you press the switch up or down
twice it plays the second track; three
times, it will play the third, etc.
The button in the center of the left-
hand switch has no function in this
mode.
CD/DVD DISC
MAINTENANCE
To keep a CD/DVD in good condition,
take the following precautions:
1. Handle the disc by its edge; avoid
touching the surface.
2. If the disc is stained, clean the
surface with a soft cloth, wiping from
center to edge.
3. Do not apply paper or tape to the
disc; avoid scratching the disc.
4. Do not use solvents such as ben-
zene, thinner, cleaners, or anti-static
sprays.
5. Store the disc in its case after play-
ing.
6. Do not expose the disc to direct
sunlight.
Remote Sound Controls
(Back View Of Steering Wheel)
214
Page 321 of 360

CAUTION!
Do not use chemical flushes in your
transmission as the chemicals can
damage your transmission compo-
nents. Such damage is not covered
by the New Vehicle Limited War-
ranty.
Fluid Level Check
The fluid level is preset at the factory
and does not require adjustment un-
der normal operating conditions.
Routine fluid level checks are not re-
quired, therefore the transmission has
no dipstick. Your authorized dealer
can check your transmission fluid
level using a special service dipstick.
If you notice fluid leakage or trans-
mission malfunction, visit your au-
thorized dealer immediately to have
the transmission fluid level checked.
Operating the vehicle with an im-
proper fluid level can cause severe
transmission damage.
CAUTION!
If a transmission fluid leak occurs,
visit your authorized dealer imme-
diately. Severe transmission dam-
age may occur. Your authorized
dealer has the proper tools to adjust
the fluid level accurately.
Fluid And Filter Changes
Refer to the “Maintenance Schedule”
for the proper maintenance intervals.
In addition, change the fluid and filter
if the transmission is disassembled for
any reason.CAUTION!
Car maintenance should be done at
a LANCIA Dealership. For routine
and minor maintenance operations
you wish to carry out yourself, we
do recommend you have the proper
equipment, genuine LANCIA spare
parts and the necessary fluids; do
not however carry out these opera-
tions if you have no experience. APPEARANCE CARE AND
PROTECTION FROM
CORROSION
Protection Of Body And Paint
From Corrosion
Vehicle body care requirements vary
according to geographic locations and
usage. Chemicals that make roads
passable in snow and ice and those
that are sprayed on trees and road
surfaces during other seasons are
highly corrosive to the metal in your
vehicle. Outside parking, which ex-
poses your vehicle to airborne con-
taminants, road surfaces on which the
vehicle is operated, extreme hot or
cold weather and other extreme con-
ditions will have an adverse effect on
paint, metal trim, and underbody
protection.
The following maintenance recom-
mendations will enable you to obtain
maximum benefit from the corrosion
resistance built into your vehicle.
315
Page 340 of 360

MAINTENANCE
SCHEDULE
MAINTENANCE
SCHEDULE – GASOLINE
ENGINE
The Scheduled Maintenance services
listed in this manual must be done at
the times or mileages specified to pro-
tect your vehicle warranty and ensure
the best vehicle performance and reli-
ability. More frequent maintenance
may be needed for vehicles in severe
operating conditions, such as dusty
areas and very short trip driving. In-
spection and service should also be
done anytime a malfunction is sus-
pected.The oil change indicator system will
remind you that it is time to take your
vehicle in for scheduled maintenance.
On Electronic Vehicle Information
Center (EVIC) equipped vehicles “Oil
Change Required” will be displayed
in the EVIC and a single chime will
sound, indicating that an oil change is
necessary.
NOTE:
The oil change indicator mes-
sage will not monitor the time
since the last oil change. Change
your vehicles oil if it has been 12
months since your last oil
change even if the oil change in-
dicator message is NOT illumi-
nated. Under no circumstances should
oil change intervals exceed
12,000 km or 12 months, which-
ever comes first.
Your authorized dealer will reset the
oil change indicator message after
completing the scheduled oil change.
CAUTION!
Failure to perform the required
maintenance items may result in
damage to the vehicle.
334