2013 Lancia Flavia Owner handbook (in English)
-
 1
1 -
 2
2 -
 3
3 -
 4
4 -
 5
5 -
 6
6 -
 7
7 -
 8
8 -
 9
9 -
 10
10 -
 11
11 -
 12
12 -
 13
13 -
 14
14 -
 15
15 -
 16
16 -
 17
17 -
 18
18 -
 19
19 -
 20
20 -
 21
21 -
 22
22 -
 23
23 -
 24
24 -
 25
25 -
 26
26 -
 27
27 -
 28
28 -
 29
29 -
 30
30 -
 31
31 -
 32
32 -
 33
33 -
 34
34 -
 35
35 -
 36
36 -
 37
37 -
 38
38 -
 39
39 -
 40
40 -
 41
41 -
 42
42 -
 43
43 -
 44
44 -
 45
45 -
 46
46 -
 47
47 -
 48
48 -
 49
49 -
 50
50 -
 51
51 -
 52
52 -
 53
53 -
 54
54 -
 55
55 -
 56
56 -
 57
57 -
 58
58 -
 59
59 -
 60
60 -
 61
61 -
 62
62 -
 63
63 -
 64
64 -
 65
65 -
 66
66 -
 67
67 -
 68
68 -
 69
69 -
 70
70 -
 71
71 -
 72
72 -
 73
73 -
 74
74 -
 75
75 -
 76
76 -
 77
77 -
 78
78 -
 79
79 -
 80
80 -
 81
81 -
 82
82 -
 83
83 -
 84
84 -
 85
85 -
 86
86 -
 87
87 -
 88
88 -
 89
89 -
 90
90 -
 91
91 -
 92
92 -
 93
93 -
 94
94 -
 95
95 -
 96
96 -
 97
97 -
 98
98 -
 99
99 -
 100
100 -
 101
101 -
 102
102 -
 103
103 -
 104
104 -
 105
105 -
 106
106 -
 107
107 -
 108
108 -
 109
109 -
 110
110 -
 111
111 -
 112
112 -
 113
113 -
 114
114 -
 115
115 -
 116
116 -
 117
117 -
 118
118 -
 119
119 -
 120
120 -
 121
121 -
 122
122 -
 123
123 -
 124
124 -
 125
125 -
 126
126 -
 127
127 -
 128
128 -
 129
129 -
 130
130 -
 131
131 -
 132
132 -
 133
133 -
 134
134 -
 135
135 -
 136
136 -
 137
137 -
 138
138 -
 139
139 -
 140
140 -
 141
141 -
 142
142 -
 143
143 -
 144
144 -
 145
145 -
 146
146 -
 147
147 -
 148
148 -
 149
149 -
 150
150 -
 151
151 -
 152
152 -
 153
153 -
 154
154 -
 155
155 -
 156
156 -
 157
157 -
 158
158 -
 159
159 -
 160
160 -
 161
161 -
 162
162 -
 163
163 -
 164
164 -
 165
165 -
 166
166 -
 167
167 -
 168
168 -
 169
169 -
 170
170 -
 171
171 -
 172
172 -
 173
173 -
 174
174 -
 175
175 -
 176
176 -
 177
177 -
 178
178 -
 179
179 -
 180
180 -
 181
181 -
 182
182 -
 183
183 -
 184
184 -
 185
185 -
 186
186 -
 187
187 -
 188
188 -
 189
189 -
 190
190 -
 191
191 -
 192
192 -
 193
193 -
 194
194 -
 195
195 -
 196
196 -
 197
197 -
 198
198 -
 199
199 -
 200
200 -
 201
201 -
 202
202 -
 203
203 -
 204
204 -
 205
205 -
 206
206 -
 207
207 -
 208
208 -
 209
209 -
 210
210 -
 211
211 -
 212
212 -
 213
213 -
 214
214 -
 215
215 -
 216
216 -
 217
217 -
 218
218 -
 219
219 -
 220
220 -
 221
221 -
 222
222 -
 223
223 -
 224
224 -
 225
225 -
 226
226 -
 227
227 -
 228
228 -
 229
229 -
 230
230 -
 231
231 -
 232
232 -
 233
233 -
 234
234 -
 235
235 -
 236
236 -
 237
237 -
 238
238 -
 239
239 -
 240
240 -
 241
241 -
 242
242 -
 243
243
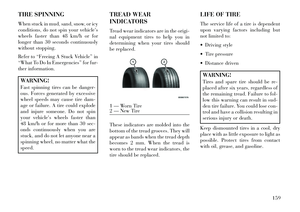
 CavityCartridge Fuse Mini Fuse Description
31 — 10 Amp RedHeadlamp Washer (for versions/
markets, where provided)
32 30 Amp Pink —Auto Shutdown (ASD) Relay 1
33 — 10 Amp RedSwitch Bank/Diagnosti")
 CAUTION!
When installing the IntegratedPower Module cover, it is impor-
tant to ensure the cover is prop-
erly positioned and fully latched.
Failure to do so may allow water
to get into the Integrat")
 LIGHT BULBS –
ExteriorBulb No.
Bi-Halogen Headlamp . . . HIR2
Front Turn Signal
Lamp . . . . . . . . . . . . 3157NAK
Front Park Lamp . . . . . . . LED (Serviced at Authorized Dealer)
Side Repeater L")
 4. Pull the bulb out of the socket and
replace the bulb.
5. If the bulb comes in contact with
any oily surface, clean the bulb with
rubbing alcohol.
6. Reinsert the bulb and socket as-
sembly and rota")
 NOTE: Placing a small flat head
screwdriver or similar tool be-
tween the lamp outboard ball stud
and plastic grommet from inside
the trunk can help to disengage the
outboard edge of the tail lamp.
3.")
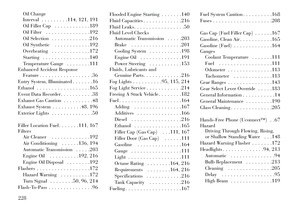
 FLUID CAPACITIES
Metric
Fuel (Approximate)
All 64 Liters
Engine Oil with Filter
2.4L Engine 4.4 Liters
Cooling System*
2.4L Engine 7.3 Liters
* Includes heater and coolant recovery bottle filled to MA")
 In this case optimum engine perfor-
mance is not guaranteed and the lubri-
cants should be replaced with recom-
mended products as soon as possible.
The use of products with features
lower than ILSAC")
 ARRANGEMENTS FOR DEALING
WITH THE VEHICLE AT THE
END OF ITS LIFE
LANCIA has been committed for
many years to safeguarding the envi-
ronment through the constant im-
provement of its production process")