Page 169 of 433
168Controls
Interior Lights/Interior Convenience ItemsInterior Lights
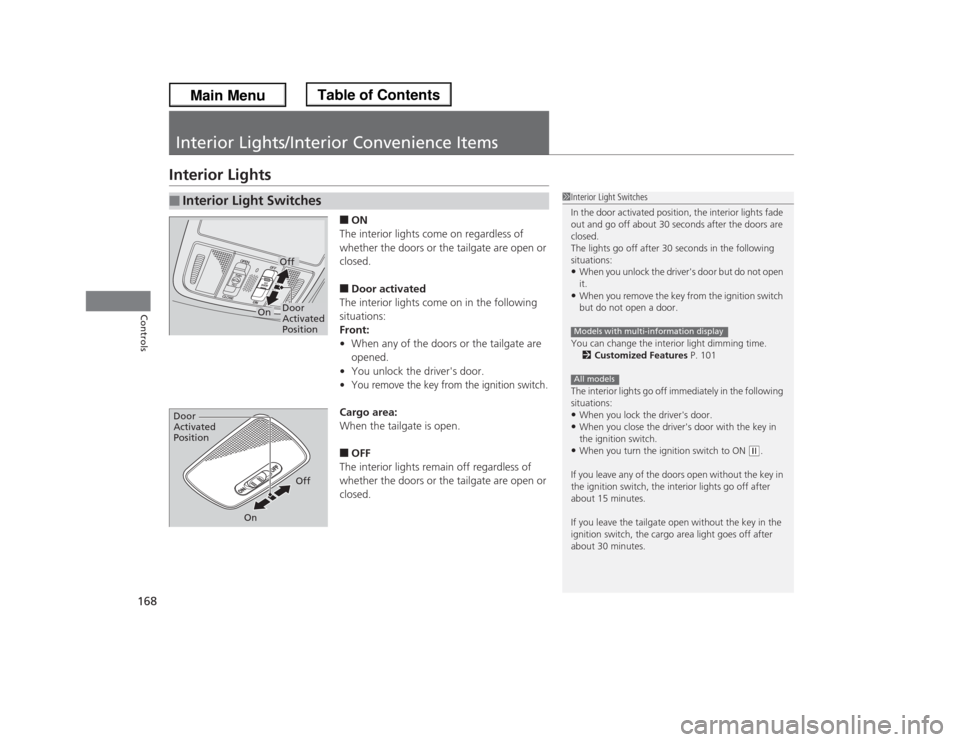
■ON
The interior lights come on regardless of
whether the doors or the tailgate are open or
closed.■Door activated
The interior lights come on in the following
situations:
Front:
•When any of the doors or the tailgate are
opened.
•You unlock the driver's door.•You remove the key from the ignition switch.Cargo area:
When the tailgate is open.■OFF
The interior lights remain off regardless of
whether the doors or the tailgate are open or
closed.
■
Interior Light Switches
1Interior Light Switches
In the door activated position, the interior lights fade
out and go off about 30 seconds after the doors are
closed.
The lights go off after 30 seconds in the following
situations:•When you unlock the driver's door but do not open
it.•When you remove the key from the ignition switch
but do not open a door.
You can change the interior light dimming time.
2Customized Features P. 101
The interior lights go off immediately in the following
situations:•When you lock the driver's door.•When you close the driver's door with the key in
the ignition switch.•When you turn the ignition switch to ON
(w.
If you leave any of the doors open without the key in
the ignition switch, the interior lights go off after
about 15 minutes.
If you leave the tailgate open without the key in the
ignition switch, the cargo area light goes off after
about 30 minutes.
Models with multi-information displayAll models
Door
Activated
PositionOff
On
Door
Activated
Position
Off
On
Page 187 of 433
186Controls
Climate Control System
*
Using Automatic Climate ControlThe automatic climate control system maintains the interior temperature you select.
The system also selects the proper mix of heated or cooled air that raises or lowers
the interior temperature to your preference as quickly as possible.
Use the system when the engine is running.
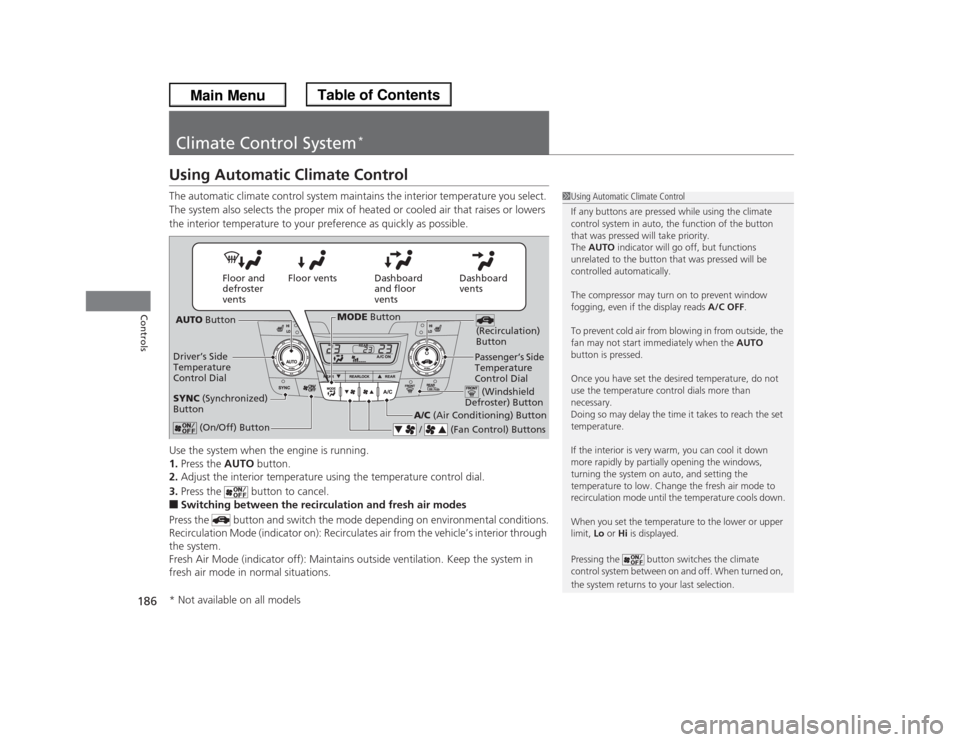
1.Press the AUTO button.
2.Adjust the interior temperature using the temperature control dial.
3.Press the button to cancel.■Switching between the recirculation and fresh air modes
Press the button and switch the mode depending on environmental conditions.
Recirculation Mode (indicator on): Recirculates air from the vehicle’s interior through
the system.
Fresh Air Mode (indicator off): Maintains outside ventilation. Keep the system in
fresh air mode in normal situations.
1Using Automatic Climate Control
If any buttons are pressed while using the climate
control system in auto, the function of the button
that was pressed will take priority.
The AUTO indicator will go off, but functions
unrelated to the button that was pressed will be
controlled automatically.
The compressor may turn on to prevent window
fogging, even if the display reads A/C OFF.
To prevent cold air from blowing in from outside, the
fan may not start immediately when the AUTO
button is pressed.
Once you have set the desired temperature, do not
use the temperature control dials more than
necessary.
Doing so may delay the time it takes to reach the set
temperature.
If the interior is very warm, you can cool it down
more rapidly by partially opening the windows,
turning the system on auto, and setting the
temperature to low. Change the fresh air mode to
recirculation mode until the temperature cools down.
When you set the temperature to the lower or upper
limit, Lo or Hi is displayed.
Pressing the button switches the climate
control system between on and off. When turned on,
the system returns to your last selection.
Dashboard
vents Dashboard
and floor
vents Floor vents Floor and
defroster
vents
AUTO Button
Driver’s Side
Temperature
Control Dial
A/C (Air Conditioning) Button
/ (Fan Control) Buttons
(Recirculation)
Button
(On/Off) Button
SYNC (Synchronized)
Button
Passenger’s Side
Temperature
Control Dial (Windshield
Defroster) Button
MODE Button
* Not available on all models
Page 196 of 433
195
uuAudio SystemuUSB Adapter Cable
Features
USB Adapter Cable
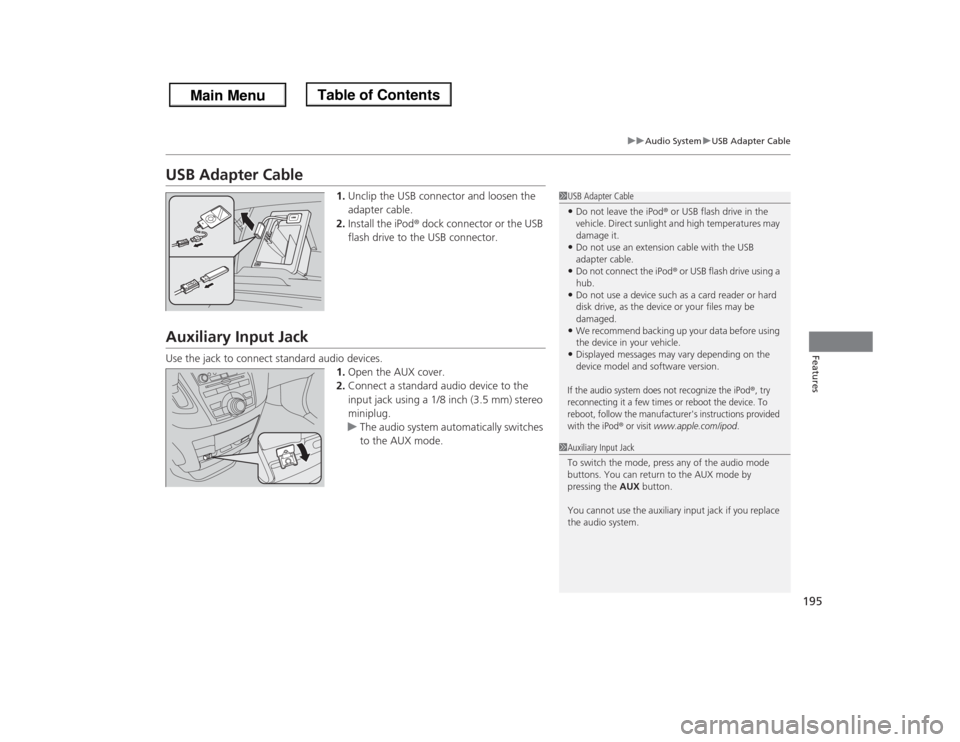
1.Unclip the USB connector and loosen the
adapter cable.
2.Install the iPod® dock connector or the USB
flash drive to the USB connector.
Auxiliary Input JackUse the jack to connect standard audio devices.
1.Open the AUX cover.
2.Connect a standard audio device to the
input jack using a 1/8 inch (3.5 mm) stereo
miniplug.
uThe audio system automatically switches
to the AUX mode.
1USB Adapter Cable•Do not leave the iPod® or USB flash drive in the
vehicle. Direct sunlight and high temperatures may
damage it.•Do not use an extension cable with the USB
adapter cable.•Do not connect the iPod® or USB flash drive using a
hub.•Do not use a device such as a card reader or hard
disk drive, as the device or your files may be
damaged.•We recommend backing up your data before using
the device in your vehicle.•Displayed messages may vary depending on the
device model and software version.If the audio system does not recognize the iPod
®, try
reconnecting it a few times or reboot the device. To
reboot, follow the manufacturer's instructions provided
with the iPod
® or visit
www.apple.com/ipod
.
1Auxiliary Input Jack
To switch the mode, press any of the audio mode
buttons. You can return to the AUX mode by
pressing the AUX button.
You cannot use the auxiliary input jack if you replace
the audio system.
Page 198 of 433
197Features
Audio System Basic OperationTo use the audio system function, the ignition switch must be in ACCESSORY
(q
or
ON
(w
.
Use the selector knob or SETUP button to
access some audio functions.
Press to switch between the normal and
extended display for some functions.
Selector knob: Rotate left or right to scroll
through the available choices. Press to set
your selection.
SETUP button: Press to select any mode such
as the Auto Select, Sound Settings, Play
Mode, Resume/Pause, or compass.
RETURN button: Press to go back to the
previous display.
button: Press to change the audio/
information screen brightness. The brightness
can be set differently for the day time and
night time. Press once for the day time mode.
Press twice for the night time mode.
Adjust the brightness using .
1Audio System Basic Operation
These indications are used to show how to operate
the selector knob.
Rotate to select.
Press to enter.
Selector Knob
SETUP
Button
RETURN Button
Button
Page 201 of 433
200
uuAudio System Basic OperationuPlaying the AM/FM Radio
Features
Playing the AM/FM Radio
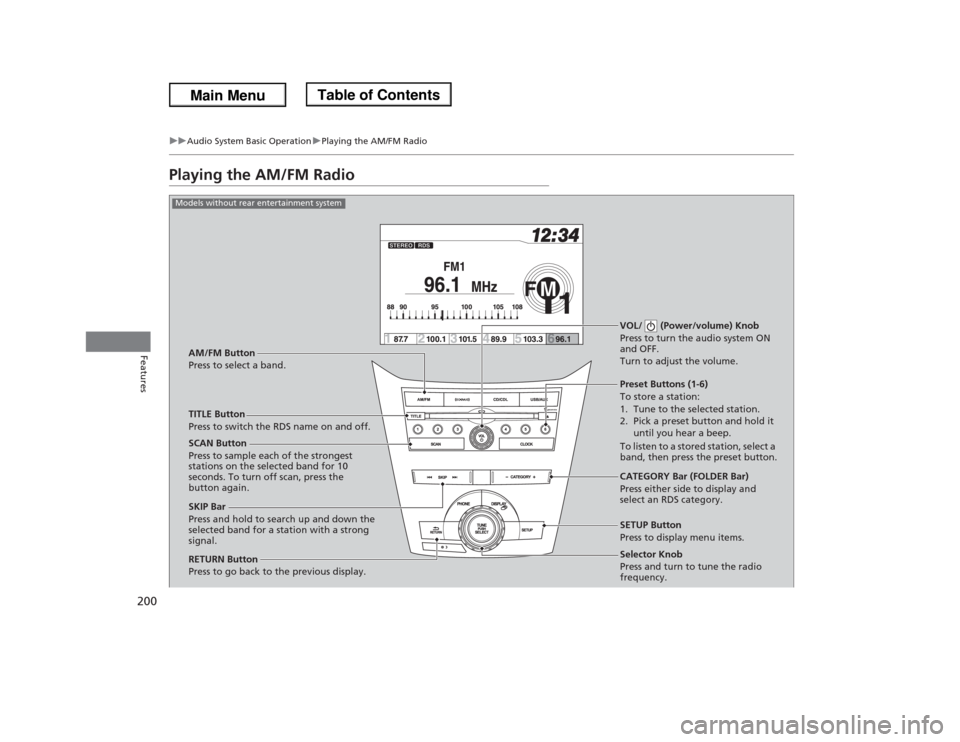
Selector Knob
Press and turn to tune the radio
frequency. SCAN Button
Press to sample each of the strongest
stations on the selected band for 10
seconds. To turn off scan, press the
button again.VOL/ (Power/volume) Knob
Press to turn the audio system ON
and OFF.
Turn to adjust the volume.Preset Buttons (1-6)
To store a station:
1. Tune to the selected station.
2. Pick a preset button and hold it
until you hear a beep.
To listen to a stored station, select a
band, then press the preset button.
SKIP Bar
Press and hold to search up and down the
selected band for a station with a strong
signal.CATEGORY Bar (FOLDER Bar)
Press either side to display and
select an RDS category. TITLE Button
Press to switch the RDS name on and off. AM/FM Button
Press to select a band.
RETURN Button
Press to go back to the previous display.SETUP Button
Press to display menu items.
Models without rear entertainment system
Page 202 of 433
201
uuAudio System Basic OperationuPlaying the AM/FM Radio
Continued
Features
Selector Knob
Press and turn to tune the radio
frequency. SCAN Button
Press to sample each of the strongest
stations on the selected band for 10
seconds. To turn off scan, press the
button again.VOL/ (Power/volume) Knob
Press to turn the audio system ON
and OFF.
Turn to adjust the volume.Preset Buttons (1-6)
To store a station:
1. Tune to the selected station.
2. Pick a preset button and hold it
until you hear a beep.
To listen to a stored station, select a
band, then press the preset button. SKIP Bar
Press and hold to search up and down the
selected band for a station with a strong
signal.
CATEGORY Bar (FOLDER Bar)
Press either side to display and
select an RDS category. TITLE Button
Press to switch the RDS name on and off. AM/FM Button
Press to select a band.
RETURN Button
Press to go back to the previous display.SETUP Button
Press to display menu items.
Models with rear entertainment system
Page 203 of 433
uuAudio System Basic OperationuPlaying the AM/FM Radio
202Features
Use the auto select feature to scan both bands and store the strongest station in
each preset.
1.Press the SETUP button.
2.Rotate to select Auto Select, then press
.
3.Select PUSH TO START or ON, then press
.
To turn off auto select, press again. This
restores the presets you originally set.■
Auto Select
1Playing the AM/FM Radio
The ST indicator appears on the display indicating
stereo FM broadcasts.
Stereo reproduction in AM is not available.
Switching the Audio Mode
Press the MODE button on the steering wheel.
2Audio Remote Controls P. 198
You can store six AM stations and twelve FM stations
into the preset button memory. FM1 and FM2 let you
store six stations each.
Auto Select function scans and stores up to six AM
stations and twelve FM stations with a strong signal
into the preset button memory.
If you do not like the stations auto select has stored,
you can manually store your preferred frequencies.
Page 204 of 433
203
uuAudio System Basic OperationuPlaying the AM/FM Radio
Features
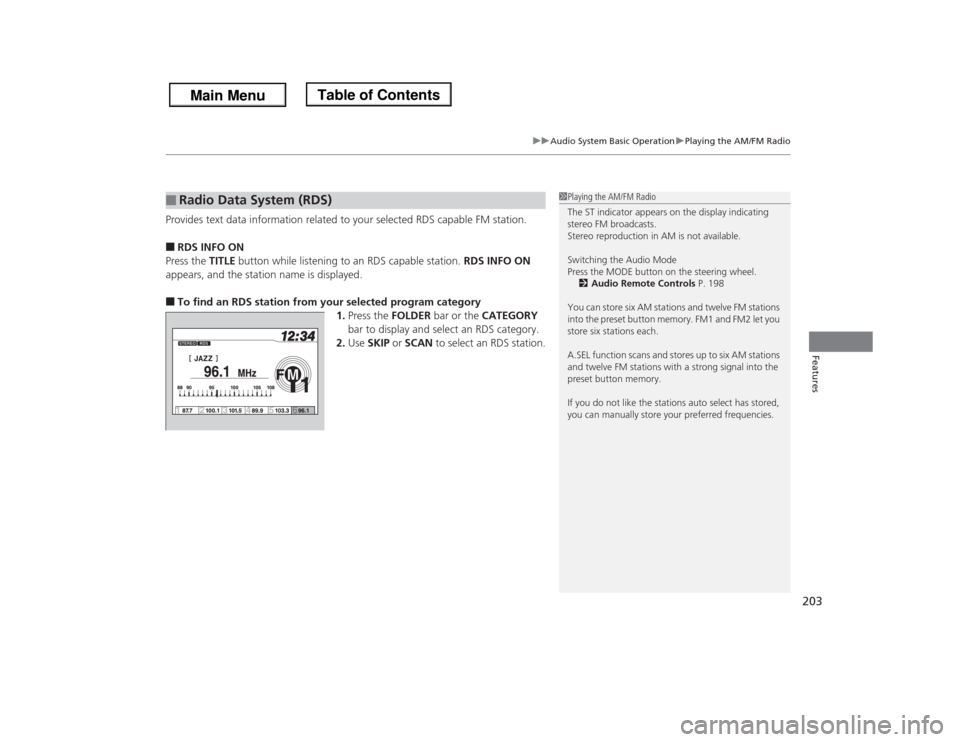
Provides text data information related to your selected RDS capable FM station.■RDS INFO ON
Press the TITLE button while listening to an RDS capable station. RDS INFO ON
appears, and the station name is displayed.■To find an RDS station from your selected program category
1.Press the FOLDER bar or the CATEGORY
bar to display and select an RDS category.
2.Use SKIP or SCAN to select an RDS station.■
Radio Data System (RDS)
1Playing the AM/FM Radio
The ST indicator appears on the display indicating
stereo FM broadcasts.
Stereo reproduction in AM is not available.
Switching the Audio Mode
Press the MODE button on the steering wheel.
2Audio Remote Controls P. 198
You can store six AM stations and twelve FM stations
into the preset button memory. FM1 and FM2 let you
store six stations each.
A.SEL function scans and stores up to six AM stations
and twelve FM stations with a strong signal into the
preset button memory.
If you do not like the stations auto select has stored,
you can manually store your preferred frequencies.